1、组件及实现的功能 Keepalived:实现对Haproxy服务的高可用,并采用双主模型配置; Haproxy:实现对Nginx的负载均衡和读写分离; Nginx:实现对Http
Keepalived:实现对Haproxy服务的高可用,并采用双主模型配置;
Nginx:实现对Http请求的高速处理;

在两个节点上都需要执行安装keepalived,命令如下:
$ yum -y install keepalived修改 172.16.25.109 节点上 keepalived.conf 文件配置,命令如下
$ vim /etc/keepalived/keepalived.conf修改后的内容如下:
! Configuration File for keepalived
global_defs {
   notification_email {
         root@localhost
   }
   notification_email_from admin@lnmmp.com
   smtp_connect_timeout 3
   smtp_server 127.0.0.1
   router_id LVS_DEVEL
}
vrrp_script chk_maintaince_down {
   script "[[ -f /etc/keepalived/down ]] && exit 1 || exit 0"
   interval 1
   weight 2
}
vrrp_script chk_haproxy {
    script "killall -0 haproxy"
    interval 1
    weight 2
}
vrrp_instance VI_1 {
    interface eth0
    state MASTER
    priority 100
    virtual_router_id 125
    garp_master_delay 1
    authentication {
        auth_type PASS
        auth_pass 1e3459f77aba4ded
    }
    track_interface {
       eth0
    }
    virtual_ipaddress {
        172.16.25.10/16 dev eth0 label eth0:0
    }
    track_script {
        chk_haproxy
    }
    notify_master "/etc/keepalived/notify.sh master 172.16.25.10"
    notify_backup "/etc/keepalived/notify.sh backup 172.16.25.10"
    notify_fault "/etc/keepalived/notify.sh fault 172.16.25.10"
}
vrrp_instance VI_2 {
    interface eth0
    state BACKUP
    priority 99
    virtual_router_id 126
    garp_master_delay 1
    authentication {
        auth_type PASS
        auth_pass 7615c4b7f518cede
    }
    track_interface {
       eth0
    }
    virtual_ipaddress {
        172.16.25.11/16 dev eth0 label eth0:1
    }
    track_script {
        chk_haproxy
chk_maintaince_down
    }
    notify_master "/etc/keepalived/notify.sh master 172.16.25.11"
    notify_backup "/etc/keepalived/notify.sh backup 172.16.25.11"
    notify_fault "/etc/keepalived/notify.sh fault 172.16.25.11"
}
同理修改 172.16.25.110 节点上 keepalived.conf 配置,内容如下:
! Configuration File for keepalived
global_defs {
   notification_email {
         root@localhost
   }
   notification_email_from admin@lnmmp.com
   smtp_connect_timeout 3
   smtp_server 127.0.0.1
   router_id LVS_DEVEL
}
vrrp_script chk_maintaince_down {
   script "[[ -f /etc/keepalived/down ]] && exit 1 || exit 0"
   interval 1
   weight 2
}
vrrp_script chk_haproxy {
    script "killall -0 haproxy"
    interval 1
    weight 2
}
vrrp_instance VI_1 {
    interface eth0
    state BACKUP
    priority 99
    virtual_router_id 125
    garp_master_delay 1
    authentication {
        auth_type PASS
        auth_pass 1e3459f77aba4ded
    }
    track_interface {
       eth0
    }
    virtual_ipaddress {
        172.16.25.10/16 dev eth0 label eth0:0
    }
    track_script {
        chk_haproxy
chk_maintaince_down
    }
    notify_master "/etc/keepalived/notify.sh master 172.16.25.10"
    notify_backup "/etc/keepalived/notify.sh backup 172.16.25.10"
    notify_fault "/etc/keepalived/notify.sh fault 172.16.25.10"
}
vrrp_instance VI_2 {
    interface eth0
    state MASTER
    priority 100
    virtual_router_id 126
    garp_master_delay 1
    authentication {
        auth_type PASS
        auth_pass 7615c4b7f518cede
    }
    track_interface {
       eth0
    }
    virtual_ipaddress {
        172.16.25.11/16 dev eth0 label eth0:1
    }
    track_script {
        chk_haproxy
    }
    notify_master "/etc/keepalived/notify.sh master 172.16.25.11"
    notify_backup "/etc/keepalived/notify.sh backup 172.16.25.11"
    notify_fault "/etc/keepalived/notify.sh fault 172.16.25.11"
}
# vi /etc/keepalived/notify.sh
#!/bin/bash
# Author: Jason.Yu <admin@lnmmp.com>
# description: An example of notify script
#
contact='root@localhost'
notify() {
    mailsubject="`hostname` to be $1: $2 floating"
    mailbody="`date '+%F %H:%M:%S'`: vrrp transition, `hostname` changed to be $1"
    echo $mailbody | mail -s "$mailsubject" $contact
}
case "$1" in
    master)
        notify master $2
        /etc/rc.d/init.d/haproxy restart
        exit 0
    ;;
    backup)
        notify backup $2 # 在节点切换成backup状态时,无需刻意停止haproxy服务,防止chk_maintaince和chk_haproxy多次对haproxy服务操作;
        exit 0
    ;;
    fault)
        notify fault $2 # 同上
        exit 0
    ;;
    *)
        echo 'Usage: `basename $0` {master|backup|fault}'
        exit 1
    ;;
esac
在两个节点上执行 keepalived 启动命令,命令如下:
$ service keepalived start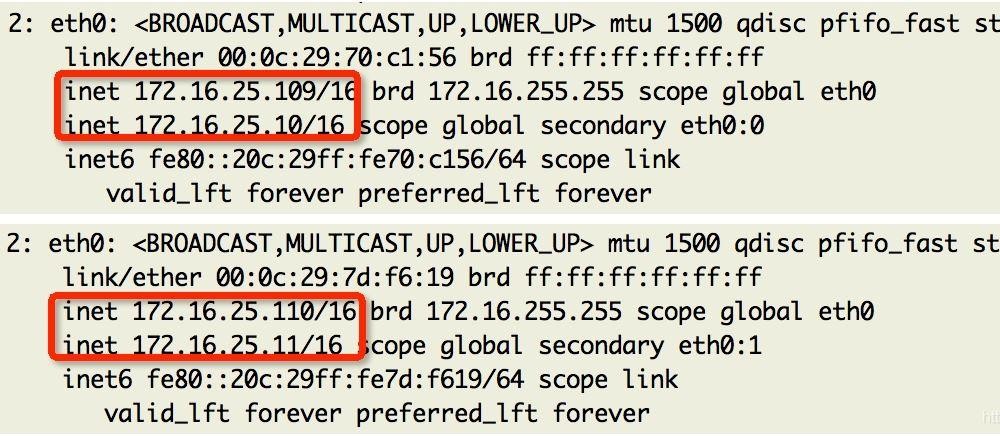
在两个节点上都需要执行安装 HAProxy,命令如下:
$ yum -y install haproxy修改 172.16.25.109 和 172.16.25.110 节点上 haproxy.cfg 文件配置(两节点配置文件内容一致),命令如下:
$ vim /etc/haproxy/haproxy.cfg配置文件内容如下:
global
    log         127.0.0.1 local2
    chroot      /var/lib/haproxy
    pidfile     /var/run/haproxy.pid
    maxconn     4000
    user         haproxy
    group       haproxy
    daemon # 以后台程序运行;
defaults
    mode                   http # 选择HTTP模式,即可进行7层过滤;
    log                     global
    option                  httplog # 可以得到更加丰富的日志输出;
    option                  dontlognull
    option http-server-close # server端可关闭HTTP连接的功能;
    option forwardfor except 127.0.0.0/8 # 传递client端的IP地址给server端,并写入“X-Forward_for”首部中;
    option                  Redispatch
    retries                 3
    timeout http-request    10s
    timeout queue           1m
    timeout connect         10s
    timeout client          1m
    timeout server          1m
    timeout http-keep-alive 10s
    timeout check           10s
    maxconn                 30000
listen stats
    mode http
    bind 0.0.0.0:1080 # 统计页面绑定1080端口;
    stats enable # 开启统计页面功能;
    stats hide-version # 隐藏Haproxy版本号;
    stats uri     /haproxyadmin?stats # 自定义统计页面的访问uri;
    stats realm   Haproxy\ Statistics # 统计页面密码验证时的提示信息;
    stats auth    admin:admin # 为统计页面开启登录验证功能;
    stats admin if TRUE # 若登录用户验证通过,则赋予管理功能;
frontend http-in
    bind *:80
    mode http
    log global
    option httpclose
    option logasap
    option dontlognull
    capture request  header Host len 20
    capture request  header Referer len 60
    acl url_static       path_beg       -i /static /p_w_picpaths /javascript /stylesheets
    acl url_static       path_end       -i .jpg .jpeg .gif .png .CSS .js .html
    use_backend static_servers if url_static # 符合ACL规则的,请求转入后端静态服务器
    default_backend dynamic_servers # 默认请求转入后端动态服务器
backend static_servers
    balance roundrobin
    server imgsrv1 192.168.0.25:80 check maxconn 6000 # 静态服务器,可配置多台,还可设置权重weight;
backend dynamic_servers
    balance source # 对于动态请求利用source调度算法,可一定程度上实现session保持;但最好利用cookie绑定的方式实现session保持
    server WEBsrv1 192.168.0.35:80 check maxconn 1000 # 动态服务器,可配置多台,还可设置权重weight;
两个节点执行启动服务,命令如下:
$ service haproxy start
yum -y groupinstall “Development tools”
yum -y groupinstall “Server PlatfORM Development”
yum install GCc openssl-devel pcre-devel zlib-devel
groupadd -r nginx
useradd -r -g nginx -s /sbin/nologin -M nginx
tar xf nginx-1.4.7.tar.gz
cd nginx-1.4.7
mkdir -pv /var/tmp/nginx
./configure \
  --prefix=/usr \
  --sbin-path=/usr/sbin/nginx \
  --conf-path=/etc/nginx/nginx.conf \
  --error-log-path=/var/log/nginx/error.log \
  --http-log-path=/var/log/nginx/access.log \
  --pid-path=/var/run/nginx/nginx.pid  \
  --lock-path=/var/lock/nginx.lock \
  --user=nginx \
  --group=nginx \
  --with-http_ssl_module \
  --with-http_flv_module \
  --with-http_stub_status_module \
  --with-http_gzip_static_module \
  --http-client-body-temp-path=/var/tmp/nginx/client/ \
  --http-proxy-temp-path=/var/tmp/nginx/proxy/ \
  --http-fastcgi-temp-path=/var/tmp/nginx/fcgi/ \
  --http-uwsgi-temp-path=/var/tmp/nginx/uwsgi \
  --http-scgi-temp-path=/var/tmp/nginx/scgi \
  --with-pcre
make && make install
配置服务脚本
vi /etc/init.d/nginx # 配置服务脚本
#!/bin/sh
#
# nginx - this script starts and stops the nginx daemon
#
# chkconfig:   - 85 15
# description:  Nginx is an HTTP(S) server, HTTP(S) reverse \
#               proxy and IMAP/POP3 proxy server
# processname: nginx
# config:      /etc/nginx/nginx.conf
# config:      /etc/sysconfig/nginx
# pidfile:     /var/run/nginx.pid
# Source function library.
. /etc/rc.d/init.d/functions
# Source networking configuration.
. /etc/sysconfig/network
# Check that networking is up.
[ "$NETWORKING" = "no" ] && exit 0
nginx="/usr/sbin/nginx"
prog=$(basename $nginx)
NGINX_CONF_FILE="/etc/nginx/nginx.conf"
[ -f /etc/sysconfig/nginx ] && . /etc/sysconfig/nginx
lockfile=/var/lock/subsys/nginx
make_dirs() {
   # make required directories
   user=`nginx -V 2>&1 | grep "configure arguments:" | sed 's/[^*]*--user=\([^ ]*\).*/\1/g' -`
   options=`$nginx -V 2>&1 | grep 'configure arguments:'`
   for opt in $options; do
       if [ `echo $opt | grep '.*-temp-path'` ]; then
           value=`echo $opt | cut -d "=" -f 2`
           if [ ! -d "$value" ]; then
               # echo "creating" $value
               mkdir -p $value && chown -R $user $value
           fi
       fi
   done
}
start() {
    [ -x $nginx ] || exit 5
    [ -f $NGINX_CONF_FILE ] || exit 6
    make_dirs
    echo -n $"Starting $prog: "
    daemon $nginx -c $NGINX_CONF_FILE
    retval=$?
    echo
    [ $retval -eq 0 ] && touch $lockfile
    return $retval
}
stop() {
    echo -n $"Stopping $prog: "
    killproc $prog -QUIT
    retval=$?
    echo
    [ $retval -eq 0 ] && rm -f $lockfile
    return $retval
}
restart() {
    configtest || return $?
    stop
    sleep 1
    start
}
reload() {
    configtest || return $?
    echo -n $"Reloading $prog: "
    killproc $nginx -HUP
    RETVAL=$?
    echo
}
force_reload() {
    restart
}
configtest() {
  $nginx -t -c $NGINX_CONF_FILE
}
rh_status() {
    status $prog
}
rh_status_q() {
    rh_status >/dev/null 2>&1
}
case "$1" in
    start)
        rh_status_q && exit 0
        $1
        ;;
    stop)
        rh_status_q || exit 0
        $1
        ;;
    restart|configtest)
        $1
        ;;
    reload)
        rh_status_q || exit 7
        $1
        ;;
    force-reload)
        force_reload
        ;;
    status)
        rh_status
        ;;
    condrestart|try-restart)
        rh_status_q || exit 0
            ;;
    *)
        echo $"Usage: $0 {start|stop|status|restart|condrestart|try-restart|reload|force-reload|configtest}"
        exit 2
esac
chmod +x /etc/init.d/nginx # 复***务脚本执行权限
vi /etc/nginx/nginx.conf # 编辑主配置文件
worker_processes  2;
error_log  /var/log/nginx/nginx.error.log;
pid        /var/run/nginx.pid;
events {
    worker_connections  1024;
}
http {
    include       mime.types;
    default_type  application/octet-stream;
    log_format  main  '$remote_addr - $remote_user [$time_local] "$request" '
                      '$status $body_bytes_sent "$http_referer" '
                      '"$http_user_agent" "$http_x_forwarded_for"';
    sendfile        on;
    keepalive_timeout  65;
    server {
        listen       80;
        server_name  xxrenzhe.lnmmp.com;
        access_log  /var/log/nginx/nginx.access.log  main;
        location / {
            root   /www/lnmmp.com;
            index  index.PHP index.html index.htm;
        }
        error_page  404              /404.html;
        error_page  500 502 503 504  /50x.html;
        location = /50x.html {
            root   /www/lnmmp.com;
        }
        location ~ \.php$ {
            root           /www/lnmmp.com;
            fastcgi_pass   127.0.0.1:9000;
            fastcgi_index  index.php;
            fastcgi_param  SCRIPT_FILENAME  $document_root$fastcgi_script_name;
            include        fastcgi_params;
        }
    }
}
vi /etc/nginx/fastcgi_params # 编辑fastcgi参数文件
fastcgi_param  GATEWAY_INTERFACE  CGI/1.1;
fastcgi_param  SERVER_SOFTWARE    nginx;
fastcgi_param  QUERY_STRING       $query_string;
fastcgi_param  REQUEST_METHOD     $request_method;
fastcgi_param  CONTENT_TYPE       $content_type;
fastcgi_param  CONTENT_LENGTH     $content_length;
fastcgi_param  SCRIPT_FILENAME    $document_root$fastcgi_script_name;
fastcgi_param  SCRIPT_NAME        $fastcgi_script_name;
fastcgi_param  REQUEST_URI        $request_uri;
fastcgi_param  DOCUMENT_URI       $document_uri;
fastcgi_param  DOCUMENT_ROOT      $document_root;
fastcgi_param  SERVER_PROTOCOL    $server_protocol;
fastcgi_param  REMOTE_ADDR        $remote_addr;
fastcgi_param  REMOTE_PORT        $remote_port;
fastcgi_param  SERVER_ADDR        $server_addr;
fastcgi_param  SERVER_PORT        $server_port;
fastcgi_param  SERVER_NAME        $server_name;
启动服务
service nginx configtest # 服务启动前先验证配置文件是否正确
service nginx start
ps -ef |grep nginx # 检查nginx进程,尤其是worker进程是否与worker_processes值一致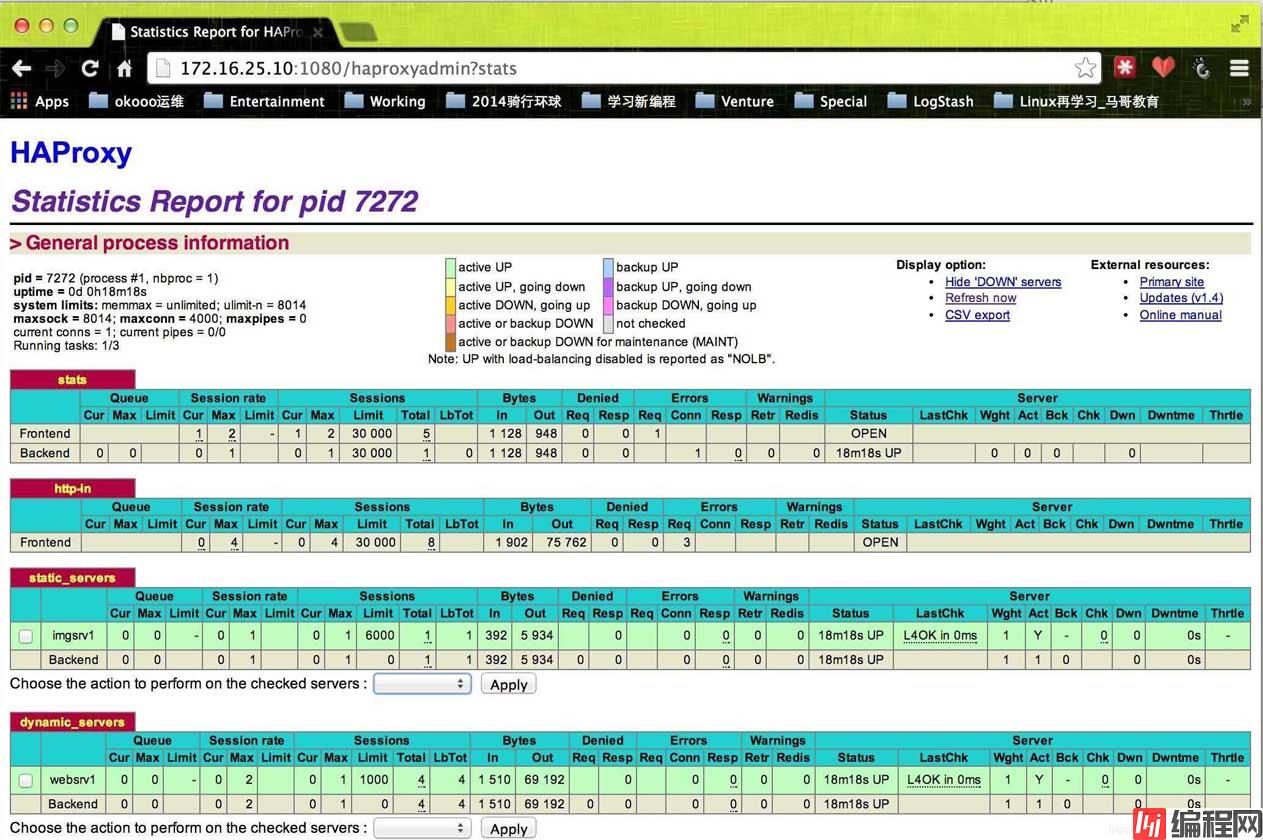
ss -antupl |grep 80 # 检查服务端口是否启动Haproxy 统计页面测试

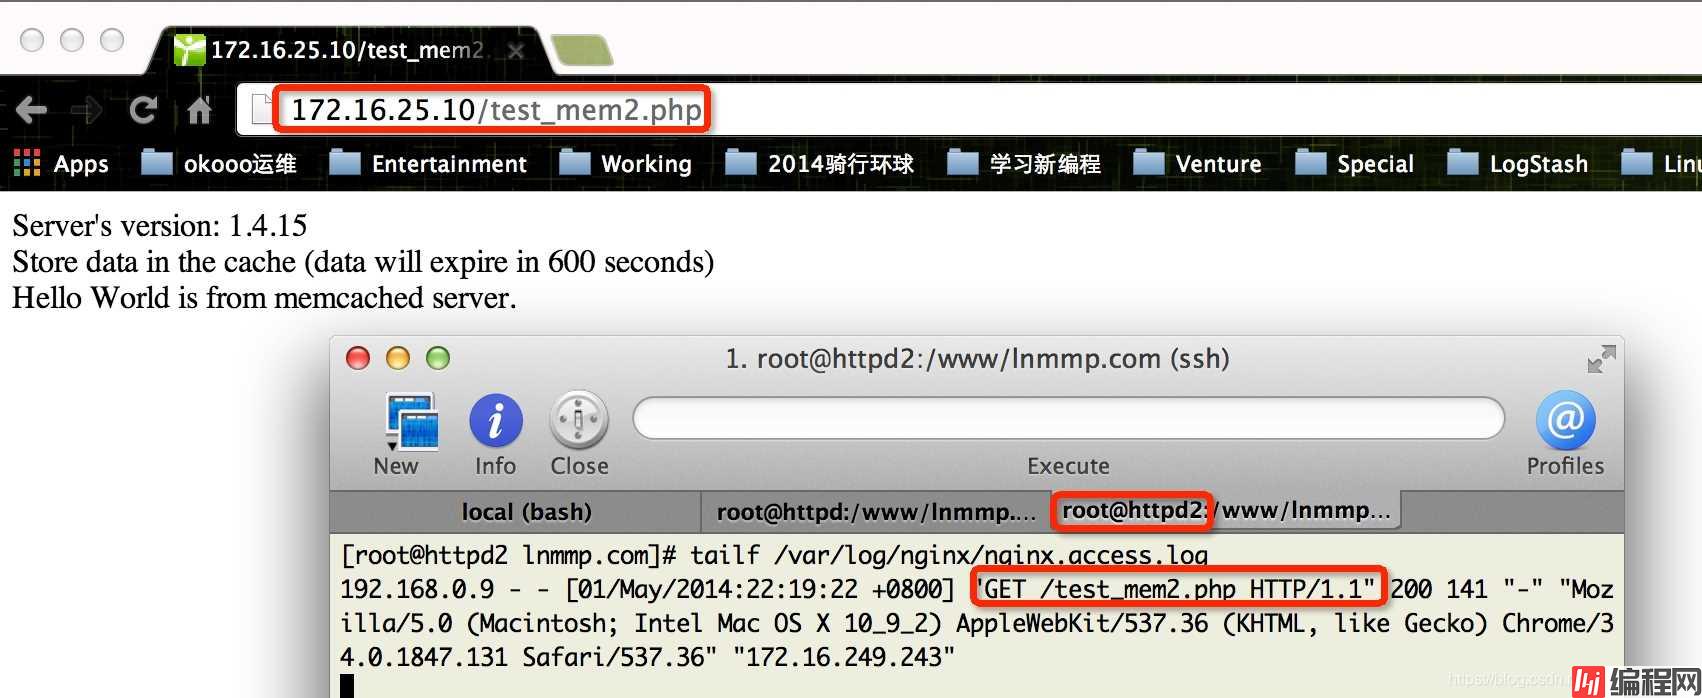
动静分离测试

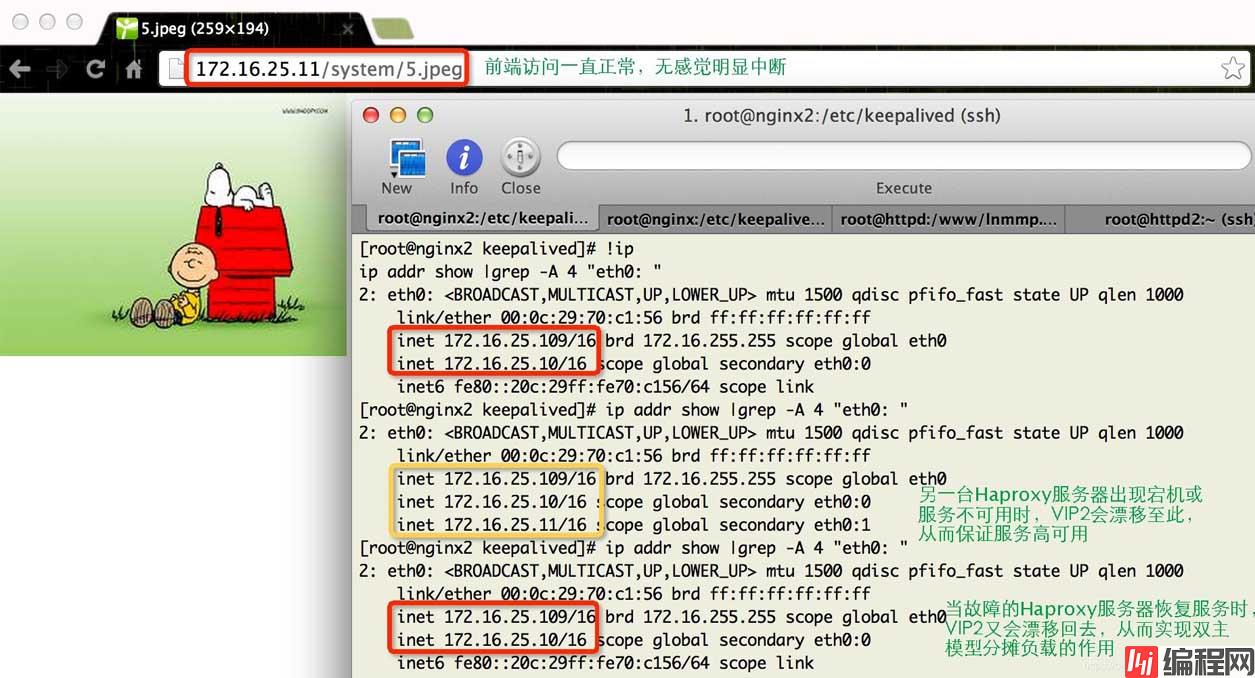
高可用测试
到此 Nginx高可用集群构建(Keepalived+Haproxy+Nginx)介绍完成。
到此这篇关于Nginx实现高可用集群构建(Keepalived+Haproxy+Nginx)的文章就介绍到这了,更多相关Nginx 高可用集群内容请搜索编程网以前的文章或继续浏览下面的相关文章希望大家以后多多支持编程网!
--结束END--
本文标题: Nginx实现高可用集群构建(Keepalived+Haproxy+Nginx)
本文链接: https://www.lsjlt.com/news/126974.html(转载时请注明来源链接)
有问题或投稿请发送至: 邮箱/279061341@qq.com QQ/279061341
下载Word文档到电脑,方便收藏和打印~
2024-04-11
2024-04-08
2024-04-08
2024-04-03
2024-03-15
2024-03-15
2024-03-11
2024-03-08
2024-03-07
2024-03-06
回答
回答
回答
回答
回答
回答
回答
回答
回答
回答


官方手机版

微信公众号

商务合作


0