Python 官方文档:入门教程 => 点击学习
概念 我们使用配置中心时,当配置中心的配置发生了变化,我们就要发送一个post请求给客户端,让它重新去拉取新的的配置。当客户端有很多时,并且还是使用同一份配置文件,这样当配置中心的配
我们使用配置中心时,当配置中心的配置发生了变化,我们就要发送一个post请求给客户端,让它重新去拉取新的的配置。当客户端有很多时,并且还是使用同一份配置文件,这样当配置中心的配置发生改变,我们就得逐个发送post请求通知,这样无疑是很浪费人力物力的。
Bus消息总线组件就帮我们解决了这个问题。他的工作流程是这样的,当配置中心的配置发生了变化时,我们给其中一个客户端发送post请求,然后client将请求的信息发送到RabbitMQ队列中,然后消息队列将消息发送给别的队列。
项目基于spring cloud 第七章的项目改造。
改造config-client 添加相应坐标
<dependencies>
		<dependency>
			<groupId>org.springframework.cloud</groupId>
			<artifactId>spring-cloud-starter-config</artifactId>
		</dependency>

		<dependency>
			<groupId>org.springframework.boot</groupId>
			<artifactId>spring-boot-starter-WEB</artifactId>
		</dependency>

		<dependency>
			<groupId>org.springframework.cloud</groupId>
			<artifactId>spring-cloud-starter-netflix-eureka-client</artifactId>
		</dependency>

		<dependency>
			<groupId>org.springframework.cloud</groupId>
			<artifactId>spring-cloud-starter-bus-aMQp</artifactId>
		</dependency>

		<dependency>
			<groupId>org.springframework.boot</groupId>
			<artifactId>spring-boot-starter-actuator</artifactId>
		</dependency>
在启动类中添加@RefreshScope注解
@RefreshScope注解只需要写在需要刷新配置文件的地方,不一定非要在启动类中
@SpringBootApplication
@EnableEurekaClient
@EnableDiscoveryClient
@RestController
@RefreshScope
public class ConfiGClientApplication {


	public static void main(String[] args) {
		SpringApplication.run(ConfigClientApplication.class, args);
	}

	@Value("${foo}")
	String foo;

	@RequestMapping(value = "/hi")
	public String hi(){
		return foo;
	}
}
配置相关配置
spring.rabbitmq.host=localhost
spring.rabbitmq.port=5672
spring.rabbitmq.username=guest
spring.rabbitmq.passWord=guest

spring.cloud.bus.enabled=true
spring.cloud.bus.trace.enabled=true
management.endpoints.web.exposure.include=bus-refresh
management.security.enabled=false  //报错加上
foo version 3
foo version 4
另外,/actuator/bus-refresh接口可以指定服务,即使用"destination"参数,比如 “/actuator/bus-refresh?destination=customers:**” 即刷新服务名为customers的所有服务。 原理图
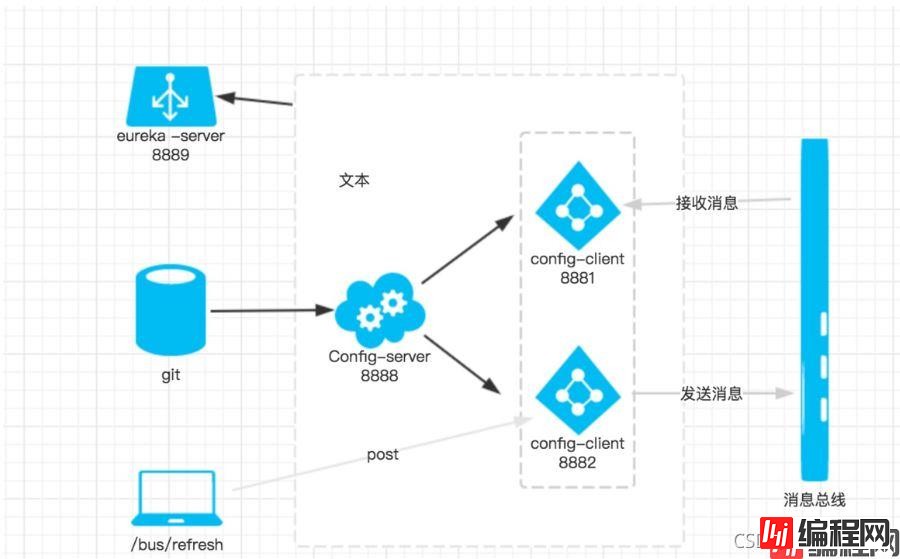
当git文件更改的时候,通过pc端用post 向端口为8882的config-client发送请求/bus/refresh/;此时8882端口会发送一个消息,由消息总线向其他服务传递,从而使整个微服务集群都达到更新配置文件。
--结束END--
本文标题: 解析Spring Cloud Bus消息总线
本文链接: https://www.lsjlt.com/news/155988.html(转载时请注明来源链接)
有问题或投稿请发送至: 邮箱/279061341@qq.com QQ/279061341
下载Word文档到电脑,方便收藏和打印~
2024-03-01
2024-03-01
2024-03-01
2024-02-29
2024-02-29
2024-02-29
2024-02-29
2024-02-29
2024-02-29
2024-02-29
回答
回答
回答
回答
回答
回答
回答
回答
回答
回答


官方手机版

微信公众号

商务合作


0