目录一 、安装前准备、安装包下载1 准备安装2 下载安装包二、开始安装1 将tar安装包上传到Centos并解压2 移动到/usr/local目录下并改名3 增加Mysql配置文件4
由于CentOS7自带的是 Mariadb, 所以先来删除他吧…
查找版本
# rpm -qa|grep mariadb
执行命令后会出现类似 MariaDB-server-5.5.49-1.el7.centos.x86_64 之类的鬼…记住名字就行了…
删除
# rpm -e --nodeps 上面查出来的文件名
删除配置文件
# rm /etc/my.cnf
到这里就OK了…现在我们开始安装mysql

下载地址 https://downloads.mysql.com/arcHives/commUnity/
上传
[root@boGon /]# cd /tmp
[root@bogon tmp]# rz              #然后选择安装包上传到CentOS
[root@bogon tmp]# ll
-rw-r--r--.  1 root root 198993245 11月  6 12:35 mysql-5.5.62-linux-glibc2.12-x86_64.tar.gz
解压
[root@bogon tmp]# tar -zxvf mysql-5.5.62-linux-glibc2.12-x86_64.tar.gz
[root@bogon tmp]# ll
drwxr-xr-x. 13 root root       213 11月  6 12:41 mysql-5.5.62-linux-glibc2.12-x86_64
-rw-r--r--.  1 root root 198993245 11月  6 12:35 mysql-5.5.62-linux-glibc2.12-x86_64.tar.gz
[root@bogon tmp]# mv mysql-5.5.62-linux-glibc2.12-x86_64 /usr/local/
[root@bogon tmp]# cd /usr/local/
[root@bogon local]# ll
总用量 0
drwxr-xr-x.  2 root root   6 5月  11 2019 bin
drwxr-xr-x.  2 root root   6 5月  11 2019 etc
drwxr-xr-x.  2 root root   6 5月  11 2019 games
drwxr-xr-x.  2 root root   6 5月  11 2019 include
drwxr-xr-x.  2 root root   6 5月  11 2019 lib
drwxr-xr-x.  2 root root   6 5月  11 2019 lib64
drwxr-xr-x.  2 root root   6 5月  11 2019 libexec
drwxr-xr-x. 13 root root 213 11月  6 12:41 mysql-5.5.62-linux-glibc2.12-x86_64
drwxr-xr-x.  2 root root   6 5月  11 2019 sbin
drwxr-xr-x.  5 root root  49 8月  23 10:42 share
drwxr-xr-x.  2 root root   6 5月  11 2019 src
[root@bogon local]# mv mysql-5.5.62-linux-glibc2.12-x86_64 mysql-5.5.60
[root@bogon local]# ll
总用量 0
drwxr-xr-x.  2 root root   6 5月  11 2019 bin
drwxr-xr-x.  2 root root   6 5月  11 2019 etc
drwxr-xr-x.  2 root root   6 5月  11 2019 games
drwxr-xr-x.  2 root root   6 5月  11 2019 include
drwxr-xr-x.  2 root root   6 5月  11 2019 lib
drwxr-xr-x.  2 root root   6 5月  11 2019 lib64
drwxr-xr-x.  2 root root   6 5月  11 2019 libexec
drwxr-xr-x. 13 root root 213 11月  6 12:41 mysql-5.5.60
drwxr-xr-x.  2 root root   6 5月  11 2019 sbin
drwxr-xr-x.  5 root root  49 8月  23 10:42 share
drwxr-xr-x.  2 root root   6 5月  11 2019 src
[root@bogon local]# vi /etc/my.cnf
将一下内容复制到新文件中
[mysql]
# 设置mysql客户端默认字符集
default-character-set=utf8
Socket=/var/lib/mysql/mysql.sock

[mysqld]
skip-name-resolve
#设置3306端口
port = 3306
socket=/var/lib/mysql/mysql.sock
# 设置mysql的安装目录, 这里的目录一定要是你解压后并且改了名的目录哟..
basedir=/usr/local/mysql-5.5.60
# 设置mysql数据库的数据的存放目录, 这里的目录一定要是你解压后并且改了名的目录哟..
datadir=/usr/local/mysql-5.5.60/data
# 允许最大连接数
max_connections=200
# 服务端使用的字符集默认为8比特编码的latin1字符集
character-set-server=utf8
# 创建新表时将使用的默认存储引擎
default-storage-engine=INNODB
lower_case_table_name=1
max_allowed_packet=16M
配置命令:
# cd /usr/local/mysql-5.5.60
# groupadd mysql
# useradd -g mysql mysql
# chown -R mysql:mysql ./
安装命令:
./scripts/mysql_install_db --user=mysql --basedir=/usr/local/mysql-5.5.60/ --datadir=/usr/local/mysql-5.5.60/data/
演示:
[root@bogon local]# cd mysql-5.5.60/
[root@bogon mysql-5.5.60]#
[root@bogon mysql-5.5.60]# groupadd mysql
groupadd:“mysql”组已存在
[root@bogon mysql-5.5.60]# useradd -g mysql mysql
useradd:用户“mysql”已存在
[root@bogon mysql-5.5.60]# chown -R mysql:mysql ./
[root@bogon mysql-5.5.60]# ./scripts/mysql_install_db --user=mysql --basedir=/usr/local/mysql-5.5.60/ --datadir=/usr/local/mysql-5.5.60/data/
Installing MySQL system tables...
....
....
Please report any problems at Http://bugs.mysql.com/
[root@bogon mysql-5.5.60]# chown -R mysql:mysql data
[root@bogon mysql-5.5.60]# chown 777 /etc/my.cnf
[root@bogon mysql-5.5.60]# ll
总用量 56
drwxr-xr-x.  2 mysql mysql  4096 11月  6 12:41 bin
-rw-r--r--.  1 mysql mysql 17987 8月  29 2018 COPYING
drwxr-xr-x.  5 mysql mysql    57 11月  6 12:48 data
drwxr-xr-x.  2 mysql mysql    55 11月  6 12:41 docs
drwxr-xr-x.  3 mysql mysql  4096 11月  6 12:41 include
-rw-r--r--.  1 mysql mysql   301 8月  29 2018 INSTALL-BINARY
drwxr-xr-x.  3 mysql mysql  4096 11月  6 12:41 lib
drwxr-xr-x.  4 mysql mysql    30 11月  6 12:41 man
drwxr-xr-x. 10 mysql mysql  4096 11月  6 12:41 mysql-test
-rw-r--r--.  1 mysql mysql  2496 8月  29 2018 README
drwxr-xr-x.  2 mysql mysql    30 11月  6 12:41 scripts
drwxr-xr-x. 27 mysql mysql  4096 11月  6 12:41 share
drwxr-xr-x.  4 mysql mysql  4096 11月  6 12:41 sql-bench
drwxr-xr-x.  2 mysql mysql  4096 11月  6 12:41 support-files
[root@bogon mysql-5.5.60]# cp ./support-files/mysql.server /etc/rc.d/init.d/mysqld
[root@bogon mysql-5.5.60]# chmod +x /etc/rc.d/init.d/mysqld
[root@bogon mysql-5.5.60]# chkconfig --add mysqld
[root@bogon mysql-5.5.60]# chkconfig --list mysqld

注:该输出结果只显示 SysV 服务,并不包含
原生 systemd 服务。SysV 配置数据
可能被原生 systemd 配置覆盖。

      要列出 systemd 服务,请执行 'systemctl list-unit-files'。
      查看在具体 target 启用的服务请执行
      'systemctl list-dependencies [target]'。

mysqld         	0:关	1:关	2:开	3:开	4:开	5:开	6:关
# chown -R mysql:mysql data
# chown 777 /etc.my.cnf
# cp ./support-files/mysql.server /etc/rc.d/init.d/mysqld
# chmod +x /etc/rc.d/init.d/mysqld
# chkconfig --add mysqld
# chkconfig --list mysqld
chmod 和 chown的区别
chown 修改文件和文件夹的用户和用户组属性
	(1)要修改文件hh.c的所有者.修改为sakia的这个用户所有
		chown sakia hh.c      #这样就把hh.c的用户访问权限应用到sakia作为所有者
	(2)将目录 /tmp/sco 这个目录的所有者和组改为sakia和组net
		chown -R sakia:net /tmp/sco

chmod 修改文件和文件夹读写执行属性
	(1)把hh.c文件修改为可写可读可执行
		chmod 777 hh.c
	(2)要修改某目录下所有的文件属性为可写可读可执行
		chmod 777 *.*    #把文件夹名称与后缀名用*来代替就可以了。
	(3)同理若是要修改所有htm文件的属性
		chmod 777 *.htm
	(4)把目录 /tmp/sco修改为可写可读可执行
		chmod 777 /tmp/sco
	(5)要修改某目录下所有的文件夹属性为可写可读可执行
		chmod 777 *   #把文件夹名称用*来代替就可以了
    (6)要修改/tmp/sco下所有的文件和文件夹及其子文件夹属性为可写可读可执行
		chmod -R 777 /tmp/sco
##
可写 w=4
可读 r=2
可执行 x=1
777就是拥有全权限,根据需要可以自由组合用户和组的
##
[root@bogon mysql-5.5.60]# service mysqld start
一旦报错
[root@bogon mysql-5.5.60]# service mysqld start
Starting MySQL.Logging to '/usr/local/mysql-5.5.60/data/bogon.err'.
201106 12:50:02 mysqld_safe Directory '/var/lib/mysql' for UNIX socket file don't exists.
ERROR! The server quit without updating PID file (/usr/local/mysql-5.5.60/data/bogon.pid).
解决方法
随即执行命令:cat  /usr/local/mysql/data/iZ2ze8hspx8qsmxx7b1i9sZ.err查看错误原因
error内容如下:

[ERROR] Can't start server : Bind on unix socket: Permission denied
[ERROR] Do you already have another mysqld server running on socket: /var/lib/mysql/mysql.sock ?
结合先前写入配置/etc/my.cnf:

由上不难理解——
第一:
mysqld_safe Directory ‘/var/lib/mysql' for UNIX socket file don't exists.
“var/lib/mysql”目录不存在,首要先创建:
mkdir /var/lib/mysql
第二:
Mysql客户端和服务器端是通过初始化mysql.sock 文件来进行通信,所以服务器在启动时需要写入该文件,因此该文件所存放的目录必须双方都
具有访问权限。而异常日志中表示:
[ERROR] Can't start server : Bind on unix socket: Permission denied
所以,MySQL服务不具备目录 /var/lib/mysql 的写入权限,无法生成mysql.sock文件,自然服务启动时无法找到该文件。
给目录 /var/lib/mysql 付予写入权限或者最大权限—chmod 777 /var/lib/mysql
[root@bogon lib]# mkdir mysql
[root@bogon lib]# chmod 777 -R mysql/
最终:
[root@bogon lib]# service mysql start
Starting MySQL... SUCCESS!
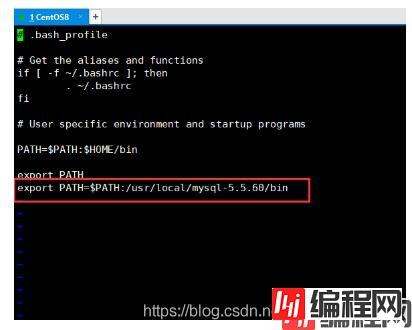
配置PATH
# vi ~/.bash_profile
在文件最后面加入以下内容,并使用:wq保存
export PATH=$PATH:/usr/local/mysql-5.5.60/bin
刷新PATH
# source ~/.bash_profile
[root@bogon lib]# mysql -uroot -p
[root@bogon lib]# mysql -uroot -p
mysql: error while loading shared libraries: libncurses.so.5: cannot open shared object file: No such file or directory
系统是redhad8,binary方式安装完mysql之后,mysql命令登录不成功,报错:mysql: error while loading shared libraries: libncurses.so.5: cannot open shared object file: No such file or directory。按照百度的方法都不成功,应该和系统版本有关,后来自己想到一个方法:yum install libncurses*,完美解决问题。
解决:
[root@bogon lib]# yum -y install libncurses*
[root@bogon lib]# mysql -uroot -p
Enter passWord:               #直接回车登录
Welcome to the MySQL monitor.  Commands end with ; or \g.
Your MySQL connection id is 2
Server version: 5.5.62 MySQL Community Server (GPL)

Copyright (c) 2000, 2018, oracle and/or its affiliates. All rights reserved.

Oracle is a reGIStered trademark of Oracle Corporation and/or its
affiliates. Other names may be trademarks of their respective
owners.

Type 'help;' or '\h' for help. Type '\c' to clear the current input statement.

mysql>
mysql> use mysql;
Reading table infORMation for completion of table and column names
You can turn off this feature to get a quicker startup with -A

Database changed
mysql> update user set password=password('需要设置的密码') where user='root' and host='localhost';
Query OK, 1 row affected (0.00 sec)
Rows matched: 1  Changed: 1  Warnings: 0
mysql> update user set password=password('12345') where user='root' and host='localhost';
Query OK, 1 row affected (0.00 sec)
Rows matched: 1  Changed: 1  Warnings: 0

mysql> flush privileges;
Query OK, 0 rows affected (0.00 sec)
mysql> grant all privileges on *.* to 'root'@'%' identified by '12345' with grant option;
Query OK, 0 rows affected (0.00 sec)

mysql> FLUSH PRIVILEGES;
Query OK, 0 rows affected (0.00 sec)
如果远程无法登录则关闭防火墙
[root@bogon lib]# systemctl stop firewalld.service
到此这篇关于CentOS安装MySQL5.5的文章就介绍到这了,更多相关CentOS安装MySQL5.5内容请搜索编程网以前的文章或继续浏览下面的相关文章希望大家以后多多支持编程网!
--结束END--
本文标题: CentOS安装MySQL5.5的完整步骤
本文链接: https://www.lsjlt.com/news/157896.html(转载时请注明来源链接)
有问题或投稿请发送至: 邮箱/279061341@qq.com QQ/279061341
下载Word文档到电脑,方便收藏和打印~
2024-05-15
2024-05-15
2024-05-15
2024-05-15
2024-05-15
2024-05-15
2024-05-15
2024-05-15
2024-05-14
2024-05-14
回答
回答
回答
回答
回答
回答
回答
回答
回答
回答


官方手机版

微信公众号

商务合作


0