Python 官方文档:入门教程 => 点击学习
目录thymeleaf模板引擎中th:if的使用th:if 条件判断th:if 判断表达式Thymeleaf模板引擎语法使用1、模板引擎thymeleaf使用2、ognl表达式的语法
很多时候只有在满⾜某个条件时,才将⼀个模板⽚段显示在结果中,否则不进行显示。比如只有当用户有订单时,才为它显示订单链接,否则不显示。th:if 属性用于满足这个需求
<body>
	<!--if属性结果为 true,模板会进行显示-->
	<p th:if="true">th:if="true"</p>
	<!--if属性结果为 false,模板不会进行显示-->
	<p th:if="false">th:if="false"</p>
	<!--后台控制器传出数据:model.addAttribute("isMarry", true);-->
	<p th:if="${isMarry}">已婚</p>
</body>
th:if 属性不仅只以布尔值作为判断条件,它将按照如下规则判定指定的表达式结果为 true:
<body>
	<!--表达式的结果为布尔类型时,if 直接以它为结果-->
	<p th:if="true">th:if="true"</p>

	<!--当表达式结果为null时,则if判定为false-->
	<p th:if="null">th:if="null"</p>

	<!--表达式为数字时,不为0,if判定为true,为0,时,if判定为false-->
	<p th:if="11">th:if="11"</p>
	<p th:if="0">th:if="0"</p>

	<!--表达式结果为字符串时,如果为 true,则if判定为true;值为 false,则if判定为false-->
	<!--结果为 off、no 等特殊字符串时,if 判定为false-->
	<p th:if="'true'">th:if="'true'"</p>
	<p th:if="'false'">th:if="'false'"</p>
	<p th:if="'off'">th:if="'off'"</p>
	<p th:if="'no'">th:if="'no'"</p>
	<!--表达式结果字符串不为false,off,no时,if判定为true-->
	<p th:if="'Love China'">th:if="'Love China'"</p>

	<!--后台传输:model.addAttribute("userList", User.getUsers());-->
	<!--只要 userList 不等于null,则if判定为true,否则为false-->
	<p th:if="${userList}">th:if="${userList}"</p>

	<!--后台传输:model.addAttribute("name", "");-->
	<!--字符串为空时,if判定为 true-->
	<p th:if="${name}eq''">name 等于空</p>
	<p th:if="${name}">th:if="${name}"</p>
</body>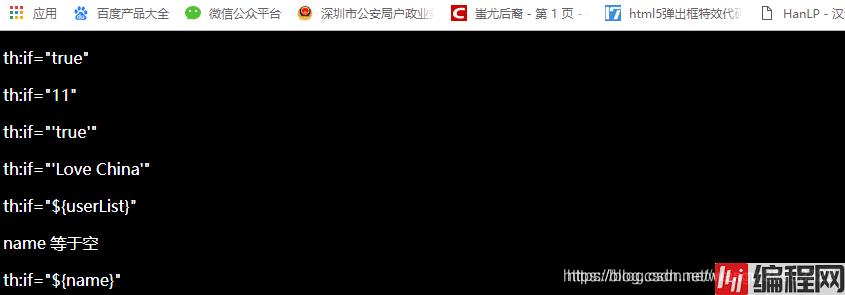
gt:(大于)>ge:(大于等于)>=eq:(等于)==lt:(小于)<le:(小于等于)<=ne:(不等于)!=引入依赖:
<dependency>
    <groupId>org.springframework.boot</groupId>
    <artifactId>spring-boot-starter-thymeleaf</artifactId>
</dependency>
页面导入头部文件:
语法说明:
Thymeleaf通过 ${}来获取model中的变量,注意这不是el 表达式,而是ognl表达式,但是语法非常像。
刚才获取变量值,我们使用的是经典的对象.属性名方式。但有些情况下,我们的属性名可能本身也是变量,怎么办?
ognl提供了类似js的语法方式:
例如:${user.name} 可以写作${user['name']}
自定义变量
场景
看下面的案例:
<h2>
    <p>Name: <span th:text="${user.name}">Jack</span>.</p>
    <p>Age: <span th:text="${user.age}">21</span>.</p>
    <p>friend: <span th:text="${user.friend.name}">Rose</span>.</p>
</h2>
我们获取用户的所有信息,分别展示。
当数据量比较多的时候,频繁的写user.就会非常麻烦。
因此,Thymeleaf提供了自定义变量来解决:
示例:
<h2 th:object="${user}">
    <p>Name: <span th:text="*{name}">Jack</span>.</p>
    <p>Age: <span th:text="*{age}">21</span>.</p>
    <p>friend: <span th:text="*{friend.name}">Rose</span>.</p>
</h2>
首先在 h2上 用 th:object="${user}"获取user的值,并且保存
然后,在h2内部的任意元素上,可以通过 *{属性名}的方式,来获取user中的属性,这样就省去了大量的user.前缀了
我们经常会用到普通字符串与表达式拼接的情况:
<span th:text="'欢迎您:' + ${user.name} + '!'"></span>字符串字面值需要用'',拼接起来非常麻烦,Thymeleaf对此进行了简化,使用一对|即可:
<span th:text="|欢迎您:${user.name}|"></span>与上面是完全等效的,这样就省去了字符串字面值的书写。

需要注意:${}内部的是通过OGNL表达式引擎解析的,外部的才是通过Thymeleaf的引擎解析,因此运算符尽量放在${}外进行。
算术运算
支持的算术运算符:+ - * / %
<span th:text="${user.age}"></span>
<span th:text="${user.age}%2 == 0"></span>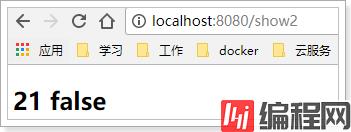
比较运算
支持的比较运算:>, <, >= and <= ,但是>, <不能直接使用,因为xml会解析为标签,要使用别名。
注意 == and !=不仅可以比较数值,类似于equals的功能。
可以使用的别名:gt (>), lt (<), ge (>=), le (<=), not (!). Also eq (==), neq/ne (!=).
条件运算
三元运算
<span th:text="${user.sex} ? '男':'女'"></span>三元运算符的三个部分:conditon ? then : else
condition:条件then:条件成立的结果else:不成立的结果其中的每一个部分都可以是Thymeleaf中的任意表达式。

默认值
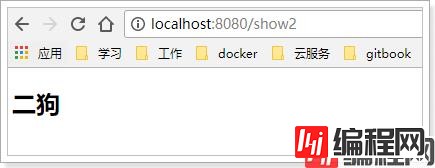
有的时候,我们取一个值可能为空,这个时候需要做非空判断,可以使用 表达式 ?: 默认值简写:
<span th:text="${user.name} ?: '二狗'"></span>当前面的表达式值为null时,就会使用后面的默认值。
注意:?:之间没有空格。
循环也是非常频繁使用的需求,我们使用th:each指令来完成:
假如有用户的集合:users在Context中。
<tr th:each="user : ${users}">
    <td th:text="${user.name}">ONIOns</td>
    <td th:text="${user.age}">2.41</td>
</tr>
${users} 是要遍历的集合,可以是以下类型:Iterable,实现了Iterable接口的类Enumeration,枚举Interator,迭代器Map,遍历得到的是Map.EntryArray,数组及其它一切符合数组结果的对象在迭代的同时,我们也可以获取迭代的状态对象:
<tr th:each="user,stat : ${users}">
    <td th:text="${user.name}">Onions</td>
    <td th:text="${user.age}">2.41</td>
</tr>
stat对象包含以下属性:
index,从0开始的角标count,元素的个数,从1开始size,总元素个数current,当前遍历到的元素even/odd,返回是否为奇偶,boolean值first/last,返回是否为第一或最后,boolean值有了if和else,我们能实现一切功能_。
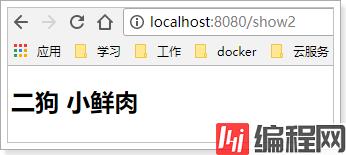
Thymeleaf中使用th:if 或者 th:unless ,两者的意思恰好相反
<span th:if="${user.age} < 24">小鲜肉</span>如果表达式的值为true,则标签会渲染到页面,否则不进行渲染。
以下情况被认定为true:
其它情况包括null都被认定为false
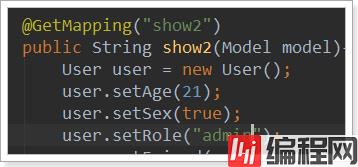
这里要使用两个指令:th:switch 和 th:case
<div th:switch="${user.role}">
  <p th:case="'admin'">用户是管理员</p>
  <p th:case="'manager'">用户是经理</p>
  <p th:case="*">用户是别的玩意</p>
</div>
需要注意的是,一旦有一个th:case成立,其它的则不再判断。与java中的switch是一样的。
另外th:case="*"表示默认,放最后
页面

模板引擎不仅可以渲染html,也可以对JS中的进行预处理。而且为了在纯静态环境下可以运行,其Thymeleaf代码可以被注释起来:
<script th:inline="javascript">
    const user =  {};
    const age =  20;
    console.log(user);
    console.log(age)
</script>
在script标签中通过th:inline="javascript"来声明这是要特殊处理的js脚本
语法结构:
const user = "静态环境下的默认值";因为Thymeleaf被注释起来,因此即便是静态环境下, js代码也不会报错,而是采用表达式后面跟着的默认值。
看看页面的源码:
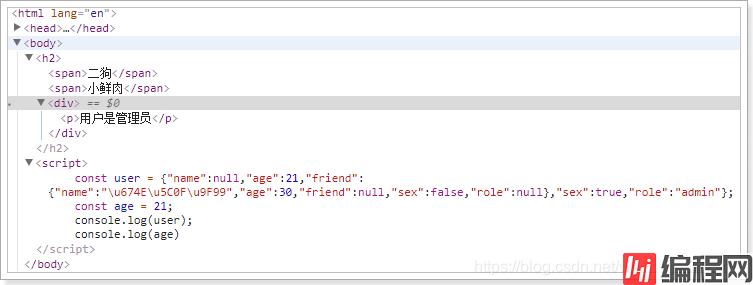
我们的User对象被直接处理为JSON格式了,非常方便。
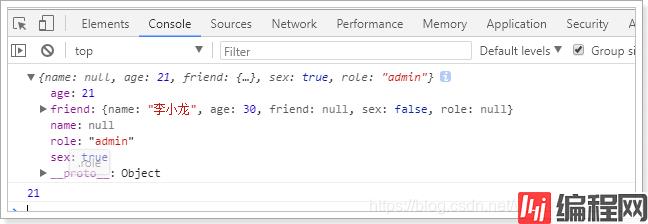
控制台:

pom.xml依赖
<?xml version="1.0" encoding="UTF-8"?>
<project xmlns="http://Maven.apache.org/POM/4.0.0" xmlns:xsi="http://www.w3.org/2001/XMLSchema-instance"
         xsi:schemaLocation="http://maven.apache.org/POM/4.0.0 https://maven.apache.org/xsd/maven-4.0.0.xsd">
    <modelVersion>4.0.0</modelVersion>
    <groupId>com.zhf</groupId>
    <artifactId>demoboot4_01</artifactId>
    <version>0.0.1-SNAPSHOT</version>
    <name>demoboot4_01</name>
    <description>demoboot4_01</description>

    <properties>
        <java.version>1.8</java.version>
        <project.build.sourceEncoding>UTF-8</project.build.sourceEncoding>
        <project.reporting.outputEncoding>UTF-8</project.reporting.outputEncoding>
        <spring-boot.version>2.3.7.RELEASE</spring-boot.version>
    </properties>

    <dependencies>

        <!--热部署依赖插件-->
        <dependency>
            <groupId>org.springframework.boot</groupId>
            <artifactId>spring-boot-devtools</artifactId>
            <optional>true</optional>
        </dependency>

        <dependency>
            <groupId>org.mybatis.spring.boot</groupId>
            <artifactId>mybatis-spring-boot-starter</artifactId>
            <version>1.3.2</version>
        </dependency>

        <dependency>
            <groupId>org.springframework.boot</groupId>
            <artifactId>spring-boot-starter-jdbc</artifactId>
        </dependency>

        <dependency>
            <groupId>org.springframework.boot</groupId>
            <artifactId>spring-boot-starter-thymeleaf</artifactId>
        </dependency>

        <dependency>
            <groupId>org.springframework.boot</groupId>
            <artifactId>spring-boot-starter-WEB</artifactId>
        </dependency>

        <dependency>
            <groupId>Mysql</groupId>
            <artifactId>mysql-connector-java</artifactId>
            <scope>runtime</scope>
        </dependency>

        <dependency>
            <groupId>org.springframework.boot</groupId>
            <artifactId>spring-boot-starter-test</artifactId>
            <scope>test</scope>
            <exclusions>
                <exclusion>
                    <groupId>org.junit.vintage</groupId>
                    <artifactId>junit-vintage-engine</artifactId>
                </exclusion>
            </exclusions>
        </dependency>
    </dependencies>

    <dependencyManagement>
        <dependencies>
            <dependency>
                <groupId>org.springframework.boot</groupId>
                <artifactId>spring-boot-dependencies</artifactId>
                <version>${spring-boot.version}</version>
                <type>pom</type>
                <scope>import</scope>
            </dependency>
        </dependencies>
    </dependencyManagement>

    <build>
        <plugins>
            <plugin>
                <groupId>org.apache.maven.plugins</groupId>
                <artifactId>maven-compiler-plugin</artifactId>
                <version>3.8.1</version>
                <configuration>
                    <source>1.8</source>
                    <target>1.8</target>
                    <encoding>UTF-8</encoding>
                </configuration>
            </plugin>
            <plugin>
                <groupId>org.springframework.boot</groupId>
                <artifactId>spring-boot-maven-plugin</artifactId>
                <version>2.3.7.RELEASE</version>
                <configuration>
                    <mainClass>com.zhf.demoboot4_01.Demoboot401Application</mainClass>
                </configuration>
                <executions>
                    <execution>
                        <id>repackage</id>
                        <Goals>
                            <goal>repackage</goal>
                        </goals>
                    </execution>
                </executions>
            </plugin>
        </plugins>
    </build>

</project>
配置文件application.properties
# 应用名称
spring.application.name=demoboot4_01

# THYMELEAF (ThymeleafAutoConfiguration)
# 开启模板缓存(默认值: true ,    一般改为false,要不页面可能会不实时刷新)
spring.thymeleaf.cache=false
# 检查模板是否存在,然后再呈现
spring.thymeleaf.check-template=true
# 检查模板位置是否正确(默认值 :true )
spring.thymeleaf.check-template-location=true
#Content-Type 的值(默认值: text/html )
spring.thymeleaf.content-type=text/html
# 开启 mvc Thymeleaf 视图解析(默认值: true )
spring.thymeleaf.enabled=true
# 模板编码
spring.thymeleaf.encoding=UTF-8
# 要被排除在解析之外的视图名称列表,⽤逗号分隔
spring.thymeleaf.excluded-view-names=
# 要运⽤于模板之上的模板模式。另⻅ StandardTemplate-ModeHandlers( 默认值: HTML5)
spring.thymeleaf.mode=HTML5
# 在构建 URL 时添加到视图名称前的前缀(默认值: classpath:/templates/ )
spring.thymeleaf.prefix=classpath:/templates/
# 在构建 URL 时添加到视图名称后的后缀(默认值: .html )
spring.thymeleaf.suffix=.html

# 应用服务 WEB 访问端口
server.port=8080

mybatis.mapper-locations=classpath:mapperxml/*xml
mybatis.type-aliases-package=com.zhf.demoboot4_01.domain


# 数据库驱动:
spring.datasource.driver-class-name=com.mysql.cj.jdbc.Driver
# 数据源名称
#spring.datasource.name=defaultDataSource
# 数据库连接地址
spring.datasource.url=jdbc:mysql://localhost:3306/roadhelp?serverTimezone=UTC
# 数据库用户名&密码:
spring.datasource.username=root
spring.datasource.passWord=root
以上为个人经验,希望能给大家一个参考,也希望大家多多支持编程网。
--结束END--
本文标题: 解读thymeleaf模板引擎中th:if的使用
本文链接: https://www.lsjlt.com/news/169248.html(转载时请注明来源链接)
有问题或投稿请发送至: 邮箱/279061341@qq.com QQ/279061341
下载Word文档到电脑,方便收藏和打印~
2024-03-01
2024-03-01
2024-03-01
2024-02-29
2024-02-29
2024-02-29
2024-02-29
2024-02-29
2024-02-29
2024-02-29
回答
回答
回答
回答
回答
回答
回答
回答
回答
回答


官方手机版

微信公众号

商务合作


0