目录echarts点击按钮从新渲染图表并更新数据效果图思路echarts3点击按钮动态更新数据1.后台代码(模拟数据)2.前台界面3.echarts代码4.点击搜索按钮触发的函数5.
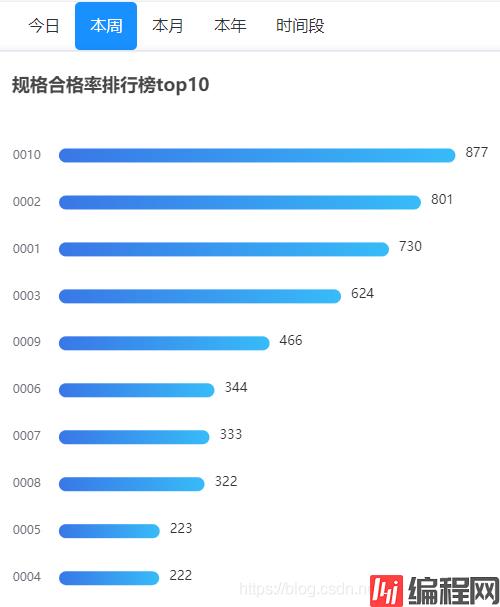
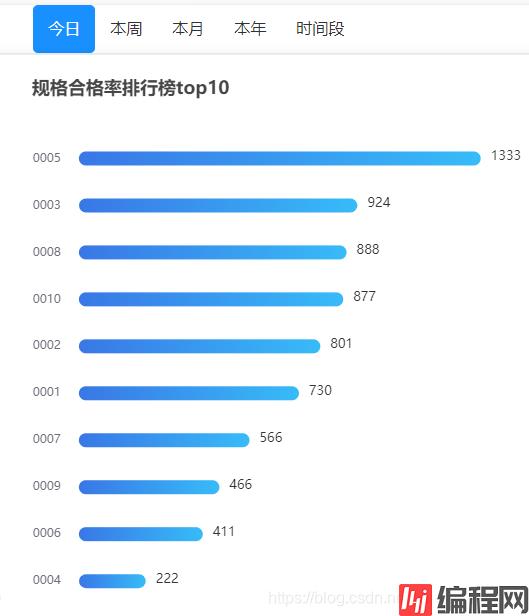
像这样的,点击一个会显示不同的数据的试图。
很简单,就是点击按钮后从新调用一下echarts试图的方法,然后把新的数据当参数传给echarts方法内,然后给到data就能渲染了。
上代码
export default {
  data() {
    return {
      //默认给一个数据,一进来就能看到的。
      barDatas:[730, 801, 924, 222, 1333, 411, 566, 888, 466, 877]
    };
  },
  mounted() {
  //一进页面就加载试图,并把默认的数据传给他渲染出来,这个默认的不是写死的,实际工作可以一进来直接发请求那数据给试图
    this.barGraph(this.barDatas);
  },
  methods: {
    //横向条形图
    barGraph(val) {
      //初始化图标
      var myCharts = this.$echarts.init(this.$refs["echart-right"]);
      //Y轴的数据,和数据值位置一一对应
      var cate = [
        "0001",
        "0002",
        "0003",
        "0004",
        "0005",
        "0006",
        "0007",
        "0008",
        "0009",
        "0010",
      ];
      //数据值,顺序和Y轴的名字一一对应
      var barData = val    //这个地方参数传给他渲染数据
      var option = {
        title: {
          text: this.rightname + "合格率排行榜top10",
        },
        tooltip: {
          trigger: "axis",
          axisPointer: {
            type: "shadow",
          },
        },
        //图表位置
        grid: {
          left: "3%",
          right: "4%",
          bottom: "3%",
          containLabel: true,
        },
        //X轴
        xAxis: {
          type: "value",
          axisLine: {
            show: false,
          },
          axisTick: {
            show: false,
          },
          //不显示X轴刻度线和数字
          splitLine: { show: false },
          axisLabel: { show: false },
        },
        yAxis: {
          type: "cateGory",
          data: cate,
          //升序
          inverse: true,
          splitLine: { show: false },
          axisLine: {
            show: false,
          },
          axisTick: {
            show: false,
          },
          //key和图间距
          offset: 10,
          //动画部分
          animationDuration: 300,
          animationDurationUpdate: 300,
          //key文字大小
          nameTextStyle: {
            fontSize: 5,
          },
        },
        series: [
          {
            //柱状图自动排序,排序自动让Y轴名字跟着数据动
            realtimeSort: true,
            name: "数量",
            type: "bar",
            data: barData,
            barWidth: 14,
            barGap: 10,
            smooth: true,
            valueAnimation: true,
            //Y轴数字显示部分
            label: {
              nORMal: {
                show: true,
                position: "right",
                valueAnimation: true,
                offset: [5, -2],
                textStyle: {
                  color: "#333",
                  fontSize: 13,
                },
              },
            },
            itemStyle: {
              emphasis: {
                barBorderRadius: 7,
              },
              //颜色样式部分
              normal: {
                barBorderRadius: 7,
                color: new echarts.graphic.LinearGradient(0, 0, 1, 0, [
                  { offset: 0, color: "#3977E6" },
                  { offset: 1, color: "#37BBF8" },
                ]),
              },
            },
          },
        ],
        //动画部分

        animationDuration: 0,
        animationDurationUpdate: 3000,
        animationEasing: "linear",
        animationEasingUpdate: "linear",
      };
      myCharts.setOption(option);
      //图表大小变动从新渲染,动态自适应
      window.addEventListener("resize", function () {
        myCharts.resize();
      });
    },
    //点击高亮
    // 点击后渲染不同echarts试图
    acts(index) {
      this.actlist = index;
      if (index == 4) {
        this.isshow = true;
      } else {
        this.isshow = false;
        //我是循环写的按钮,所以通过判断点击的是哪一个按钮,来对应赋值新的数据然后调用方法传参从新渲染试图,单独写的按钮直接在上面加点击事件就行。
        //当然这个数据不是死的,后面给成点击按钮发请求接口那数据赋值。
        if(index==0){
          this.barDatas=[530, 301, 524, 622, 223, 344, 333, 422, 566, 677]
          this.barGraph(this.barDatas)
          console.log("ri");
        }else if(index==1){
          this.barDatas=[730, 801, 624, 222, 223, 344, 333, 322, 466, 877]
          this.barGraph(this.barDatas)
          console.log("zhou");
        }else if(index==2){
          this.barDatas=[430, 501, 524, 722, 123, 644, 433, 322, 666, 827]
          this.barGraph(this.barDatas)
          console.log("yue");
        }else{
          this.barDatas=[330, 401, 524, 622, 723, 844, 533, 322, 636, 527]
          this.barGraph(this.barDatas)
          console.log("nian");
        }
      }
    }
  },
};
@RequestMapping("/queryMiddleAppinfo")
	@ResponseBody
	public Map queryMiddleAppinfo(){
		List<Integer> list1 = new ArrayList<Integer>();
		list1.add((int)Math.floor(Math.random()*20+1));
		list1.add((int)Math.floor(Math.random()*20+1));
		list1.add((int)Math.floor(Math.random()*20+1));
		list1.add((int)Math.floor(Math.random()*20+1));
		list1.add((int)Math.floor(Math.random()*20+1));
		list1.add((int)Math.floor(Math.random()*20+1));
		list1.add((int)Math.floor(Math.random()*20+1));

		List<Integer> list2 = new ArrayList<Integer>();
		list2.add((int)Math.floor(Math.random()*20+1));
		list2.add((int)Math.floor(Math.random()*20+1));
		list2.add((int)Math.floor(Math.random()*20+1));
		list2.add((int)Math.floor(Math.random()*20+1));
		list2.add((int)Math.floor(Math.random()*20+1));
		list2.add((int)Math.floor(Math.random()*20+1));
		list2.add((int)Math.floor(Math.random()*20+1));

		Map map = new HashMap();
		map.put("man", list1);
		map.put("women", list2);

		return map;
}按钮
<button class="layui-btn" data-type="reload">搜索</button>存放图标的div
<div id="main-line" style="height: 450px;"></div>// 基于准备好的dom,初始化echarts实例
var myChart = echarts.init(document.getElementById('main-line'));
// 使用刚指定的配置项和数据显示图表。
myChart.setOption({
tooltip: {
trigger: 'axis'
},
legend: {
data: ['男', '女']
},
toolbox: {
show: false,
feature: {
dataView: {show: true, readOnly: false},
magicType: {show: true, type: ['line', 'bar']},
restore: {show: true},
saveAsImage: {show: true}
}
},
calculable: true,
xAxis: [
{
type: 'category',
data: ['1930', '1940', '1950', '1960', '1970', '1980','1990']
}
],
yAxis: [
{
type: 'value'
}
],
series: [
{
name: '男',
type: 'bar',
data: [],
markPoint: {
data: [
{type: 'max', name: '最大值'},
{type: 'min', name: '最小值'}
]
}
},
{
name: '女',
type: 'bar',
data: [],
markPoint: {
data: [
{type: 'max', name: '最大值'},
{type: 'min', name: '最小值'}
]
}
}
]
});function loadsexnums(){
var nums_man=[]; //存放男性数量
var nums_women=[]; //存放女性数量
myChart.showLoading(); //数据加载完之前先显示一段简单的loading动画
$.ajax({
type : "post",
async : true, //异步请求(同步请求将会锁住浏览器,用户其他操作必须等待请求完成才可以执行)
url : "/queryMiddleAppinfo", //请求发送到TestServlet处
data : {},
dataType : "JSON", //返回数据形式为json
success : function(result) {
//请求成功时执行该函数内容,result即为服务器返回的json对象
if (result) {
var man = result.man;
var women = result.women;
for(var i=0;i<man.length;i++){
nums_man.push(man[i]); //挨个取出类别并填入类别数组
}
for(var i=0;i<women.length;i++){
nums_women.push(women[i]); //挨个取出销量并填入销量数组
}
myChart.hideLoading(); //隐藏加载动画
myChart.setOption({ //加载数据图表
series: [
{
data: nums_man //此处只对data数据修改即可
},
{
data: nums_women
}
]
});
}
},
error : function(errorMsg) {
alert("图表请求数据失败!");
myChart.hideLoading();
}
})
}
每次点击查询图标展示都会变化
以上为个人经验,希望能给大家一个参考,也希望大家多多支持编程网。
--结束END--
本文标题: 使用echarts点击按钮从新渲染图表并更新数据
本文链接: https://www.lsjlt.com/news/169912.html(转载时请注明来源链接)
有问题或投稿请发送至: 邮箱/279061341@qq.com QQ/279061341
下载Word文档到电脑,方便收藏和打印~
2024-01-12
2023-05-20
2023-05-20
2023-05-20
2023-05-20
2023-05-20
2023-05-20
2023-05-20
2023-05-20
2023-05-20
回答
回答
回答
回答
回答
回答
回答
回答
回答
回答


官方手机版

微信公众号

商务合作


0