最近做了一个简单的3D效果翻页特效,先说说我的思路吧,首先我这个翻页效果并不是两个Activity之间的跳转,而是在同一个activity类切换不同的view而已。我现在的做法
最近做了一个简单的3D效果翻页特效,先说说我的思路吧,首先我这个翻页效果并不是两个Activity之间的跳转,而是在同一个activity类切换不同的view而已。我现在的做法是单击一个button然后Gone当前的布局,然后把需要呈现的布局visible,在隐藏当前布局的时候启动动画,然后给动画添加监听,在动画结束时开始另外一个view的入场动画就行了。
下面来看下我的主页面的布局文件:
<FrameLayout xmlns:Android="Http://schemas.android.com/apk/res/android"
 android:id="@+id/container"
 android:layout_width="fill_parent"
 android:layout_height="fill_parent" >
 <include
 android:layout_width="fill_parent"
 android:layout_height="fill_parent"
 layout="@layout/layout2" />
 <include
 android:layout_width="fill_parent"
 android:layout_height="fill_parent"
 layout="@layout/layout1" />
</FrameLayout>
我这个布局文件使用<include>标签包含了另外2个布局文件,这些布局文件才是呈现数据的,下面是另外2个布局文件:
layout1:
<?xml version="1.0" encoding="utf-8"?>
<LinearLayout xmlns:android="http://schemas.android.com/apk/res/android"
 android:layout_width="match_parent"
 android:layout_height="match_parent"
 android:background="@drawable/test1"
 android:orientation="vertical"
 android:id="@+id/container1"
 >
 <Button
 android:id="@+id/bt_towhile"
 android:layout_width="wrap_content"
 android:layout_height="wrap_content"
 android:layout_gravity="center"
 android:text="白色" />
</LinearLayout>
layout2:
<?xml version="1.0" encoding="utf-8"?>
<LinearLayout xmlns:android="http://schemas.android.com/apk/res/android"
 android:id="@+id/container2"
 android:layout_width="match_parent"
 android:layout_height="match_parent"
 android:background="@drawable/test2"
 android:orientation="vertical" >
 <Button
 android:id="@+id/bt_toblack"
 android:layout_width="wrap_content"
 android:layout_height="wrap_content"
 android:layout_gravity="center"
 android:text="黑色" />
</LinearLayout>
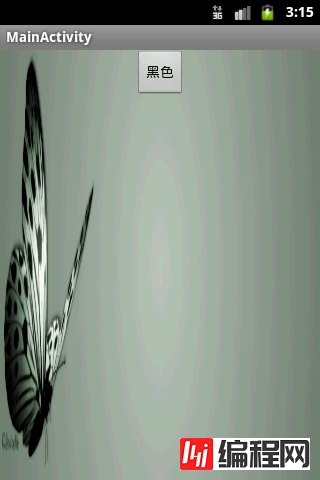
我这里只是举个例子并没有放什么实际的类容,只是放了2个button,当我点击其中一个跳转到另外一个layout。
有了布局文件那我们就开始要实现功能了,我们的想法是点击按钮的时候开始一个动画等动画结束时再开启另外一个动画并隐藏和展示layout1和layout2。
package com.test.view;
import android.view.View;
import android.view.ViewGroup;
import android.view.animation.Animation;
import android.view.animation.DecelerateInterpolator;
public class RotateAnimationUtil {
 private ViewGroup context;
 private View[] views;
 public RotateAnimationUtil(ViewGroup context, View... views) {
 super();
 this.context = context;
 this.views = views;
 }

 public void applyRotateAnimation(int flag, float startDegress,
  float endDegress) {
 final float centerX = context.getWidth() / 2.0f;
 final float centerY = context.getHeight() / 2.0f;
 Rotate3DAnimation rotate = new Rotate3DAnimation(startDegress,
  endDegress, centerX, centerY, 310.0f, true);
 rotate.setDuration(1000);
 rotate.setFillAfter(false);
 rotate.setInterpolator(new DecelerateInterpolator());
 rotate.setAnimationListener(new DisplayNextView(flag));
 context.startAnimation(rotate);
 }
 private final class DisplayNextView implements Animation.AnimationListener {
 private final int mFlag;
 private DisplayNextView(int flag) {
  mFlag = flag;
 }
 public void onAnimationStart(Animation animation) {
 }
 // 动画结束
 public void onAnimationEnd(Animation animation) {
  context.post(new SwapViews(mFlag));
 }
 public void onAnimationRepeat(Animation animation) {
 }
 }

 private final class SwapViews implements Runnable {
 private final int mFlag;
 public SwapViews(int mFlag) {
  this.mFlag = mFlag;
 }
 public void run() {
  final float centerX = context.getWidth() / 2.0f;
  final float centerY = context.getHeight() / 2.0f;
  Rotate3DAnimation rotation;
  if (mFlag > -1) {
  views[0].setVisibility(View.GONE);
  views[1].setVisibility(View.VISIBLE);
  views[1].requestFocus();
  rotation = new Rotate3DAnimation(270, 360, centerX, centerY,
   310.0f, false);
  } else {
  views[1].setVisibility(View.GONE);
  views[0].setVisibility(View.VISIBLE);
  views[0].requestFocus();
  rotation = new Rotate3DAnimation(90, 0, centerX, centerY,
   310.0f, false);
  }
  rotation.setDuration(1000);
  rotation.setFillAfter(false);
  rotation.setInterpolator(new DecelerateInterpolator());
  // 开始动画
  context.startAnimation(rotation);
 }
 }
}
解释一下这个类的构造方法:
public RotateAnimationUtil(ViewGroup context, View... views) {
 super();
 this.context = context;
 this.views = views;
 }
有2个参数,第一个参数就是我们的主布局页面的FrameLayout,第2个参数就是我们要进行动画切换的2个子layout,我这使用的是一个可变长参数只是为了方便而已。
public void applyRotateAnimation(int flag, float startDegress,float endDegress)方法第一个参数是标记当前是第是从哪个个layout跳转,因外我们必须知道当前开始跳转的layout才能推算角度。
下面是我自定义动画的源码:
package com.test.view;
import android.graphics.Camera;
import android.graphics.Matrix;
import android.view.animation.Animation;
import android.view.animation.TransfORMation;
public class Rotate3DAnimation extends Animation {
 private final float mFormDegress;
 private final float mToDegress;
 private final float mCenterX;
 private final float mCenterY;

 private final float mDepthz;

 private final boolean mReverse;
 private Camera mCamera;
 public Rotate3DAnimation(float formDegress, float toDegress, float centerX,
  float centerY, float depthz, boolean reverse) {
 super();
 this.mFormDegress = formDegress;
 this.mToDegress = toDegress;
 this.mCenterX = centerX;
 this.mCenterY = centerY;
 this.mDepthz = depthz;
 this.mReverse = reverse;
 }
 @Override
 public void initialize(int width, int height, int parentWidth,
  int parentHeight) {
 super.initialize(width, height, parentWidth, parentHeight);
 mCamera = new Camera();
 }

 @Override
 protected void applyTransformation(float interpolatedTime, Transformation t) {
 final float formDegress = mFormDegress;
 // 通过差点值计算出转变的角度
 float degress = formDegress
  + ((mToDegress - formDegress) * interpolatedTime);
 final float centerX = mCenterX;
 final float centerY = mCenterY;
 final Camera camera = mCamera;
 // 得到当前矩阵
 Matrix matrix = t.getMatrix();
 // 报错当前屏幕的状态
 camera.save();
 // 判断是降还是升
 if (mReverse) {
  // 正向改变Z轴角度
  camera.translate(0.0f, 0.0f, mDepthz * interpolatedTime);
 } else {
  // 反向改变Z轴角度
  camera.translate(0.0f, 0.0f, mDepthz * (1.0f - interpolatedTime));
 }
 // 旋转Y轴角度
 camera.rotateY(degress);
 // 把当前改变后的矩阵信息复制给Transformation的Matrix
 camera.getMatrix(matrix);
 // 根据改变后的矩阵信息从新恢复屏幕
 camera.restore();
 // 让动画在屏幕中间运行
 matrix.preTranslate(-centerX, -centerY);
 matrix.postTranslate(centerX, centerY);
 }
}
如果你不需要沉降效果那么你把下面的代码删除掉即可:
if (mReverse) {
  // 正向改变Z轴角度
  camera.translate(0.0f, 0.0f, mDepthz * interpolatedTime);
 } else {
  // 反向改变Z轴角度
  camera.translate(0.0f, 0.0f, mDepthz * (1.0f - interpolatedTime));
 }
好了核心代码已经上完,下面是主界面代码:
package com.test.rotateanimation;
import android.app.Activity;
import android.os.Bundle;
import android.view.Menu;
import android.view.View;
import android.view.ViewGroup;
import android.widget.Button;
import android.widget.FrameLayout;
import android.widget.LinearLayout;
import com.test.view.RotateAnimationUtil;
public class MainActivity extends Activity {
 private FrameLayout container;
 private LinearLayout container1;
 private LinearLayout container2;
 private RotateAnimationUtil rotateAnimationUtil;
 private Button bt_towhile;
 private Button bt_toblack;
 @Override
 public void onCreate(Bundle savedInstanceState) {
 super.onCreate(savedInstanceState);
 setContentView(R.layout.activity_main);
 initView();
 bt_towhile.setOnClickListener(new View.OnClickListener() {
  @Override
  public void onClick(View v) {
  rotateAnimationUtil.applyRotateAnimation(1, 0, 90);
  }
 });
 bt_toblack.setOnClickListener(new View.OnClickListener() {
  @Override
  public void onClick(View v) {
  rotateAnimationUtil.applyRotateAnimation(-1, 0, -90);
  }
 });
 // 设置当前View控件的缓存
 container
  .setPersistentDrawinGCache(ViewGroup.PERSISTENT_ANIMATION_CACHE);
 }
 private void initView() {
 container = (FrameLayout) findViewById(R.id.container);
 bt_toblack = (Button) findViewById(R.id.bt_toblack);
 bt_towhile = (Button) findViewById(R.id.bt_towhile);
 container1 = (LinearLayout) findViewById(R.id.container1);
 container2 = (LinearLayout) findViewById(R.id.container2);
 rotateAnimationUtil = new RotateAnimationUtil(container, container1,
  container2);
 }
 @Override
 public boolean onCreateOptionsMenu(Menu menu) {
 getMenuInflater().inflate(R.menu.activity_main, menu);
 return true;
 }
}
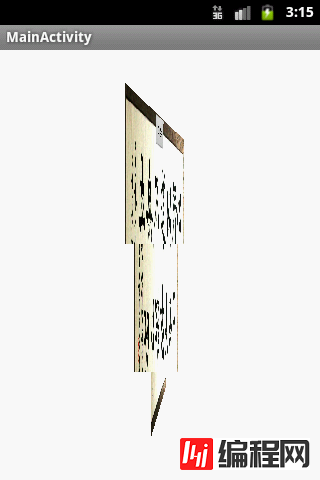
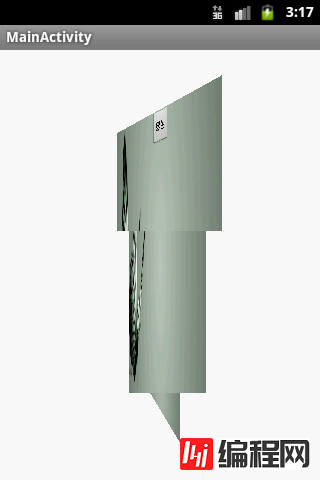
下面是运行效果,剪切效果不好,呵呵.

源码下载:http://xiazai.jb51.net/201606/yuanma/RotateAnimation(jb51.net).rar
您可能感兴趣的文章:Android 中使用RecyclerView实现底部翻页android中图片翻页效果简单的实现方法解析Android中实现滑动翻页之ViewFlipper的使用详解Android实现阅读APP平移翻页效果android ViewPager实现滑动翻页效果实例代码Android自定义左右或上下滑动翻页效果Android ViewPager实现左右滑动翻页效果Android利用悬浮按钮实现翻页效果Android 仿日历翻页、仿htc时钟翻页、数字翻页切换效果Android通过手势实现答题器翻页效果RecyclerView+PagerSnapHelper实现抖音首页翻页的Viewpager效果
--结束END--
本文标题: 基于Android实现3D翻页效果
本文链接: https://www.lsjlt.com/news/24901.html(转载时请注明来源链接)
有问题或投稿请发送至: 邮箱/279061341@qq.com QQ/279061341
下载Word文档到电脑,方便收藏和打印~
2024-01-21
2023-10-28
2023-10-28
2023-10-27
2023-10-27
2023-10-27
2023-10-27
回答
回答
回答
回答
回答
回答
回答
回答
回答
回答


官方手机版

微信公众号

商务合作


0