需求描述: 在项目开发过程中,遇到一种情况,需要自定义UIBarButtonItem,来实现分享样式,并在iPad中弹出系统分享框(UIActivityViewController)
需求描述:
在项目开发过程中,遇到一种情况,需要自定义UIBarButtonItem,来实现分享样式,并在iPad中弹出系统分享框(UIActivityViewController),系统分享框需要指定显示位置(barButtonItem)。而自定义的UIBarButtonItem target指向的是UIButton。这与需求不符,需自定义UIBarButtonItem。
在介绍自定义UIBarButtonItem前,先介绍一下相关控件的子父类关系(也可以说继承关系)。
1、UIBarItem
UIBarButtonItem
NS_CLASS_AVAILABLE_ioS(2_0) @interface UIBarButtonItem : UIBarItem <NSCoding>UITabBarItem
NS_CLASS_AVAILABLE_IOS(2_0) @interface UITabBarItem : UIBarItem下面是在界面上的显示效果
UIBarButtonItem和UITabBarItem效果显示
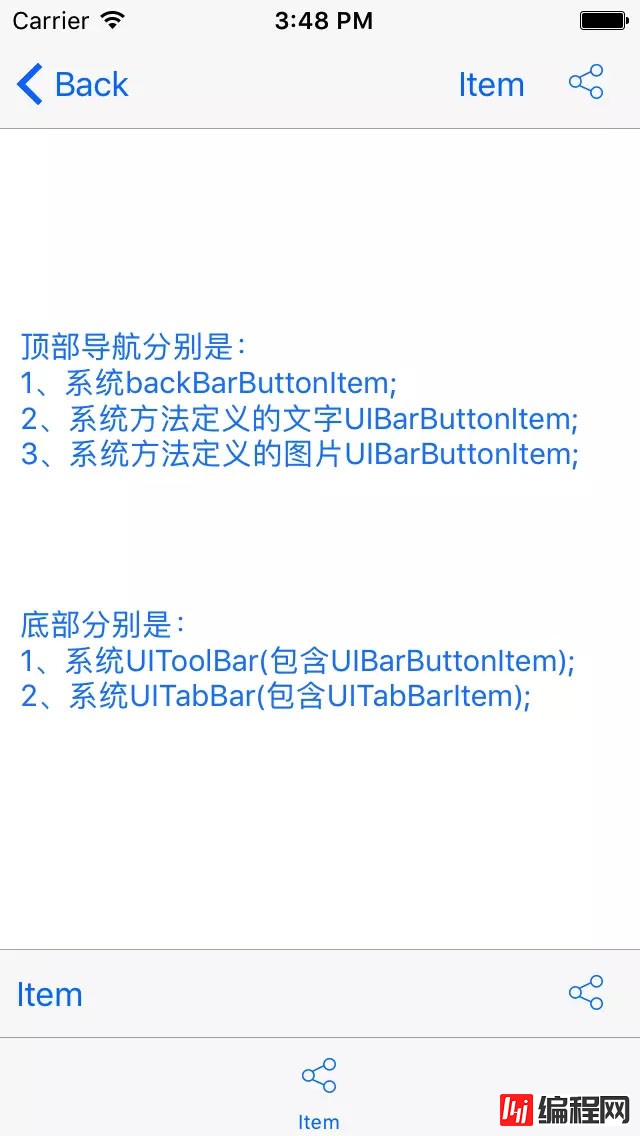
从上图中看到UIBarButtonItem有三种效果显示,分别是
导航左侧返回按钮,UINavigationItem中的backBarButtonItem属性
@property(nullable,nonatomic,strong) UIBarButtonItem *backBarButtonItem纯文本的UIBarButtonItem
- (instancetype)initWithTitle:(nullable NSString *)title style:(UIBarButtonItemStyle)style target:(nullable id)target action:(nullable SEL)action;纯图片的UIBarButtonItem,其中包括自定义图片和系统样式
- (instancetype)initWithImage:(nullable UIImage *)image style:(UIBarButtonItemStyle)style target:(nullable id)target action:(nullable SEL)action;
- (instancetype)initWithBarButtonSystemItem:(UIBarButtonSystemItem)systemItem target:(nullable id)target action:(nullable SEL)action;UIToolBar使用UIBarButtonItem与导航效果一致。
关于UITabBarItem在这里就不多介绍,只是拿其显示效果与UIBarButtonItem对比。
在开发过程中,我们会使用到自定义UIBarButtonItem,来显示我们想要的界面效果。使用的方法常为:
- (instancetype)initWithCustomView:(UIView *)customView;
- (void)viewDidLoad {
 [super viewDidLoad];
 //自定义View
 UIView *view = [[UIView alloc] initWithFrame:CGRectMake(0.0, 0.0, 60.0, 40.0)];
 view.backgroundColor = [UIColor redColor];
 //自定义按钮
 UIButton *btn = [UIButton buttonWithType:UIButtonTypeCustom];
 btn.frame = view.bounds;
 [btn addTarget:self action:@selector(clickRight:) forControlEvents:UIControlEventTouchUpInside];
 [view addSubview:btn];
 //自定义Item
 UIBarButtonItem *barItem = [[UIBarButtonItem alloc] initWithCustomView:view];
 //
 self.navigationItem.leftBarButtonItem = barItem;
}

#pragma mark -

- (void)clickRight:(id)sender {
 NSLog(@"sender:%@",sender);
}
其中打印sender,其类型是UIButton。
2017-10-17 16:08:43.917 TestImage[5482:163865] sender:<UIButton: 0x7fb9bad12e60; frame = (0 0; 60 40); opaque = NO; layer = <CALayer: 0x61000003b940>>
通过上面描述,发现系统方法不能实现项目需求效果。当然也可以通过属性保存UIBarButtonItem方法来实现需求效果。即在点击按钮响应后,直接使用保存的UIBarButtonItem,但是我没有采用这种方法。
下面是我给出的两种解决方案:
方案一
继承UIBarButtonItem,实现子类。
定义子类
#import <UIKit/UIKit.h>

@interface LLBarButtonItem : UIBarButtonItem


@end
#import "LLBarButtonItem.h"

@implementation LLBarButtonItem

- (id)initWithCustomView:(UIView *)customView {
 self = [super initWithCustomView:customView];
 if (self) {
 UIButton *btn = [UIButton buttonWithType:UIButtonTypeCustom];
 btn.frame = customView.bounds;
 btn.backgroundColor = [UIColor clearColor];
 [btn addTarget:self action:@selector(clickButton:) forControlEvents:UIControlEventTouchUpInside];
 [customView addSubview:btn];
 }
 return self;
}

- (void)clickButton:(UIButton *)sender {
 if (self.target && [self.target respondsToSelector:self.action]) {
 //[self.target perfORMSelector:self.action withObject:self];
 IMP imp = [self.target methodForSelector:self.action];

 void (*func)(id, SEL, id) = (void *)imp;

 func(self.target, self.action, self);
 }
}

@end
定义子类对象,调用子类对象
- (void)viewDidLoad {
 [super viewDidLoad];
 //自定义View
 UIView *view = [[UIView alloc] initWithFrame:CGRectMake(0.0, 0.0, 60.0, 40.0)];
 view.backgroundColor = [UIColor clearColor];
 //自定义Item
 LLBarButtonItem *barItem = [[LLBarButtonItem alloc] initWithCustomView:view];
 barItem.target = self;
 barItem.action = @selector(clickRight:);
 //
 self.navigationItem.leftBarButtonItem = barItem;
}

#pragma mark -

- (void)clickRight:(id)sender {
 NSLog(@"sender:%@",sender);
}
打印target对象
2017-10-17 16:24:11.696 TestImage[5557:170144] sender:<LLBarButtonItem: 0x7fb403c16080>
方案二
UIBarButtonItem类别
定义类别
#import <UIKit/UIKit.h>

@interface UIBarButtonItem (Custom)

- (void)addCutomTarget:(id)target action:(SEL)action;

@end
#import "UIBarButtonItem+Custom.h"

@implementation UIBarButtonItem (Custom)

- (void)addCutomTarget:(id)target action:(SEL)action {
 if (self.customView != nil) {
 self.target = target;
 self.action = action;
 //
 UIButton *btn = [UIButton buttonWithType:UIButtonTypeCustom];
 btn.frame = self.customView.bounds;
 btn.backgroundColor = [UIColor clearColor];
 [btn addTarget:self action:@selector(clickButton:) forControlEvents:UIControlEventTouchUpInside];
 [self.customView addSubview:btn];
 }
}

- (void)clickButton:(UIButton *)sender {
 if (self.target && [self.target respondsToSelector:self.action]) {
 //[self.target performSelector:self.action withObject:self];
 IMP imp = [self.target methodForSelector:self.action];

 void (*func)(id, SEL, id) = (void *)imp;

 func(self.target, self.action, self);
 }
}

@end
调用类别方法
- (void)viewDidLoad {
 [super viewDidLoad];
 //自定义View
 UIView *view = [[UIView alloc] initWithFrame:CGRectMake(0.0, 0.0, 60.0, 40.0)];
 view.backgroundColor = [UIColor clearColor];
 //自定义Item
 UIBarButtonItem *barItem = [[UIBarButtonItem alloc] initWithCustomView:view];
 [barItem addCutomTarget:self action:@selector(clickRight:)];
 //
 self.navigationItem.leftBarButtonItem = barItem;
}

#pragma mark -

- (void)clickRight:(id)sender {
 NSLog(@"sender:%@",sender);
}
打印target对象
2017-10-17 16:28:14.407 TestImage[5598:172418] sender:<UIBarButtonItem: 0x7ffeda609e20>
两种方法都使用了IMP做消息传递。
你更喜欢哪一种?!
总结
以上就是这篇文章的全部内容了,希望本文的内容对大家的学习或者工作具有一定的参考学习价值,如果有疑问大家可以留言交流,谢谢大家对编程网的支持。
--结束END--
本文标题: iOS自定义UIBarButtonItem的target和action示例代码
本文链接: https://www.lsjlt.com/news/30290.html(转载时请注明来源链接)
有问题或投稿请发送至: 邮箱/279061341@qq.com QQ/279061341
下载Word文档到电脑,方便收藏和打印~
回答
回答
回答
回答
回答
回答
回答
回答
回答
回答


官方手机版

微信公众号

商务合作


0