这篇文章将为大家详细讲解有关Android中FlowLayout组件如何实现瀑布流效果,小编觉得挺实用的,因此分享给大家做个参考,希望大家阅读完这篇文章后可以有所收获。纸上得来终觉浅,绝知此事要躬行。动手实践是学习的最好的方式,对于自定义V
这篇文章将为大家详细讲解有关Android中FlowLayout组件如何实现瀑布流效果,小编觉得挺实用的,因此分享给大家做个参考,希望大家阅读完这篇文章后可以有所收获。
纸上得来终觉浅,绝知此事要躬行。
动手实践是学习的最好的方式,对于自定义View来说,听和看只能是过一遍流程,能掌握个30%、40%就不错了,而且很快就会遗忘,想变成自己的东西必须动手来写几遍,细细体会其中的细节和系统api的奥秘、真谛。
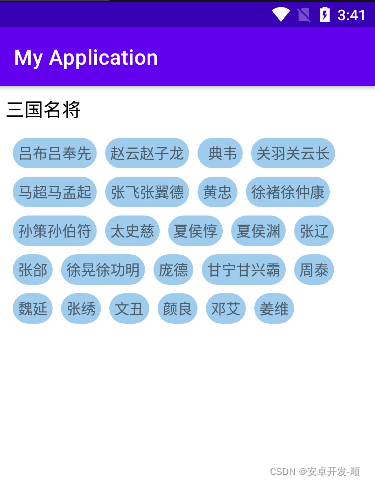
进入主题,今天来手写一个瀑布流组件FlowLayout,温习下自定义view的流程和关键点,先来张效果图
class ZSFlowLayout : ViewGroup { constructor(context: Context) : super(context) {} constructor(context: Context, attr: AttributeSet) : super(context, attr) {} constructor (context: Context, attr: AttributeSet, defZStyle: Int) : super( context, attr, defZStyle ) { } }这里注意两个参数的构造函数是必须的构造函数,系统会通过反射来调用此构造方法完成view的创建,具体调用位置在LayoutInflater 的 createView方法中,如下(基于android-31):
省略了若干不相关代码,并写了重要的注释信息,请留意
public final View createView(@NonNull Context viewContext, @NonNull String name, @Nullable String prefix, @Nullable AttributeSet attrs) throws ClassNotFoundException, InflateException { Objects.requireNonNull(viewContext); Objects.requireNonNull(name); //从缓存中取对应的构造函数 Constructor<? extends View> constructor = sConstructORMap.get(name); Class<? extends View> clazz = null; try { if (constructor == null) { // 通过反射创建class对象 clazz = Class.forName(prefix != null ? (prefix + name) : name, false, mContext.getClassLoader()).asSubclass(View.class); //创建构造函数 这里的mConstructorSignature 长这个样子 //static final Class<?>[] mConstructorSignature = new Class[] { // Context.class, AttributeSet.class}; //看到了没 就是我们第二个构造方法 constructor = clazz.getConstructor(mConstructorSignature); constructor.setAccessible(true); //缓存构造方法 sConstructorMap.put(name, constructor); } else { ... } try { //执行构造函数 创建出view final View view = constructor.newInstance(args); ... return view; } finally { mConstructorArgs[0] = lastContext; } } catch (Exception e) { ... } finally { ... } }对LayoutInflater以及setContentView、DecorView、PhoneWindow相关一整套源码流程感兴趣的可以看下我这篇文章:
Activity setContentView背后的一系列源码分析
override fun onMeasure(widthMeasureSpec: Int, heightMeasureSpec: Int) { }(1)先了解下 MeasureSpec的含义
MeasureSpec是View中的内部类,基本都是二进制运算。由于int是32位的,用高两位表示mode,低30位表示size。
(2)重点解释下 两个参数widthMeasureSpec 和 heightMeasureSpec是怎么来的
这个是父类传给我们的尺寸规则,那父类是如何按照什么规则生成的widthMeasureSpec、heightMeasureSpec呢?
答:父类会结合自身的情况,并且结合子view的情况(子类的宽是match_parent、wrap_content、还是写死的值)来生成的。生成的具体逻辑 请见:ViewGroup的getChildMeasureSpec方法
相关说明都写在了注释中,请注意查看:
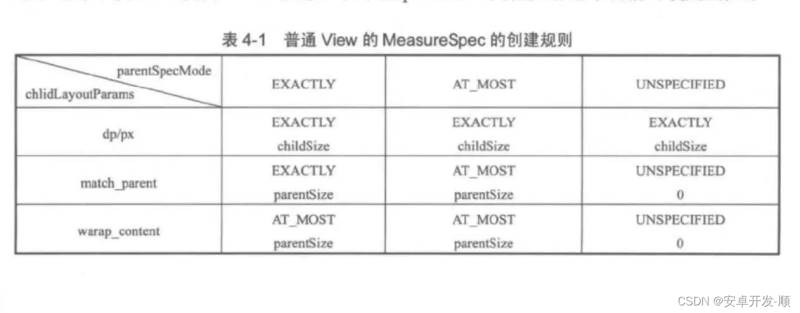
public static int getChildMeasureSpec(int spec, int padding, int childDimension) { //获取父类的尺寸模式 int specMode = MeasureSpec.getMode(spec); //获取父类的尺寸大小 int specSize = MeasureSpec.getSize(spec); //去掉padding后的大小 最小不能低于0 int size = Math.max(0, specSize - padding); int resultSize = 0; int resultMode = 0; switch (specMode) { // 如果父类的模式是MeasureSpec.EXACTLY(精确模式,父类的值是可以确定的) case MeasureSpec.EXACTLY: if (childDimension >= 0) { //此时子view的大小就是我们设置的值,超过父类也没事,开发人员自定义设置的 //比如父view的宽是100dp,子view宽你非要设置200dp,那就给200dp,这么做有什么 //意义?这样是可以扩展的,不至于限制死,比如子view可能具有滚动属性或者其他高级 //玩法 resultSize = childDimension; resultMode = MeasureSpec.EXACTLY; } else if (childDimension == LayoutParams.MATCH_PARENT) { // MATCH_PARENT 则子view和父view大小一致 模式是确定的 resultSize = size; resultMode = MeasureSpec.EXACTLY; } else if (childDimension == LayoutParams.WRAP_CONTENT) { // WRAP_CONTENT 则子view和父view大小一致 模式是最大不超过这个值 resultSize = size; resultMode = MeasureSpec.AT_MOST; } break; // Parent has imposed a maximum size on us case MeasureSpec.AT_MOST: if (childDimension >= 0) { // 按子view值执行,确定模式 resultSize = childDimension; resultMode = MeasureSpec.EXACTLY; } else if (childDimension == LayoutParams.MATCH_PARENT) { //按父view值执行 模式是最多不超过指定值模式 resultSize = size; resultMode = MeasureSpec.AT_MOST; } else if (childDimension == LayoutParams.WRAP_CONTENT) { //按父view值执行 模式是最多不超过指定值模式 resultSize = size; resultMode = MeasureSpec.AT_MOST; } break; // Parent asked to see how big we want to be case MeasureSpec.UNSPECIFIED: if (childDimension >= 0) { // 按子view值执行,确定模式 resultSize = childDimension; resultMode = MeasureSpec.EXACTLY; } else if (childDimension == LayoutParams.MATCH_PARENT) { // 按父view值执行 模式是未定义 resultSize = View.sUseZeroUnspecifiedMeasureSpec ? 0 : size; resultMode = MeasureSpec.UNSPECIFIED; } else if (childDimension == LayoutParams.WRAP_CONTENT) { // 按父view值执行 模式是未定义 resultSize = View.sUseZeroUnspecifiedMeasureSpec ? 0 : size; resultMode = MeasureSpec.UNSPECIFIED; } break; } //noinspection ResourceType return MeasureSpec.makeMeasureSpec(resultSize, resultMode); }其实就是网上的这张图
我们要在这个方法里面,确定所有被添加到我们的FlowLayout里面的子view的位置,这里没有特殊要注意的地方,控制好细节就可以。
三个关键步骤介绍完了,下面上实战代码:
ZSFlowLayout:
class ZSFlowLayout : ViewGroup { //保存所有子view 按行保存 每行都可能有多个view 所有是一个list var allViews: MutableList<MutableList<View>> = mutableListOf() //每个子view之间的水平间距 val horizontalSpace: Int = resources.getDimensionPixelOffset(R.dimen.zs_flowlayout_horizontal_space) //每行之间的间距 val verticalSpace: Int = resources.getDimensionPixelOffset(R.dimen.zs_flowlayout_vertical_space) //记录每一行的行高 onLayout时会用到 var lineHeights: MutableList<Int> = mutableListOf() constructor(context: Context) : super(context) {} constructor(context: Context, attr: AttributeSet) : super(context, attr) {} constructor (context: Context, attr: AttributeSet, defZStyle: Int) : super( context, attr, defZStyle ) { } override fun onMeasure(widthMeasureSpec: Int, heightMeasureSpec: Int) { //会测量次 allViews.clear() lineHeights.clear() //保存每一行的view var everyLineViews: MutableList<View> = mutableListOf() //记录每一行当前的宽度,用来判断是否要换行 var curLineHasUsedWidth: Int = paddingLeft + paddingRight //父布局能给的宽 val selfWidth: Int = MeasureSpec.getSize(widthMeasureSpec) //父布局能给的高 val selfHeight: Int = MeasureSpec.getSize(heightMeasureSpec) //我们自己通过测量需要的宽(如果用户在布局里对ZSFlowLayout的宽设置了wrap_content 就会用到这个) var selfNeedWidth = 0 //我们自己通过测量需要的高(如果用户在布局里对ZSFlowLayout的高设置了wrap_content 就会用到这个) var selfNeedHeight = paddingBottom + paddingTop var curLineHeight = 0 //第一步 先测量子view 核心系统方法是 View measure方法 //(1)因为子view有很多,所以循环遍历执行 for (i in 0 until childCount) { val childView = getChildAt(i) if (childView.visibility == GoNE) { continue } //测量view之前 先把测量需要的参数准备好 通过ViewGroup getChildMeasureSpec获取子view的MeasureSpec信息 val childWidthMeasureSpec = getChildMeasureSpec( widthMeasureSpec, paddingLeft + paddingRight, childView.layoutParams.width ) val childHeightMeasureSpec = getChildMeasureSpec( heightMeasureSpec, paddingTop + paddingBottom, childView.layoutParams.height ) //调用子view的measure方法来对子view进行测量 childView.measure(childWidthMeasureSpec, childHeightMeasureSpec) //测量之后就能拿到子view的宽高了,保存起来用于判断是否要换行 以及需要的总高度 val measuredHeight = childView.measuredHeight val measuredWidth = childView.measuredWidth //按行保存view 保存之前判断是否需要换行,如果需要就保存在下一行的list里面 if (curLineHasUsedWidth + measuredWidth > selfWidth) { //要换行了 先记录换行之前的数据 lineHeights.add(curLineHeight) selfNeedHeight += curLineHeight + verticalSpace allViews.add(everyLineViews) //再处理当前要换行的view相关数据 curLineHeight = measuredHeight everyLineViews = mutableListOf() curLineHasUsedWidth = paddingLeft + paddingRight + measuredWidth + horizontalSpace } else { //每一行的高度是这一行view中最高的那个 curLineHeight = curLineHeight.coerceAtLeast(measuredHeight) curLineHasUsedWidth += measuredWidth + horizontalSpace } everyLineViews.add(childView) selfNeedWidth = selfNeedWidth.coerceAtLeast(curLineHasUsedWidth) //处理最后一行 if (i == childCount - 1) { curLineHeight = curLineHeight.coerceAtLeast(measuredHeight) allViews.add(everyLineViews) selfNeedHeight += curLineHeight lineHeights.add(curLineHeight) } } //第二步 测量自己 //根据父类传入的尺寸规则 widthMeasureSpec、heightMeasureSpec 获取当前自身应该遵守的布局模式 //以widthMeasureSpec为例说明下 这个是父类传入的,那父类是如何按照什么规则生成的widthMeasureSpec呢? //父类会结合自身的情况,并且结合子view的情况(子类的宽是match_parent、wrap_content、还是写死的值)来生成 //生成的具体逻辑 请见:ViewGroup的getChildMeasureSpec方法 //(1)获取父类传过来的 我们自身应该遵守的尺寸模式 val widthMode = MeasureSpec.getMode(widthMeasureSpec) val heightMode = MeasureSpec.getMode(heightMeasureSpec) //(2)根据模式来判断最终的宽高 val widthResult = if (widthMode == MeasureSpec.EXACTLY) selfWidth else selfNeedWidth val heightResult = if (heightMode == MeasureSpec.EXACTLY) selfHeight else selfNeedHeight //第三步 设置自身的测量结果 setMeasuredDimension(widthResult, heightResult) } override fun onLayout(changed: Boolean, l: Int, t: Int, r: Int, b: Int) { //设置所有view的位置 var curT = paddingTop for (i in allViews.indices) { val mutableList = allViews[i] //记录每一行view的当前距离父布局左侧的位置 初始值就是父布局的paddingLeft var curL = paddingLeft if (i != 0) { curT += lineHeights[i - 1] + verticalSpace } for (j in mutableList.indices) { val view = mutableList[j] val right = curL + view.measuredWidth val bottom = curT + view.measuredHeight view.layout(curL, curT, right, bottom) //为下一个view做准备 curL += view.measuredWidth + horizontalSpace } } }}在布局文件中使用:
<?xml version="1.0" encoding="utf-8"?><ScrollView xmlns:android="Http://schemas.android.com/apk/res/android" android:layout_width="match_parent" android:layout_height="match_parent"> <LinearLayout android:layout_width="match_parent" android:layout_height="match_parent" android:orientation="vertical"> <TextView android:layout_marginTop="10dp" android:layout_width="wrap_content" android:layout_height="wrap_content" android:layout_marginLeft="@dimen/zs_flowlayout_title_marginL" android:text="三国名将" android:textColor="@android:color/black" android:textSize="18sp" /> <com.zs.test.customview.ZSFlowLayout android:id="@+id/activity_flow_flowlayout" android:layout_width="match_parent" android:layout_height="wrap_content" android:layout_margin="8dp" android:padding="7dp"> <TextView android:layout_width="wrap_content" android:layout_height="wrap_content" android:background="@drawable/shape_button_circular" android:text="吕布吕奉先" /> <TextView android:layout_width="wrap_content" android:layout_height="wrap_content" android:background="@drawable/shape_button_circular" android:text="赵云赵子龙" /> <TextView android:layout_width="wrap_content" android:layout_height="wrap_content" android:background="@drawable/shape_button_circular" android:paddingLeft="10dp" android:text="典韦" /> <TextView android:layout_width="wrap_content" android:layout_height="wrap_content" android:background="@drawable/shape_button_circular" android:text="关羽关云长" /> <TextView android:layout_width="wrap_content" android:layout_height="wrap_content" android:background="@drawable/shape_button_circular" android:text="马超马孟起" /> <TextView android:layout_width="wrap_content" android:layout_height="wrap_content" android:background="@drawable/shape_button_circular" android:text="张飞张翼德" /> <TextView android:layout_width="wrap_content" android:layout_height="wrap_content" android:background="@drawable/shape_button_circular" android:text="黄忠" /> <TextView android:layout_width="wrap_content" android:layout_height="wrap_content" android:background="@drawable/shape_button_circular" android:text="徐褚徐仲康" /> <TextView android:layout_width="wrap_content" android:layout_height="wrap_content" android:background="@drawable/shape_button_circular" android:text="孙策孙伯符" /> <TextView android:layout_width="wrap_content" android:layout_height="wrap_content" android:background="@drawable/shape_button_circular" android:text="太史慈" /> <TextView android:layout_width="wrap_content" android:layout_height="wrap_content" android:background="@drawable/shape_button_circular" android:text="夏侯惇" /> <TextView android:layout_width="wrap_content" android:layout_height="wrap_content" android:background="@drawable/shape_button_circular" android:text="夏侯渊" /> <TextView android:layout_width="wrap_content" android:layout_height="wrap_content" android:background="@drawable/shape_button_circular" android:text="张辽" /> <TextView android:layout_width="wrap_content" android:layout_height="wrap_content" android:background="@drawable/shape_button_circular" android:text="张郃" /> <TextView android:layout_width="wrap_content" android:layout_height="wrap_content" android:background="@drawable/shape_button_circular" android:text="徐晃徐功明" /> <TextView android:layout_width="wrap_content" android:layout_height="wrap_content" android:background="@drawable/shape_button_circular" android:text="庞德" /> <TextView android:layout_width="wrap_content" android:layout_height="wrap_content" android:background="@drawable/shape_button_circular" android:text="甘宁甘兴霸" /> <TextView android:layout_width="wrap_content" android:layout_height="wrap_content" android:background="@drawable/shape_button_circular" android:text="周泰" /> <TextView android:layout_width="wrap_content" android:layout_height="wrap_content" android:background="@drawable/shape_button_circular" android:text="魏延" /> <TextView android:layout_width="wrap_content" android:layout_height="wrap_content" android:background="@drawable/shape_button_circular" android:text="张绣" /> <TextView android:layout_width="wrap_content" android:layout_height="wrap_content" android:background="@drawable/shape_button_circular" android:text="文丑" /> <TextView android:layout_width="wrap_content" android:layout_height="wrap_content" android:background="@drawable/shape_button_circular" android:text="颜良" /> <TextView android:layout_width="wrap_content" android:layout_height="wrap_content" android:background="@drawable/shape_button_circular" android:text="邓艾" /> <TextView android:layout_width="wrap_content" android:layout_height="wrap_content" android:background="@drawable/shape_button_circular" android:text="姜维" /> </com.zs.test.customview.ZSFlowLayout> </LinearLayout> </ScrollView>也可以在代码中动态添加view(更接近实战,实战中数据多是后台请求而来)
class FlowActivity : AppCompatActivity() { @BindView(id = R.id.activity_flow_flowlayout) var flowLayout : ZSFlowLayout ? = null; override fun onCreate(savedInstanceState: Bundle?) { super.onCreate(savedInstanceState) setContentView(R.layout.activity_customview_flow) BindViewInject.inject(this) for (i in 1 until 50) { val tv:TextView = TextView(this) tv.text = "TextView $i" flowLayout!!.addView(tv) } }}其中BindViewInject是用反射+注解实现的一个小工具类
object BindViewInject { @JVMStatic fun inject(activity: Activity) { inject(activity, false) } fun inject(activity: Activity, isSetOnClickListener: Boolean) { //第一步 获取class对象 val aClass: Class<out Activity> = activity.javaClass //第二步 获取类本身定义的所有成员变量 val declaredFields = aClass.declaredFields //第三步 遍历找出有注解的属性 for (i in declaredFields.indices) { val field = declaredFields[i] //判断是否用BindView进行注解 if (field.isAnnotationPresent(BindView::class.java)) { //得到注解对象 val bindView = field.getAnnotation(BindView::class.java) //得到注解对象上的id值 这个就是view的id val id = bindView.id if (id <= 0) { Toast.makeText(activity, "请设置正确的id", Toast.LENGTH_LONG).show() return } //建立映射关系,找出view val view = activity.findViewById<View>(id) //修改权限 field.isAccessible = true //第四步 给属性赋值 try { field[activity] = view } catch (e: IllegalAccessException) { e.printStackTrace() } //第五步 设置点击监听 if (isSetOnClickListener) { //这里用反射实现 增加练习 //第一步 获取这个属性的值 val button = field.get(activity) //第二步 获取其class对象 val javaClass = button.javaClass //第三步 获取其 setOnClickListener 方法 val method = javaClass.getMethod("setOnClickListener", View.OnClickListener::class.java) //第四步 执行此方法 method.invoke(button, activity) } } } }}@Target(AnnotationTarget.FIELD)@Retention(RetentionPolicy.RUNTIME)annotation class BindView( //value是默认的,如果只有一个参数,并且名称是value,外面传递时可以直接写值,否则就要通过键值对来传值(例如:value = 1) // int value() default 0; val id: Int = 0)关于“Android中FlowLayout组件如何实现瀑布流效果”这篇文章就分享到这里了,希望以上内容可以对大家有一定的帮助,使各位可以学到更多知识,如果觉得文章不错,请把它分享出去让更多的人看到。
--结束END--
本文标题: Android中FlowLayout组件如何实现瀑布流效果
本文链接: https://www.lsjlt.com/news/308948.html(转载时请注明来源链接)
有问题或投稿请发送至: 邮箱/279061341@qq.com QQ/279061341
下载Word文档到电脑,方便收藏和打印~
2024-05-14
2024-05-14
2024-05-14
2024-05-14
2024-05-14
2024-05-14
2024-05-14
2024-05-14
2024-05-14
2024-05-14
回答
回答
回答
回答
回答
回答
回答
回答
回答
回答


官方手机版

微信公众号

商务合作


0