本文小编为大家详细介绍“Vue封装组件js实例分析”,内容详细,步骤清晰,细节处理妥当,希望这篇“vue封装组件js实例分析”文章能帮助大家解决疑惑,下面跟着小编的思路慢慢深入,一起来学习新知识吧。什么是组件化:组件化就是将一个页面拆分成一
本文小编为大家详细介绍“Vue封装组件js实例分析”,内容详细,步骤清晰,细节处理妥当,希望这篇“vue封装组件js实例分析”文章能帮助大家解决疑惑,下面跟着小编的思路慢慢深入,一起来学习新知识吧。
组件化就是将一个页面拆分成一个个小的功能模块,每个功能模块完成属于自己这部分独立的功能,使得整个页面的管理和维护变得非常容易。
组件化是Vue中的重要思想,当我们对vue的基本知识有了一定的基础就要开始封装组件了
它提供了一种抽象,让我们可以开发出一个个独立可复用的小组件来构造我们的应用。组件树。
组件化思想的应用
在项目中充分利用组件化的思想
尽可能的将也页面拆分成一个个小的可复用的组件
好处:代码更加方便组织和管理,扩展性也更强
下面我们用一个封装一个Element Ui 的输入框组件为例,贯彻全文
组件的使用分成三个步骤
组件的模板 template
注意:只能有一个根元素,否则警告报错
1 template 可以是字面量字符串,缺点是没有高亮,内置在 javascript 中,写起来麻烦
2 template 可以写在 script 标签中,虽然解决了高亮的问题,但是也麻烦
3 以上方式都不好,我们最终的解决方案是使用 Vue 的 .vue 单文件组件来写。(webpack)
但是要想使用这种方式必须结合一些构建工具
<template> <el-input > </el-input></template>注册组件 分为 局部注册 与 全局注册,下一章再讲
......使用代码.........import cInput from "组件地址/c-ipunt.vue";export default { components: {cInput},.......<template> <c-ipunt/></template><script>import cInput from "组件地址/c-ipunt.vue";export default { components: {cInput},.......</script>组件是独立的作用域,就像我们 node 中的 JavaScript 模块一样,独立的
组件其实就是一个特殊的 Vue 实例,可以有自己的 data、methods、computed、watch 等等选项
组件的 data 必须是函数
函数中返回一个对象作为组件的 data
<template> <el-input > </el-input></template><script>export default { name: 'c-input', model: { prop: 'value', event: 'input', }, props: { }, data() { return { } }, watch: { }, methods: { }, mounted() { },}</script><style scoped></style>父组件通过 props 向下传递数据给子组件
所以子组件要定义接收的参数
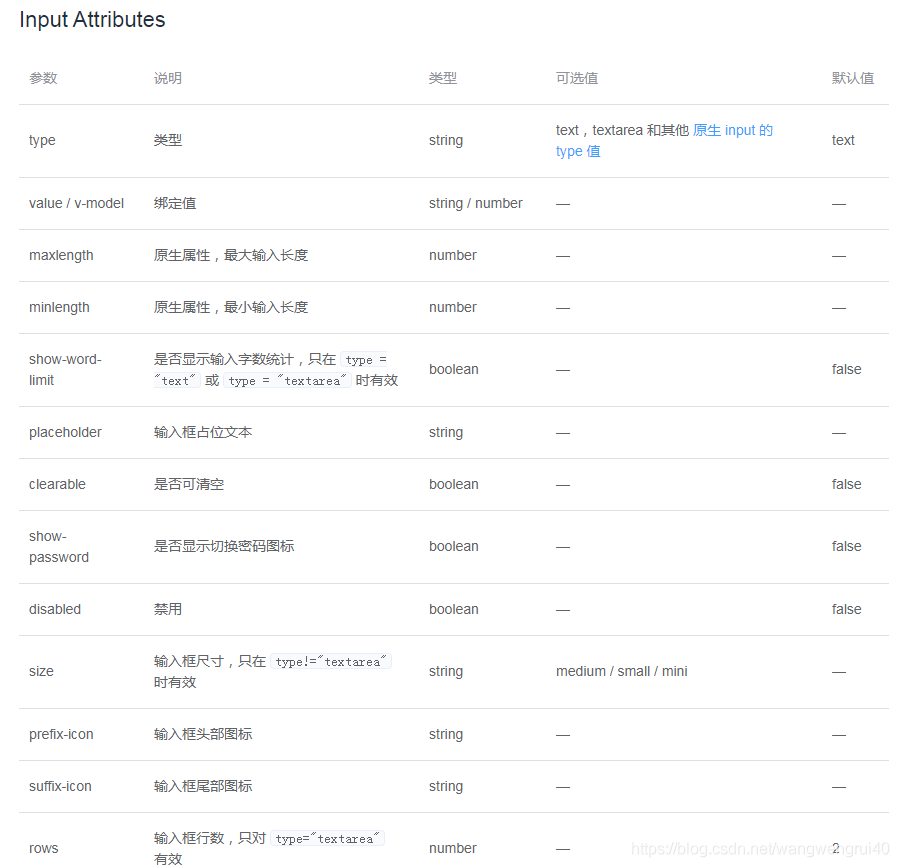
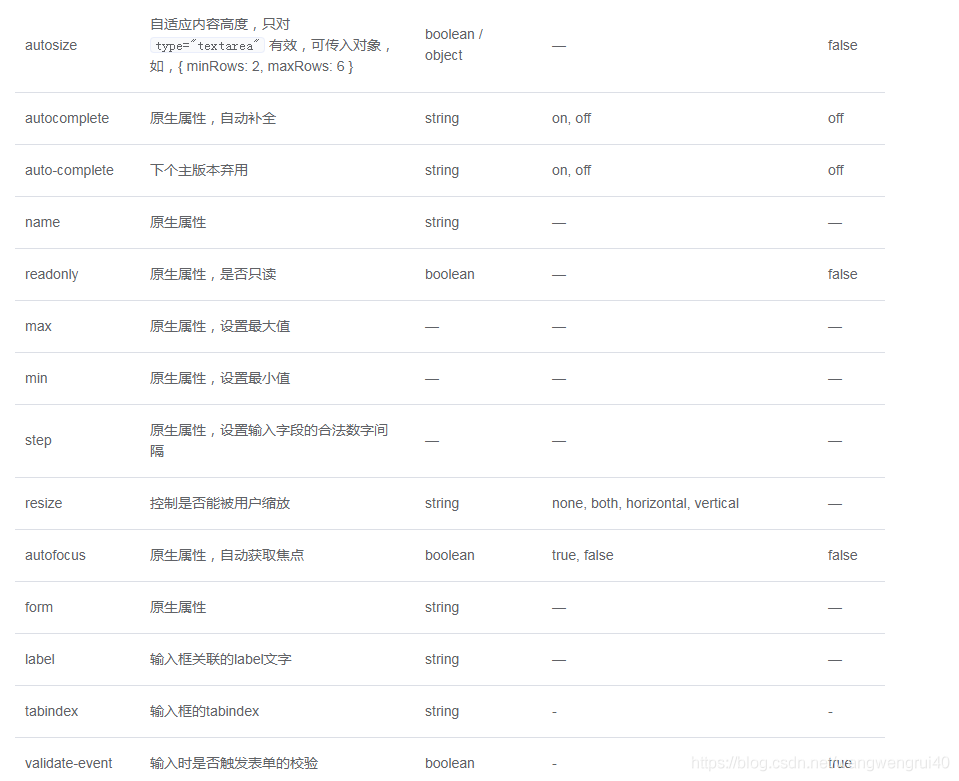
我们可以看到Element Ui 的输入框组件,有这些属性我们可以重新定义封装
<template> <el-input :disabled="disabled" ref="input" :placeholder="placeholder" :type="type" :auto-complete="autocomplete"> </el-input></template><script>export default { name: 'c-input', model: { prop: 'value', event: 'input', }, props: { labelwidth: { type: String, default: undefined, }, autosize: { default() { return { minRows: 2, maxRows: 4 }//如果不使用这个属性的默认值 }, }, inputCSS: { type: String, default: '', }, label: { type: String, default: '', }, value: { default: undefined, }, prop: { type: String, default: null, }, placeholder: { type: String, default: undefined, }, required: { type: Boolean, default: false, }, width: { type: String, }, type: { type: String, default: undefined, }, autocomplete: { type: String, default: 'on', }, disabled: { type: Boolean, default: false, }, span: { type: Number, }, }, data() { return { } }, watch: { }, methods: { }, mounted() { },}</script><style scoped></style>父组件使用
<template> <c-input label="用户名" :span="12" /></template><script>import cInput from "组件地址/c-ipunt.vue";export default { components: {cInput},.......</script>子组件通过 events 给父组件发送消息,实际上就是子组件把自己的数据发送到父组件。
在 element ui 的 el-input中是有@input.native="updateValue($event.target.value)" 获取现在输入值 @keyup.enter.native="handleEnter" 回车 @focus="focus" 得到焦点 等事件的

<template> <el-input :disabled="disabled" ref="input" :placeholder="placeholder" :type="type" :auto-complete="autocomplete" @input.native="updateValue($event.target.value)" @keyup.enter.native="handleEnter" @focus="focus"> </el-input></template><script>export default { name: 'c-input', model: { prop: 'value', event: 'input', }, props: { labelwidth: { type: String, default: undefined, }, autosize: { default() { return { minRows: 2, maxRows: 4 }//如果不使用这个属性的默认值 }, }, inputCss: { type: String, default: '', }, label: { type: String, default: '', }, value: { default: undefined, }, prop: { type: String, default: null, }, placeholder: { type: String, default: undefined, }, required: { type: Boolean, default: false, }, width: { type: String, }, type: { type: String, default: undefined, }, autocomplete: { type: String, default: 'on', }, disabled: { type: Boolean, default: false, }, span: { type: Number, }, }, data() { return { } }, watch: { }, methods: { updateValue(val) { this.$emit('input', val) }, handleEnter() { this.$emit('keyup-enter') }, focus() { this.$emit('focus') }, }, mounted() { },}</script><style scoped></style>父组件使用
<template> <c-input label="用户名" :span="12" @keyup-enter="mykeyupEnter" @focus="myfocus"/></template><script>import cInput from "组件地址/c-ipunt.vue";export default { components: {cInput},....... methods: {mykeyupEnter(){console.log("我是父组件的输入框回车")},myfocus(){console.log("我是父组件的输入框得到焦点")}},......</script>我们知道Vue的核心特性之一是双向绑定,
v-model是一个指令用来实现双向绑定,限制在<input>、<select>、<textarea>、components中使用,修饰符.lazy(取代input监听change事件)、.number(输入字符串转为有效的数字)、.trim(输入首尾空格过滤)。那么我们封装的组件怎么进行双向绑定呢。
首先 props添加一个value,接收父组件的数据变化。
再添加一个value的监听,监听父组件的数据变化。
而子组件数据变化的时候会出发这个事件@input.native="",所以这个时间触发this.$emit('input',val),向父组件传递 子组件的数据变化
<template> <el-input :disabled="disabled" ref="input" :placeholder="placeholder" :type="type" :auto-complete="autocomplete" @input.native="updateValue($event.target.value)" @keyup.enter.native="handleEnter" @focus="focus" v-model="modelValue"> </el-input></template><script>export default { name: 'c-input', model: { prop: 'value', event: 'input', }, props: { labelwidth: { type: String, default: undefined, }, autosize: { default() { return { minRows: 2, maxRows: 4 }//如果不使用这个属性的默认值 }, }, inputCss: { type: String, default: '', }, label: { type: String, default: '', }, value: { default: undefined, }, prop: { type: String, default: null, }, placeholder: { type: String, default: undefined, }, required: { type: Boolean, default: false, }, width: { type: String, }, type: { type: String, default: undefined, }, autocomplete: { type: String, default: 'on', }, disabled: { type: Boolean, default: false, }, span: { type: Number, }, }, data() { return { modelValue: undefined, } }, watch: { value: { handler(newValue) { this.modelValue = newValue }, immediate: true, }, }, methods: { updateValue(val) { this.$emit('input', val) }, handleEnter() { this.$emit('keyup-enter') }, focus() { this.$emit('focus') }, }, mounted() { },}</script><style scoped></style>使用
<template> <c-input label="用户名" :span="12" @keyup-enter="mykeyupEnter" @focus="myfocus" v-model="myName"/></template><script>import cInput from "组件地址/c-ipunt.vue";export default { components: {cInput}, data() { return {myName: undefined,}},....... methods: {mykeyupEnter(){console.log("我是父组件的输入框回车")},myfocus(){console.log("我是父组件的输入框得到焦点")}},......</script>插槽(Slot)是Vue提出来的一个概念,正如名字一样,插槽用于决定将所携带的内容,插入到指定的某个位置,从而使模板分块,具有模块化的特质和更大的重用性。
插槽显不显示、怎样显示是由父组件来控制的,而插槽在哪里显示就由子组件来进行控制
默认插槽
父组件
<template> <div> 我是父组件 <slotOne1> <p >我是父组件插槽内容</p> </slotOne1> </div></template>在父组件引用的子组件中写入想要显示的内容(可以使用标签,也可以不用)
子组件(slotOne1)
<template> <div class="slotOne1"> <div>我是slotOne1组件</div> <slot></slot> </div></template>在子组件中写入slot,slot所在的位置就是父组件要显示的内容

子组件
<template> <div class="slottwo"> <div>slottwo</div> <slot name="header"></slot> <slot></slot> <slot name="footer"></slot> </div></template>在子组件中定义了三个slot标签,其中有两个分别添加了name属性header和footer
父组件
<template> <div> 我是父组件 <slot-two> <p>啦啦啦,啦啦啦,我是卖报的小行家</p> <template slot="header"> <p>我是name为header的slot</p> </template> <p slot="footer">我是name为footer的slot</p> </slot-two> </div></template>在父组件中使用template并写入对应的slot值来指定该内容在子组件中现实的位置(当然也不用必须写到template),没有对应值的其他内容会被放到子组件中没有添加name属性的slot中

子组件
<template> <div> 我是作用域插槽的子组件 <slot :data="user"></slot> </div></template><script>export default { name: 'slotthree', data () { return { user: [ {name: 'Jack', sex: 'boy'}, {name: 'Jone', sex: 'girl'}, {name: 'Tom', sex: 'boy'} ] } }}</script>在子组件的slot标签上绑定需要的值
父组件
<template> <div> 我是作用域插槽 <slot-three> <template slot-scope="user"> <div v-for="(item, index) in user.data" :key="index"> {{item}} </div> </template> </slot-three> </div></template>在父组件上使用slot-scope属性,user.data就是子组件传过来的值

读到这里,这篇“vue封装组件js实例分析”文章已经介绍完毕,想要掌握这篇文章的知识点还需要大家自己动手实践使用过才能领会,如果想了解更多相关内容的文章,欢迎关注编程网精选频道。
--结束END--
本文标题: vue封装组件js实例分析
本文链接: https://www.lsjlt.com/news/328476.html(转载时请注明来源链接)
有问题或投稿请发送至: 邮箱/279061341@qq.com QQ/279061341
下载Word文档到电脑,方便收藏和打印~
2024-05-15
2024-05-15
2024-05-15
2024-05-15
2024-05-15
2024-05-14
2024-05-14
2024-05-14
2024-05-14
2024-05-14
回答
回答
回答
回答
回答
回答
回答
回答
回答
回答


官方手机版

微信公众号

商务合作


0