这篇“node.js如何实现学生档案管理”文章的知识点大部分人都不太理解,所以小编给大家总结了以下内容,内容详细,步骤清晰,具有一定的借鉴价值,希望大家阅读完这篇文章能有所收获,下面我们一起来看看这篇“node.js如何实现学生档案管理”文
这篇“node.js如何实现学生档案管理”文章的知识点大部分人都不太理解,所以小编给大家总结了以下内容,内容详细,步骤清晰,具有一定的借鉴价值,希望大家阅读完这篇文章能有所收获,下面我们一起来看看这篇“node.js如何实现学生档案管理”文章吧。
目标:模板引擎应用,强化node.js项目制作流程
建立项目文件夹并生成项目描述文件
连接数据库并根据需求设计学员信息表
创建路由并实现页面模板呈递
实现静态资源访问
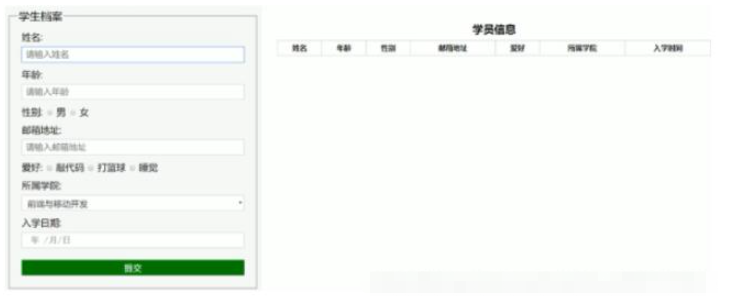
实现学生信息添加功能
1).在模板的表单中指定请求地址与请求方式
2).为每一个表单项添加name属性
3).添加实现学生信息功能路由
4).接收客户端传递过来的学生信息
5).将学生信息添加到数据库中
6).将页面重定向到学生信息列表页面
实现学生信息展示功能
1).从数据库中将所有的学生信息查询出来
2).通过模板引擎将学生信忠和html模板进行拼接
3).将拼接好的HTML模板响应给客户端
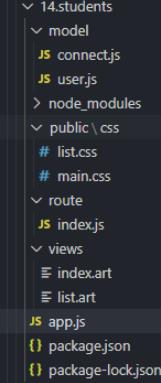
connect.js
const monGoose = require('mongoose');// 连接数据库mongoose.connect('mongodb://localhost/playground', { useNewUrlParser: true}).then(() => console.log('连接数据库成功')).catch(() => console.log('连接数据库失败'))user.js
const mongoose = require('mongoose');// 创建学生集合规则const studentsSchema = new mongoose.Schema({ name: { type: String, required: true, minlength: 2, maxlength: 10 }, age: { type: Number, min: 10, max: 25 }, sex: { type: String }, email: String, hobbies: [String], collage: String, enterDate: { type: Date, default: Date.now }});// 创建学生学习集合const Student = mongoose.model('Student',studentsSchema);// 将学生学习集合进行导出module.exports = Student;list.CSS
body { padding: 0; margin: 0;}table { border-collapse: collapse;}table, td, th { text-align: center; line-height: 30px; border: 1px solid #CCC;}caption { font-weight: bold; font-size: 24px; margin-bottom: 10px;}table { width: 960px; margin: 50px auto;}a { text-decoration: none; color: #333;}a:hover { text-decoration: underline; color: #000;}main.css
body { margin: 0; padding: 0 0 40px; background-color: #F7F7F7; font-family: '微软雅黑';}fORM { max-width: 640px; width: 100%; margin: 24px auto; font-size: 28px;}label { display: block; margin: 10px 10px 15px; font-size: 24px;}.normal { display: block; width: 100%; height: 40px; font-size: 22px; margin-top: 10px; padding: 6px 10px; color: #333; border: 1px solid #CCC; box-sizing: border-box;}.btn { margin-top: 30px;}.btn input { color: #FFF; background-color: green; border: 0 none; outline: none; cursor: pointer;}input[type="file"] { width: 120px; position: absolute; right: 0; z-index: 9;}.import { height: 40px; position: relative;}index.js
// 引入router模块const getRouter = require('router');// 获取路由对象const router = getRouter();// 引入模板引擎const template = require('art-template');// 学生学习集合const Student = require('../model/user');// 引入querystrinGConst querystring = require('querystring');// 呈递学生档案信息页面router.get('/add',(req, res) => { let html = template('index.art', {}) res.end(html);});// 呈递学生档案信息列表页面router.get('/list', async(req, res) => { // 查询学生信息 let students = await Student.find(); console.log(students); let html = template('list.art', { students: students }) res.end(html);});// 实现学生信息添加路由功能router.post('/add', (req, res) => { // 接受post请求参数 let formData = ''; req.on('data', param => { formData += param; }); req.on('end', async() => { await Student.create(querystring.parse(formData)); res.writeHead(301, { Location: '/list' }) res.end(); })})module.exports = router;index.art
<!DOCTYPE html><html lang="en"><head> <meta charset="UTF-8"> <meta name="viewport" content="width=device-width, initial-scale=1, user-Scalable=no"> <title>学生档案</title> <link rel="stylesheet" href="./css/main.css" ></head><body> <form action="/add" method="post"> <fieldset> <legend>学生档案</legend> <label> 姓名: <input class="normal" type="text" autofocus placeholder="请输入姓名" name="name"> </label> <label> 年龄: <input class="normal" type="text" placeholder="请输入年龄" name="age"> </label> <label> 性别: <input type="radio" value="0" name="sex"> 男 <input type="radio" value="1" name="sex"> 女 </label> <label> 邮箱地址: <input class="normal" type="text" placeholder="请输入邮箱地址" name="email"> </label> <label> 爱好: <input type="checkbox" value="敲代码" name="hobbies"> 敲代码 <input type="checkbox" value="打篮球" name="hobbies"> 打篮球 <input type="checkbox" value="睡觉" name="hobbies"> 睡觉 </label> <label> 所属学院: <select class="normal" name="collage"> <option value="前端与移动开发">前端与移动开发</option> <option value="PHP">php</option> <option value="JAVA">JAVA</option> <option value="Android">Android</option> <option value="iOS">IOS</option> <option value="UI设计">UI设计</option> <option value="c++">C++</option> </select> </label> <label> 入学日期: <input type="date" class="normal" name="enterDate"> </label> <label class="btn"> <input type="submit" value="提交" class="normal"> </label> </fieldset> </form></body></html>list.art
<!DOCTYPE html><html lang="en"><head> <meta charset="UTF-8"> <title>学员信息</title> <link rel="stylesheet" href="./css/list.css" ></head><body> <table> <caption>学员信息</caption> <tr> <th>姓名</th> <th>年龄</th> <th>性别</th> <th>邮箱地址</th> <th>爱好</th> <th>所属学院</th> <th>入学时间</th> </tr> {{each students}} <tr> <th>{{$value.name}}</th> <th>{{$value.age}}</th> <th>{{$value.sex == '0' ? '男' : '女'}}</th> <th>{{$value.email}}</th> <th> {{each $value.hobbies}} <span>{{$value}}</span> {{/each}} </th> <th>{{$value.collage}}</th> <th>{{dateformat($value.enterDate, 'yyyy-mm-dd')}}</th> </tr> {{/each}} </table></body></html>app.js
// 引入http模块const http = require('http');// 引入模板引擎const template = require('art-template');// 引入path模块const path = require('path');// 引入静态资源访问模块const serveStatic = require('serve-static');// 引入处理日期的第三方模块const dateformat = require('dateformat');// 引入routerconst router = require('./route/index')// 实现静态资源访问服务const serve = serveStatic(path.join(__dirname, 'public'));// 配置模板的根目录template.defaults.root = path.join(__dirname, 'views');// 处理日期格式的方法template.defaults.imports.dateformat = dateformat;// 数据库连接require('./model/connect');// 创建网站服务器const app = http.createServer();// 当客户端访问服务器的时候app.on('request', (req, res) => { // 启用路由功能 router(req, res, () => {}) // 启用静态资源访问服务功能 serve(req, res, () => {})});app.listen(3000,() => { console.log('服务器创建成功');});package.JSON(需要提前下载第三方模块)
{ "name": "14.students", "version": "1.0.0", "description": "", "main": "app.js", "scripts": { "test": "echo \"Error: no test specified\" && exit 1" }, "keyWords": [], "author": "", "license": "ISC", "dependencies": { "art-template": "^4.13.2", "dateformat": "^3.0.3", "mongoose": "^5.9.18", "router": "^1.3.5", "serve-static": "^1.14.1" }}// art-template、dateformat、mongoose、router、serve-static以上就是关于“node.js如何实现学生档案管理”这篇文章的内容,相信大家都有了一定的了解,希望小编分享的内容对大家有帮助,若想了解更多相关的知识内容,请关注编程网精选频道。
--结束END--
本文标题: node.js如何实现学生档案管理
本文链接: https://www.lsjlt.com/news/330466.html(转载时请注明来源链接)
有问题或投稿请发送至: 邮箱/279061341@qq.com QQ/279061341
下载Word文档到电脑,方便收藏和打印~
2024-05-15
2024-05-15
2024-05-15
2024-05-14
2024-05-14
2024-05-14
2024-05-14
2024-05-14
2024-05-14
2024-05-14
回答
回答
回答
回答
回答
回答
回答
回答
回答
回答


官方手机版

微信公众号

商务合作


0