Python 官方文档:入门教程 => 点击学习
这篇文章主要介绍“python first-order-model怎么实现让照片动起来”的相关知识,小编通过实际案例向大家展示操作过程,操作方法简单快捷,实用性强,希望这篇“Python first-order-mode
这篇文章主要介绍“python first-order-model怎么实现让照片动起来”的相关知识,小编通过实际案例向大家展示操作过程,操作方法简单快捷,实用性强,希望这篇“Python first-order-model怎么实现让照片动起来”文章能帮助大家解决问题。
我们先看一下README关于项目的基本信息,可以看出除了表情驱动照片,还可以姿态迁移。

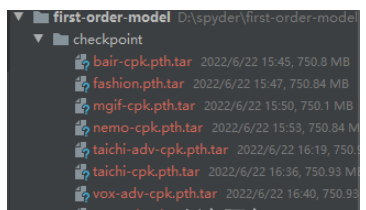
模型文件提供了线上的下载地址。
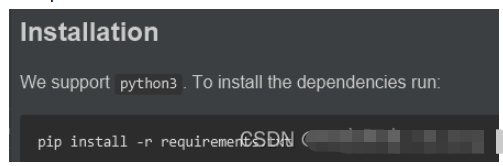
将requirements.txt中的依赖安装一下。
在测试README中的命令的时候,如果出现一下报错。
Traceback (most recent call last):
File "demo.py", line 17, in <module>
from animate import nORMalize_kp
File "D:\spyder\first-order-model\animate.py", line 7, in <module>
from frames_dataset import PairedDataset
File "D:\spyder\first-order-model\frames_dataset.py", line 10, in <module>
from augmentation import AllAugmentationTransform
File "D:\spyder\first-order-model\augmentation.py", line 13, in <module>
import torchvision
File "C:\Users\huyi\.conda\envs\fom\lib\site-packages\torchvision\__init__.py", line 2, in <module>
from torchvision import datasets
File "C:\Users\huyi\.conda\envs\fom\lib\site-packages\torchvision\datasets\__init__.py", line 9, in <module>
from .fakedata import FakeData
File "C:\Users\huyi\.conda\envs\fom\lib\site-packages\torchvision\datasets\fakedata.py", line 3, in <module>
from .. import transforms
File "C:\Users\huyi\.conda\envs\fom\lib\site-packages\torchvision\transforms\__init__.py", line 1, in <module>
from .transforms import *
File "C:\Users\huyi\.conda\envs\fom\lib\site-packages\torchvision\transforms\transforms.py", line 16, in <module>
from . import functional as F
File "C:\Users\huyi\.conda\envs\fom\lib\site-packages\torchvision\transforms\functional.py", line 5, in <module>
from PIL import Image, ImageOps, ImageEnhance, PILLOW_VERSION
ImportError: cannot import name 'PILLOW_VERSION' from 'PIL' (C:\Users\huyi\.conda\envs\fom\lib\site-packages\PIL\__init__.py)
这个问题主要是我使用的pillow版本过高的原因,如果不想找对应的低版本,可以按照我的方式解决。
修改functional.py代码,将PILLOW_VERSION调整为__version__。

将imageio升级。
pip install --upgrade imageio -i https://pypi.douban.com/simple
安装imageio_FFmpeg模块。
pip install imageio-ffmpeg -i Https://pypi.douban.com/simple
官方给出的使用方法我就不重复测试,大家可以按照下面的命令去测试一下。

这里我推荐一个可视化的库gradio,下面我将demo.py的代码改造了一下。
新的工具文件代码如下:
#!/user/bin/env python# coding=utf-8"""@project : first-order-model@author : 剑客阿良_ALiang@file : hy_gradio.py@ide : PyCharm@time : 2022-06-23 14:35:28"""import uuidfrom typing import Optional import gradio as grimport matplotlib matplotlib.use('Agg')import os, sysimport yamlfrom argparse import ArgumentParserfrom tqdm import tqdm import imageioimport numpy as npfrom skimage.transform import resizefrom skimage import img_as_ubyteimport torchfrom sync_batchnorm import DataParallelWithCallback from modules.generator import OcclusionAwareGeneratorfrom modules.keypoint_detector import KPDetectorfrom animate import normalize_kpfrom scipy.spatial import ConvexHull if sys.version_info[0] < 3: raise Exception("You must use Python 3 or higher. Recommended version is Python 3.7") def load_checkpoints(config_path, checkpoint_path, cpu=False): with open(config_path) as f: config = yaml.load(f) generator = OcclusionAwareGenerator(**config['model_params']['generator_params'], **config['model_params']['common_params']) if not cpu: generator.cuda() kp_detector = KPDetector(**config['model_params']['kp_detector_params'], **config['model_params']['common_params']) if not cpu: kp_detector.cuda() if cpu: checkpoint = torch.load(checkpoint_path, map_location=torch.device('cpu')) else: checkpoint = torch.load(checkpoint_path) generator.load_state_dict(checkpoint['generator']) kp_detector.load_state_dict(checkpoint['kp_detector']) if not cpu: generator = DataParallelWithCallback(generator) kp_detector = DataParallelWithCallback(kp_detector) generator.eval() kp_detector.eval() return generator, kp_detector def make_animation(source_image, driving_video, generator, kp_detector, relative=True, adapt_movement_scale=True, cpu=False): with torch.no_grad(): predictions = [] source = torch.tensor(source_image[np.newaxis].astype(np.float32)).permute(0, 3, 1, 2) if not cpu: source = source.cuda() driving = torch.tensor(np.array(driving_video)[np.newaxis].astype(np.float32)).permute(0, 4, 1, 2, 3) kp_source = kp_detector(source) kp_driving_initial = kp_detector(driving[:, :, 0]) for frame_idx in tqdm(range(driving.shape[2])): driving_frame = driving[:, :, frame_idx] if not cpu: driving_frame = driving_frame.cuda() kp_driving = kp_detector(driving_frame) kp_norm = normalize_kp(kp_source=kp_source, kp_driving=kp_driving, kp_driving_initial=kp_driving_initial, use_relative_movement=relative, use_relative_jacobian=relative, adapt_movement_scale=adapt_movement_scale) out = generator(source, kp_source=kp_source, kp_driving=kp_norm) predictions.append(np.transpose(out['prediction'].data.cpu().numpy(), [0, 2, 3, 1])[0]) return predictions def find_best_frame(source, driving, cpu=False): import face_alignment def normalize_kp(kp): kp = kp - kp.mean(axis=0, keepdims=True) area = ConvexHull(kp[:, :2]).volume area = np.sqrt(area) kp[:, :2] = kp[:, :2] / area return kp fa = face_alignment.FaceAlignment(face_alignment.LandmarksType._2D, flip_input=True, device='cpu' if cpu else 'cuda') kp_source = fa.get_landmarks(255 * source)[0] kp_source = normalize_kp(kp_source) norm = float('inf') frame_num = 0 for i, image in tqdm(enumerate(driving)): kp_driving = fa.get_landmarks(255 * image)[0] kp_driving = normalize_kp(kp_driving) new_norm = (np.abs(kp_source - kp_driving) ** 2).sum() if new_norm < norm: norm = new_norm frame_num = i return frame_num def h_interface(input_image: str): parser = ArgumentParser() opt = parser.parse_args() opt.config = "./config/vox-256.yaml" opt.checkpoint = "./checkpoint/vox-cpk.pth.tar" opt.source_image = input_image opt.driving_video = "./data/input/ts.mp4" opt.result_video = "./data/result/{}.mp4".format(uuid.uuid1().hex) opt.relative = True opt.adapt_scale = True opt.cpu = True opt.find_best_frame = False opt.best_frame = False # source_image = imageio.imread(opt.source_image) source_image = opt.source_image reader = imageio.get_reader(opt.driving_video) fps = reader.get_meta_data()['fps'] driving_video = [] try: for im in reader: driving_video.append(im) except RuntimeError: pass reader.close() source_image = resize(source_image, (256, 256))[..., :3] driving_video = [resize(frame, (256, 256))[..., :3] for frame in driving_video] generator, kp_detector = load_checkpoints(config_path=opt.config, checkpoint_path=opt.checkpoint, cpu=opt.cpu) if opt.find_best_frame or opt.best_frame is not None: i = opt.best_frame if opt.best_frame is not None else find_best_frame(source_image, driving_video, cpu=opt.cpu) print("Best frame: " + str(i)) driving_forward = driving_video[i:] driving_backward = driving_video[:(i + 1)][::-1] predictions_forward = make_animation(source_image, driving_forward, generator, kp_detector, relative=opt.relative, adapt_movement_scale=opt.adapt_scale, cpu=opt.cpu) predictions_backward = make_animation(source_image, driving_backward, generator, kp_detector, relative=opt.relative, adapt_movement_scale=opt.adapt_scale, cpu=opt.cpu) predictions = predictions_backward[::-1] + predictions_forward[1:] else: predictions = make_animation(source_image, driving_video, generator, kp_detector, relative=opt.relative, adapt_movement_scale=opt.adapt_scale, cpu=opt.cpu) imageio.mimsave(opt.result_video, [img_as_ubyte(frame) for frame in predictions], fps=fps) return opt.result_video if __name__ == "__main__": demo = gr.Interface(h_interface, inputs=[gr.Image(shape=(500, 500))], outputs=[gr.Video()]) demo.launch() # h_interface("C:\\Users\\huyi\\Desktop\\xx3.jpg")代码说明
将原demo.py中的main函数内容,重新编辑为h_interface方法,输入是想要驱动的图片。
其中driving_video参数使用了我自己录制的一段表情视频ts.mp4,我建议在使用的时候可以自己用手机录制一段替换。
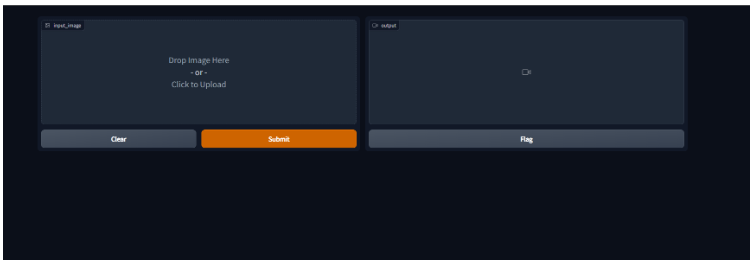
使用gradio来生成方法的页面,下面会展示给大家看。
使用uuid为结果视频命名。
执行结果如下
Running on local URL: http://127.0.0.1:7860/
To create a public link, set `share=True` in `launch()`.
打开本地的地址:http://localhost:7860/
可以看到我们实现的交互界面如下:
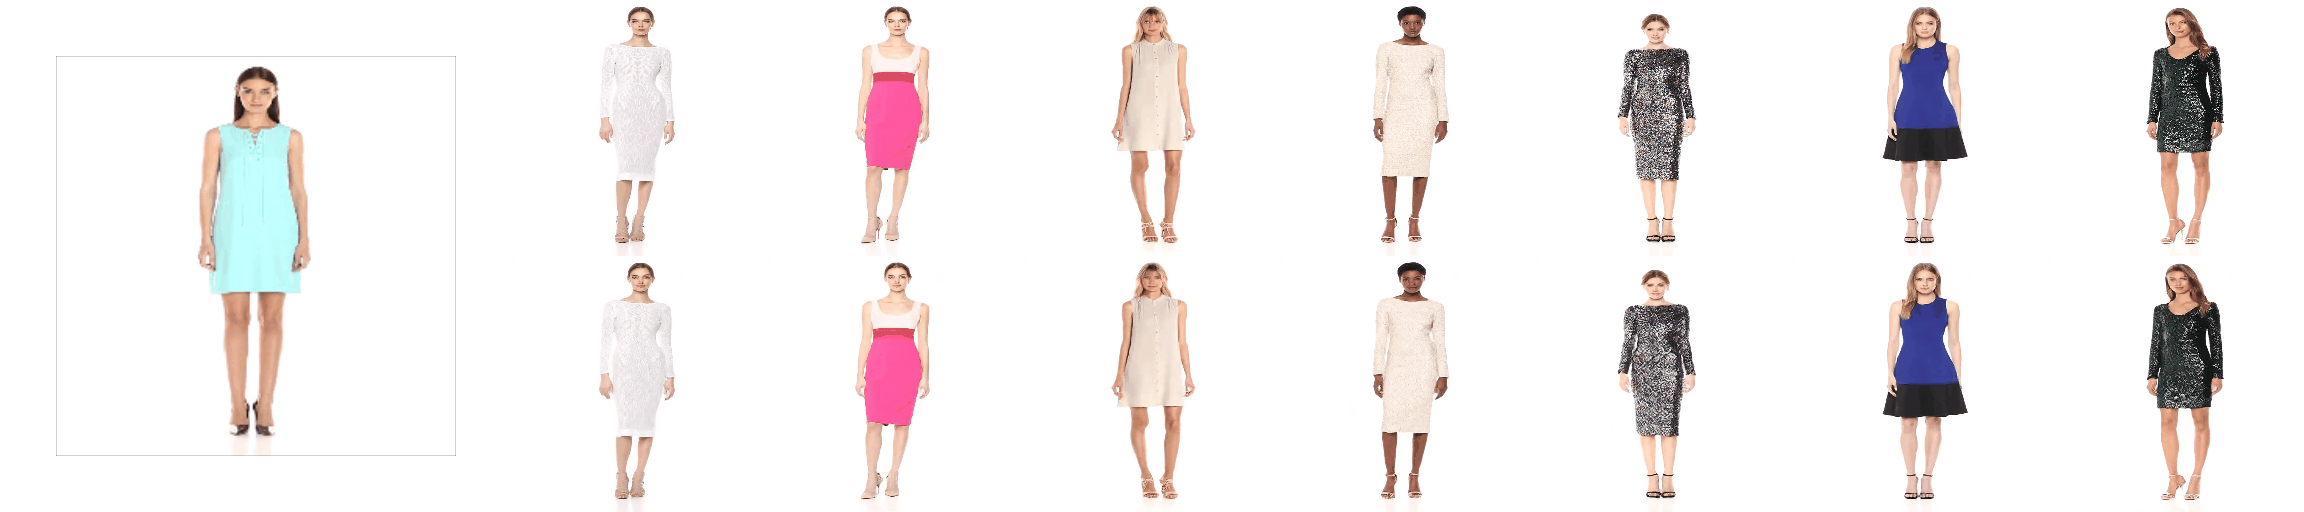
我们上传一下我准备的样例图片,提交制作。

看一下执行的日志,如下图。

看一下制作结果。

由于上传不了视频,我将视频转成了gif。

关于“Python first-order-model怎么实现让照片动起来”的内容就介绍到这里了,感谢大家的阅读。如果想了解更多行业相关的知识,可以关注编程网Python频道,小编每天都会为大家更新不同的知识点。
--结束END--
本文标题: Python first-order-model怎么实现让照片动起来
本文链接: https://www.lsjlt.com/news/341934.html(转载时请注明来源链接)
有问题或投稿请发送至: 邮箱/279061341@qq.com QQ/279061341
下载Word文档到电脑,方便收藏和打印~
2024-03-01
2024-03-01
2024-03-01
2024-02-29
2024-02-29
2024-02-29
2024-02-29
2024-02-29
2024-02-29
2024-02-29
回答
回答
回答
回答
回答
回答
回答
回答
回答
回答


官方手机版

微信公众号

商务合作


0