Python 官方文档:入门教程 => 点击学习
这篇文章主要介绍“如何使用python制作自已的动态屏保”,在日常操作中,相信很多人在如何使用Python制作自已的动态屏保问题上存在疑惑,小编查阅了各式资料,整理出简单好用的操作方法,希望对大家解答”如何使用Python制作自已的动态屏保
这篇文章主要介绍“如何使用python制作自已的动态屏保”,在日常操作中,相信很多人在如何使用Python制作自已的动态屏保问题上存在疑惑,小编查阅了各式资料,整理出简单好用的操作方法,希望对大家解答”如何使用Python制作自已的动态屏保”的疑惑有所帮助!接下来,请跟着小编一起来学习吧!
我的环境
win10
python3.X
1.编写自己的屏保程序
注意:屏保程序打开就是全屏,可自动循环播放
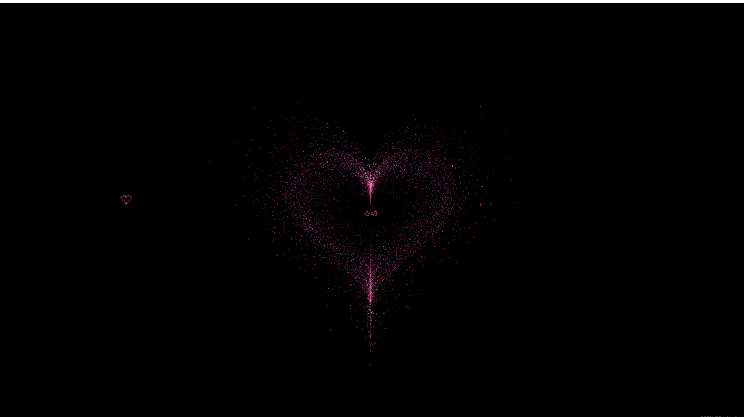
我的样子如图
代码准备
gitee下载
import os# 必须在加载 加之前os.environ['SDL_VIDEO_WINDOW_POS'] = "%d, %d" % (0, 30)import randomimport pygamefrom pygame.locals import *from math import pi, sin, cospygame.init()# 获取显示器大小screen_width, screen_height = pygame.display.get_desktop_sizes()[0]ICON = "./icon.png"TITLE = "见到你时我的心"WIDTH = 800HEIGHT = 800main_loops = True# 心形中心点center_x = screen_width / 2center_y = screen_height / 2#screen = pygame.display.set_mode((screen_width, screen_height), pygame.FULLSCREEN)pygame.display.set_caption(TITLE)pygame.mouse.set_visible(False)try: pygame.display.set_icon(pygame.image.load(ICON))except: passbottomlefttip_h = "[f:全屏/窗口][s:闪烁][t:跳动][+/-:频率][esc:退出]: "bottomlefttip = bottomlefttip_hbottomrighttip_h = "[鼠标位置]: "bottomrighttip = bottomrighttip_hHOT_PINK = (255,105,180)class Particle(): def __init__(self, pos, size, f): # (left, top, width, height) self.pos = pos.copy() self.pos0 = pos.copy() self.size = size self.f = f def draw(self, center_x, center_y): """ Rect((left, top), (width, height)) -> Rect :return: """ pygame.draw.rect(screen, HOT_PINK, pygame.Rect((self.size * self.f * self.pos[0] + center_x, -self.size * self.f * self.pos[1] + center_y), (self.pos[2], self.pos[3])), 0) def update(self, t): # 全部一个呼吸系数 # df = 1 + (2 - 1.5 ) * sin(t * 3) / 8 # df = 1 + (heartbeatmplitude )*sin(t * 3) / 8 # 外内,内快,参数外小内大 df = 1 + (2 - 1.5 * self.f) * sin(t * 3) / 8 self.pos[0] = self.pos0[0] * df self.pos[1] = self.pos0[1] * dfclass MouseParticle(): def __init__(self, pos): # (left, top, width, height) self.pos = pos.copy() self.particles = [] self.xiaoshishudu = .8 self.xiaoshishuduxishu = 1.2 self.show = .5 no_p = 50 # dt 离散点数 dt = 2 * pi / no_p t = 0 while t <= 2 * pi: # 正向随机分面 l = mu - abs(random.gauss(mu, sigma) - mu) # 双向分布 # l=random.gauss(mu, sigma) # l=1,表示画一个线 # l=1 xleft = l * 16 * sin(t) ** 3 ytop = l * (13 * cos(t) - 5 * cos(2 * t) - 2 * cos(3 * t) - cos(4 * t)) t += dt self.particles.append(Particle([xleft, ytop, static_wh[0], static_wh[1]], 1, l)) def draw(self): """ Rect((left, top), (width, height)) -> Rect :return: """ if not self.show: return if self.xiaoshishudu < 0.000005: self.show = 0 for p in self.particles: p.draw(self.pos[0], self.pos[1]) self.update() def update(self): self.xiaoshishudu = self.xiaoshishudu ** self.xiaoshishuduxishu for p in self.particles: p.update(self.xiaoshishudu) def jiashudu(self): if self.xiaoshishuduxishu < 3: self.xiaoshishuduxishu += .1 def jianshudu(self): if self.xiaoshishuduxishu > 1.1: self.xiaoshishuduxishu -= .1mouseParticleList = []particles = []"""若随机变量X服从一个数学期望为μ、方差为σ^2的正态分布,记为N(μ,σ^2)期望值μ决定了其位置,其标准差σ决定了分布的幅度。当μ = 0,σ = 1时的正态分布是标准正态分布心形公式 x=16*sin(t)**3 y=13*cos(t)-5*cos(2*t)-2*cos(3*t)-cos(4*t)"""# 均值,心形的大小mu = 1.1# 是标准差,辐射范围sigma = .15# 静态心形点的大小static_wh = (1.5, 1.5)# 动态心形点大小,dynamic_wh = (1, 2)# 心跳幅度heartbeatmplitude = 1.2# 心形大小size = 15# 外部开关waiweikaiguan = True# 跳动开关tiaodongkaiguan = True# 窗口,全屏fullscreenkaiguan = False# 跳动频率jumpfreq=30no_p = 10000# dt 离散点数dt = 2 * pi / no_pt = 0## ++++++++++++++++++++++++++++++++++++++++++++++++++++++# 3万个点def init_dynamic_particles(): # dt 离散点数 global t # 初始化跳动心形点 while t <= 2 * pi: # 正向随机分面 l = mu - abs(random.gauss(mu, sigma) - mu) # 双向分布 # l=random.gauss(mu, sigma) # l=1,表示画一个线 # l=1 xleft = l * 16 * sin(t) ** 3 ytop = l * (13 * cos(t) - 5 * cos(2 * t) - 2 * cos(3 * t) - cos(4 * t)) t += dt particles.append(Particle([xleft, ytop, static_wh[0], static_wh[1]], size, l))# def draw():# screen.clear()# for i in range(len(x)):# screen.draw.filled_rect(Rect((x[i]*10+center_x, -y[i]*10+center_y), (4, 4)), 'pink')def show_ynamic_particles(): for p in particles: p.draw(center_x, center_y)def show_static_particles(): # 3万个点 # no_p = 20000 # dt 离散点数 t = 0 while waiweikaiguan and t < 2 * pi: f = random.gauss(mu, sigma * 2) x = 16 * sin(t) ** 3 y = 13 * cos(t) - 5 * cos(2 * t) - 2 * cos(3 * t) - cos(4 * t) # unifORM成下一个实数,它在 [x,y] 范围内 pygame.draw.rect(screen, HOT_PINK, Rect((17 * f * x + center_x, -17 * f * y + center_y), (random.uniform(.5, 3), random.uniform(.5, 3))), 0 ) # screen.draw.filled_rect( # Rect((17 * f * x + center_x, -17 * f * y + center_y), (random.uniform(.5, 3), random.uniform(.5, 3))), # 'hot pink') t += dt * 2def show_mouse_particles(): global mouseParticleList t = [] for p in mouseParticleList: if p.show: t.append(p) p.draw() else: break mouseParticleList = tdef add_mouse_particles(pos): global mouseParticleList mouseParticleList = [MouseParticle(pos)] + mouseParticleListdef draw_text(sc, str, position, pos:tuple , color, background="black", fontsize=24, name=None): text = pygame.font.SysFont(name, fontsize).render(str, True, color, background) textRect = text.get_rect() if position.startswith("c"): textRect.center = pos elif position.startswith("m"): pass elif position.startswith("bottomleft"): textRect.bottomleft=pos elif position.startswith("bottomright"): textRect.bottomright=pos elif position.startswith("topleft"): textRect.topleft=pos elif position.startswith("topright"): textRect.topright=pos else: try: raise AttributeError("position") # 假装这里有异常,一般针对难以复现的异常 except: print("""postion # bottomleft=(100, 100) # topleft=(100, 100) # topright=(100, 100) # bottomright=(100, 100) # # midtop=(100, 100) # midleft=(100, 100) # midbottom=(100, 100) # midright=(100, 100) # center=(100, 100)""") sc.blit(text, textRect) # bottomleft=(100, 100) # topleft=(100, 100) # topright=(100, 100) # bottomright=(100, 100) # # midtop=(100, 100) # midleft=(100, 100) # midbottom=(100, 100) # midright=(100, 100) # center=(100, 100) # centerx # centerydef draw(): # 清空全部内容 screen.fill("black") draw_text(screen, "心动", "center", (center_x, center_y), HOT_PINK, "black", 24, "SimSun") draw_text(screen, bottomlefttip, "bottomleft", (0, center_y * 2), HOT_PINK, "black", 12, "SimSun") draw_text(screen, bottomrighttip, "bottomright", (center_x * 2, center_y * 2), HOT_PINK, "black", 12, "SimSun") # 显示动态心形 show_ynamic_particles() """ 初始化外部心形情况 """ show_static_particles() # 显示鼠标 show_mouse_particles() """ screen.draw.text("ccccccccc\nbbbbbbbbb", center=(100, 100), color='hot pink', background="black", fontsize=24) screen.draw.text("1", bottomleft=(100, 100), color=(200, 200, 200), background="black") screen.draw.text("2", topleft=(100, 100), color=(200, 200, 200), background="black") screen.draw.text("3", topright=(100, 100), color=(200, 200, 200), background="black") screen.draw.text("4", bottomright=(100, 100), color=(200, 200, 200), background="black") screen.draw.text("5", midtop=(100, 100), color=(200, 200, 200), background="black") screen.draw.text("6", midleft=(100, 100), color=(200, 200, 200), background="black") screen.draw.text("7", midbottom=(100, 100), color=(200, 200, 200), background="black") screen.draw.text("8", midright=(100, 100), color=(200, 200, 200), background="black") """ #刷新一下画面,将画的东西显示到画面上 pygame.display.update()def update(dt): # dt 1/fps 两帧之间的时间间隔 单位是秒 global t t += dt if tiaodongkaiguan: for p in particles: p.update(t)# 加载背景音乐def musicloops(path): pygame.mixer.init() try: pygame.mixer.music.load(path) pygame.mixer.music.play(-1) except: passdef on_mouse_down(pos, button): # print(pos, button) global bottomrighttip bottomrighttip = bottomrighttip_h + str(pos) + str(button)def on_mouse_up(pos, button): passdef on_mouse_move(pos, rel, buttons): # print(pos, rel, buttons) global bottomrighttip bottomrighttip = bottomrighttip_h + str(pos) # 更新状态 add_mouse_particles([pos[0], pos[1]])def on_key_down(key): global screen global bottomlefttip, fullscreenkaiguan, waiweikaiguan, tiaodongkaiguan bottomlefttip = bottomlefttip_h + pygame.key.name(key) global center_x, center_y global jumpfreq if key == K_f: if fullscreenkaiguan: # screen = pygame.display.set_mode((WIDTH, HEIGHT), pygame.RESIZABLE) # 发现从pygame.FULLSCREEN,到pygame.RESIZABLE调用一次不起作用 pygame.display.set_mode((WIDTH, HEIGHT), pygame.RESIZABLE) center_x = WIDTH / 2 center_y = HEIGHT / 2 pass pygame.mouse.set_visible(True ) else: # pygame.display.set_mode((screen_width, screen_height), pygame.NOFRAME) # screen = pygame.display.set_mode((screen_width, screen_height), pygame.FULLSCREEN) pygame.display.set_mode((screen_width, screen_height), pygame.FULLSCREEN) center_x = screen_width / 2 center_y = screen_height / 2 pygame.mouse.set_visible(False) # , pygame.NOFRAME fullscreenkaiguan = not fullscreenkaiguan bottomlefttip += " 全屏"+str(fullscreenkaiguan) elif key == K_ESCAPE: global main_loops main_loops=False elif key == K_SPACE: pass elif key == K_s: waiweikaiguan = not waiweikaiguan bottomlefttip += " 闪烁"+str(waiweikaiguan) elif key == K_t: tiaodongkaiguan = not tiaodongkaiguan bottomlefttip += " 跳动"+str(tiaodongkaiguan) elif key == K_KP_PLUS or key == K_PLUS: if jumpfreq>5: jumpfreq-=5 bottomlefttip += " 频率=" + str(jumpfreq) elif key == K_KP_MINUS or key == K_MINUS: if jumpfreq<60: jumpfreq+=5 bottomlefttip += " 频率=" + str(jumpfreq) elif key == K_MENU: pass else: bottomlefttip += " 无动作 "# pgzrun.Go()def event(): global center_x, center_y for event in pygame.event.get(): # if event.type not in [KEYDOWN, MOUSEMOTION, MOUSEBUTTONDOWN, MOUSEBUTTONUP]: # print(event) if event.type == QUIT: global main_loops main_loops = False elif event.type == KEYDOWN: # 键盘被按下 unicode 、key 、mod on_key_down(event.key) # https://blog.csdn.net/qq_41556318/article/details/86304649 # Http://t.zoukankan.com/liquancai-p-13235734.html elif event.type == MOUSEMOTION: # MOUSEMOTION 鼠标移动 pos 、rel 、buttons # <Event(1024-MouseMotion {'pos': (289, 464), 'rel': (2, -5), 'buttons': (0, 0, 0), 'touch': False, 'window': None})> on_mouse_move(event.pos, event.rel, event.buttons) elif event.type == MOUSEBUTTONDOWN: # MOUSEBUTTONDOWN 鼠标被按下pos 、button # <Event(1025-MouseButtonDown {'pos': (289, 464), 'button': 1, 'touch': False, 'window': None})> on_mouse_down(event.pos, event.button) elif event.type == MOUSEBUTTONUP: # MOUSEBUTTONUP鼠标被放开pos 、button on_mouse_up(event.pos, event.button) elif event.type == VIDEORESIZE: center_x = event.w / 2 center_y = event.h / 2 elif event.type == WINDOWMAXIMIZED: # 窗口最大化 print(event) elif event.type == WINDOWMINIMIZED: # 窗口最大化 print(event) pygame.mixer.music.pause() elif event.type == WINDOWRESTORED: # 重新显示 pygame.mixer.music.unpause() elif event.type == windowsHOWN: print(event) elif event.type == ACTIVEEVENT: # print(pygame.mixer.music.get_busy()) # try: # if event.gain and not pygame.mixer.music.get_busy(): # #显示内容 # pygame.mixer.music.pause() # elif not event.gain and pygame.mixer.music.get_busy(): # pygame.mixer.music.pause() # except: # pass passif __name__ == '__main__': musicloops("bfa.mp3") # 初始化动态心形点,只执行一次 init_dynamic_particles() # Run the game loop. while main_loops: event() update(1/jumpfreq) draw() pygame.quit()# pyinstaller -F -c -w -i favicon.ico --clean xx-pygame.py# cxfreeze xg.py --target-dir x --base-name=win32gui编译
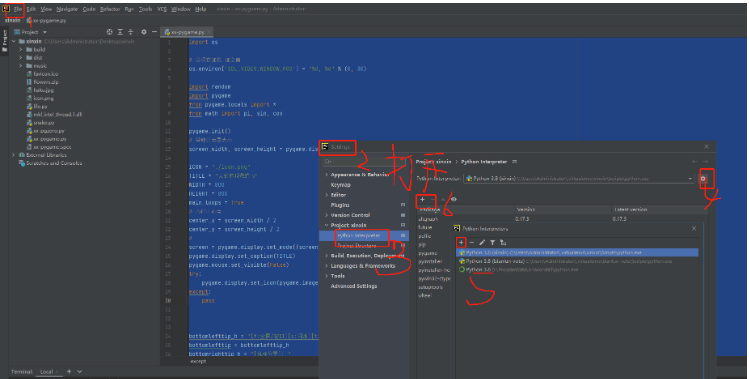
1)新建一个虚拟环境安装pygame,pyinstaller两个库
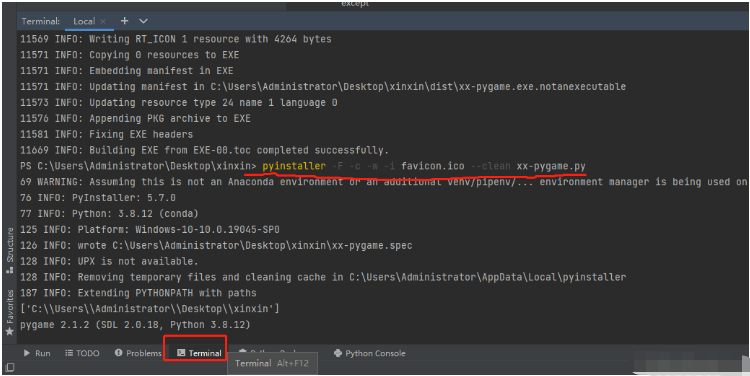
2)使用pyinstaller打包
说明一下,pyinstaller打包,会加载环境里的全部内容,所以需要单独新建环境,这样在dist生成的exe文件会比较小。
不用看.spec文件格式,用不到。
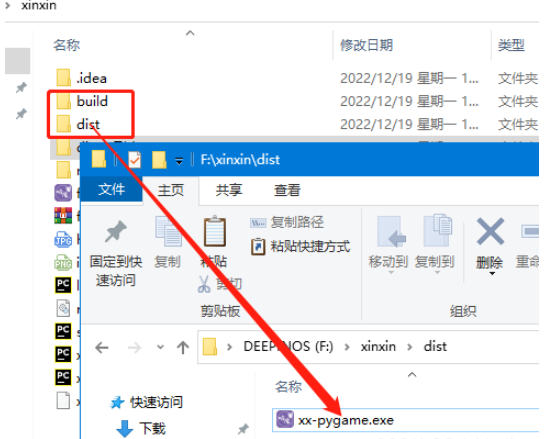
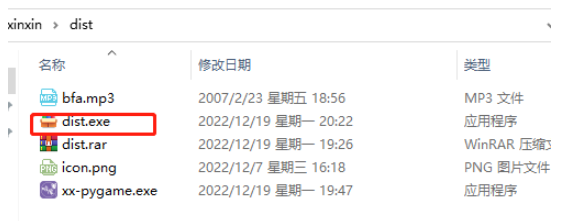
3)生成结果
说明:运行程序是没有窗口图标和声音的,需要dist中放一个bfa.mp3.这个是在465行。可以修改成自己的内容。
2.有了可运行程序,使用RAR压缩工具将资源和程序打包成独立可执行exe
1)将声音,图标,python打包生成的exe 打成一个rar
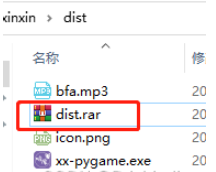
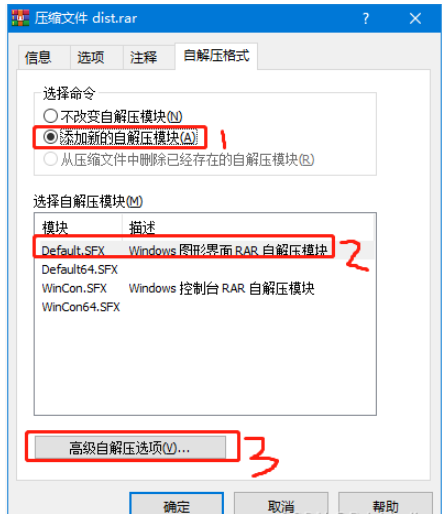
2)打开 dist.rar ,工具拦选择“自解压格式”

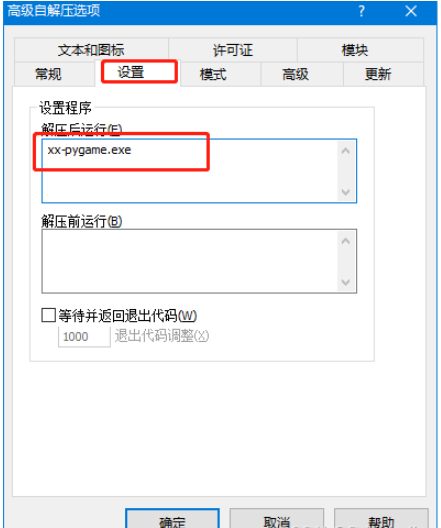
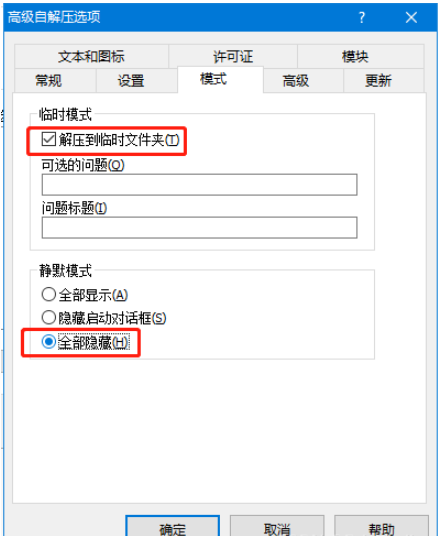

完成以上配置后选确定,两次。这时在目录下会生成dist.exe。这时可以运行查下一下效果。
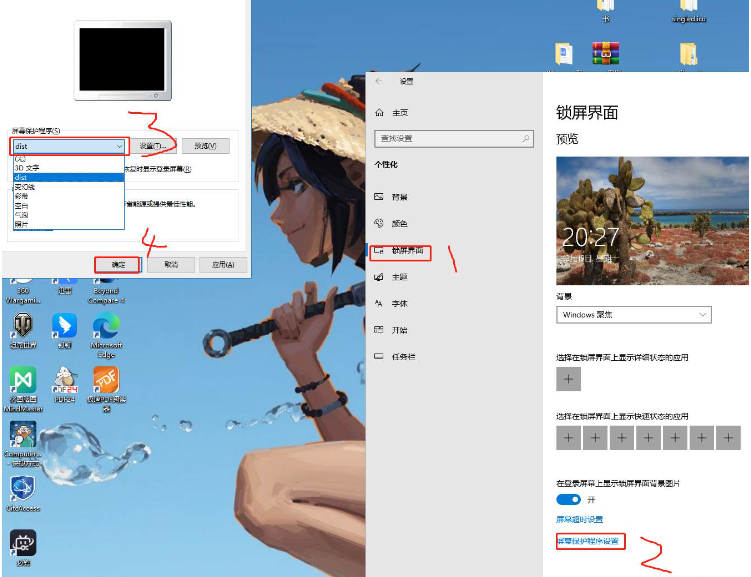
3.将dist.exe配置成系统屏幕保护
1)将dist.exe 修改成 dist.scr 复制到 C:\Windows目录下双击运行
2)回到电脑桌面,鼠标右击,选择个性化打开如下图:
到此,关于“如何使用Python制作自已的动态屏保”的学习就结束了,希望能够解决大家的疑惑。理论与实践的搭配能更好的帮助大家学习,快去试试吧!若想继续学习更多相关知识,请继续关注编程网网站,小编会继续努力为大家带来更多实用的文章!
--结束END--
本文标题: 如何使用Python制作自已的动态屏保
本文链接: https://www.lsjlt.com/news/347313.html(转载时请注明来源链接)
有问题或投稿请发送至: 邮箱/279061341@qq.com QQ/279061341
下载Word文档到电脑,方便收藏和打印~
2024-03-01
2024-03-01
2024-03-01
2024-02-29
2024-02-29
2024-02-29
2024-02-29
2024-02-29
2024-02-29
2024-02-29
回答
回答
回答
回答
回答
回答
回答
回答
回答
回答


官方手机版

微信公众号

商务合作


0