Python 官方文档:入门教程 => 点击学习
这篇“怎么用python+Pytest实现压力测试”文章的知识点大部分人都不太理解,所以小编给大家总结了以下内容,内容详细,步骤清晰,具有一定的借鉴价值,希望大家阅读完这篇文章能有所收获,下面我们一起来看看这篇“怎么用Python+Pyte
这篇“怎么用python+Pytest实现压力测试”文章的知识点大部分人都不太理解,所以小编给大家总结了以下内容,内容详细,步骤清晰,具有一定的借鉴价值,希望大家阅读完这篇文章能有所收获,下面我们一起来看看这篇“怎么用Python+Pytest实现压力测试”文章吧。
首先做的第一件事情就是设置测试参数。代码如下
# 定义测试用例 def test_perfORMance(): # 设置测试参数 url = 'Http://www.a.com/' num_threads = 20 num_requests = 200 timeout = 5这里面设置了网站的URL, 线程数, 每个线程的请求次数,以及超时时间。 可以看到, 这里面一共会做4000次请求。
这里做一个提示:注意缩进, 这段代码仍然在测试用例test_performance内。
# 初始化测试结果 response_times = [] errors = 0 successes = 0接下来, 定义一个内部函数。这个函数就是在某一线程内完成设定次数的请求。
# 定义测试函数 def test_func(): nonlocal errors, successes for _ in range(num_requests): try: start_time = time.time() requests.get(url, timeout=timeout) end_time = time.time() response_time = end_time - start_time response_times.append(response_time) successes += 1 except requests.exceptions.RequestException: errors += 1 # 创建测试线程 threads = [] for _ in range(num_threads): t = threading.Thread(target=test_func) threads.append(t) # 启动测试线程 for t in threads: t.start() # 等待测试线程结束 for t in threads: t.join() # 计算测试结果 total_requests = num_threads * num_requests throughput = successes / (sum(response_times) or 1) concurrency = num_threads error_rate = errors / (total_requests or 1) cpu_usage = psutil.cpu_percent() memory_usage = psutil.virtual_memory().percent # 将测试结果写入文件 with open('performance_test_result.txt', 'w') as f: f.write(f'总请求数:{total_requests}\n') f.write(f'总时间:{sum(response_times):.2f}s\n') f.write(f'吞吐量:{throughput:.2f} requests/s\n') f.write(f'并发数:{concurrency}\n') f.write(f'错误率:{error_rate:.2%}\n') f.write(f'CPU利用率:{cpu_usage:.2f}%\n') f.write(f'内存利用率:{memory_usage:.2f}%\n')在PyCharm里面直接执行这段代码, 得出的结果是:
总请求数:4000
总时间:1837.65s
吞吐量:2.17 requests/s
并发数:20
错误率:0.12%
CPU利用率:4.10%
内存利用率:88.60%
如果在PyCharm里面直接执行上面的代码, 虽然我们把结果写在文件中,但是, 不好看呀。
所以呢,再额外介绍一个方法,这个方法能够生成一个相对美观的测试报告出来。
2.2.1 声明压力测试
首先在定义用例的时候通过装饰器声明这是一个压力测试:
# 定义测试用例 @pytest.mark.performance def test_performance(): # 设置测试参数 url = 'http://www.a.biz/' num_threads = 202.2.2 在命令行中通过pytest命令执行测试
第二步, 在命令行中执行测试
-v 用于显示详细的测试结果
--html 用于指定输出报告的位置。 这个参数需要依赖包:pytest-html
$ pytest -v --html=report.html test_a.py
输出执行结果是:
======================== test session starts =================================
platform win32 -- Python 3.10.9, pytest-7.2.1, pluggy-1.0.0 -- D:\python-grp\miniconda_env\py3.10_playwright\python.exe
cachedir: .pytest_cache
metadata: {'Python': '3.10.9', 'Platform': 'windows-10-10.0.22624-SP0', 'Packages': {'pytest': '7.2.1', 'pluggy': '1.0.0'}, 'Plugins': {'allure-pytest': '2.12.0', 'base-url': '2.0.0', 'html': '3.2.0', 'metadata': '2.0.4', 'ordering': '0.6', 'playwright': '0.3.0'}, 'JAVA_HOME': 'D:\\java-grp\\jdk\\', 'Base URL': ''}
rootdir: E:\develop\python\pytest-training\test
plugins: allure-pytest-2.12.0, base-url-2.0.0, html-3.2.0, metadata-2.0.4, ordering-0.6, playwright-0.3.0
collected 1 item
test_a.py::test_performance PASSED [100%]
========================== warnings summary =================================
test_a.py:25
E:\develop\python\pytest-training\test\test_a.py:25: PytestUnknownMarkWarning: Unknown pytest.mark.performance - is this a typo? You can reGISter custom marks to avoid this warning - for details, see https://docs.pytest.org/en/stable/how-to/mark.html
@pytest.mark.performance
-- Docs: https://docs.pytest.org/en/stable/how-to/capture-warnings.html
-- generated html file: file:///E:/develop/python/pytest-training/test/report.html --
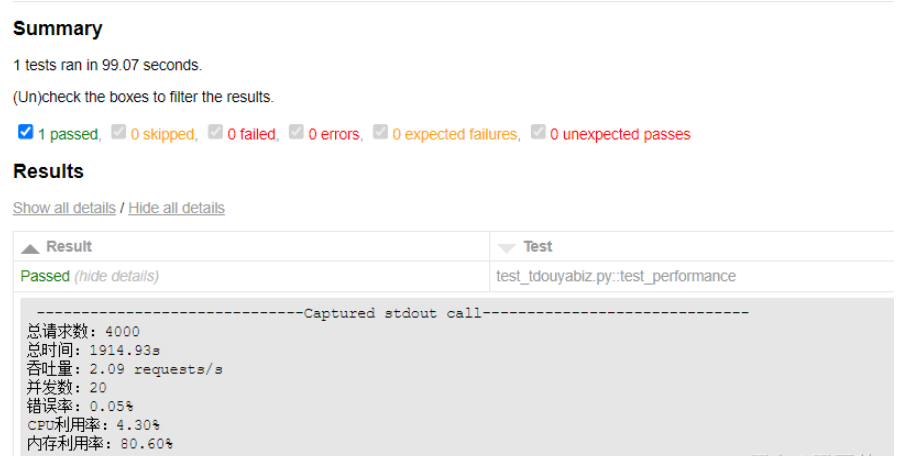
================= 1 passed, 1 warning in 99.09s (0:01:39) ===================
(D:\python-grp\miniconda_env\py3.10_playwright) E:\develop\python\pytest-training\test>
最终生成的报告是:(有点长, 截取了关键部分)
因为时间关系, 本案例今天没有时间在服务器端执行, 所以通过psutil库所取得CPU利用率和内存利用率时间并不对。 如果是在服务器端执行, 这两个数字才是对的。
如果要在本地获取服务器的CPU,内存,IO等情况,有一个监控神器:prometheus。
#!/usr/bin/env python # -*- coding:utf-8 -*- """ #----------------------------------------------------------------------------- # --- TDOUYA STUDiOS --- #----------------------------------------------------------------------------- # # @Project : pytest-training # @File : test_a.py # @Author : tianxin.xp@gmail.com # @Date : 2023/3/10 14:39 # # 压力测试案例 # #--------------------------------------------------------------------------""" import threading import time import psutil import pytest import requests # 定义测试用例 @pytest.mark.performance def test_performance(): # 设置测试参数 url = 'http://www.tdouya.biz/' num_threads = 20 num_requests = 200 timeout = 5 # 初始化测试结果 response_times = [] errors = 0 successes = 0 # 定义测试函数 def test_func(): nonlocal errors, successes for _ in range(num_requests): try: start_time = time.time() requests.get(url, timeout=timeout) end_time = time.time() response_time = end_time - start_time response_times.append(response_time) successes += 1 except requests.exceptions.RequestException: errors += 1 # 创建测试线程 threads = [] for _ in range(num_threads): t = threading.Thread(target=test_func) threads.append(t) # 启动测试线程 for t in threads: t.start() # 等待测试线程结束 for t in threads: t.join() # 计算测试结果 total_requests = num_threads * num_requests throughput = successes / (sum(response_times) or 1) concurrency = num_threads error_rate = errors / (total_requests or 1) cpu_usage = psutil.cpu_percent() memory_usage = psutil.virtual_memory().percent # 输出测试结果 print(f'总请求数:{total_requests}') print(f'总时间:{sum(response_times):.2f}s') print(f'吞吐量:{throughput:.2f} requests/s') print(f'并发数:{concurrency}') print(f'错误率:{error_rate:.2%}') print(f'CPU利用率:{cpu_usage:.2f}%') print(f'内存利用率:{memory_usage:.2f}%') # 将测试结果写入文件 with open('performance_test_result.txt', 'w') as f: f.write(f'总请求数:{total_requests}\n') f.write(f'总时间:{sum(response_times):.2f}s\n') f.write(f'吞吐量:{throughput:.2f} requests/s\n') f.write(f'并发数:{concurrency}\n') f.write(f'错误率:{error_rate:.2%}\n') f.write(f'CPU利用率:{cpu_usage:.2f}%\n') f.write(f'内存利用率:{memory_usage:.2f}%\n')以上就是关于“怎么用Python+Pytest实现压力测试”这篇文章的内容,相信大家都有了一定的了解,希望小编分享的内容对大家有帮助,若想了解更多相关的知识内容,请关注编程网Python频道。
--结束END--
本文标题: 怎么用Python+Pytest实现压力测试
本文链接: https://www.lsjlt.com/news/351406.html(转载时请注明来源链接)
有问题或投稿请发送至: 邮箱/279061341@qq.com QQ/279061341
下载Word文档到电脑,方便收藏和打印~
2024-03-01
2024-03-01
2024-03-01
2024-02-29
2024-02-29
2024-02-29
2024-02-29
2024-02-29
2024-02-29
2024-02-29
回答
回答
回答
回答
回答
回答
回答
回答
回答
回答


官方手机版

微信公众号

商务合作


0