[root@wallet03 ~]# yum install -y iscsi-initiator-utils [root@wallet03 ~]# vim /etc/iscsi/iscsid.conf n
[root@wallet03 ~]# yum install -y iscsi-initiator-utils
[root@wallet03 ~]# vim /etc/iscsi/iscsid.conf
node.session.auth.authmethod = CHAP
node.session.auth.username = gscf
node.session.auth.passWord = gscf@1234

[root@wallet03 ~]# iscsiadm -m discovery -t sendtargets -p 192.168.40.36
Starting iscsid:                                           [  OK  ]
192.168.40.36:3260,1 iqn.2019-02.com.gscaifu:disk01
192.168.40.36:3260,1 iqn.2019-02.com.gscaifu:disk02
192.168.40.36:3260,1 iqn.2019-02.com.gscaifu:disk03
192.168.40.36:3260,1 iqn.2019-02.com.gscaifu:disk04
192.168.40.36:3260,1 iqn.2019-02.com.gscaifu:disk05
192.168.40.36:3260,1 iqn.2019-02.com.gscaifu:disk06
192.168.40.36:3260,1 iqn.2019-02.com.gscaifu:disk07
192.168.40.36:3260,1 iqn.2019-02.com.gscaifu:disk08
192.168.40.36:3260,1 iqn.2019-02.com.gscaifu:disk09
192.168.40.36:3260,1 iqn.2019-02.com.gscaifu:disk10

[root@wallet03 ~]# iscsiadm -m node -T iqn.2019-02.com.gscaifu:disk01 --login
Logging in to [iface: default, target: iqn.2019-02.com.gscaifu:disk01, portal: 192.168.40.36,3260] (multiple)
Login to [iface: default, target: iqn.2019-02.com.gscaifu:disk01, portal: 192.168.40.36,3260] successful.

[root@wallet03 ~]# iscsiadm -m node -T iqn.2019-02.com.gscaifu:disk02 --login
Logging in to [iface: default, target: iqn.2019-02.com.gscaifu:disk02, portal: 192.168.40.36,3260] (multiple)
Login to [iface: default, target: iqn.2019-02.com.gscaifu:disk02, portal: 192.168.40.36,3260] successful.

[root@wallet03 ~]# iscsiadm -m node -T iqn.2019-02.com.gscaifu:disk03 --login
Logging in to [iface: default, target: iqn.2019-02.com.gscaifu:disk03, portal: 192.168.40.36,3260] (multiple)
Login to [iface: default, target: iqn.2019-02.com.gscaifu:disk03, portal: 192.168.40.36,3260] successful.

[root@wallet03 ~]# iscsiadm -m node -T iqn.2019-02.com.gscaifu:disk04 --login
Logging in to [iface: default, target: iqn.2019-02.com.gscaifu:disk04, portal: 192.168.40.36,3260] (multiple)
Login to [iface: default, target: iqn.2019-02.com.gscaifu:disk04, portal: 192.168.40.36,3260] successful.

[root@wallet03 ~]# iscsiadm -m node -T iqn.2019-02.com.gscaifu:disk05 --login
Logging in to [iface: default, target: iqn.2019-02.com.gscaifu:disk05, portal: 192.168.40.36,3260] (multiple)
Login to [iface: default, target: iqn.2019-02.com.gscaifu:disk05, portal: 192.168.40.36,3260] successful.

[root@wallet03 ~]# iscsiadm -m node -T iqn.2019-02.com.gscaifu:disk06 --login
Logging in to [iface: default, target: iqn.2019-02.com.gscaifu:disk06, portal: 192.168.40.36,3260] (multiple)
Login to [iface: default, target: iqn.2019-02.com.gscaifu:disk06, portal: 192.168.40.36,3260] successful.

[root@wallet03 ~]# iscsiadm -m node -T iqn.2019-02.com.gscaifu:disk07 --login
Logging in to [iface: default, target: iqn.2019-02.com.gscaifu:disk07, portal: 192.168.40.36,3260] (multiple)
Login to [iface: default, target: iqn.2019-02.com.gscaifu:disk07, portal: 192.168.40.36,3260] successful.

[root@wallet03 ~]# iscsiadm -m node -T iqn.2019-02.com.gscaifu:disk08 --login
Logging in to [iface: default, target: iqn.2019-02.com.gscaifu:disk08, portal: 192.168.40.36,3260] (multiple)
Login to [iface: default, target: iqn.2019-02.com.gscaifu:disk08, portal: 192.168.40.36,3260] successful.

[root@wallet03 ~]# iscsiadm -m node -T iqn.2019-02.com.gscaifu:disk09 --login
Logging in to [iface: default, target: iqn.2019-02.com.gscaifu:disk09, portal: 192.168.40.36,3260] (multiple)
Login to [iface: default, target: iqn.2019-02.com.gscaifu:disk09, portal: 192.168.40.36,3260] successful.

[root@wallet03 ~]# iscsiadm -m node -T iqn.2019-02.com.gscaifu:disk10 --login
Logging in to [iface: default, target: iqn.2019-02.com.gscaifu:disk10, portal: 192.168.40.36,3260] (multiple)
Login to [iface: default, target: iqn.2019-02.com.gscaifu:disk10, portal: 192.168.40.36,3260] successful.

[root@wallet03 ~]# groupadd -g 1200 dba
[root@wallet03 ~]# groupadd -g 1201 oinstall
[root@wallet03 ~]# groupadd -g 1202 asmadmin
[root@wallet03 ~]# groupadd -g 1203 asmdba
[root@wallet03 ~]# useradd -u 1100 -g oinstall -G asmadmin,asmdba,dba grid
[root@wallet03 ~]# echo grid | passwd --stdin grid
Changing password for user grid.
passwd: all authentication tokens updated successfully.

[root@wallet03 ~]# id grid
uid=1100(grid) gid=1201(oinstall) groups=1201(oinstall),1200(dba),1202(asmadmin),1203(asmdba)

[root@wallet03 ~]# yum install -y kmod-oracleasm*
[root@wallet03 ~]# rpm -ivh oracleasmlib-2.0.4-1.el6.x86_64.rpm
[root@wallet03 ~]# rpm -ivh oracleasm-support-2.1.8-1.el6.x86_64.rpm

[root@wallet03 ~]#  /usr/sbin/oracleasm configure -i
Configuring the Oracle ASM library driver.
This will configure the on-boot properties of the Oracle ASM library
driver.  The following questions will determine whether the driver is
loaded on boot and what permissions it will have.  The current values
will be shown in brackets ('[]').  Hitting <ENTER> without typing an
answer will keep that current value.  Ctrl-C will abort.
Default user to own the driver interface []: grid
Default group to own the driver interface []: asmadmin
Start Oracle ASM library driver on boot (y/n) [n]: y
Scan for Oracle ASM disks on boot (y/n) [y]: y
Writing Oracle ASM library driver configuration: done

[root@wallet03 ~]# /usr/sbin/oracleasm init
Creating /dev/oracleasm mount point: /dev/oracleasm
Loading module "oracleasm": oracleasm
Configuring "oracleasm" to use device physical block size
Mounting ASMlib driver filesystem: /dev/oracleasm

[root@wallet03 ~]#  /usr/sbin/oracleasm scandisks
Reloading disk partitions: done
Cleaning any stale ASM disks...
Scanning system for ASM disks...
Instantiating disk "DISK1"
Instantiating disk "DISK5"
Instantiating disk "DISK4"
Instantiating disk "DISK10"
Instantiating disk "DISK6"
Instantiating disk "DISK8"
Instantiating disk "DISK3"
Instantiating disk "DISK2"
Instantiating disk "DISK7"
Instantiating disk "DISK9"

[root@wallet03 ~]#  /usr/sbin/oracleasm listdisks
DISK1
DISK10
DISK2
DISK3
DISK4
DISK5
DISK6
DISK7
DISK8
DISK9
[root@wallet03 ~]# cat >> /etc/hosts <<EOF
# Public Network
192.168.40.34 wallet01
192.168.40.35 wallet02
192.168.40.38 wallet03
# Public Virtual IP (VIP)
192.168.40.134 wallet01-vip
192.168.40.135 wallet02-vip
192.168.40.138 wallet03-vip
EOF
[root@wallet03 ~]# yum -y install GCc gcc-c++ glibc glibc-common ksh make sysstat \
binutils elfutils-libelf elfutils-libelf-devel elfutils-libelf-devel-static \
glibc-devel glibc-headers libaio libaio-devel libstdc++ libstdc++-devel unixODBC unixODBC-devel
[root@wallet03 ~]# CVUQDISK_GRP=oinstall
[root@wallet03 ~]# export CVUQDISK_GRP
[root@wallet03 ~]# rpm -ivh cvuqdisk-1.0.9-1.rpm
[root@wallet03 ~]# /sbin/service ntpd stop
[root@wallet03 ~]# chkconfig ntpd off
[root@wallet03 ~]# mv /etc/ntp.conf /etc/ntp.conf.backup
[root@wallet03 ~]# cat >> /etc/sysctl.conf <<EOF
kernel.shmmni = 4096
kernel.sem = 250 32000 100 128
fs.file-max = 6815744
net.ipv4.ip_local_port_range = 9000 65500
net.core.rmem_default=262144
net.core.rmem_max=4194304
net.core.wmem_default=262144
net.core.wmem_max=1048576
fs.aio-max-nr=1048576
net.ipv4.conf.default.rp_filter = 0
net.ipv4.conf.all.rp_filter = 0
EOF
[root@wallet03 ~]# sysctl -p
[root@wallet03 ~]# cat >> /etc/security/limits.conf <<EOF
grid soft nproc 2047
grid hard nproc 16384
grid soft nofile 1024
grid hard nofile 65536
EOF
[root@wallet03 ~]# mkdir -p /u01/app/grid
[root@wallet03 ~]# mkdir -p /u01/app/11.2.0.4/grid
[root@wallet03 ~]# chown -R grid:oinstall /u01
[root@wallet03 ~]# su - grid
[grid@wallet03 ~]$ vi .bash_profile
export ORACLE_SID=+ASM3
export ORACLE_BASE=/u01/app/grid
export ORACLE_HOME=/u01/app/11.2.0.4/grid
export PATH=$ORACLE_HOME/bin:$PATH
[grid@wallet03 ~]$ mkdir ~/.ssh
[grid@wallet03 ~]$ chmod 700 ~/.ssh
[grid@wallet03 ~]$ /usr/bin/ssh-keygen -t dsa
Generating public/private dsa key pair.
Enter file in which to save the key (/home/grid/.ssh/id_dsa):
Enter passphrase (empty for no passphrase):
Enter same passphrase again:
Your identification has been saved in /home/grid/.ssh/id_dsa.
Your public key has been saved in /home/grid/.ssh/id_dsa.pub.
The key fingerprint is:
7a:f9:18:01:fa:13:5a:22:4f:0b:d9:11:e0:7c:42:17 grid@wallet03
The key's randomart image is:
+--[ DSA 1024]----+
| o.E. |
| + . . |
| + o . |
| = o . |
| + = o S |
| = * o o |
| + + + |
| o + |
| . . |
+-----------------+
[grid@wallet01 ~]$ ssh wallet03 cat ~/.ssh/id_dsa.pub >>~/.ssh/authorized_keys
[grid@wallet01 ~]$ scp ~/.ssh/authorized_keys wallet03:.ssh/authorized_keys
[grid@wallet01 ~]$ (ssh wallet01 "date;hostname";ssh wallet03 "date;hostname")
Tue Apr 30 17:34:33 CST 2019
wallet01
Tue Apr 30 17:34:33 CST 2019
wallet03
[grid@wallet03 ~]$ (ssh wallet01 "date;hostname";ssh wallet03 "date;hostname")
Tue Apr 30 17:34:42 CST 2019
wallet01
Tue Apr 30 17:34:42 CST 2019
wallet03
[grid@wallet01 ~]$ cd grid
[grid@wallet01 grid]$ ./runcluvfy.sh stage -pre nodeadd -n wallet03 -fixup -verbose >check2.txt
[grid@wallet01 ~]$ export IGNORE_PREADDNODE_CHECKS=Y
[grid@wallet01 ~]$ cd $ORACLE_HOME/oui/bin
[grid@wallet01 bin]$ ./addNode.sh -silent "CLUSTER_NEW_NODES={wallet03}" "CLUSTER_NEW_VIRTUAL_HOSTNAMES={wallet03-vip}"
Starting Oracle Universal Installer...
Checking swap space: must be greater than 500 MB. Actual 8191 MB Passed
Oracle Universal Installer, Version 11.2.0.4.0 Production
Copyright (C) 1999, 2013, Oracle. All rights reserved.
PerfORMing tests to see whether nodes wallet03,wallet03 are available
............................................................... 100% Done.
.
-----------------------------------------------------------------------------
Cluster Node Addition Summary
Global Settings
Source: /u01/app/11.2.0.4/grid
New Nodes
Space Requirements
New Nodes
wallet03
/: Required 4.49GB : Available 75.62GB
略......
Instantiating scripts for add node (Sunday, May 5, 2019 4:02:55 PM CST)
. 1% Done.
Instantiation of add node scripts complete
Copying to remote nodes (Sunday, May 5, 2019 4:02:57 PM CST)
............................................................................................... 96% Done.
Home copied to new nodes
Saving inventory on nodes (Sunday, May 5, 2019 4:06:33 PM CST)
. 100% Done.
Save inventory complete
WARNING:A new inventory has been created on one or more nodes in this session. However, it has not yet been reGIStered as the central inventory of this system.
To register the new inventory please run the script at '/u01/app/oraInventory/orainstRoot.sh' with root privileges on nodes 'wallet03'.
If you do not register the inventory, you may not be able to update or patch the products you installed.
The following configuration scripts need to be executed as the "root" user in each new cluster node. Each script in the list below is followed by a list of nodes.
/u01/app/oraInventory/orainstRoot.sh #On nodes wallet03
/u01/app/11.2.0.4/grid/root.sh #On nodes wallet03
To execute the configuration scripts:
1. Open a terminal window
2. Log in as "root"
3. Run the scripts in each cluster node
The Cluster Node Addition of /u01/app/11.2.0.4/grid was successful.
Please check '/tmp/silentInstall.log' for more details.
[root@wallet03 ~]# /u01/app/oraInventory/orainstRoot.sh
Creating the Oracle inventory pointer file (/etc/oraInst.loc)
Changing permissions of /u01/app/oraInventory.
Adding read,write permissions for group.
Removing read,write,execute permissions for world.
Changing groupname of /u01/app/oraInventory to oinstall.
The execution of the script is complete.
[root@wallet03 ~]# /u01/app/11.2.0.4/grid/root.sh
Performing root user operation for Oracle 11g
The following environment variables are set as:
ORACLE_OWNER= grid
ORACLE_HOME= /u01/app/11.2.0.4/grid
Enter the full pathname of the local bin directory: [/usr/local/bin]:
Copying dbhome to /usr/local/bin ...
Copying oraenv to /usr/local/bin ...
Copying coraenv to /usr/local/bin ...
Creating /etc/oratab file...
Entries will be added to the /etc/oratab file as needed by
Database Configuration Assistant when a database is created
Finished running generic part of root script.
Now product-specific root actions will be performed.
Using configuration parameter file: /u01/app/11.2.0.4/grid/crs/install/crsconfig_params
Creating trace directory
User ignored Prerequisites during installation
Installing Trace File Analyzer
OLR initialization - successful
Adding Clusterware entries to upstart
CRS-4402: The CSS daemon was started in exclusive mode but found an active CSS daemon on node wallet03, number 1, and is terminating
An active cluster was found during exclusive startup, restarting to join the cluster
clscfg: EXISTING configuration version 5 detected.
clscfg: version 5 is 11g Release 2.
Successfully accumulated necessary OCR keys.
Creating OCR keys for user 'root', privgrp 'root'..
Operation successful.
Configure Oracle Grid Infrastructure for a Cluster ... succeeded[root@wallet03 ~]# useradd -u 1101 -g oinstall -G dba,asmdba oracle
[root@wallet03 ~]# echo oracle | passwd --stdin oracle
Changing password for user oracle.
passwd: all authentication tokens updated successfully.
[root@wallet03 ~]# id oracle
uid=1101(oracle) gid=1201(oinstall) groups=1201(oinstall),1200(dba),1203(asmdba)
[root@wallet03 ~]# cat >> /etc/profile <<EOF
if [ \$USER = "oracle" ] || [ \$USER = "grid" ]; then
if [ \$shell = "/bin/ksh" ]; then
ulimit -p 16384
ulimit -n 65536
else
ulimit -u 16384 -n 65536
fi
umask 022
fi
EOF
[root@wallet03 ~]# cat >> /etc/security/limits.conf <<EOF
oracle soft nproc 2047
oracle hard nproc 16384
oracle soft nofile 1024
oracle hard nofile 65536
EOF
[root@wallet03 ~]# cat >> /etc/pam.d/login <<EOF
session required pam_limits.so
EOF
[root@wallet03 ~]# mkdir -p /u01/app/oracle
[root@wallet01 ~]# chown oracle:oinstall /u01/app/oracle
[root@wallet03 ~]# su - oracle
[oracle@wallet03 ~]$ vi .bash_profile
export ORACLE_SID=wallet3
export ORACLE_BASE=/u01/app/oracle
export ORACLE_HOME=$ORACLE_BASE/product/11.2.0/db_1
export PATH=$ORACLE_HOME/bin:$PATH
[oracle@wallet03 ~]$ mkdir ~/.ssh
[oracle@wallet03 ~]$ chmod 700 ~/.ssh
[oracle@wallet03 ~]$ /usr/bin/ssh-keygen -t dsa
Generating public/private dsa key pair.
Enter file in which to save the key (/home/oracle/.ssh/id_dsa):
Enter passphrase (empty for no passphrase):
Enter same passphrase again:
Your identification has been saved in /home/oracle/.ssh/id_dsa.
Your public key has been saved in /home/oracle/.ssh/id_dsa.pub.
The key fingerprint is:
87:45:4d:c0:f3:e8:14:51:12:d8:b6:3f:c1:62:c3:9c oracle@wallet02
The key's randomart image is:
+--[ DSA 1024]----+
| +*Bo |
| ..*.. |
| +.O |
| oE + |
| S+.+ . |
| .. o |
| . |
| |
| |
+-----------------+
[oracle@wallet01 ~]$ ssh wallet03 cat ~/.ssh/id_dsa.pub >>~/.ssh/authorized_keys
[oracle@wallet01 ~]$ scp ~/.ssh/authorized_keys wallet03:.ssh/authorized_keys
[oracle@wallet01 ~]$ (ssh wallet01 "date;hostname";ssh wallet03 "date;hostname")
Sun May 5 10:12:50 CST 2019
wallet01
Sun May 5 10:12:50 CST 2019
wallet03
[oracle@wallet03 ~]$ (ssh wallet01 "date;hostname";ssh wallet03 "date;hostname")
Sun May 5 10:12:58 CST 2019
wallet01
Sun May 5 10:12:58 CST 2019
wallet03
[oracle@wallet01 ~]$ cd $ORACLE_HOME/oui/bin
[oracle@wallet01 bin]$ ./addNode.sh -silent "CLUSTER_NEW_NODES={wallet03}"
Performing pre-checks for node addition
Checking node reachability...
Node reachability check passed from node "wallet03"
Checking user equivalence...
User equivalence check passed for user "oracle"
WARNING:
Node "wallet03" already appears to be part of cluster
Pre-check for node addition was successful.
Starting Oracle Universal Installer...
Checking swap space: must be greater than 500 MB. Actual 8191 MB Passed
Oracle Universal Installer, Version 11.2.0.4.0 Production
Copyright (C) 1999, 2013, Oracle. All rights reserved.
Performing tests to see whether nodes wallet03,wallet03 are available
............................................................... 100% Done.
.
-----------------------------------------------------------------------------
Cluster Node Addition Summary
Global Settings
Source: /u01/app/oracle/product/11.2.0/db_1
New Nodes
Space Requirements
New Nodes
wallet03
/: Required 4.25GB : Available 71.76GB
略......
-----------------------------------------------------------------------------
Instantiating scripts for add node (Sunday, May 5, 2019 4:24:17 PM CST)
. 1% Done.
Instantiation of add node scripts complete
Copying to remote nodes (Sunday, May 5, 2019 4:24:19 PM CST)
............................................................................................... 96% Done.
Home copied to new nodes
Saving inventory on nodes (Sunday, May 5, 2019 4:30:13 PM CST)
. 100% Done.
Save inventory complete
WARNING:
The following configuration scripts need to be executed as the "root" user in each new cluster node. Each script in the list below is followed by a list of nodes.
/u01/app/oracle/product/11.2.0/db_1/root.sh #On nodes wallet03
To execute the configuration scripts:
1. Open a terminal window
2. Log in as "root"
3. Run the scripts in each cluster node
The Cluster Node Addition of /u01/app/oracle/product/11.2.0/db_1 was successful.
Please check '/tmp/silentInstall.log' for more details.
[root@wallet03 ~]# /u01/app/oracle/product/11.2.0/db_1/root.sh
Performing root user operation for Oracle 11g
The following environment variables are set as:
ORACLE_OWNER= oracle
ORACLE_HOME= /u01/app/oracle/product/11.2.0/db_1
Enter the full pathname of the local bin directory: [/usr/local/bin]:
The contents of "dbhome" have not changed. No need to overwrite.
The contents of "oraenv" have not changed. No need to overwrite.
The contents of "coraenv" have not changed. No need to overwrite.
Entries will be added to the /etc/oratab file as needed by
Database Configuration Assistant when a database is created
Finished running generic part of root script.
Now product-specific root actions will be performed.
Finished product-specific root actions.[root@wallet01 ~]# su - oracle
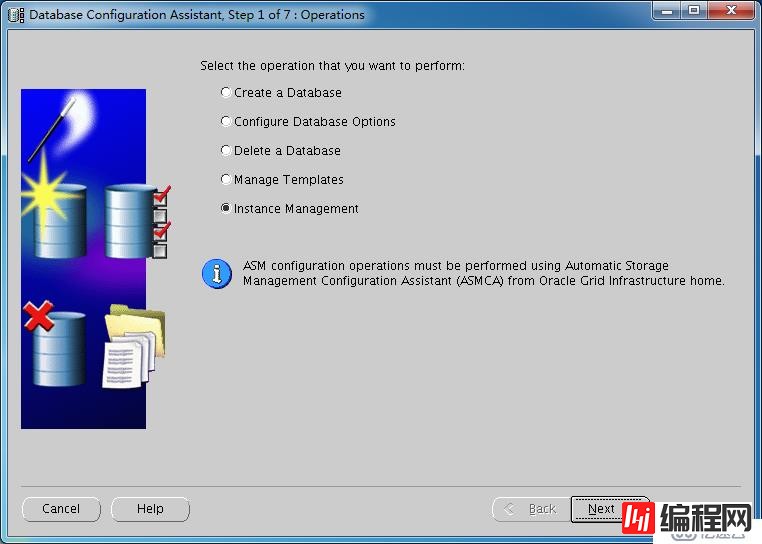
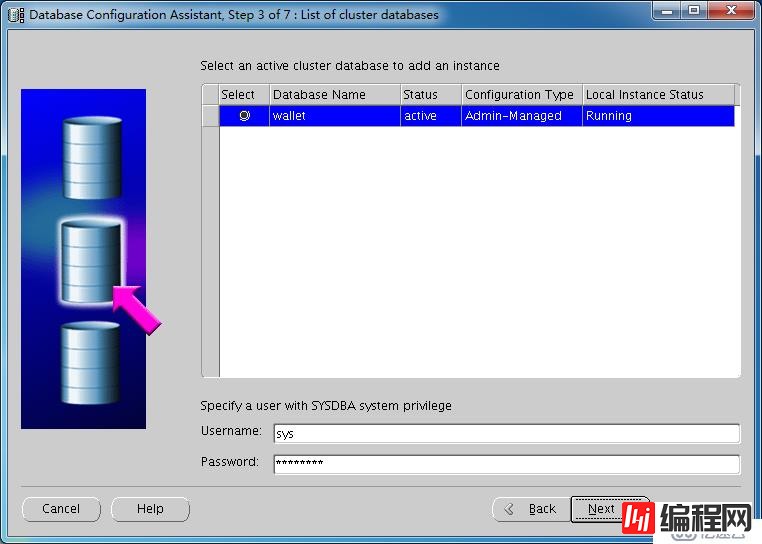
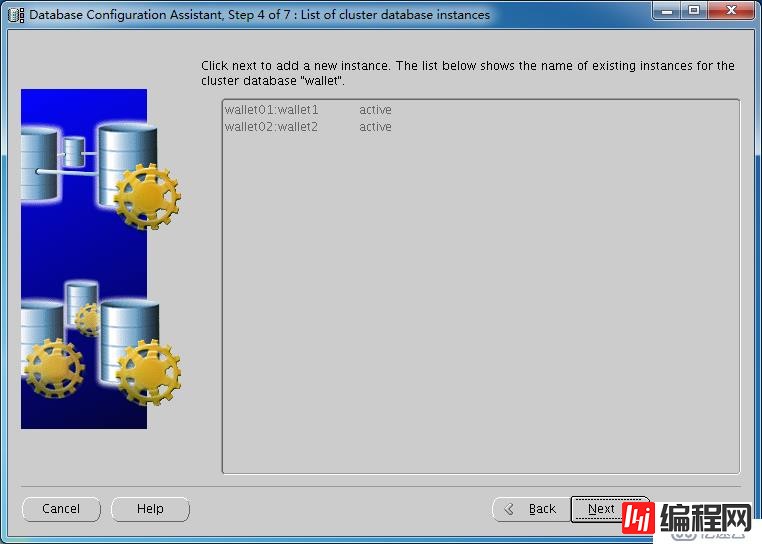
[oracle@wallet01 ~]$ dbca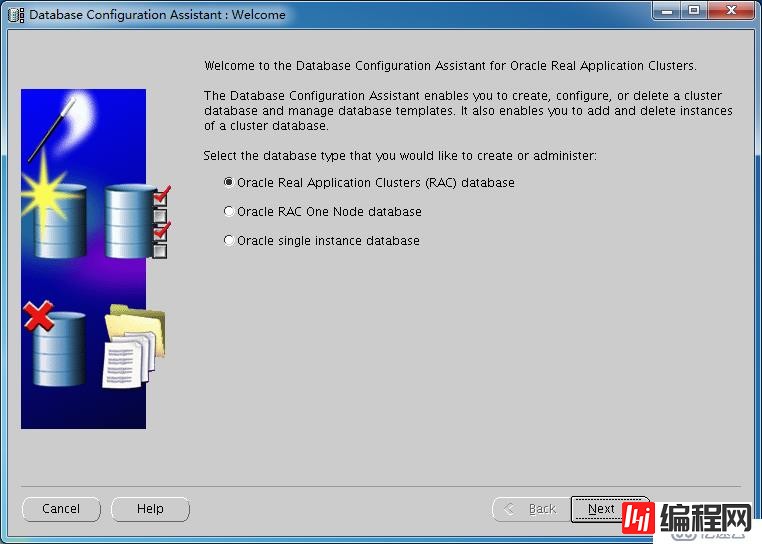


--结束END--
本文标题: 【Oracle Database】Oracle RAC(六):节点管理
本文链接: https://www.lsjlt.com/news/37233.html(转载时请注明来源链接)
有问题或投稿请发送至: 邮箱/279061341@qq.com QQ/279061341
下载Word文档到电脑,方便收藏和打印~
2024-04-20
2024-04-20
2024-04-20
2024-04-20
2024-04-20
2024-04-20
2024-04-20
2024-04-20
2024-04-20
2024-04-20
回答
回答
回答
回答
回答
回答
回答
回答
回答
回答


官方手机版

微信公众号

商务合作


0