通过综合案例,我们来了解和学习在开发WEB程序时,前端程序和后端程序以及数据库三者之间是如何交互、如何协作的,而通过综合案例也来掌握通过接口文档开发服务端接口的能力。 目录 一、准备工作 1. 需求说明 2. 环境搭建 3. 开发规范 二、
通过综合案例,我们来了解和学习在开发WEB程序时,前端程序和后端程序以及数据库三者之间是如何交互、如何协作的,而通过综合案例也来掌握通过接口文档开发服务端接口的能力。
目录
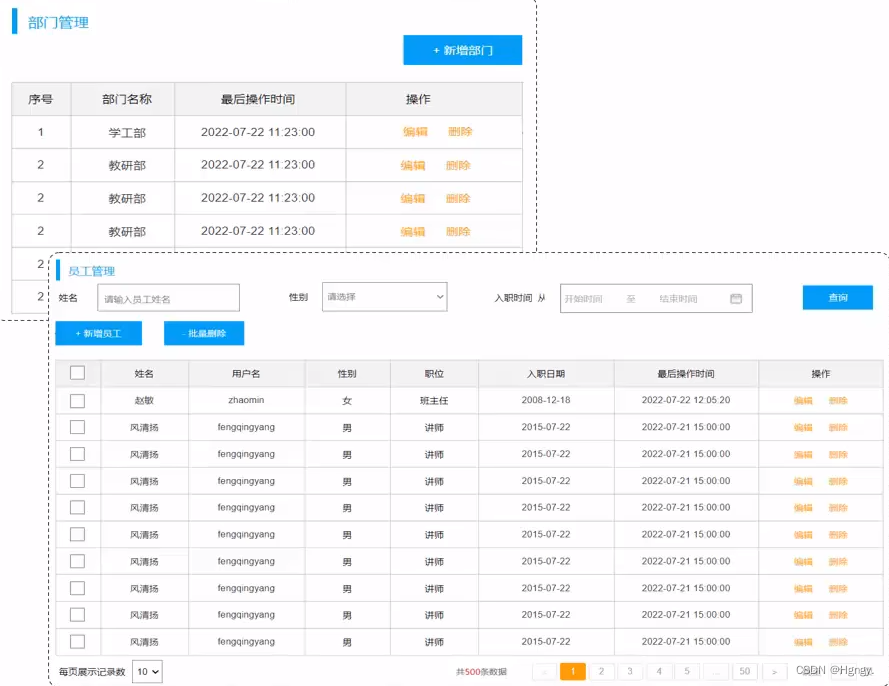 | 部门管理:
|
| 员工管理:
|
-- 部门管理create table dept( id int unsigned primary key auto_increment comment '主键ID', name varchar(10) not null unique comment '部门名称', create_time datetime not null comment '创建时间', update_time datetime not null comment '修改时间') comment '部门表';insert into dept (id, name, create_time, update_time) values(1,'学工部',now(),now()),(2,'教研部',now(),now()),(3,'咨询部',now(),now()), (4,'就业部',now(),now()),(5,'人事部',now(),now());-- 员工管理(带约束)create table emp ( id int unsigned primary key auto_increment comment 'ID', username varchar(20) not null unique comment '用户名', passWord varchar(32) default '123456' comment '密码', name varchar(10) not null comment '姓名', gender tinyint unsigned not null comment '性别, 说明: 1 男, 2 女', image varchar(300) comment '图像', job tinyint unsigned comment '职位, 说明: 1 班主任,2 讲师, 3 学工主管, 4 教研主管, 5 咨询师', entrydate date comment '入职时间', dept_id int unsigned comment '部门ID', create_time datetime not null comment '创建时间', update_time datetime not null comment '修改时间') comment '员工表';INSERT INTO emp(id, username, password, name, gender, image, job, entrydate,dept_id, create_time, update_time) VALUES(1,'jinyong','123456','金庸',1,'1.jpg',4,'2000-01-01',2,now(),now()),(2,'zhangwuji','123456','张无忌',1,'2.jpg',2,'2015-01-01',2,now(),now()),(3,'yangxiao','123456','杨逍',1,'3.jpg',2,'2008-05-01',2,now(),now()),(4,'weiyixiao','123456','韦一笑',1,'4.jpg',2,'2007-01-01',2,now(),now()),(5,'changyuchun','123456','常遇春',1,'5.jpg',2,'2012-12-05',2,now(),now()),(6,'xiaozhao','123456','小昭',2,'6.jpg',3,'2013-09-05',1,now(),now()),(7,'jixiaofu','123456','纪晓芙',2,'7.jpg',1,'2005-08-01',1,now(),now()),(8,'zhouzhiruo','123456','周芷若',2,'8.jpg',1,'2014-11-09',1,now(),now()),(9,'dingminjun','123456','丁敏君',2,'9.jpg',1,'2011-03-11',1,now(),now()),(10,'zhaomin','123456','赵敏',2,'10.jpg',1,'2013-09-05',1,now(),now()),(11,'luzhangke','123456','鹿杖客',1,'11.jpg',5,'2007-02-01',3,now(),now()),(12,'hebiweng','123456','鹤笔翁',1,'12.jpg',5,'2008-08-18',3,now(),now()),(13,'fangdongbai','123456','方东白',1,'13.jpg',5,'2012-11-01',3,now(),now()),(14,'zhangsanfeng','123456','张三丰',1,'14.jpg',2,'2002-08-01',2,now(),now()),(15,'yulianzhou','123456','俞莲舟',1,'15.jpg',2,'2011-05-01',2,now(),now()),(16,'songyuanqiao','123456','宋远桥',1,'16.jpg',2,'2007-01-01',2,now(),now()),(17,'chenyouliang','123456','陈友谅',1,'17.jpg',NULL,'2015-03-21',NULL,now(),now());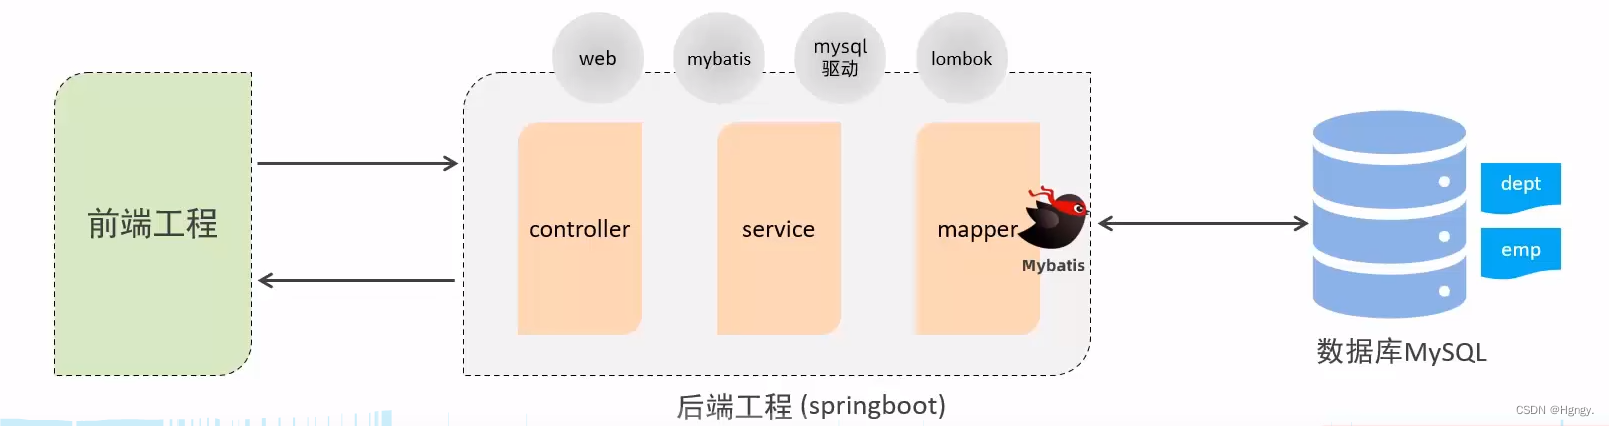
案例基于当前最为主流的前后端分离模式进行开发。在开发每一功能接口时仔细阅读接口文档并严格遵守接口文档进行开发,才能保证我们开发的功能可以顺利与前端对接。而在本案例中,前后端交互使用的是 Restful 风格接口。
REST (REpresentational State Transfer),表述性状态转换,它是一种软件架构风格
Http://localhost : 8080/user/getById?id=1 //GET:查询ia为1的用户http://localhost : 8080/user/saveUser //POST:新增用户http://localhost :8080/user/updateUser //POST:修改用户http://localhost :8080/user/deleteUser?id=1 //GET:删除id为1的用户http://localhost:8080/users/1 //GET:查询id为1的用户http://localhost:8080/users //POST:新增用户http://localhost:8080/users //PUT:修改用户http://localhost:8080/users/1 //DELETE:删除id为1的用户注意事项:
- REST是风格,是约定方式,约定不是规定,可以打破。
- 描述模块的功能通常使用复数,也就是加s的格式来描述,表示此类资源,而非单个资源。如:users、emps、books ...
@Data@NoArgsConstructor@AllArgsConstructorpublic class Result { private Integer code;//响应码,1 代表成功; 0 代表失败 private String msg; //响应信息 描述字符串 private Object data; //返回的数据 //增删改 成功响应 public static Result success(){ return new Result(1,"success",null); } //查询 成功响应 public static Result success(Object data){ return new Result(1,"success",data); } //失败响应 public static Result error(String msg){ return new Result(0,msg,null); }}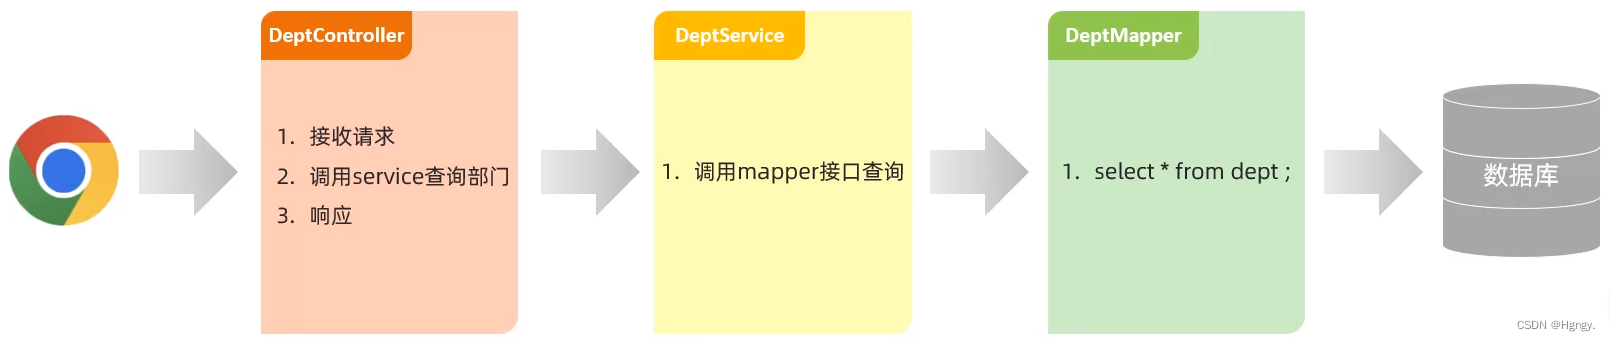
@RestControllerpublic class DeptController { @Autowired private DeptService deptService; //@RequestMapping(value = "/depts",method = RequestMethod.GET); 指定请求方式为GET @GetMapping("/depts") public Result list(){ //调用Service查询部门数据 List deptList = deptService.list(); return Result.success(deptList); }}public interface DeptService { List list();}@Servicepublic class DeptServiceImpl implements DeptService { @Autowired private DeptMapper deptMapper; @Override public List list() { return deptMapper.list(); }}@Mapperpublic interface DeptMapper { @Select("select * from dept;") List list(); } 
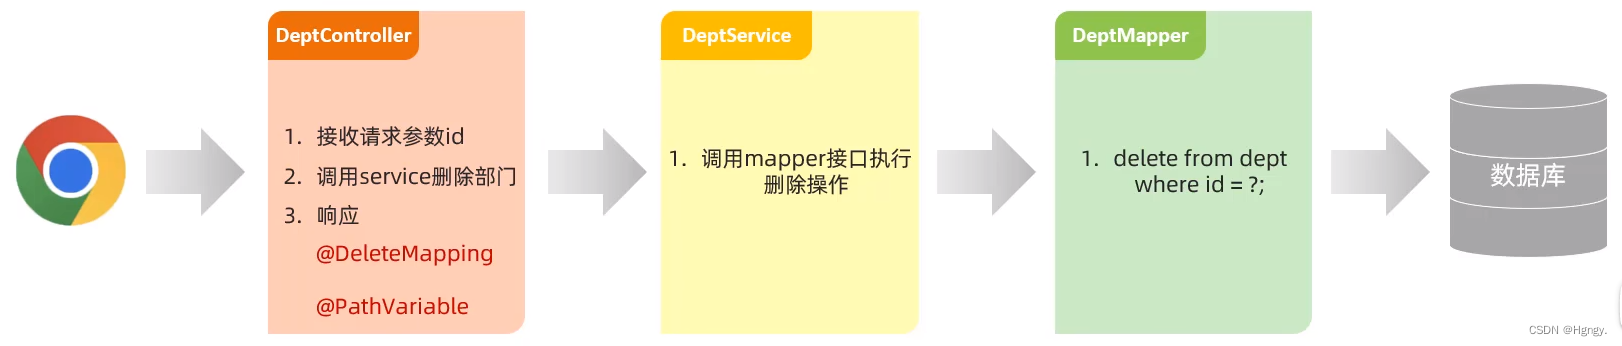
@RestControllerpublic class DeptController { @Autowired private DeptService deptService; @DeleteMapping("/depts/{id}") public Result delete(@PathVariable Integer id){ //log.info("根据id删除部门:{}",id); //调用Service删除部门数据 deptService.delete(id); return Result.success(); }}public interface DeptService { void delete(Integer id);}@Servicepublic class DeptServiceImpl implements DeptService { @Autowired private DeptMapper deptMapper; @Override public void delete(Integer id) { deptMapper.deleteById(id); }}@Mapperpublic interface DeptMapper { @Delete("delete from dept where id = #{id}") void deleteById(Integer id); }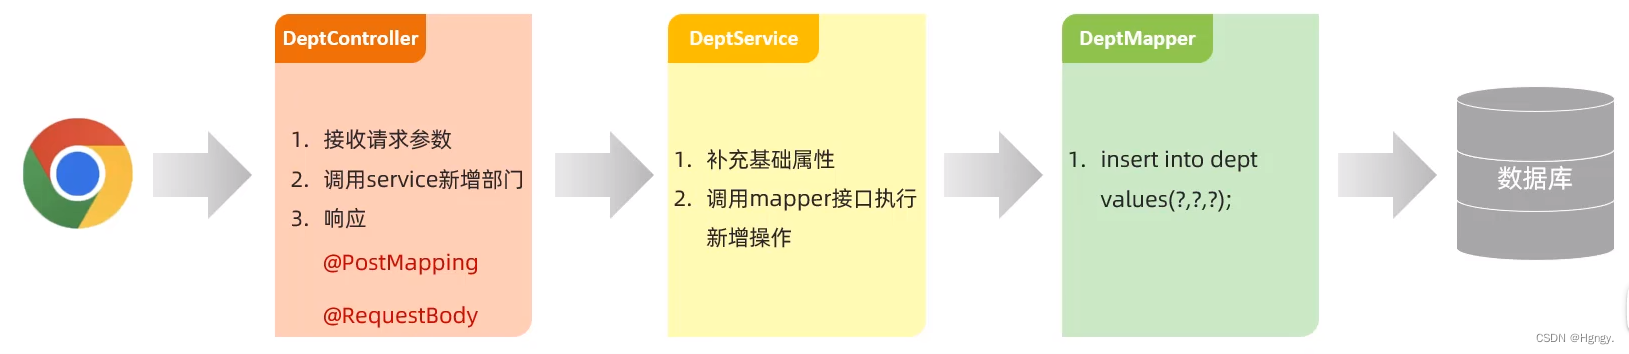
@RestControllerpublic class DeptController { @Autowired private DeptService deptService; @PostMapping("/depts") public Result add(@RequestBody Dept dept){ //log.info("新增部门:{}",dept); //调用Service新增部门数据 deptService.add(dept); return Result.success(); }}public interface DeptService { void add(Dept dept);}@Servicepublic class DeptServiceImpl implements DeptService { @Autowired private DeptMapper deptMapper; @Override public void add(Dept dept) { dept.setCreateTime(LocalDateTime.now()); dept.setUpdateTime(LocalDateTime.now()); deptMapper.insert(dept); }}@Mapperpublic interface DeptMapper { @Insert("insert into dept(name,create_time,update_time) values(#{name},#{createTime},#{updateTime}) ") void insert(Dept dept);}
在之前的mysql学习中,我们知道使用 limit 关键字 实现分页查询。
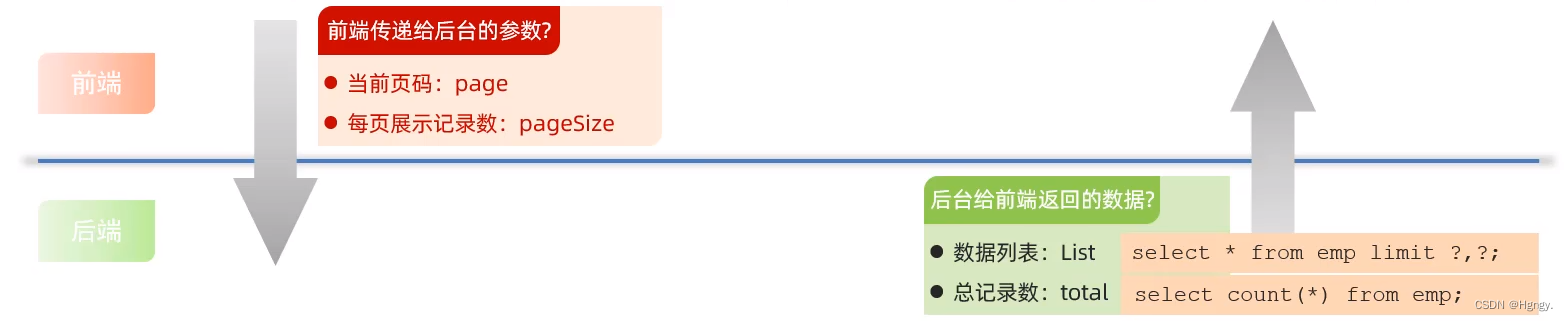
服务端给客户端响应数据最终是我们所设置的Controller方法的返回值,而一个方法只能有一个返回值,而员工列表和记录数类型不一样,所以我们需要将这两项数据封装成一个实现类。
@Datepublic class PageBean{ private Long tocal; //总记录数 private List rows; //当前页数据列表}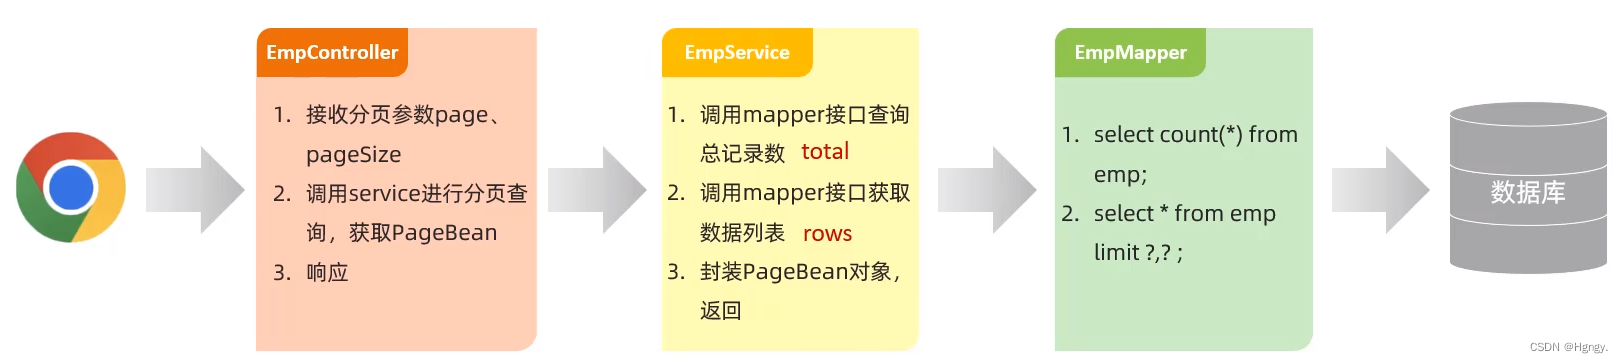
//@Slf4j - lombok日志@RestControllerpublic class EmpController { @Autowired private EmpService empService; @GetMapping("/emps") public Result page(@RequestParam(defaultValue = "1") Integer page,@RequestParam(defaultValue = "10") Integer pageSize){ //log.info("分页查询:参数:{},{}",page,pageSize); //调用Service分页查询 PageBean pageBean = empService.page(page,pageSize); return Result.success(pageBean); }}public interface EmpService { PageBean page(Integer page , Integer pageSize);}@Servicepublic class EmpServiceImpl implements EmpService { @Autowired private EmpMapper empMapper; @Override public PageBean page(Integer page, Integer pageSize) { //获取总记录数 Long count = empMapper.count(); //获取分页查询结果列表 Integer start = (page - 1) * pageSize; List empList = empMapper.page(start,pageSize); //封装pagebean对象 PageBean pageBean = new PageBean(count,empList); return pageBean; }}@Mapperpublic interface EmpMapper { @Select("select count(*) from emp") public Long count(); @Select("select * from emp limit #{start},#{pageSize}") public List page(Integer start,Integer pageSize);} 在上述分页查询操作中,我们定义两条sql语句获取指定页码数据列表和总记录数,这是原始的分页查询方式,可以看到步骤固定,代码繁琐。
所以第三方组织就提供了专门实现分页查询操作功能的插件,而目前MyBatis框架中最流行的就是PageHelper分页插件 。
com.GitHub.pagehelper pagehelper-spring-boot-starter 1.4.2 @Servicepublic class EmpServiceImpl implements EmpService {@Autowiredprivate EmpMapper empMapper; @Override public PageBean page(Integer page, Integer pageSize){ //设置分页参数 PageHelper.startPage(page,pageSize); //执行查询 List empList = empMapper.list(); Page p = (Page) empList; //封装pagebean对象 PageBean pageBean = new PageBean(p.getTotal(),p.getResult()); return pageBean; }}@Mapperpublic interface EmpMapper { @Select("select * from emp") public List list();} 
在上述分页查询代码基础上添加条件即可。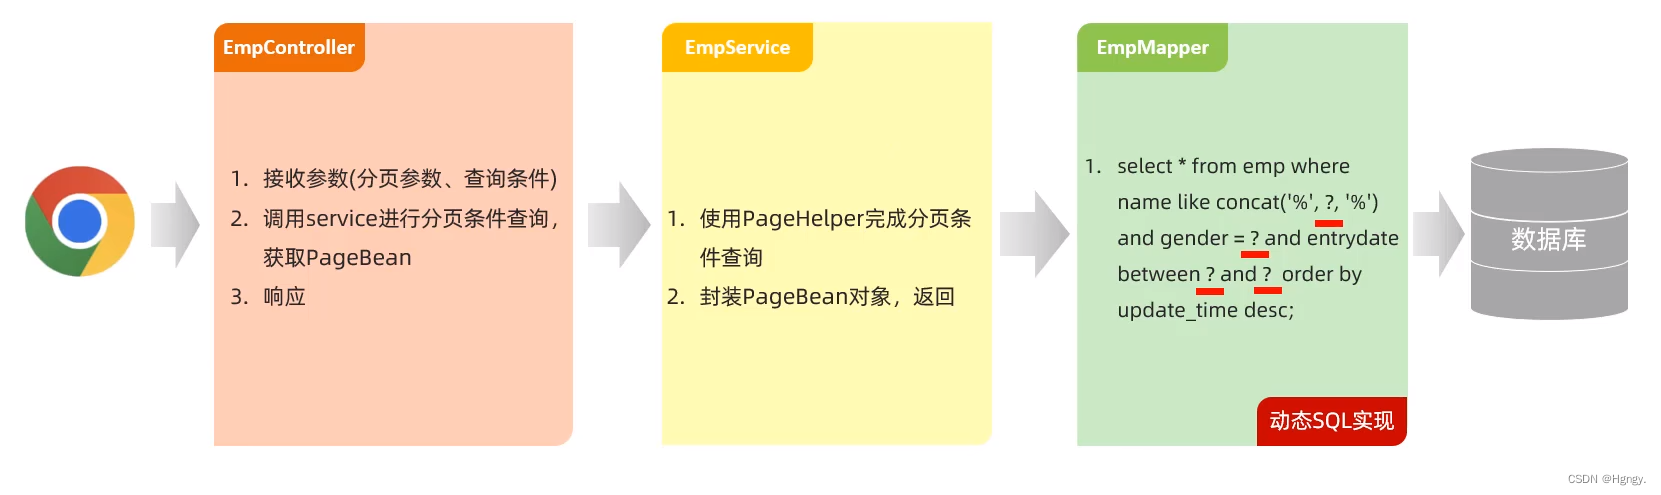
@RestControllerpublic class EmpController { @Autowired private EmpService empService; @GetMapping("/emps") public Result page( @RequestParam(defaultValue = "1") Integer page, @RequestParam(defaultValue = "10") Integer pageSize, String name, Short gender, @DateTimeFORMat(pattern = "yyyy-MM-dd") LocalDate begin, @DateTimeFormat(pattern = "yyyy-MM-dd") LocalDate end){ //log.info("分页查询:参数:{},{},{},{},{},{}",page,pageSize,name,gender,begin,end); //调用Service分页查询 PageBean pageBean = empService.page(page,pageSize,name,gender,begin,end); return Result.success(pageBean); }}public interface EmpService { PageBean page(Integer page , Integer pageSize,String name, Short gender,LocalDate begin, LocalDate end);}@Servicepublic class EmpServiceImpl implements EmpService {@Autowiredprivate EmpMapper empMapper; @Override public PageBean page(Integer page, Integer pageSize, String name, Short gender, LocalDate begin, LocalDate end){ //设置分页参数 PageHelper.startPage(page,pageSize); //执行查询 List empList = empMapper.list(name, gender, begin, end); Page p = (Page) empList; //封装pagebean对象 PageBean pageBean = new PageBean(p.getTotal(),p.getResult()); return pageBean; }}@Mapperpublic interface EmpMapper { public List list(String name, Short gender, LocalDate begin, LocalDate end);} select * from emp name like concat('%', #{name}, '%') and gender = #{gender} and entrydate between #{begin} and #{end} order by update_time desc 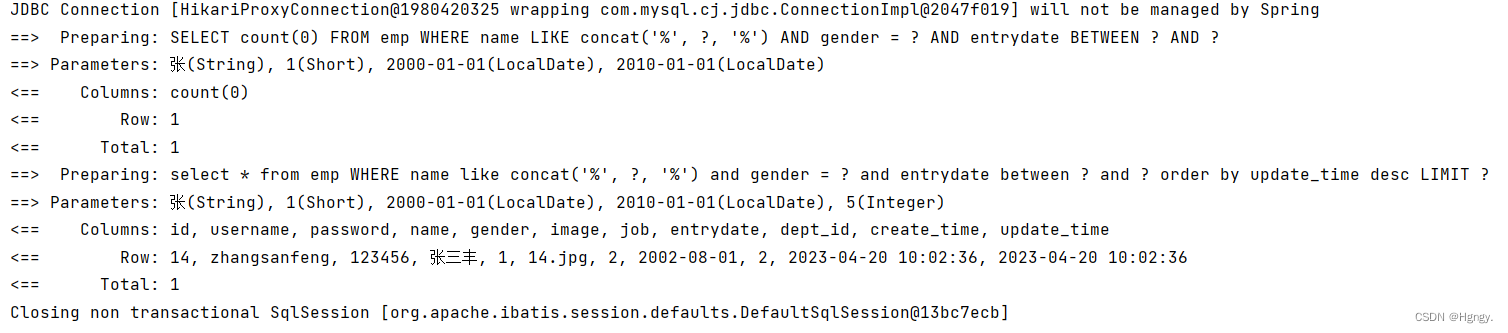

思考问题:是否要开发删除和批量删除两个接口?

@RestControllerpublic class EmpController { @Autowired private EmpService empService; @DeleteMapping("/emps/{ids}") public Result delete(@PathVariable List ids){ //log.info("删除员工:{},",ids); empService.delete(ids); return Result.success(); }}public interface EmpService { void delete(List ids);}@Servicepublic class EmpServiceImpl implements EmpService {@Override public void delete(List ids) { empMapper.delete(ids); }}@Mapperpublic interface EmpMapper { void delete(List ids);} delete from emp where id in #{id} 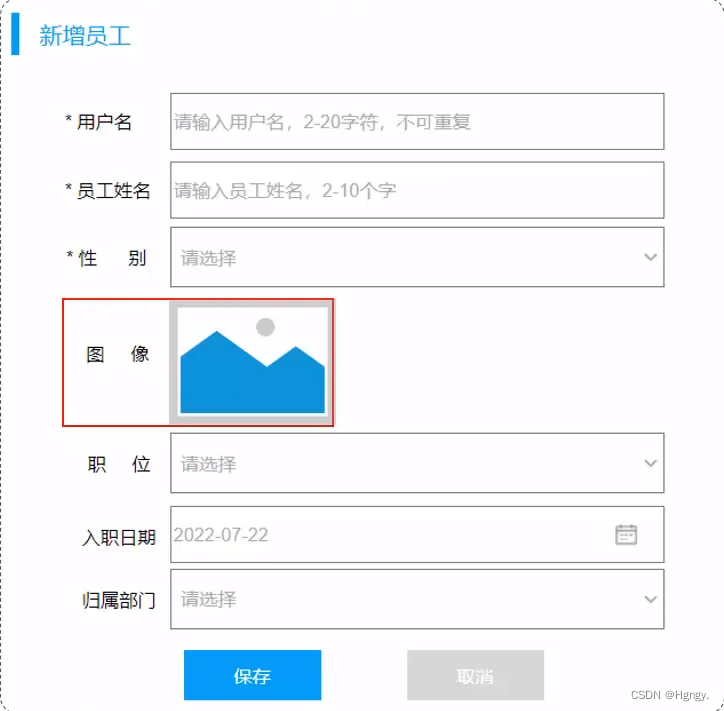
该小节我们针对于员工基本信息的录入,图像的上传第二小节再进行仔细介绍。
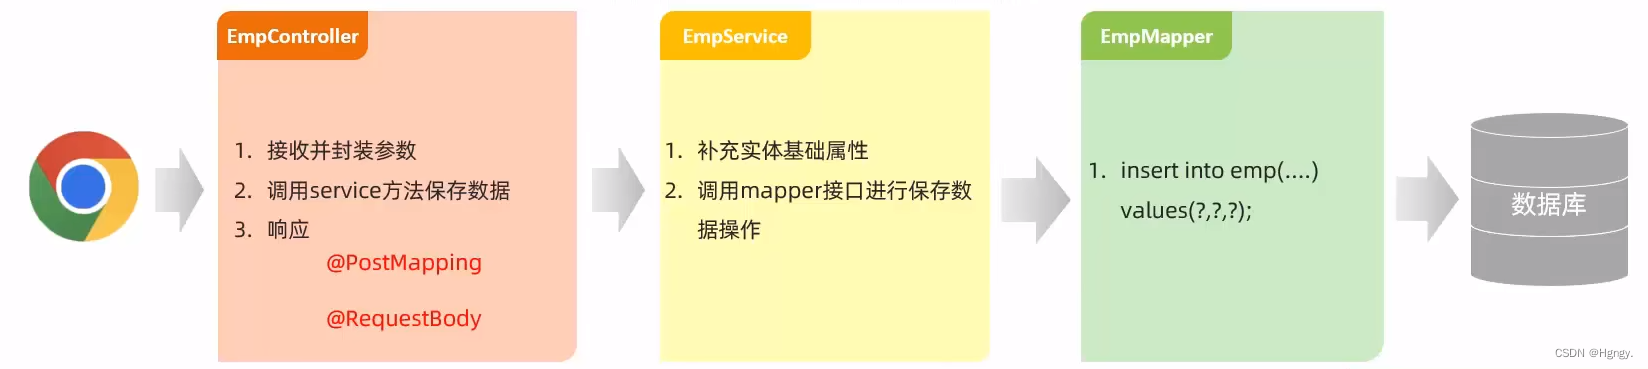
@RestControllerpublic class EmpController { @Autowired private EmpService empService; @PostMapping("/emps") public Result save(@RequestBody Emp emp){ //log.info("新增员工:{},",emp); empService.save(emp); return Result.success(); }}public interface EmpService { void save(Emp emp);}@Servicepublic class EmpServiceImpl implements EmpService {@Override public void save(Emp emp) { emp.setCreateTime(LocalDateTime.now()); emp.setUpdateTime(LocalDateTime.now()); empMapper.insert(emp); }}@Mapperpublic interface EmpMapper { void delete(List ids);}@Mapperpublic interface EmpMapper {@Insert("insert into emp(username, name, gender, image, job, entrydate, dept_id, create_time, update_time) " + "values (#{username},#{name},#{gender},#{image},#{job},#{entrydate},#{deptId},#{createTime},#{updateTime})") void insert(Emp emp);} ① 前端在进行文件上传时,需注意三要素:
② 服务端接收文件:MultipartFile
//@slf4j@RestControllerpublic class UploadController { @PostMapping("/upload") public Result upload(String username, Integer age, MultipartFile image){ //log.info("文件上传:{},{},{}",username,age,image); return Result.success(); }}在服务端,接收到上传上来的文件之后,将文件存储在本地服务器磁盘中。
① MultipartFile 常用方法:
| 方法 | 说明 |
| String getOriginalFilename() ; | 获取原始文件名。 |
| void transferTo(File dest) ; | 将接收的文件转存到磁盘文件中。 |
| long getSize() ; | 获取文件的大小,单位:字节。 |
| byte[] getBytes() ; | 获取文件内容的字节数组。 |
| lnputStream getInputStream() ; | 获取接收到的文件内容的输入流。 |
@RestControllerpublic class UploadController { @PostMapping("/upload") public Result upload(String username, Integer age, MultipartFile image) throws IOException { //log.info("文件上传:{},{},{}",username,age,image); //获取原始文件名 - 1.jpg String originalFilename= image.getOriginalFilename(); //构造唯一文件名(不重复)-- uuid(通用唯一识别码) int index = originalFilename.lastIndexOf("."); String extname = originalFilename.substring(index); String newFileName = UUID.randomUUID().toString() + extname; //log.info("新的文件名:{}" , newFileName); //将文件存储在服务器的磁盘目录中 F:\downloadfile\upload image.transferTo(new File("F:\\downloadfile\\upload\\"+newFileName)); return Result.success(); }}
② 在SpringBoot中,文件上传,默认单个文件允许最大大小为 1M。如果需要上传大文件,可以进行如下配置:
#配置单个文件最大上传大小spring.servlet.multipart.max-file-size=10MB#配置单个请求最大上传大小(一次请求可以上传多个文件)spring.servlet.multipart.max-request-size=100MB注意问题:本地存储指将我们上传的文件全部存储在本地磁盘目录当中,但是这种方式在我们实际开发中很少使用,原因如下:
- 全部存储在磁盘目录下,前端页面无法直接访问。
- 项目中上传大量文件到本地磁盘目录下,而磁盘容量有限且不方便扩容又或者磁盘发生错误,损失较大。
① 介绍:

Bucket:存储空间是用户用于存储对象(Object,就是文件)的容器,所有的对象都必须隶属于某个存储空间。
SDK:Software Development Kit的缩写,软件开发工具包,包括辅助软件开发的依赖(jar包)、代码示例等,都可以叫做SDK。
② 安装:参照官方SDK编写入门程序:阿里云对象存储OSS简介
com.aliyun.oss aliyun-sdk-oss 3.15.1 javax.xml.bind jaxb-api 2.3.1 javax.activation activation 1.1.1 org.glassfish.jaxb jaxb-runtime 2.3.3 import com.aliyun.oss.ClientException;import com.aliyun.oss.OSS;import com.aliyun.oss.OSSClientBuilder;import com.aliyun.oss.OSSException;import com.aliyun.oss.model.PutObjectRequest;import com.aliyun.oss.model.PutObjectResult;import java.io.FileInputStream;import java.io.InputStream;public class Demo { public static void main(String[] args) throws Exception { // Endpoint以华东1(杭州)为例,其它Region请按实际情况填写。 String endpoint = "https://oss-cn-hangzhou.aliyuncs.com"; // 阿里云账号AccessKey拥有所有API的访问权限,风险很高。强烈建议您创建并使用RAM用户进行API访问或日常运维,请登录RAM控制台创建RAM用户。 String accessKeyId = "yourAccessKeyId"; String accessKeySecret = "yourAccessKeySecret"; // 填写Bucket名称,例如examplebucket。 String bucketName = "examplebucket"; // 填写Object完整路径,完整路径中不能包含Bucket名称,例如exampledir/exampleobject.txt。 String objectName = "exampledir/exampleobject.txt"; // 填写本地文件的完整路径,例如D:\\localpath\\examplefile.txt。 // 如果未指定本地路径,则默认从示例程序所属项目对应本地路径中上传文件流。 String filePath= "D:\\localpath\\examplefile.txt"; // 创建OSSClient实例。 OSS ossClient = new OSSClientBuilder().build(endpoint, accessKeyId, accessKeySecret); try { InputStream inputStream = new FileInputStream(filePath); // 创建PutObjectRequest对象。 PutObjectRequest putObjectRequest = new PutObjectRequest(bucketName, objectName, inputStream); // 设置该属性可以返回response。如果不设置,则返回的response为空。 putObjectRequest.setProcess("true"); // 创建PutObject请求。 PutObjectResult result = ossClient.putObject(putObjectRequest); // 如果上传成功,则返回200。 System.out.println(result.getResponse().getStatusCode()); } catch (OSSException oe) { System.out.println("Caught an OSSException, which means your request made it to OSS, " + "but was rejected with an error response for some reason."); System.out.println("Error Message:" + oe.getErrorMessage()); System.out.println("Error Code:" + oe.getErrorCode()); System.out.println("Request ID:" + oe.getRequestId()); System.out.println("Host ID:" + oe.getHostId()); } catch (ClientException ce) { System.out.println("Caught an ClientException, which means the client encountered " + "a serious internal problem while trying to communicate with OSS, " + "such as not being able to access the network."); System.out.println("Error Message:" + ce.getMessage()); } finally { if (ossClient != null) { ossClient.shutdown(); } } }} ③ 项目集成:
package com.itheima.utils;import com.aliyun.oss.OSS;import com.aliyun.oss.OSSClientBuilder;import org.springframework.stereotype.Component;import org.springframework.web.multipart.MultipartFile;import java.io.*;import java.util.UUID;@Componentpublic class AliOSSUtils { private String endpoint = "https://oss-cn-hangzhou.aliyuncs.com"; private String accessKeyId = "LTAI5tMXhdNWon5c2k4fbSd4"; private String accessKeySecret = "3fleUo57n8X42mijz6WsCUKznmumw8"; private String bucketName = "web-tlias"; public String upload(MultipartFile file) throws IOException { // 获取上传的文件的输入流 InputStream inputStream = file.getInputStream(); // 避免文件覆盖 String originalFilename = file.getOriginalFilename(); String fileName = UUID.randomUUID().toString() + originalFilename.substring(originalFilename.lastIndexOf(".")); //上传文件到 OSS OSS ossClient = new OSSClientBuilder().build(endpoint, accessKeyId, accessKeySecret); ossClient.putObject(bucketName, fileName, inputStream); //文件访问路径 String url = endpoint.split("//")[0] + "//" + bucketName + "." + endpoint.split("//")[1] + "/" + fileName; // 关闭ossClient ossClient.shutdown(); return url;// 把上传到oss的路径返回 }}//@slf4j@RestControllerpublic class UploadController { @Autowired private AliOSSUtils aliOSSUtils; //阿里云oss上传文件 @PostMapping("/upload") public Result upload(MultipartFile image) throws IOException { //log.info("文件上传文件名:{}",image.getOriginalFilename()); //调用阿里云oss文件上传工具类 String url = aliOSSUtils.upload(image); //log.info("文件上传成功,上传文件url为:{}",url); return Result.success(url); }}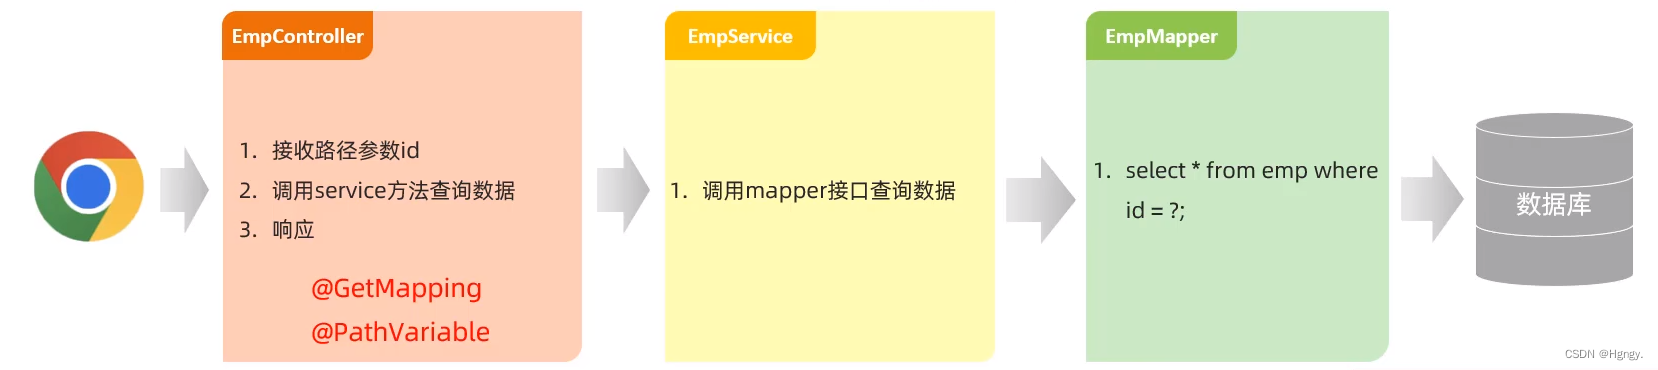
@RestControllerpublic class EmpController { @Autowired private EmpService empService; @GetMapping("/emps/{id}") public Result getById(@PathVariable Integer id){ //log.info("根据id查询员工信息:{}",id); Emp emp = empService.getById(id); return Result.success(emp); }}public interface EmpService { Emp getById(Integer id);}@Servicepublic class EmpServiceImpl implements EmpService {@Override public Emp getById(Integer id) { return empMapper.getById(id); }}@Mapperpublic interface EmpMapper { void delete(List ids);}@Mapperpublic interface EmpMapper { @Select("select * from emp where id = #{id}") Emp getById(Integer id);} 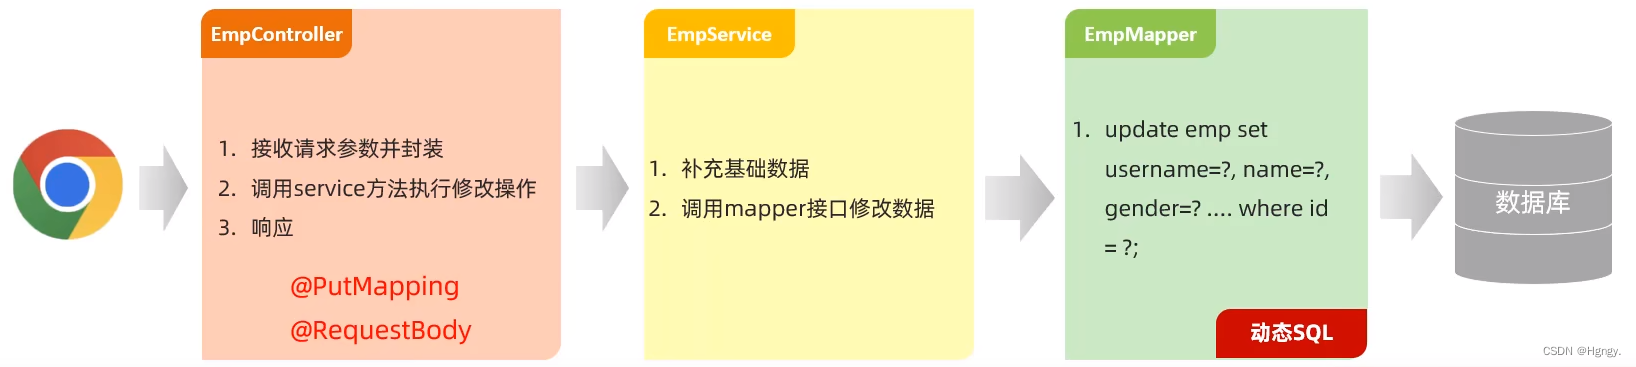
@RestControllerpublic class EmpController { @Autowired private EmpService empService; @PostMapping("/emps") public Result update(@RequestBody Emp emp){ //log.info("更新员工信息:{}",emp); empService.update(emp); return Result.success(); }}public interface EmpService { void update(Emp emp);}@Servicepublic class EmpServiceImpl implements EmpService {@Override public void update(Emp emp) { emp.setUpdateTime(LocalDateTime.now()); empMapper.update(emp); }}@Mapperpublic interface EmpMapper { void delete(List ids);} update emp username = #{username}, password = #{password}, name = #{name}, gender = #{gender}, image = #{image}, job = #{job}, entrydate = #{entrydate}, dept_id = #{deptId}, update_time = #{updateTime} where id = #{id} 问题分析:上章节中我们采用了阿里云OSS工具类上传文件,在文件上传中我们定义了许多参数,比如阿里云域名、密钥以及存储空间名等。而在之前的开发中我们采用的是硬编码,就会产生问题:不方便维护和管理。
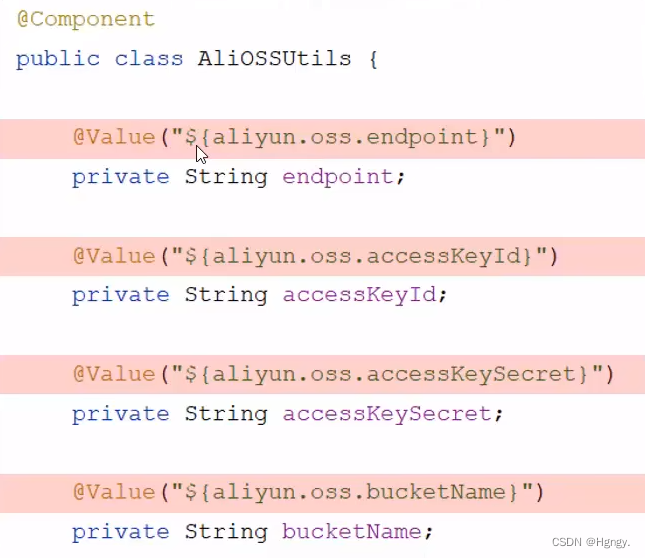
解决方案:我们可以把阿里云OSS工具类参数定义在properties配置文件当中。
#阿里云oss配置文件aliyun.oss.endpoint=https://oss-cn-hangzhou.aliyuncs.comaliyun.oss.accessKeyId=LTAI5tMXhdNWon5c2k4fbSd4aliyun.oss.accessKeySecret=3fleUo57n8X42mijz6WsCUKznmumw8aliyun.oss.bucketName=web-tlias@Componentpublic class AliOSSUtils { @Value("${aliyun.oss.endpoint}") private String endpoint; @Value("${aliyun.oss.accessKeyId}") private String accessKeyId; @Value("${aliyun.oss.accessKeySecret}") private String accessKeySecret; @Value("${aliyun.oss.bucketName}") private String bucketName;}在SpringBoot项目当中支持多种配置方式文件,在之前的学习过程当中,我们一直使用的都是application.properties配置文件,配置文件名是固定的。其实还要其他类型的配置文件:
| 类别 | 内容 | 对比 |
| xml |  | 臃肿 |
| properties |  | 层次结构不清晰 |
| yml / yaml (推荐) |  | 简洁、数据为中心 |
① 基本语法:
② yml数据格式:
user: name: zhangsan age: 18 password: 123456hobby: - java - game - sport③ yml配置:在application.yml中配置上述案例相关的配置项。
spring: # 数据库连接信息 datasource: driver-class-name: com.mysql.cj.jdbc.Driver url: jdbc:mysql://localhost:3306/tlias username: root password: 123456 # 文件上传配置 servlet: multipart: max-file-size: 10MB max-request-size: 100MB# Mybatis配置mybatis: configuration: log-impl: org.apache.ibatis.logging.stdout.StdOutImpl map-underscore-to-camel-case: true# 阿里云oss配置aliyun: oss: endpoint: https://oss-cn-hangzhou.aliyuncs.com accessKeyId: LTAI5tMXhdNWon5c2k4fbSd4 accessKeySecret: 3fleUo57n8X42mijz6WsCUKznmumw8 bucketName: web-tlias① 问题分析:
在前面的学习时,我们将阿里云oss中四个参数属性交给properties或者yaml配置文件集中的配置管理,而在工具类中我们要想用到这四个参数就需要在成员变量前加上 @Value注解来注入外部配置文件中的属性值,并且在 @Value注解中使用 ${ } 来指定我们注入的指定值。
但是在实际开发中,如果参数较多,在每一个成员变量前都加上 @Value注解就会繁琐。所以我们又引入了 @ConfigurationProperties注解 。
@Component@ConfigurationProperties(prefix = "aliyun.oss")public class AliOSSProperties { private String endpoint; private String accessKeyId; private String accessKeySecret; private String bucketName; public AliOSSProperties() { } public AliOSSProperties(String endpoint, String accessKeyId, String accessKeySecret, String bucketName) { this.endpoint = endpoint; this.accessKeyId = accessKeyId; this.accessKeySecret = accessKeySecret; this.bucketName = bucketName; } public String getEndpoint() { return endpoint; } public void setEndpoint(String endpoint) { this.endpoint = endpoint; } public String getAccessKeyId() { return accessKeyId; } public void setAccessKeyId(String accessKeyId) { this.accessKeyId = accessKeyId; } public String getAccessKeySecret() { return accessKeySecret; } public void setAccessKeySecret(String accessKeySecret) { this.accessKeySecret = accessKeySecret; } public String getBucketName() { return bucketName; } public void setBucketName(String bucketName) { this.bucketName = bucketName; } @Override public String toString() { return "AliOSSProperties{" + "endpoint='" + endpoint + '\'' + ", accessKeyId='" + accessKeyId + '\'' + ", accessKeySecret='" + accessKeySecret + '\'' + ", bucketName='" + bucketName + '\'' + '}'; }}@Componentpublic class AliOSSUtils { @Autowired private AliOSSProperties aliOSSProperties; public String upload(MultipartFile file) throws IOException { //获取阿里云oss参数 String endpoint = aliOSSProperties.getEndpoint(); String accessKeyId = aliOSSProperties.getAccessKeyId(); String accessKeySecret = aliOSSProperties.getAccessKeySecret(); String bucketName = aliOSSProperties.getBucketName();}注意:当我们完成上述操作时,会发现弹出下面提示框,我们可以添加依赖解决问题。但是这个是可选操作,并不影响我们代码的运行。
org.springframework.boot spring-boot-configuration-processor
② @ConfigurationProperties与@Value 对比:
| 相同点 |
|
| 不同点 |
|
来源地址:https://blog.csdn.net/hdakj22/article/details/130259507
--结束END--
本文标题: JavaWeb开发 —— SpringBootWeb综合案例
本文链接: https://www.lsjlt.com/news/418126.html(转载时请注明来源链接)
有问题或投稿请发送至: 邮箱/279061341@qq.com QQ/279061341
2024-10-23
2024-10-22
2024-10-22
2024-10-22
2024-10-22
2024-10-22
2024-10-22
2024-10-22
2024-10-22
2024-10-22
回答
回答
回答
回答
回答
回答
回答
回答
回答
回答


官方手机版

微信公众号

商务合作

0