文章目录 前言📣 1.前言概述📣 2.云服务器性能监控📣 3.MySQL8.1版本安装✨ 3.1 安装包下载✨ 3.2 解压安装包✨ 3.3 登
往期回顾:
华为云云耀云服务器L实例评测|Ubuntu云服务器申请使用
华为云耀云服务器L实例是新一代开箱即用、面向中小企业和开发者打造的全新轻量应用云服务器。云耀云服务器L实例提供丰富严选的应用镜像,实现应用一键部署,助力客户便捷高效的在云端构建电商网站、WEB应用、小程序、学习环境、各类开发测试等。
在上期对文章中,我们给大家讲解了如何拥有属于自己的一台云服务器,本节首先给大家介绍下如何运维运维服务器,然后再带大家进行Ubuntu系统mysql 8.1.0,并通过专业工具进行压力测试,我们一起看看性能。整体来看达到了预期的压侧效果。
linux操作系统在企业IT环境中的应用越来越广泛,其优异的性能、高安全性和低成本受到了许多企业的追捧。然而,Linux系统的监控却是一个不容忽视的问题。在Linux服务器数量增多、应用程序越来越复杂的环境下,Linux监控显得尤为重要,尤其咱们申请的云服务器。下面我们列举一些Linux监控的重要性。
- 保证系统稳定性
作为企业IT环境中的核心系统之一,Linux服务器的故障将会对企业运营带来严重后果。通过监控Linux系统的硬件和软件,可以及时发现问题并进行处理,防止因故障导致系统崩溃,保证系统稳定运行。- 预防安全威胁
操作系统具有高度的可定制性和灵活度,但同时也带来了一些安全风险。黑客和恶意软件往往会以各种方式获得入侵企业的机会。通过定期监控Linux系统,可以及时发现和处理有关Linux安全的问题,提高系统的安全性。- 提高系统性能
监控Linux系统可以实时跟踪其系统性能,如CPU利用率、内存使用率、磁盘容量等,这些指标对于系统性能的评价和优化至关重要。通过监控这些指标,可以及时发现系统瓶颈和性能问题,对系统进行优化和改进,提高服务器性能、减少资源浪费,从而减少企业成本。- 进行趋势分析
监控Linux系统可以收集大量的数据,这些数据包括历史运行情况、失败情况、容量利用情况等。通过对这些数据进行分析和解释,可以获得更多有关Linux系统状态的信息,如对未来负载和容量使用情况的预测,以及对使用模式和业务需求的评估和分析等。通过这些分析,企业可以更好地判断和满足其网络需求。- 进行问题判定和排查
监控Linux系统可以帮助管理员快速判定问题的来源,如确定是软件故障还是硬件故障等,并能帮助排查问题所在位置。当有故障发生时,管理员可以根据监控信息,快速找到问题所在,减少恢复系统运行所需的时间和成本。
总之,Linux监控对于企业IT环境的稳定运行、安全防护、提高性能、趋势分析以及故障排查等方面都具有重要意义。在面临日益复杂的企业IT环境时,Linux监控将成为一个不可或缺的工具,为企业带来更高的效益和利润。
那么申请的华为云服务器,通过以下方法,可以对服务器的各种性能进行全方位的监控。
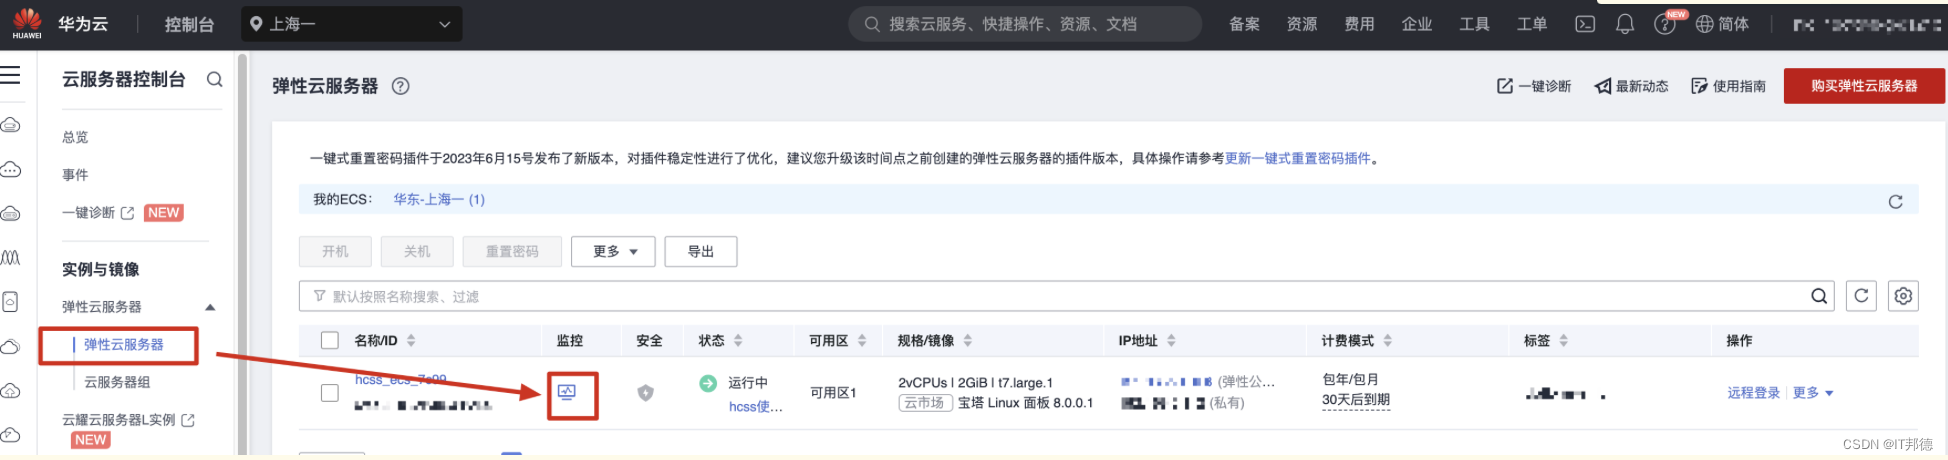
1)点击控制台,找到云服务器,单击监控项,就可以看到一些基础监控。
2)操作系统的监控及进程监控需要安装插件即可
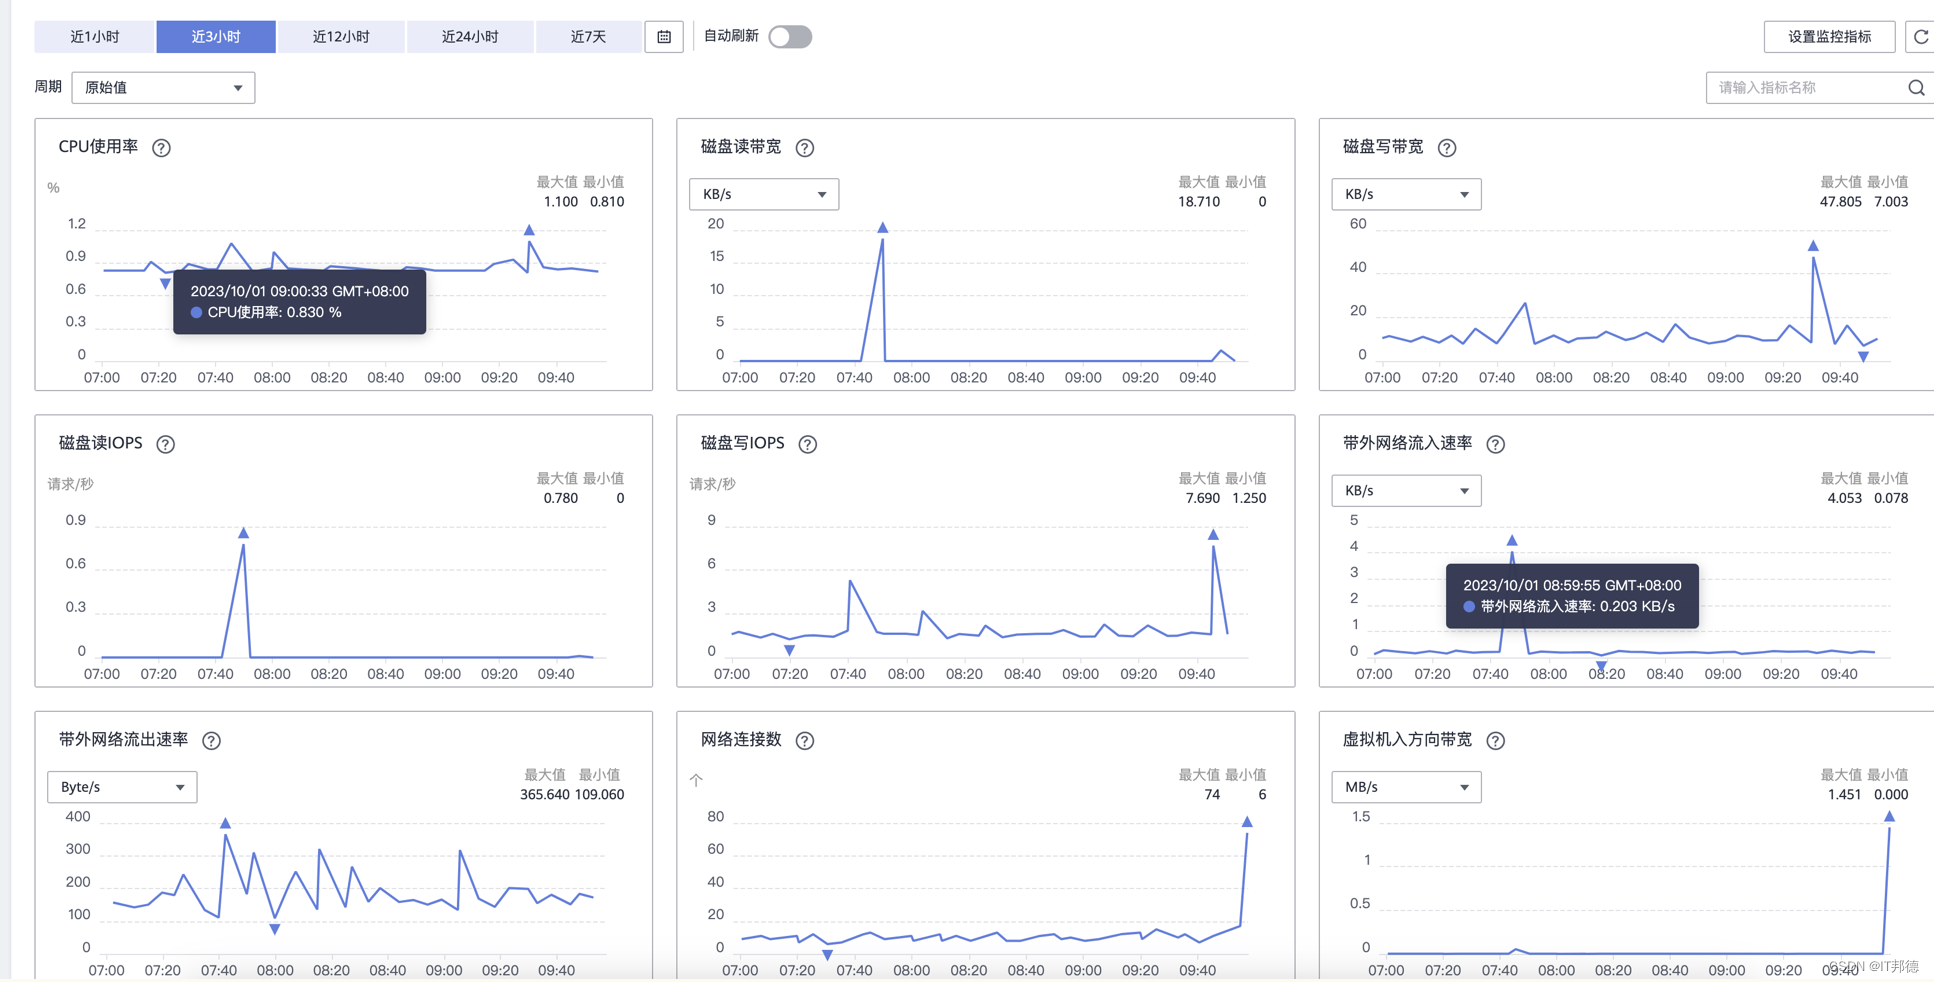
安装插件指引,安装后我们就可以对操作系统做各种监控,非常方便。1)获取插件安装命令cd /usr/local && curl -k -O https://obs.cn-east-3.myhuaweicloud.com/uniagent-cn-east-3/script/agent_install.sh && bash agent_install.sh2)登录虚拟机,在服务器列表使用root账号远程登录目标虚拟机。3)登录成功后,粘贴命令内容后点击发送按钮,按回车键开始执行命令。4)反馈如下则安装成功,等待3-5分钟插件即可正常采集监控数据。安装Agent前请确保 DNS与安全组配置,正确修改DNS(命令行方式)使用root帐号,登录ECS。输入"vi /etc/resolv.conf",打开文件。在文件中添加"nameserver 100.125.1.250"和"nameserver 100.125.21.250",输入:wq,按“Enter”保存并退出


首先要确定自己的操作系统版本,通过以下命令
root@hCSS-ecs-7c99:~# lsb_release -a
No LSB modules are available.
Distributor ID: Ubuntu
Description: Ubuntu 22.04.1 LTS
Release: 22.04
Codename: jammy
通过官网连接,按照下图下载安装包
Https://dev.mysql.com/downloads/mysql/
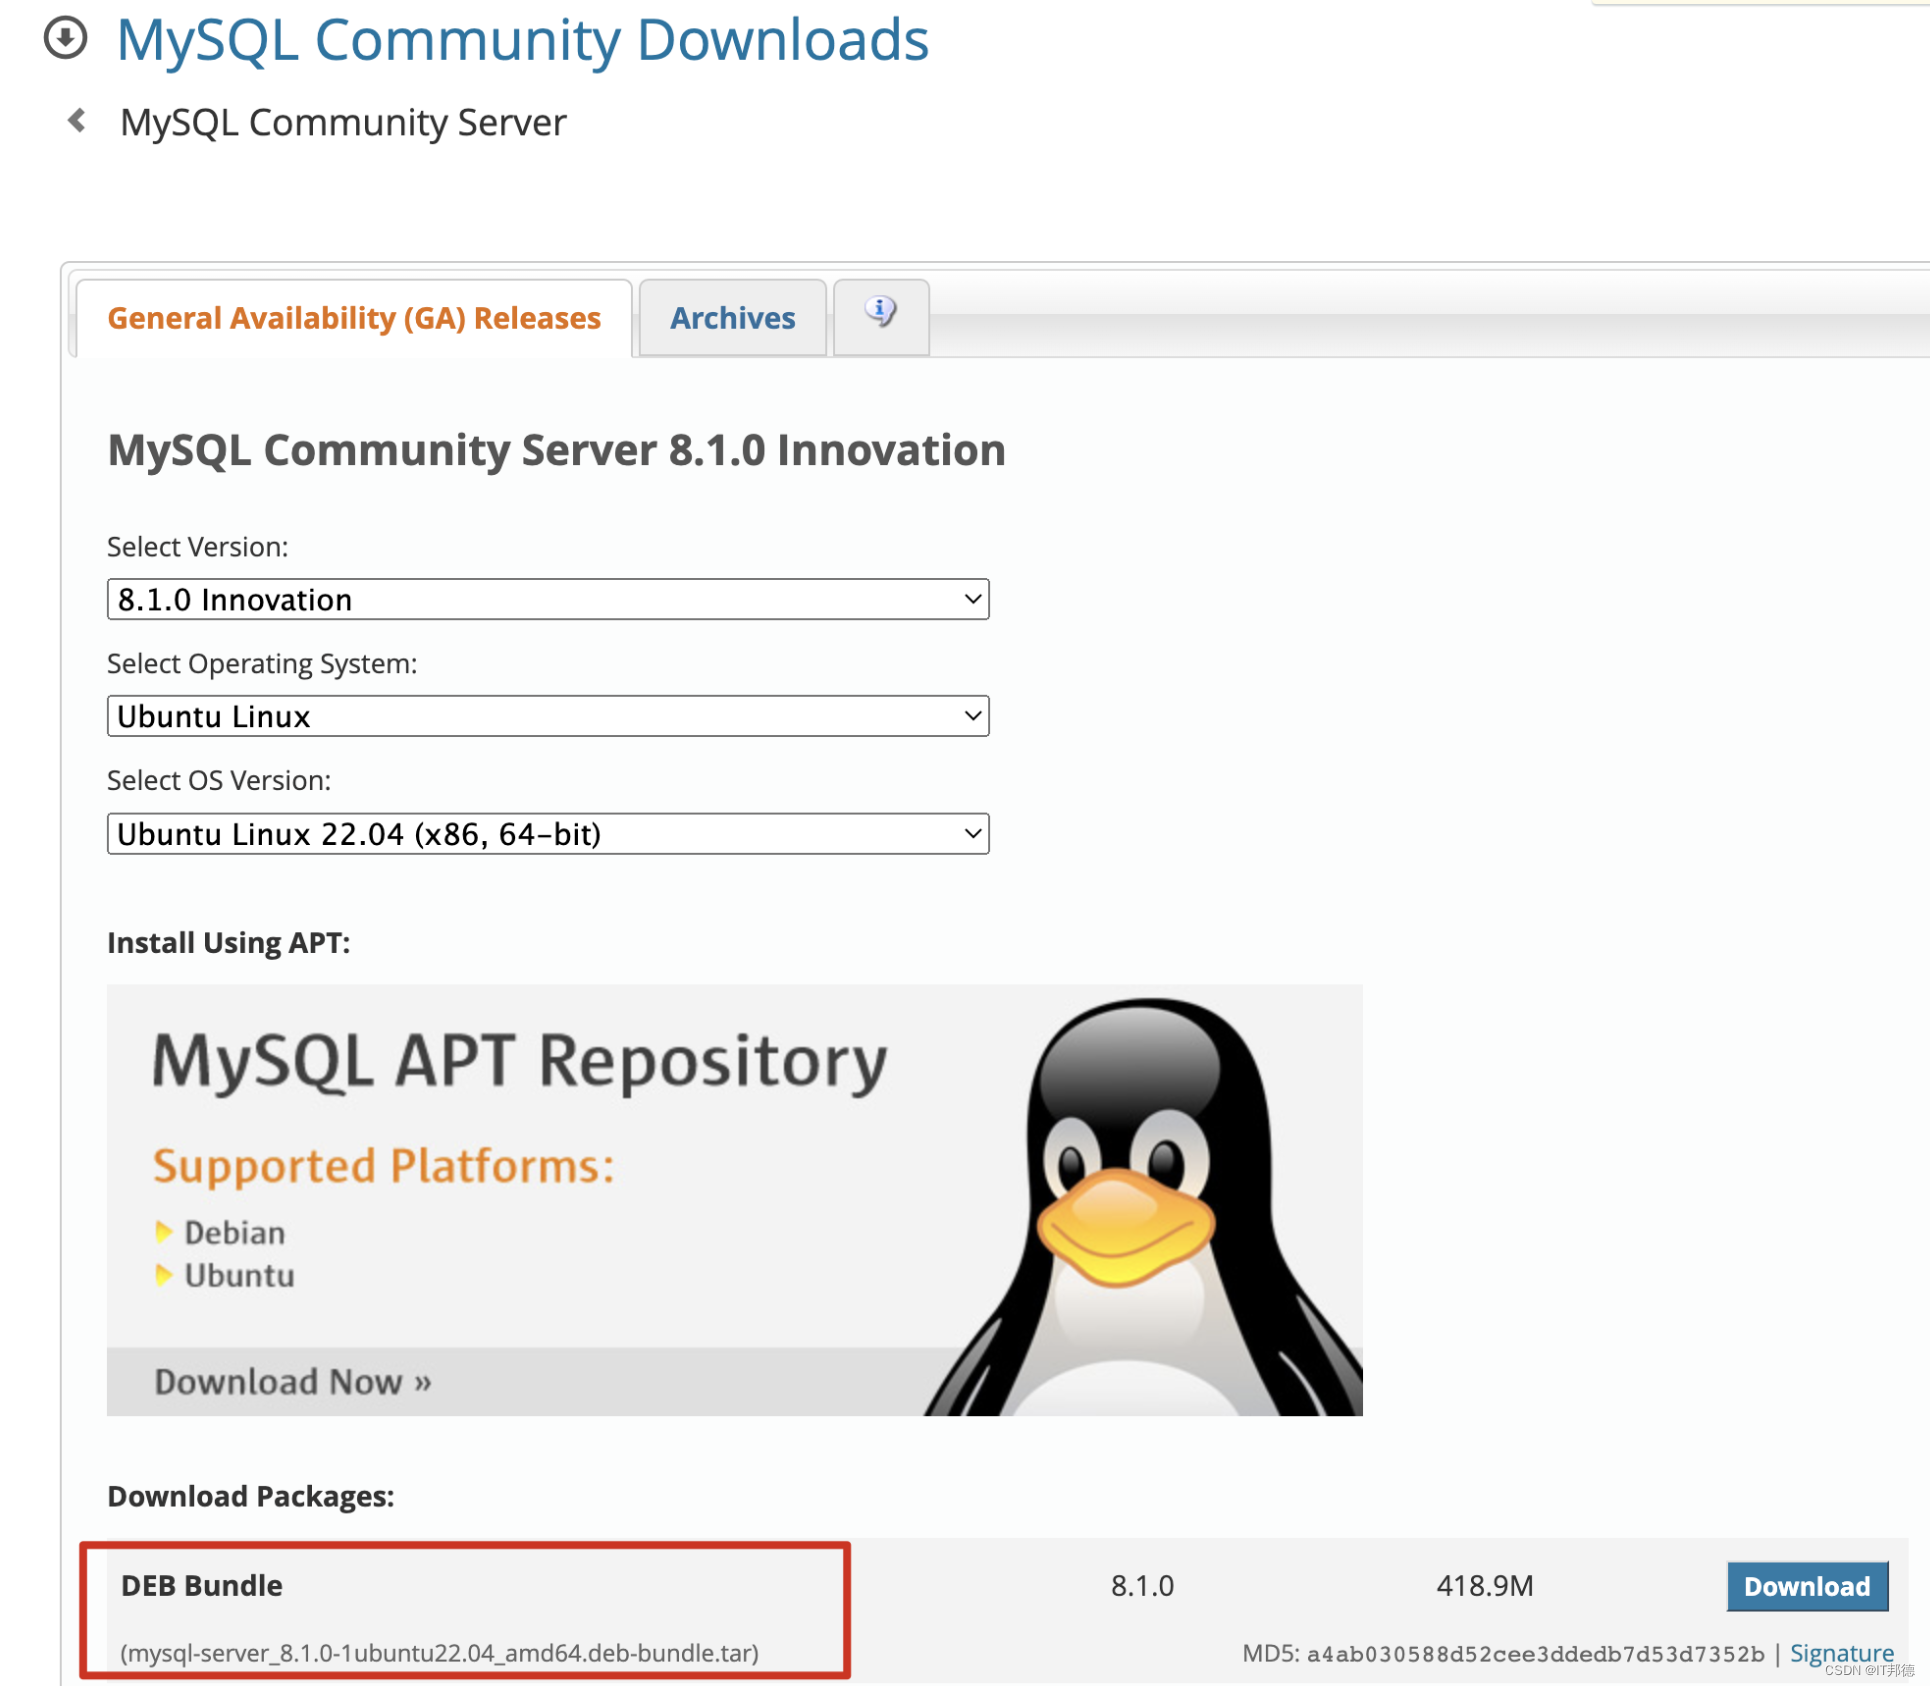
1)将下载的mysql安装包上传到/usr/local/mysql目录下root@hcss-ecs-7c99:~# mkdir -p /usr/local/mysql2)解压MySQL安装包root@hcss-ecs-7c99:~# ll /usr/local/mysqltotal 428952drwxr-xr-x 2 root root 4096 Oct 1 10:27 ./drwxr-xr-x 15 root root 4096 Oct 1 10:25 ../-rw-rw-rw- 1 root root 439234560 Oct 1 10:34 mysql-server_8.1.0-1ubuntu22.04_amd64.deb-bundle.tarroot@hcss-ecs-7c99:~# cd /usr/local/mysqlroot@hcss-ecs-7c99:/usr/local/mysql# sudo tar xvf mysql-server_8.1.0-1ubuntu22.04_amd64.deb-bundle.tarlibmysqlclient22_8.1.0-1ubuntu22.04_amd64.deblibmysqlclient-dev_8.1.0-1ubuntu22.04_amd64.debmysql-client_8.1.0-1ubuntu22.04_amd64.debmysql-common_8.1.0-1ubuntu22.04_amd64.debmysql-commUnity-client_8.1.0-1ubuntu22.04_amd64.debmysql-community-client-core_8.1.0-1ubuntu22.04_amd64.debmysql-community-client-plugins_8.1.0-1ubuntu22.04_amd64.debmysql-community-server_8.1.0-1ubuntu22.04_amd64.debmysql-community-server-core_8.1.0-1ubuntu22.04_amd64.debmysql-community-server-debug_8.1.0-1ubuntu22.04_amd64.debmysql-community-test_8.1.0-1ubuntu22.04_amd64.debmysql-community-test-debug_8.1.0-1ubuntu22.04_amd64.debmysql-server_8.1.0-1ubuntu22.04_amd64.debmysql-testsuite_8.1.0-1ubuntu22.04_amd64.deb3)依次安装包。由于包之间有依赖关系,一定要按照顺序安装
$ sudo dpkg -i mysql-common_8.1.0-1ubuntu22.04_amd64.deb
$ sudo dpkg -i mysql-community-client-plugins_8.1.0-1ubuntu22.04_amd64.deb
$ sudo dpkg -i libmysqlclient22_8.1.0-1ubuntu22.04_amd64.deb
$ sudo dpkg -i libmysqlclient-dev_8.1.0-1ubuntu22.04_amd64.deb
$ sudo dpkg -i mysql-community-client-core_8.1.0-1ubuntu22.04_amd64.deb
说明:此处要是缺少libaio1、libmecab2包,通过以下方法执行# sudo apt-get update# sudo apt-get install libaio1# sudo apt-get install libmecab2$ sudo dpkg -i mysql-community-client_8.1.0-1ubuntu22.04_amd64.deb
$ sudo dpkg -i mysql-client_8.1.0-1ubuntu22.04_amd64.deb
$ sudo dpkg -i mysql-community-server_8.1.0-1ubuntu22.04_amd64.deb
$ sudo dpkg -i mysql-community-server-core_8.1.0-1ubuntu22.04_amd64.deb
继续安装 sudo dpkg -i mysql-community-server_8.1.0-1ubuntu22.04_amd64.deb
安装完成后,继续安装 sudo dpkg -i mysql-server_8.1.0-1ubuntu22.04_amd64.deb
安装完成后验证MySQL是否安装成功mysql -u root -p 此处密码为beijing@123root@hcss-ecs-7c99:/etc/mysql# mysql -uroot -pEnter passWord: Welcome to the MySQL monitor. Commands end with ; or \g.Your MySQL connection id is 9Server version: 8.1.0 MySQL Community Server - GPLCopyright (c) 2000, 2023, oracle and/or its affiliates.Oracle is a reGIStered trademark of Oracle Corporation and/or itsaffiliates. Other names may be trademarks of their respectiveowners.Type 'help;' or '\h' for help. Type '\c' to clear the current input statement.mysql> status--------------mysql Ver 8.1.0 for Linux on x86_64 (MySQL Community Server - GPL)Connection id: 9Current database:Current user: root@localhostSSL: Not in useCurrent pager: stdoutUsing outfile: ''Using delimiter: ;Server version: 8.1.0 MySQL Community Server - GPLProtocol version: 10Connection: Localhost via UNIX SocketServer characterset: utf8mb4Db characterset: utf8mb4Client characterset: utf8mb4Conn. characterset: utf8mb4UNIX socket: /var/run/mysqld/mysqld.sockBinary data as: HexadecimalUptime: 1 hour 20 min 33 secThreads: 2 Questions: 6 Slow queries: 0 Opens: 119 Flush tables: 3 Open tables: 38 Queries per second avg: 0.001--------------mysql> select host,user from mysql.user;+-----------+------------------+| host | user |+-----------+------------------+| localhost | mysql.infoschema || localhost | mysql.session || localhost | mysql.sys || localhost | root |+-----------+------------------+4 rows in set (0.00 sec)创建用户,在给用户给权限mysql> create user root@'%' identified with mysql_native_password by 'root';mysql> grant all on *.* to root@'%' with grant option;mysql> flush privileges;要在Ubuntu上安装sysbench,您可以按照以下步骤进行操作:
1.首先,安装编译sysbench所需的依赖。打开终端,并执行以下命令:
sudo apt-get update
sudo apt-get install build-essential libmysqlclient-dev libssl-dev libpq-dev libtool automake
2.安装sysbench。
sudo apt-get install sysbench
3.查询版本
root@hcss-ecs-7c99:~# sysbench --version
sysbench 1.0.20
1) sysbench内置了几个测试指标。root@hcss-ecs-7c99:~# sysbench fileio helpsysbench 1.0.20 (using system luaJIT 2.1.0-beta3)fileio options: --file-num=N number of files to create [128] --file-block-size=N block size to use in all IO operations [16384] --file-total-size=SIZE total size of files to create [2G] --file-test-mode=STRING test mode {seqwr, seqrewr, seqrd, rndrd, rndwr, rndrw} --file-io-mode=STRING file operations mode {sync,async,mmap} [sync] --file-async-backlog=N number of asynchronous operatons to queue per thread [128] --file-extra-flags=[LIST,...] list of additional flags to use to open files {sync,dsync,direct} [] --file-fsync-freq=N do fsync() after this number of requests (0 - don't use fsync()) [100] --file-fsync-all[=on|off] do fsync() after each write operation [off] --file-fsync-end[=on|off] do fsync() at the end of test [on] --file-fsync-mode=STRING which method to use for synchronization {fsync, fdatasync} [fsync] --file-merged-requests=N merge at most this number of IO requests if possible (0 - don't merge) [0] --file-rw-ratio=N reads/writes ratio for combined test [1.5]2)创建5个文件,总共1G,每个文件大概200M,进行压力测试root@hcss-ecs-7c99:~# sysbench fileio --file-num=5 --file-total-size=1G preparesysbench 1.0.20 (using system LuaJIT 2.1.0-beta3)5 files, 209715Kb each, 1023Mb totalCreating files for the test...Extra file open flags: (none)Creating file test_file.0Creating file test_file.1Creating file test_file.2Creating file test_file.3Creating file test_file.41073807360 bytes written in 8.35 seconds (122.64 MiB/sec).root@hcss-ecs-7c99:~# ls -lh test*-rw------- 1 root root 205M Oct 1 17:01 test_file.0-rw------- 1 root root 205M Oct 1 17:01 test_file.1-rw------- 1 root root 205M Oct 1 17:01 test_file.2-rw------- 1 root root 205M Oct 1 17:01 test_file.3-rw------- 1 root root 205M Oct 1 17:01 test_file.4root@hcss-ecs-7c99:~# pwd/rootsysbench --events=5000 \ --threads=16 \ fileio \ --file-num=5 \ --file-total-size=1G \ --file-test-mode=rndrw \ --file-fsync-freq=0 \ --file-block-size=16384 \ run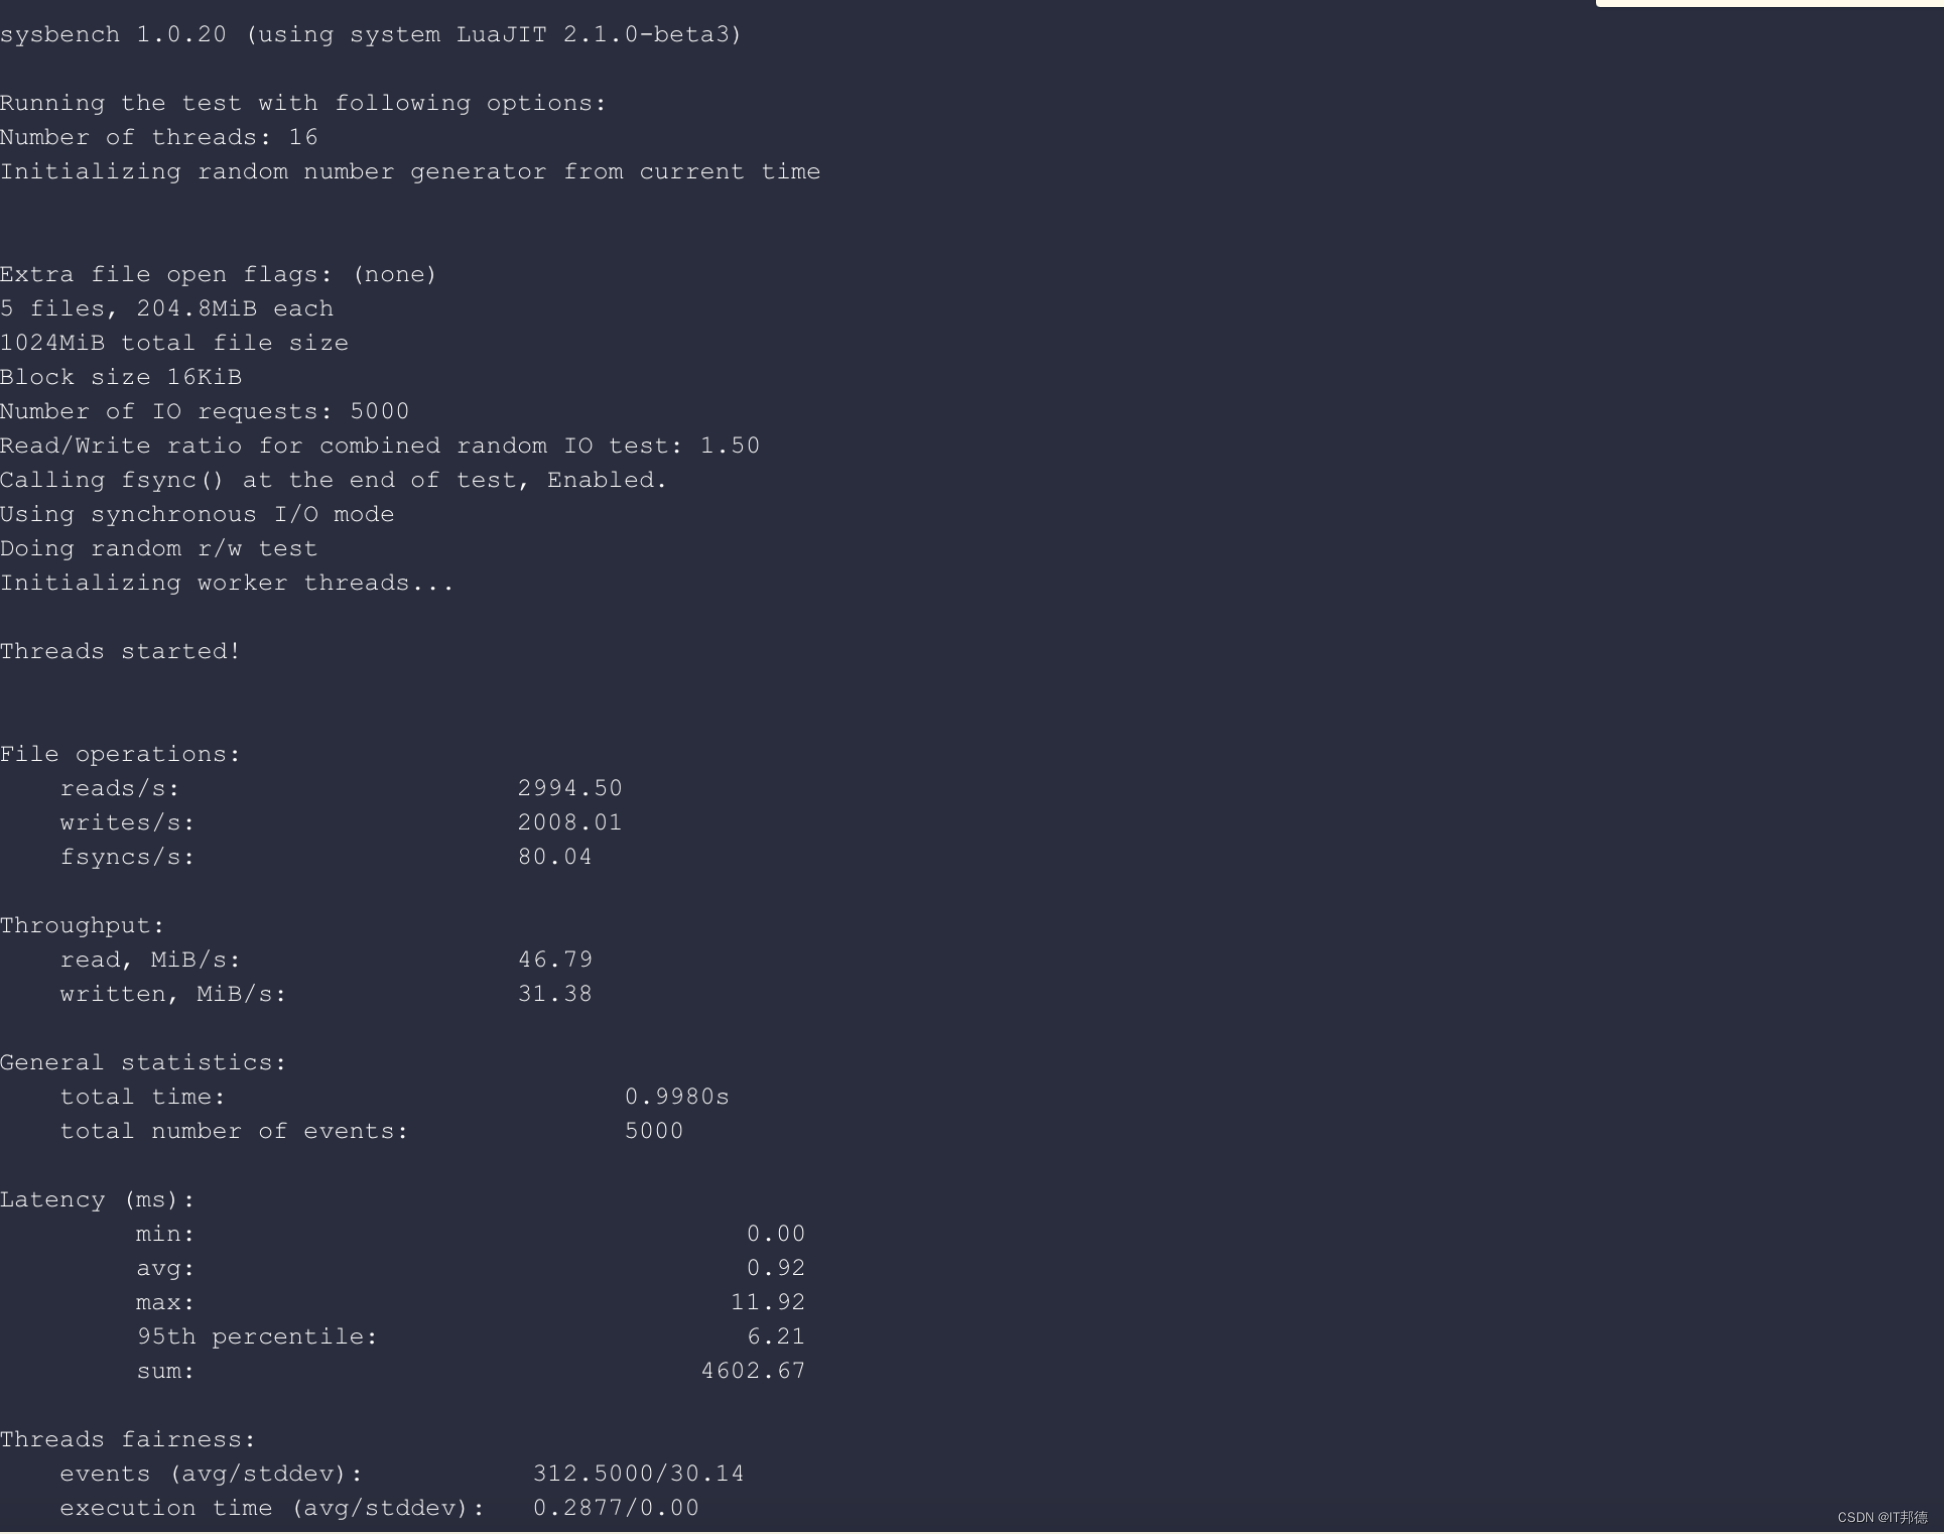
root@hcss-ecs-7c99:~# sysbench cpu --threads=40 --events=10000 --cpu-max-prime=20000 runsysbench 1.0.20 (using system LuaJIT 2.1.0-beta3)Running the test with following options:Number of threads: 40Initializing random number generator from current timePrime numbers limit: 20000Initializing worker threads...Threads started!CPU speed: events per second: 887.15General statistics: total time: 10.0229s total number of events: 8893Latency (ms): min: 2.22 avg: 44.72 max: 201.83 95th percentile: 94.10 sum: 397723.87Threads fairness: events (avg/stddev): 222.3250/1.71 execution time (avg/stddev): 9.9431/0.05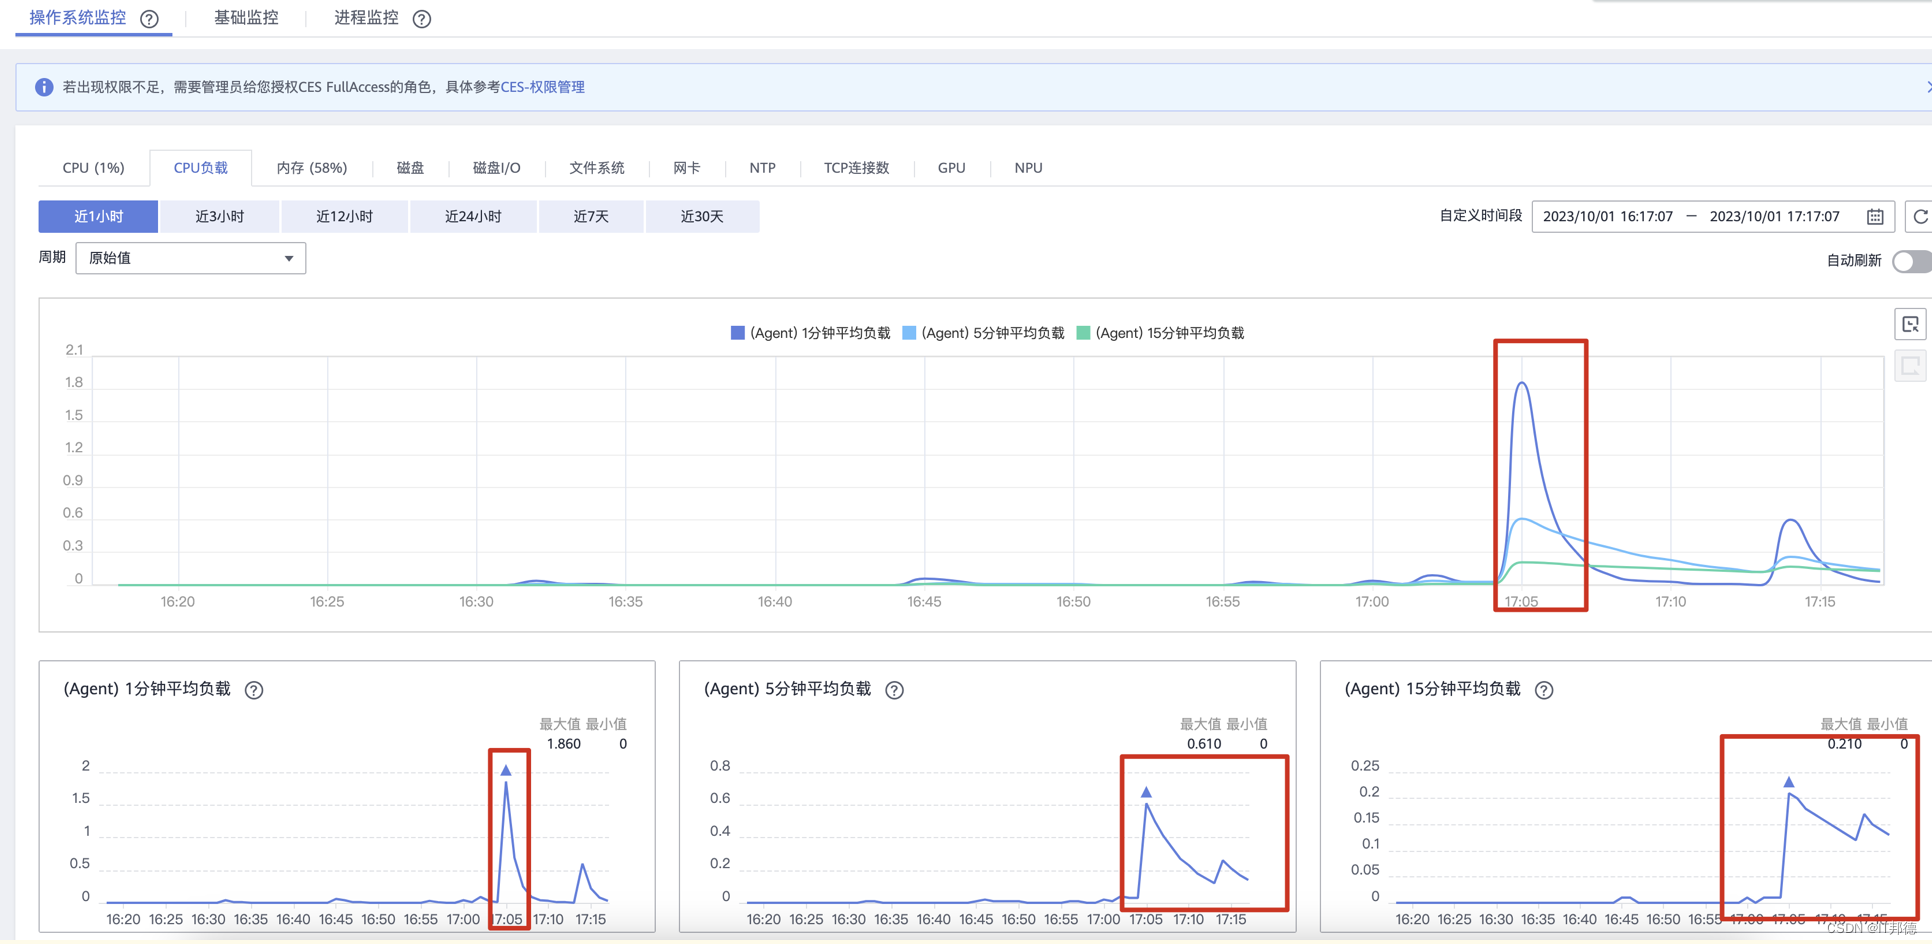
1)准备测试数据首先创建sysbench所需数据库sbtest(这是sysbench默认使用的库名,必须创建测试库)root@hcss-ecs-7c99:~# mysqladmin -h127.0.0.1 -uroot -p -P3306 create sbtest;root@hcss-ecs-7c99:~# mysql -uroot -pEnter password: Welcome to the MySQL monitor. Commands end with ; or \g.Your MySQL connection id is 15Server version: 8.1.0 MySQL Community Server - GPLCopyright (c) 2000, 2023, Oracle and/or its affiliates.Oracle is a registered trademark of Oracle Corporation and/or itsaffiliates. Other names may be trademarks of their respectiveowners.Type 'help;' or '\h' for help. Type '\c' to clear the current input statement.mysql> show databases;+--------------------+| Database |+--------------------+| infORMation_schema || mysql || performance_schema || sbtest || sys |+--------------------+5 rows in set (0.00 sec)2)测试过程sysbench --mysql-host=127.0.0.1 \ --mysql-port=3306 \ --mysql-user=root \ --mysql-password=beijing@123 \ /usr/share/sysbench/oltp_common.lua \ --tables=10 \ --table_size=100000 \ preparesysbench --threads=4 \ --time=20 \ --report-interval=5 \ --mysql-host=127.0.0.1 \ --mysql-port=3306 \ --mysql-user=root \ --mysql-password=beijing@123 \ /usr/share/sysbench/oltp_read_write.lua \ --tables=10 \ --table_size=100000 \ run
来源地址:https://blog.csdn.net/weixin_41645135/article/details/133467105
--结束END--
本文标题: 华为云云耀云服务器L实例评测|Ubuntu系统MySQL 8.1.0 Innovation压测
本文链接: https://www.lsjlt.com/news/424760.html(转载时请注明来源链接)
有问题或投稿请发送至: 邮箱/279061341@qq.com QQ/279061341
2024-10-23
2024-10-22
2024-10-22
2024-10-22
2024-10-22
2024-10-22
2024-10-22
2024-10-22
2024-10-22
2024-10-22
回答
回答
回答
回答
回答
回答
回答
回答
回答
回答


官方手机版

微信公众号

商务合作

0