创建simplecmdb项目一、创建项目simplecmdb,创建一个应用,startapp hostinfo,在setting中添加应用[root@133 ]# cd /op
创建simplecmdb项目
一、创建项目simplecmdb,创建一个应用,startapp hostinfo,在setting中添加应用
[root@133 ]# cd /opt/python/Django/
[root@133 djanGo]# django-admin.py startproject simplecmdb
[root@133 django]# cd simplecmdb/
[root@133 simplecmdb]# ls
manage.py  simplecmdb
[root@133 simplecmdb]# Python manage.py startapp hostinfo
[root@133 simplecmdb]# cd simplecmdb/
[root@133 simplecmdb]# vim settings.py
#添加app应用:hostinfo
INSTALLED_APPS = (
    'hostinfo',
)
#注释这一行,允许使用第三方的中间键
MIDDLEWARE_CLASSES = (
    #'django.middleware.csrf.CsrfViewMiddleware',
)

#修改语言编码和时区
LANGUAGE_CODE = 'zh-cn'
TIME_ZONE = 'Asia/Shanghai'

[root@133 django]# cd /opt/python/django/simplecmdb/
[root@133 simplecmdb]# ll
总用量 12
drwxr-xr-x 2 root root 4096 1月   4 11:13 hostinfo
-rwxr-xr-x 1 root root  253 1月   4 11:12 manage.py
drwxr-xr-x 2 root root 4096 1月   4 14:31 simplecmdb

#启动server
[root@133 simplecmdb]# nohup python manage.py runserver 112.65.140.133:8080 &[root@133 simplecmdb]# python manage.py runserver 112.65.140.133:8080
Validating models...
0 errors found
January 04, 2017 - 14:33:01
Django version 1.6.5, using settings 'simplecmdb.settings'
Starting development server at Http://112.65.140.133:8080/
Quit the server with CONTROL-C.
浏览器访问ok:http://11.65.140.13:8080/

二、创建数据模型,在hostinfo中定义数据模型
[root@133 simplecmdb]# cd /opt/python/django/simplecmdb/hostinfo/
[root@133 hostinfo]# ll
总用量 28
-rw-r--r-- 1 root root  63 1月   4 11:13 admin.py
-rw-r--r-- 1 root root 194 1月   4 14:33 admin.pyc
-rw-r--r-- 1 root root   0 1月   4 11:13 __init__.py
-rw-r--r-- 1 root root 137 1月   4 14:33 __init__.pyc
-rw-r--r-- 1 root root  57 1月   4 11:13 models.py
-rw-r--r-- 1 root root 191 1月   4 14:33 models.pyc
-rw-r--r-- 1 root root  60 1月   4 11:13 tests.py
-rw-r--r-- 1 root root  63 1月   4 11:13 views.py
[root@133 hostinfo]# vim models.py

from django.db import models

# Create your models here.
class Host(models.Model):
    hostname = models.CharField(max_length = 50)
    ip = models.IPAddressField()
    vendor = models.CharField(max_length = 50)
    product = models.CharField(max_length = 50)
    sn = models.CharField(max_length = 50)
    cpu_model = models.CharField(max_length = 50)
    cpu_num = models.IntegerField(max_length = 50)
    memory = models.CharField(max_length= 50)
osver = models.CharField(max_length = 50)初始化数据模型,即将数据模型保存到数据库中
#检查错误
[root@133 simplecmdb]# python manage.py validate
0 errors found
#查看同步将会执行的sql
[root@133 simplecmdb]# python manage.py sqlall hostinfo
BEGIN;
CREATE TABLE "hostinfo_host" (
"id" integer NOT NULL PRIMARY KEY,
"hostname" varchar(50) NOT NULL,
"ip" char(15) NOT NULL,
"vendor" varchar(50) NOT NULL,
"product" varchar(50) NOT NULL,
"sn" varchar(50) NOT NULL,
"cpu_model" varchar(50) NOT NULL,
"cpu_num" integer NOT NULL,
"memory" varchar(50) NOT NULL,
"osver" varchar(50) NOT NULL
)
;
COMMIT;
#同步models到sql
[root@133 simplecmdb]# python manage.py syncdb
Creating tables ...
Creating table django_admin_log
Creating table auth_permission
Creating table auth_group_permissions
Creating table auth_group
Creating table auth_user_groups
Creating table auth_user_user_permissions
Creating table auth_user
Creating table django_content_type
Creating table django_session
Creating table hostinfo_host
You just installed Django's auth system, which means you don't have any superusers defined.
Would you like to create one now? (yes/no): yes
Username (leave blank to use 'root'): root #用户
Email address: david-dai@zamplus.com #邮箱
PassWord: #输入密码
Password (again):
Superuser created successfully.
Installing custom SQL ...
Installing indexes ...
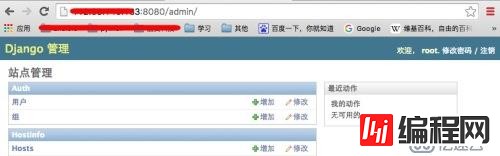
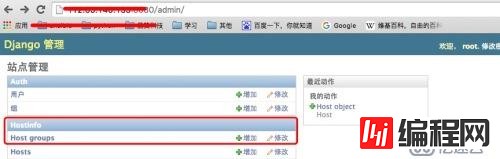
Installed 0 object(s) from 0 fixture(s)打开admin页面,输入用户名和密码登录,但是看不到host页面,
如果需要看到host页面,需要注册host class,把需要显示的字段在admin.py中定义,并且在admin.site.reGISter中注册

[root@133 simplecmdb]# cd /opt/python/django/simplecmdb/hostinfo/
[root@133 hostinfo]# vim admin.py
from django.contrib import admin
from hostinfo.models import Host #导入hostinfo目录下的models.py这个模块
# Register your models here.#把需要显示的字段定义好,才能在WEB页面上显示出来
class HostAdmin(admin.ModelAdmin):
list_display = [
'hostname',
'ip',
'cpu_model',
'cpu_num',
'memory',
'vendor',
'product',
'osver',
'sn'
]
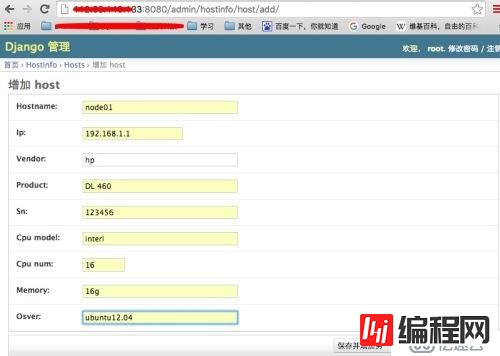
admin.site.register(Host, HostAdmin)注册之后,发现Host在页面上显示了
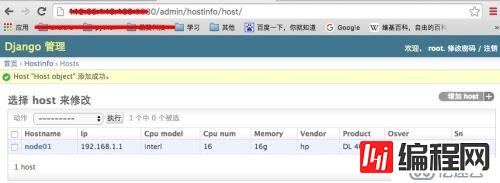
点击添加host,增加了host的配置,然后点击保存,即可显示相关的信息。
错误记录:
在定义models.py中定义字段的时候,vendor错误写成了vender,导致后面页面去数据库取数据找不到vendor字段,报错
解决办法:
1、删除db.sqlite3
2、修改models.py,vender修改为vendor,重新初始化sqlite3数据库
三、定义url访问路径(mvc中的c,正则表达式,当用户访问/hostinfo/collect 这个url,让hostinfo应用中的views中的collect函数处理
[root@133 simplecmdb]# vim urls.py
from django.conf.urls import patterns, include, url
from django.contrib import admin
admin.autodiscover()
urlpatterns = patterns('',
    # Examples:
    # url(r'^$', 'simplecmdb.views.home', name='home'),
    # url(r'^blog/', include('blog.urls')),
    url(r'^admin/', include(admin.site.urls)),
    url(r'^hostinfo/collect/$','hostinfo.views.collect'),#
)
四、views.py定义访问的方法
[root@133 simplecmdb]# vim /opt/python/django/simplecmdb/hostinfo/views.py
from django.shortcuts import render
from django.http import HttpResponse
from hostinfo.models import Host
# Create your views here.
def collect(req):
    if req.POST:
        hostname = req.POST.get('hostname')
        ip = req.POST.get('ip')
        osver = req.POST.get('osver')
        vendor = req.POST.get('vendor')
        product = req.POST.get('product')
        cpu_model = req.POST.get('cpu_model')
        cpu_num = req.POST.get('cpu_num')
        memory = req.POST.get('memory')
        sn = req.POST.get('sn')
        host = Host()
        host.hostname = hostname
        host.ip = ip
        host.osver = osver
        host.vendor = vendor
        host.product = product
        host.cpu_model = cpu_model
        host.cpu_num = cpu_num
        host.memory = memory
        host.sn = sn
        host.save()
        return HttpResponse('OK')
    else:
        return HttpResponse('no data')
#使用curl方法,传递参数,用get得到参数
[root@133 hostinfo]# curl -d hostname='node02' -d ip='192.168.1.2' -d osver='Centos6.5' -d vendor='HP' -d product='BL 380' -d sn='##$$123' -d cpu_model='Intel' -d cpu_num=16 -d memory='32G' http://112.65.140.133:8080/hostinfo/collect/
OK
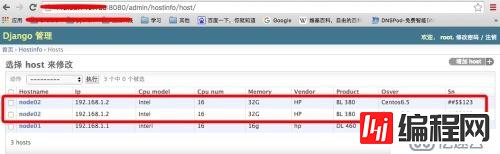
1、使用shell添加主机,shell脚本里面就是curl命令,查看页面,结果显示node03已经添加
[root@133 django]# cd /opt/python/django/
[root@133 django]# vim data.sh
curl -d hostname='node03' -d ip='192.168.1.3' -d osver='Centos6.5' -d vendor='HP' -d product='BL 380' -d sn='##$$123' -d cpu_model='Intel' -d cpu_num=16 -d memory='32G'

[root@133 django]# sh data.sh
OK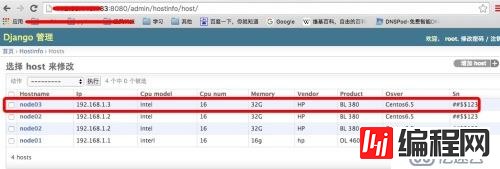
2、python下urllib,urllib2,httplib方法传递数据 ,查看node04传递成功
[root@133 django]# ipython
In [4]: import urllib, urllib2
In [5]: help(urllib2.urlopen)
Help on function urlopen in module urllib2:
urlopen(url, data=None, timeout=<object object>)
In [7]: req = urllib2.urlopen('http://112.65.140.133:8080/hostinfo/collect')

In [8]: req.read()
Out[8]: 'no data'  #直接返回no data
#'123'格式不对,需要是post格式才可以
In [12]: req = urllib2.urlopen('http://112.65.140.133:8080/hostinfo/collect',‘123’)
  File "<ipython-input-12-eb17fa9ebc01>", line 1
    req = urllib2.urlopen('http://112.65.140.133:8080/hostinfo/collect',‘123’)                                                                      ^
SyntaxError: invalid syntax

In [13]: help(urllib.urlencode)
Help on function urlencode in module urllib:
urlencode(query, doseq=0)
    Encode a sequence of two-element tuples or dictionary into a URL query string.

    If any values in the query arg are sequences and doseq is true, each
    sequence element is converted to a separate parameter.

    If the query arg is a sequence of two-element tuples, the order of the
    parameters in the output will match the order of parameters in the
    input.


In [16]: urllib.urlencode({'hostname':'node05'})
Out[16]: 'hostname=node05'

In [18]: urllib.urlencode({'hostname':'node05','ip':'192.168.1.5'})
Out[18]: 'ip=192.168.1.5&hostname=node05'

In [19]: dic = {'hostname':'node04','ip':'192.168.1.4','osver':'CentOS6.5','vendor':'david','p
    ...: roduct':'BL 380','cpu_model':'Intel','cpu_num':'16','memory':'16G','sn':'12345'}

    In [25]: dic
Out[25]:
{'vendor': 'david',
 'cpu_model': 'Intel',
 'cpu_num': '16',
 'hostname': 'node04',
 'ip': '192.168.1.4',
 'memory': '16G',
 'osver': 'CentOS6.5',
 'product': 'BL 380',
 'sn': '12345'}

In [20]: data = urllib.urlencode(dic)
In [21]: data
Out[21]: 'product=BL+380&vendor=david&osver=CentOS6.5&sn=12345&memory=16G&cpu_num=16&ip=192.168.1.4&hostname=node04&cpu_model=Intel'
In [12]: req = urllib2.urlopen('http://112.65.140.133:8080/hostinfo/collect/',data)
In [13]: req.read()
Out[13]: 'OK'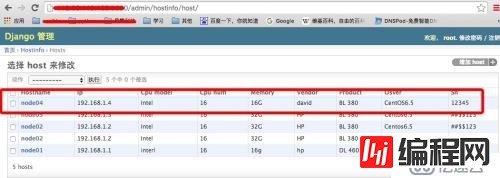
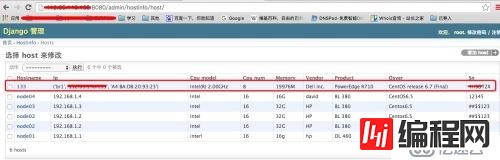
3、修改python脚本,直接修改将收集到的系统信息发送到服务器
[root@133 django]# cat sysinfORMation.py
#!/usr/bin/env python
import urllib,urllib2  #导入urllib模块

from subprocess import Popen,PIPE

def getIfconfig():
    p = Popen(['ifconfig'], stdout=PIPE)
    data = p.stdout.read()
    return data

def getDmi():
    p = Popen(['dmidecode'], stdout = PIPE)
    data = p.stdout.read()
    return data


def parseData(data):
    parsed_data = []
    new_line = ''
    data = [i for i in data.split('\n') if i ]
    for line in data:
        if line[0].strip():
            parsed_data.append(new_line)
            new_line = line + '\n'
        else:
            new_line +=line + '\n'
    parsed_data.append(new_line)
    return parsed_data

def parseIfconfig(parsed_data):
    dic = {}
    tuple_addr= ('lo','vir','vnet','em3','em4')
    parsed_data = [i for i in parsed_data if i and not i.startswith(tuple_addr)]
    for lines in parsed_data:
        line_list = lines.split('\n')
        devname = line_list[0].split()[0]
        Macaddr = line_list[0].split()[-1]
        ipaddr = line_list[1].split()[1].split(':')[1]
        break
    dic['ip'] = devname,ipaddr,macaddr
    return dic


def parseDmi(parsed_data):
    dic = {}
    parsed_data = [i for i in parsed_data if i.startswith('System Information')]
    parsed_data = [i for i in  parsed_data[0].split('\n')[1:] if i]
    dmi_dic =  dict ([i.strip().split(':') for i in parsed_data])
    dic ['vendor'] = dmi_dic['Manufacturer'].strip()
    dic ['product'] = dmi_dic['Product Name'].strip()
    dic ['sn'] = dmi_dic['Serial Number'].strip()
    return dic

def getHostname(f):
    with open(f) as fd:
        for line in fd:
            if line.startswith('HOSTNAME'):
                hostname = line.split('=')[1].strip()
                break
    return {'hostname':hostname}


def getOSver(f):
    with open(f) as fd:
        for line in fd:
            osver = line.strip()
            break
    return {'osver':osver}


def getcpu(f):
    num = 0
    with open(f) as fd:
        for line in fd:
            if line.startswith('processor'):
                num +=1
            if line.startswith('model name'):
                cpu_model = line.split(':')[1].split()
                cpu_model = cpu_model[0] + ' '+cpu_model[-1]
    return {'cpu_num':num, 'cpu_model':cpu_model}

def getMemory(f):
    with open(f) as fd:
        for line in fd:
            if line.startswith('MemTotal'):
                mem = int(line.split()[1].strip())
                break
    mem = "%s" % int(mem/1024.0)+'M'
    return {'memory':mem}


if __name__ == "__main__":
    dic = {}
    data_ip = getIfconfig()
    parsed_data_ip = parseData(data_ip)
    ip = parseIfconfig(parsed_data_ip)

    data_dmi = getDmi()
    parsed_data_dmi = parseData(data_dmi)
    dmi = parseDmi(parsed_data_dmi)

    hostname = getHostname('/etc/sysconfig/network')
    osver = getOSver('/etc/issue')
    cpu = getCpu('/proc/cpuinfo')
    mem = getMemory('/proc/meminfo')

    dic.update(ip)
    dic.update(dmi)
    dic.update(hostname)
    dic.update(cpu)
    dic.update(mem)
    dic.update(osver)
    #将字典dic内容转换为urlencode格式,并用urlopen打开网页并传递数据,使用req.read()返回结果
    d = urllib.urlencode(dic)
    req = urllib2.urlopen('http://112.65.140.133:8080/hostinfo/collect/',d)
    print req.read()

[root@133 django]# python sysinformation.py
OK
网页查看,真实的系统信息已经收集到了
五、对收集的主机信息进行分组管理
创建HostGroup表,models.py
[root@133 simplecmdb]# cd /opt/python/django/simplecmdb/hostinfo/
[root@133 hostinfo]# ll
总用量 32
-rw-r--r-- 1 root root  405 1月   4 15:38 admin.py
-rw-r--r-- 1 root root  669 1月   4 16:10 admin.pyc
-rw-r--r-- 1 root root    0 1月   4 11:13 __init__.py
-rw-r--r-- 1 root root  137 1月   4 14:33 __init__.pyc
-rw-r--r-- 1 root root  498 1月   4 15:25 models.py
-rw-r--r-- 1 root root  738 1月   4 15:25 models.pyc
-rw-r--r-- 1 root root   60 1月   4 11:13 tests.py
-rw-r--r-- 1 root root 1099 1月   4 17:17 views.py
-rw-r--r-- 1 root root 1115 1月   4 17:17 views.pyc
[root@133 hostinfo]# vim models.py

from django.db import models

# Create your models here.
class Host(models.Model):
    hostname = models.CharField(max_length = 50)
    ip = models.IPAddressField()
    vendor = models.CharField(max_length = 50)
    product = models.CharField(max_length = 50)
    sn = models.CharField(max_length = 50)
    cpu_model = models.CharField(max_length = 50)
    cpu_num = models.IntegerField(max_length = 50)
    memory = models.CharField(max_length = 50)
    osver = models.CharField(max_length = 50)

class HostGroup(models.Model):
    groupname = models.CharField(max_length = 50)
    members = models.ManyToManyField(Host)

#同步数据库,创建了2个表
[root@133 hostinfo]# cd ..
[root@133 simplecmdb]# ll
总用量 60
-rw-r--r-- 1 root root 35840 1月   4 17:50 db.sqlite3
drwxr-xr-x 2 root root  4096 1月   4 20:10 hostinfo
-rwxr-xr-x 1 root root   253 1月   4 11:12 manage.py
-rw------- 1 root root  8640 1月   4 16:59 nohup.out
drwxr-xr-x 2 root root  4096 1月   4 18:49 simplecmdb
[root@133 simplecmdb]# python manage.py syncdb
Creating tables ...
Creating table hostinfo_hostgroup_members
Creating table hostinfo_hostgroup
Installing custom SQL ...
Installing indexes ...
Installed 0 object(s) from 0 fixture(s)


[root@133 simplecmdb]# ll
总用量 68
-rw-r--r-- 1 root root 41984 1月   4 20:10 db.sqlite3
drwxr-xr-x 2 root root  4096 1月   4 20:10 hostinfo
-rwxr-xr-x 1 root root   253 1月   4 11:12 manage.py
-rw------- 1 root root  8640 1月   4 16:59 nohup.out
drwxr-xr-x 2 root root  4096 1月   4 18:49 simplecmdb
[root@133 simplecmdb]# sqlite3 db.sqlite3
SQLite version 3.6.20
Enter ".help" for instructions
Enter SQL statements terminated with a ";"
sqlite> .tables
auth_group                  django_admin_log
auth_group_permissions      django_content_type
auth_permission             django_session
auth_user                   hostinfo_host
auth_user_groups            hostinfo_hostgroup
auth_user_user_permissions  hostinfo_hostgroup_members
sqlite> .schema hostinfo_hostgroup
CREATE TABLE "hostinfo_hostgroup" (
    "id" integer NOT NULL PRIMARY KEY,
    "groupname" varchar(50) NOT NULL
);
sqlite> .schema hostinfo_hostgroup_members
CREATE TABLE "hostinfo_hostgroup_members" (
    "id" integer NOT NULL PRIMARY KEY,
    "hostgroup_id" integer NOT NULL,
    "host_id" integer NOT NULL REFERENCES "hostinfo_host" ("id"),
    UNIQUE ("hostgroup_id", "host_id")
);
CREATE INDEX "hostinfo_hostgroup_members_27f00f5d" ON "hostinfo_hostgroup_members" ("host_id");
CREATE INDEX "hostinfo_hostgroup_members_521bb4b0" ON "hostinfo_hostgroup_members" ("hostgroup_id");
sqlite>
sqlite> .exit
注册数据库,admin.py
[root@133 hostinfo]# vim /opt/python/django/simplecmdb/hostinfo/admin.py

from django.contrib import admin
from hostinfo.models import Host,HostGroup
# Register your models here.
class HostAdmin(admin.ModelAdmin):
    list_display = [
            'hostname',
            'ip',
            'cpu_model',
            'cpu_num',
            'memory',
            'vendor',
            'product',
            'osver',
            'sn'
                   ]
class HostGroupAdmin(admin.ModelAdmin):
    list_display = ['groupname']

admin.site.register(Host, HostAdmin)
admin.site.register(HostGroup,HostGroupAdmin)
可以看到Host groups组
如果需要分组的时候显示主机名hostname,需要在modles中继承并重写self方法
[root@133 hostinfo]# vim /opt/python/django/simplecmdb/hostinfo/models.py

from django.db import models

# Create your models here.
class Host(models.Model):
    hostname = models.CharField(max_length = 50)
    ip = models.IPAddressField()
    vendor = models.CharField(max_length = 50)
    product = models.CharField(max_length = 50)
    sn = models.CharField(max_length = 50)
    cpu_model = models.CharField(max_length = 50)
    cpu_num = models.IntegerField(max_length = 50)
    memory = models.CharField(max_length = 50)
    osver = models.CharField(max_length = 50)

#这里指定使用hostname显示
    def __unicode__(self):
        return self.hostname


class HostGroup(models.Model):
    groupname = models.CharField(max_length = 50)
    members = models.ManyToManyField(Host)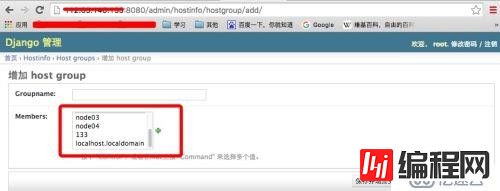
问题:关于def __unicode__(self): 他的作用是什么是啊,这return hostname 可是怎么和下边的函数HostGroup 关联起来的呢?
主机与主机组是通过members = models.ManyToManyField(Host)这个字段关联起来的。
def __unicode__(self)它的作用与在类里重写__str__()这个方法是一样的。让类返回一个字节串,否则members显示的是对象。
--结束END--
本文标题: 创建simplecmdb项目
本文链接: https://www.lsjlt.com/news/42702.html(转载时请注明来源链接)
有问题或投稿请发送至: 邮箱/279061341@qq.com QQ/279061341
下载Word文档到电脑,方便收藏和打印~
2024-05-14
2024-05-14
2024-05-14
2024-05-14
2024-05-14
2024-05-14
2024-05-14
2024-05-14
2024-05-14
2024-05-14
回答
回答
回答
回答
回答
回答
回答
回答
回答
回答


官方手机版

微信公众号

商务合作


0