Python 官方文档:入门教程 => 点击学习
目录本文速览1、matplotlib.pyplot api 方式添加子图2、面向对象方式添加子图3、matplotlib.pyplot add_subplot方式添加子图4、matp
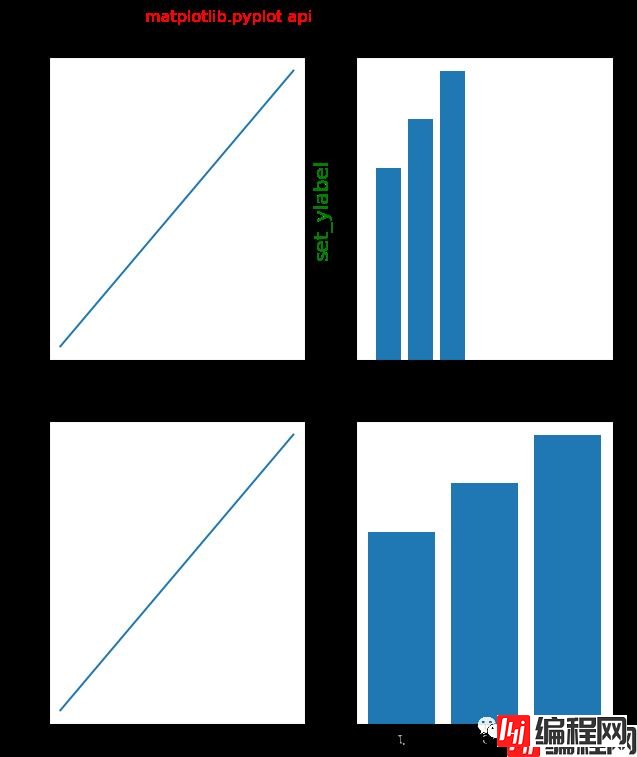
matplotlib.pyplot api 绘制子图

面向对象方式绘制子图

matplotlib.gridspec.GridSpec绘制子图

任意位置添加子图

关于pyplot和面向对象两种绘图方式可参考之前文章:matplotlib.pyplot api verus matplotlib object-oriented
import matplotlib.pyplot as plt
my_dpi=96
plt.figure(figsize=(480/my_dpi,480/my_dpi),dpi=my_dpi)
plt.subplot(221)
plt.plot([1,2,3])


plt.subplot(222)
plt.bar([1,2,3],[4,5,6])
plt.title('plt.subplot(222)')#注意比较和上面面向对象方式的差异
plt.xlabel('set_xlabel')
plt.ylabel('set_ylabel',fontsize=15,color='g')#设置y轴刻度标签
plt.xlim(0,8)#设置x轴刻度范围
plt.xticks(range(0,10,2))   # 设置x轴刻度间距
plt.tick_params(axis='x', labelsize=20, rotation=45)#x轴标签旋转、字号等

plt.subplot(223)
plt.plot([1,2,3])

plt.subplot(224)
plt.bar([1,2,3],[4,5,6])


plt.suptitle('matplotlib.pyplot api',color='r')
fig.tight_layout(rect=(0,0,1,0.9))


plt.subplots_adjust(left=0.125,
                    bottom=-0.51,
                    right=1.3,
                    top=0.88,
                    wspace=0.2,
                    hspace=0.2
                   )


#plt.tight_layout()

plt.show()
import matplotlib.pyplot as plt
my_dpi=96
fig, axs = plt.subplots(2,2,figsize=(480/my_dpi,480/my_dpi),dpi=my_dpi,
                       sharex=False,#x轴刻度值共享开启
                       sharey=False,#y轴刻度值共享关闭

                       )
#fig为matplotlib.figure.Figure对象
#axs为matplotlib.axes.Axes,把fig分成2x2的子图
axs[0][0].plot([1,2,3])
axs[0][1].bar([1,2,3],[4,5,6])
axs[0][1].set(title='title')#设置axes及子图标题
axs[0][1].set_xlabel('set_xlabel',fontsize=15,color='g')#设置x轴刻度标签
axs[0][1].set_ylabel('set_ylabel',fontsize=15,color='g')#设置y轴刻度标签
axs[0][1].set_xlim(0,8)#设置x轴刻度范围
axs[0][1].set_xticks(range(0,10,2))   # 设置x轴刻度间距
axs[0][1].tick_params(axis='x', #可选'y','both'
                      labelsize=20, rotation=45)#x轴标签旋转、字号等


axs[1][0].plot([1,2,3])
axs[1][1].bar([1,2,3],[4,5,6])

fig.suptitle('matplotlib object-oriented',color='r')#设置fig即整整张图的标题

#修改子图在整个figure中的位置(上下左右)
plt.subplots_adjust(left=0.125,
                    bottom=-0.61,
                    right=1.3,#防止右边子图y轴标题与左边子图重叠
                    top=0.88,
                    wspace=0.2,
                    hspace=0.2
                   )

# 参数介绍
'''
## The figure subplot parameters.  All dimensions are a fraction of the figure width and height.
#figure.subplot.left:   0.125  # the left side of the subplots of the figure
#figure.subplot.right:  0.9    # the right side of the subplots of the figure
#figure.subplot.bottom: 0.11   # the bottom of the subplots of the figure
#figure.subplot.top:    0.88   # the top of the subplots of the figure
#figure.subplot.wspace: 0.2    # the amount of width reserved for space between subplots,
                               # expressed as a fraction of the average axis width
#figure.subplot.hspace: 0.2    # the amount of height reserved for space between subplots,
                               # expressed as a fraction of the average axis height


'''


plt.show()

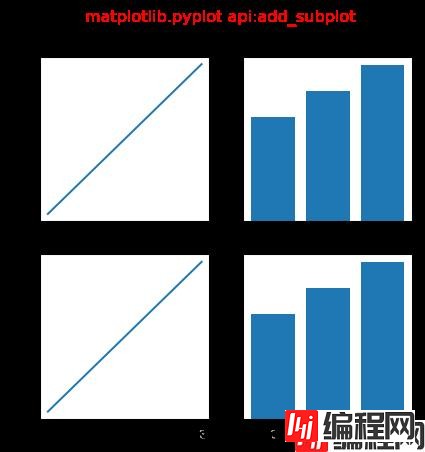
my_dpi=96
fig = plt.figure(figsize=(480/my_dpi,480/my_dpi),dpi=my_dpi)
fig.add_subplot(221)
plt.plot([1,2,3])

fig.add_subplot(222)
plt.bar([1,2,3],[4,5,6])
plt.title('fig.add_subplot(222)')

fig.add_subplot(223)
plt.plot([1,2,3])

fig.add_subplot(224)
plt.bar([1,2,3],[4,5,6])
plt.suptitle('matplotlib.pyplot api:add_subplot',color='r')
语法:matplotlib.gridspec.GridSpec(nrows, ncols, figure=None, left=None, bottom=None, right=None, top=None, wspace=None, hspace=None, width_ratiOS=None, height_ratios=None)
import matplotlib.pyplot as plt
from matplotlib.gridspec import GridSpec


fig = plt.figure(dpi=100,
                 constrained_layout=True,#类似于tight_layout,使得各子图之间的距离自动调整【类似excel中行宽根据内容自适应】

                )

gs = GridSpec(3, 3, figure=fig)#GridSpec将fiure分为3行3列,每行三个axes,gs为一个matplotlib.gridspec.GridSpec对象,可灵活的切片figure
ax1 = fig.add_subplot(gs[0, 0:1])
plt.plot([1,2,3])
ax2 = fig.add_subplot(gs[0, 1:3])#gs[0, 0:3]中0选取figure的第一行,0:3选取figure第二列和第三列

#ax3 = fig.add_subplot(gs[1, 0:2])
plt.subplot(gs[1, 0:2])#同样可以使用基于pyplot api的方式
plt.scatter([1,2,3],[4,5,6],marker='*')

ax4 = fig.add_subplot(gs[1:3, 2:3])
plt.bar([1,2,3],[4,5,6])

ax5 = fig.add_subplot(gs[2, 0:1])
ax6 = fig.add_subplot(gs[2, 1:2])

fig.suptitle("GridSpec",color='r')
plt.show()

import matplotlib.pyplot as plt
import matplotlib.gridspec as gridspec


def fORMat_axes(fig):
    for i, ax in enumerate(fig.axes):
        ax.text(0.5, 0.5, "ax%d" % (i+1), va="center", ha="center")
        ax.tick_params(labelbottom=False, labelleft=False)


# 子图中再绘制子图
fig = plt.figure(dpi=100,
                constrained_layout=True,
                )

gs0 = GridSpec(1, 2, figure=fig)#将figure切片为1行2列的两个子图

gs00 = gridspec.GridSpecFromSubplotSpec(3, 3, subplot_spec=gs0[0])#将以上第一个子图gs0[0]再次切片为3行3列的9个axes
#gs0[0]子图自由切片
ax1 = fig.add_subplot(gs00[:-1, :])
ax2 = fig.add_subplot(gs00[-1, :-1])
ax3 = fig.add_subplot(gs00[-1, -1])

gs01 = gs0[1].subgridspec(3, 3)#将以上第二个子图gs0[1]再次切片为3行3列的axes
#gs0[1]子图自由切片
ax4 = fig.add_subplot(gs01[:, :-1])
ax5 = fig.add_subplot(gs01[:-1, -1])
ax6 = fig.add_subplot(gs01[-1, -1])

plt.suptitle("GridSpec Inside GridSpec",color='r')
format_axes(fig)

plt.show()

plt.subplots(1,2,dpi=100)
plt.subplot(121)
plt.plot([1,2,3])


plt.subplot(122)
plt.plot([1,2,3])


plt.axes([0.7, 0.2, 0.15, 0.15], ## [left, bottom, width, height]四个参数(fractions of figure)可以非常灵活的调节子图中子图的位置
        )
plt.bar([1,2,3],[1,2,3],color=['r','b','g'])


plt.axes([0.2, 0.6, 0.15, 0.15],
        )
plt.bar([1,2,3],[1,2,3],color=['r','b','g'])

以上就是python+matplotlib绘制多子图的方法详解的详细内容,更多关于Python matplotlib多子图的资料请关注编程网其它相关文章!
--结束END--
本文标题: Python+matplotlib绘制多子图的方法详解
本文链接: https://www.lsjlt.com/news/119126.html(转载时请注明来源链接)
有问题或投稿请发送至: 邮箱/279061341@qq.com QQ/279061341
下载Word文档到电脑,方便收藏和打印~
2024-03-01
2024-03-01
2024-03-01
2024-02-29
2024-02-29
2024-02-29
2024-02-29
2024-02-29
2024-02-29
2024-02-29
回答
回答
回答
回答
回答
回答
回答
回答
回答
回答


官方手机版

微信公众号

商务合作


0