Python 官方文档:入门教程 => 点击学习
前言 在我们项目中经常会涉及到权限管理,特别是一些企业级后台应用中,那权限管理是必不可少的。这个时候就涉及到技术选型的问题。在
在我们项目中经常会涉及到权限管理,特别是一些企业级后台应用中,那权限管理是必不可少的。这个时候就涉及到技术选型的问题。在我以前项目中也没用到什么权限框架,就全部到一个spring mvc拦截器中去校验权限,当然,对需求比较少,小型的项目这也不失一个好的实现(实现简单,功能单一),但是对于一些比较大的应用,权限认证,session管理要求比较高的项目,如果再使用mvc拦截器,那就得不偿失了(需要自己去实现很多的代码)。
现在比较流行的权限校验框架有spring-security 和 apache-shiro。鉴于我们一直在使用spring全家桶,那我的项目中当然首选spring-security。下面我我所认识的spring-security来一步一步的看怎么实现。这里我抛砖引玉,欢迎大家指正。
我的完整代码在我的GitHub中 我的github ,欢迎大家留言讨论!!
Spring Security 是 Spring 家族中的一个安全管理框架,类似的安全框架还有apache-shiro。shiro以使用简单,功能强大而著称,本篇我们只讨论Spring Security,shiro就不再铺开讨论了。
以前我们在使用springMVC与Security 结合的时候,那一堆堆配置文件,长篇大论的xml看的人头大,幸好,现在有了SpringBoot,可以基于java config的方式配置,实现零配置,而且又兼有springboot的约定大于配置的前提,我们项目中的配置文件或需要配置的代码大大减少了。
spring-security最主要的功能包含:
1、认证(就是,你是谁)
2、授权(就是,你能干什么)
3、攻击防护 (防止伪造身份)
这三点其实就是我们在应用中常用到的。现在有了spring-security框架,就使得我们代码实现起来非常简单。
下面就来跟着我一步一步来看,怎么使用它
<dependency>
	<groupId>org.springframework.boot</groupId>
	<artifactId>spring-boot-starter-WEB</artifactId>
</dependency>
<dependency>
	<groupId>org.springframework.boot</groupId>
	<artifactId>spring-boot-starter-security</artifactId>
</dependency>
版本号就跟着springboot版本走
server.port=8080
server.servlet.context-path=/demo

spring.main.allow-bean-definition-overriding=true
spring.profiles.active=dev
这个时候,我们启动项目,就会在控制台看到这一行信息
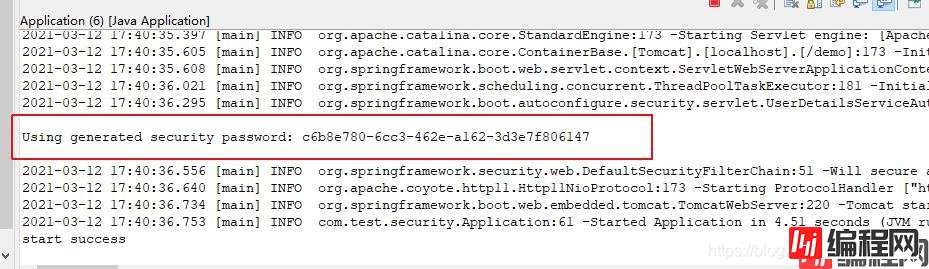
红色框出来的就是spring-security为你自动分配的账号为 user 的密码。
你现在如果想要访问系统里面的接口,那必须要经过这个权限验证。
随便打开一个接口都会跳转到内置的一个登陆页面中

我们看到,他跳转到一个地址为login的页面去了。这个时候我们输入用户名 user,密码为控制台打印出来的一串字符, 点击按钮 sign in 页面正常跳转到接口返回的数据。
我们发现,我们没有写一行代码,仅仅是在pom里面依赖了spring-boot-starter-security,框架就自动为我们做了最简单的验证功能,惊不惊喜意不意外。当然仅仅这么点当然不能满足我们项目的要求,不急,听我一步一步慢慢道来。
下面我们以最常见的企业级应用管理后台的权限为例
我们需要提出几个问题
1、用户的账号,密码保存在数据库中,登录的时候验证
2、用户登录成功后,每访问一个地址,后台都要判断该用户有没有这个菜单的权限,有,则放行;没有,则,拒绝访问。
3、系统中的一些静态资源则直接放行,不需要经过权限校验
4、系统中可能存在三种类型的资源地址
①:所有用户都能访问的地址(如:登录页面)
②:只要登录,就可以访问的地址(如:首页)
③:需要授权才能访问的地址
针对上面提出的几个问题,我们设计最常用的权限表结构模型
sys_user(用户表:保存用户的基本信息,登录名,密码等等)sys_role(角色表:保存了创建的角色)sys_menu(菜单表:保存了系统可访问的资源(包含菜单url等))sys_user_role(用户关联的角色:一个用户可以关联多个角色,最后用户的权限就是这多个角色权限的并集)sys_role_menu(角色关联的菜单:一个角色可以关联多个菜单) 5.spring-security主配置类
spring-security的主配置类,就需要我们自定义一个类继承 WebSecurityConfigurerAdapter 并且实现里面方法,如下:
package com.hp.springboot.admin.security;

import java.util.ArrayList;
import java.util.List;

import org.springframework.beans.factory.annotation.Autowired;
import org.springframework.context.annotation.Bean;
import org.springframework.context.annotation.Configuration;
import org.springframework.security.config.annotation.authentication.builders.AuthenticationManagerBuilder;
import org.springframework.security.config.annotation.method.configuration.EnableGlobalMethodSecurity;
import org.springframework.security.config.annotation.web.builders.httpsecurity;
import org.springframework.security.config.annotation.web.builders.WebSecurity;
import org.springframework.security.config.annotation.web.configuration.WebSecurityConfigurerAdapter;
import org.springframework.security.core.userdetails.UserDetailsService;
import org.springframework.security.crypto.bcrypt.BCryptPassWordEncoder;
import org.springframework.security.crypto.password.PasswordEncoder;
import org.springframework.security.web.authentication.UsernamePasswordAuthenticationFilter;

import com.hp.springboot.admin.constant.AdminConstants;
import com.hp.springboot.admin.interceptor.UrlAuthenticationInterceptor;
import com.hp.springboot.admin.security.handler.AdminAccessDeniedHandler;
import com.hp.springboot.admin.security.handler.AdminAuthenticationEntryPoint;
import com.hp.springboot.admin.security.handler.AdminAuthenticationFailureHandler;
import com.hp.springboot.admin.security.handler.AdminAuthenticationSuccesshandler;
import com.hp.springboot.common.configuration.CommonWebMvcConfigurer;


@Configuration
@EnableGlobalMethodSecurity(prePostEnabled = true) //开启Security注解的功能,如果你项目中不用Security的注解(hasRole,hasAuthority等),则可以不加该注解
public class AdminWebSecurityConfigurer extends WebSecurityConfigurerAdapter {

	@Autowired
	private CommonWebMvcConfigurer commonWebMvcConfigurer;

	@Override
	protected void configure(AuthenticationManagerBuilder auth) throws Exception {
		// 设置超级管理员
		auth.inMemoryAuthentication()
			.withUser(AdminConstants.ADMIN_USER)
		;

		// 其余账号通过数据库查询验证
		auth.userDetailsService(adminUserDetailsService()).passwordEncoder(passwordEncoder());
	}

	@Override
	public void configure(WebSecurity web) throws Exception {
		// 静态资源
		String[] ignoreArray = commonWebMvcConfigurer.getMergeStaticPatternArray();

		// 设置系统的静态资源。静态资源不会走权限框架
		web.ignoring().antMatchers(ignoreArray);
	}

	@Override
	protected void configure(HttpSecurity http) throws Exception {
		// 验证码过滤器
		http.addFilterBefore(new ValidateCodeFilter(), UsernamePasswordAuthenticationFilter.class);

		// 第一层免过滤列表
		// 就是所有人都可以访问的地址。区别于静态资源
		List<String> noFilterList = new ArrayList<>();
		noFilterList.add(AdminConstants.ACCESS_DENIED_URL);
		noFilterList.add(AdminConstants.VERIFY_CODE_URL);
		noFilterList.addAll(commonWebMvcConfigurer.getMergeFirstNoFilterList());

		http.fORMLogin()// 登录页面使用form提交的方式
		.usernameParameter("username").passwordParameter("password")// 设置登录页面用户名和密码的input对应name值(其实默认值就是username,password,所以这里可以不用设置)
		.loginPage(AdminConstants.LOGIN_PAGE_URL)// 设置登录页面的地址
		.loginProcessingUrl(AdminConstants.LOGIN_PROCESSING_URL)// 登录页面输入用户名密码后提交的地址
		.successHandler(adminAuthenticationSuccessHandler())// 登录成功处理
		.failureHandler(adminAuthenticationFailureHandler())// 登录失败的处理
		.permitAll()// 以上url全部放行,不需要校验权限
		.and()

		// 注销相关配置
		.loGout()
		.logoutUrl(AdminConstants.LOGOUT_URL)// 注销地址
		.logoutSuccessUrl(AdminConstants.LOGIN_PAGE_URL)// 注销成功后跳转地址(这里就是跳转到登录页面)
		.permitAll()// 以上地址全部放行
		.and().authorizeRequests()

		// 第一层免过滤列表
		// 不需要登录,就可以直接访问的地址
		.antMatchers(noFilterList.toArray(new String[noFilterList.size()])).permitAll() // 全部放行

		// 其他都需要权限控制
		// 这里使用.anyRequest().access方法,把权限验证交给指定的一个方法去处理。
		// 这里 hasPermission接受两个参数request和authentication
		.anyRequest().access("@UrlAuthenticationInterceptor.hasPermission(request, authentication)")

		// 异常处理
		.and().exceptionHandling()
		.accessDeniedHandler(new AdminAccessDeniedHandler())// 登录用户访问无权限的资源
		.authenticationEntryPoint(new AdminAuthenticationEntryPoint())// 匿名用户访问无权限的资源
		.and().csrf().disable()// 禁用csrf

		// session管理
		.sessionManagement()
		.invalidSessionUrl(AdminConstants.LOGIN_PAGE_URL)// session失效后,跳转的地址
		.maximumSessions(1)// 同一个账号最大允许同时在线数
		;
	}


	@Bean
 public PasswordEncoder passwordEncoder() {
  return new BCryptPasswordEncoder();
 }


	@Bean
	public UserDetailsService adminUserDetailsService() {
		return new AdminUserDetailsService();
	}


	@Bean
	public AdminAuthenticationFailureHandler adminAuthenticationFailureHandler() {
		return new AdminAuthenticationFailureHandler();
	}


	@Bean
	public AdminAuthenticationSuccessHandler adminAuthenticationSuccessHandler() {
		return new AdminAuthenticationSuccessHandler();
	}


	@Bean("UrlAuthenticationInterceptor")
	public UrlAuthenticationInterceptor urlAuthenticationInterceptor() {
		return new UrlAuthenticationInterceptor();
	}
}
解读一下这个类:
类继承WebSecurityConfigurerAdapter 说明是一个spring-Security配置类注解 @Configuration 说明是一个springboot的配置类注解 @EnableGlobalMethodSecurity 不是必须。开启注解用的第一个 configure 方法,设置登录的用户和账号验证方法
这里设置了两种方式,一个是内置的admin账号,一个是通过数据库验证账号
这样设置有个好处,就是我们在后台的用户管理页面里面是看不到admin账号的,这样就不会存在把所有用户都删除了,就登录不了系统的bug(好多年前做系统的时候,一个测试人员一上来就打开用户管理菜单,然后把所有用户都删除,再退出。然后就登录不了系统了,随即提了一个bug。只能手动插入数据到数据库才行,当时我看的一脸懵逼,还能这样操作???)。现在有了这样设置,就保证admin用户永远不可能被删除,也就不存在上面提到的bug了。第二个configure方法。这个方法是设置一些静态资源的。可以在这里设置系统所有的静态资源第三个configure方法。这个是这个类中最重要的配置。里面设置了登录方式、url过滤规则、权限校验规则、成功处理、失败处理、session管理、登出处理等等。这里是链式的调用方式,可以把需要的都在里面配置
这里有几个特别要说明的:
1、我们项目中保存到session中的用户对象一般是我们项目中自定义的一个类(我这里是SysUserResponseBO),在项目中我们用 SecurityContextHolder.getContext().getAuthentication().getPrincipal() 这个方法获取当前登录用户信息时,如果是admin用户,则返回的对象是org.springframework.security.core.userdetails.User对象
2、密码需要加密,保存在数据库里面的密码也是加密方式,不允许直接保存明文(这个也是规范)
3、第三个 configure 方法中,我们使用了.anyRequest().access("@UrlAuthenticationInterceptor.hasPermission(request, authentication)")交给这个方法去验证。验证的方法有很多,我们也可以这样去写
.anyRequest().authenticated().withObjectPostProcessor(new ObjectPostProcessor<FilterSecurityInterceptor>() {

			@Override
			public <O extends FilterSecurityInterceptor> O postProcess(O object) {
				// 权限查询器
				// 设置你有哪些权限
				object.setSecurityMetadataSource(null);

				// 权限决策器
				// 判断你有没有权限访问当前的url
				object.setAccessDecisionManager(null);
				return object;
			}

		})
这里之所以没有用.antMatchers("/XXX").hasRole(“ROLET_XXX”),是因为,一般项目中的权限都是动态的,所有的资源菜单都是可配置的,在这里是无法写死的。当然这个要根据实际项目需求来做。总之配置很灵活,可以随意组合。
3、验证码过滤器那边ValidateCodeFilter一定不能交给spring bean去管理,不然这个过滤器会执行两遍,只能直接new 出来。
AdminUserDetailsService类
该类是用来在登录的时候,进行登录校验的。也就是校验你的账号密码是否正确(其实这里只根据账号查询,密码的验证是框架里面自带的)。来看下这个类的实现
package com.hp.springboot.admin.security;

import org.slf4j.Logger;
import org.slf4j.LoggerFactory;
import org.springframework.beans.factory.annotation.Autowired;
import org.springframework.security.core.userdetails.UserDetails;
import org.springframework.security.core.userdetails.UserDetailsService;
import org.springframework.security.core.userdetails.UsernameNotFoundException;

import com.hp.springboot.admin.convert.SysUserConvert;
import com.hp.springboot.admin.dal.ISysUserDAO;
import com.hp.springboot.admin.dal.model.SysUser;
import com.hp.springboot.admin.model.response.SysUserResponseBO;
import com.hp.springboot.database.bean.sqlBuilders;
import com.hp.springboot.database.bean.SQLWhere;


public class AdminUserDetailsService implements UserDetailsService {

	private static Logger log = LoggerFactory.getLogger(AdminUserDetailsService.class);

	@Autowired
	private ISysUserDAO sysUserDAO;


	@Override
	public UserDetails loadUserByUsername(String username) throws UsernameNotFoundException {
		log.info("loadUserByUsername with username={}", username);

		//根据登录名,查询用户
		SysUser user = sysUserDAO.selectOne(SQLBuilders.create()
				.withWhere(SQLWhere.builder()
						.eq("login_name", username)
						.build()
						)
				);
		if (user == null) {
			log.warn("loadUserByUsername with user is not exists. with username={}", username);
			throw new UsernameNotFoundException("用户不存在");
		}

		// 对象装换,转换成SysUserResponseBO对象
		SysUserResponseBO resp = SysUserConvert.dal2BOResponse(user);
		return resp;
	}

}
这个里面很简单,我们的类实现 UserDetailsService 这个接口,并且实现一下loadUserByUsername这个方法。就是根据登录名,查询用户的功能。
这里有必须要主要的:
我们返回值是UserDetails,所以SysUserResponseBO必须要实现UserDetails这个接口
UserDetails里面有好几个必须实现的方法,基本上看方法名就可以猜到是干什么用的,其中最重要的的一个方法
	public Collection<? extends GrantedAuthority> getAuthorities() {
		return this.authorities;
	}
这个就是获取当前用户所拥有的权限。这个需要根据用户所拥有的角色去获取。这个在上面使用 withObjectPostProcessor 这种方式校验的时候是必须要的,但是我这里.anyRequest().access()方法,在这里校验,并没有使用到这个属性,所以这个也可以直接return null.
第二个configure方法。这里面定义了静态资源,这个跟springMVC的静态资源差不多。重点来说下第三个configure方法
①、如果需要,那就加上一个过滤器增加图形验证码校验
②、登录成功后处理AdminAuthenticationSuccessHandler这个类。该类实现了AuthenticationSuccessHandler接口,必须实现一个方法,直接上代码
@Override
	public void onAuthenticationSuccess(HttpServletRequest request, HttpServletResponse response,
			Authentication authentication) throws IOException, ServletException {
		response.setContentType(ContentTypeConstant.APPLICATION_JSON_UTF8);

		// 获取session对象
		HttpSession session = request.getSession();

		//设置登录用户session
		setUserSession(session);

		//查询用户的菜单和按钮
		setUserMenu(session);

		//session中获取当前登录的用户
		SysUserResponseBO user = SecuritySessionUtil.getSessionData();

		// 更新最近登录时间
		sysUserService.updateLastLoginTime(user.getId());

		//项目名称
		session.setAttribute("projectName", projectName);

		// 注销地址
		session.setAttribute("logoutUrl", AdminConstants.LOGOUT_URL);

		// 返回json格式数据
		Response<Object> resp = Response.success();
		try (PrintWriter out = response.getWriter()) {
			out.write(resp.toString());
			out.flush();
		}
	}
基本上看注释也就了解每一步的意义。
我们代码中无需写登录的controller,因为这个方法框架已经根据你配置的loginProcessingUrl给你生成好了。这个是用户输入用户名密码后,点击登录按钮后执行的操作。能够进入这个方法,那说明用户输入的用户名和密码是正确的,后续只要保存用户的信息,查询用户权限等操作。
③、登录失败处理。AdminAuthenticationFailureHandler。登录失败后交给这个类去处理,看下代码:
package com.hp.springboot.admin.security.handler;

import java.io.IOException;
import java.io.PrintWriter;

import javax.servlet.ServletException;
import javax.servlet.http.HttpServletRequest;
import javax.servlet.http.HttpServletResponse;

import org.slf4j.Logger;
import org.slf4j.LoggerFactory;
import org.springframework.security.authentication.AccountExpiredException;
import org.springframework.security.authentication.BadCredentialsException;
import org.springframework.security.authentication.CredentialsExpiredException;
import org.springframework.security.authentication.DisabledException;
import org.springframework.security.authentication.InsufficientAuthenticationException;
import org.springframework.security.authentication.LockedException;
import org.springframework.security.core.AuthenticationException;
import org.springframework.security.core.userdetails.UsernameNotFoundException;
import org.springframework.security.web.authentication.AuthenticationFailureHandler;

import com.hp.springboot.admin.exception.ValidateCodeException;
import com.hp.springboot.common.bean.Response;
import com.hp.springboot.common.constant.ContentTypeConstant;


public class AdminAuthenticationFailureHandler implements AuthenticationFailureHandler {

	private static Logger log = LoggerFactory.getLogger(AdminAuthenticationFailureHandler.class);

	@Override
	public void onAuthenticationFailure(HttpServletRequest request, HttpServletResponse response,
			AuthenticationException exception) throws IOException, ServletException {
		log.warn("login error with exception is {}", exception.getMessage());
		response.setContentType(ContentTypeConstant.APPLICATION_JSON_UTF8);
		String message = "";
		if (exception instanceof BadCredentialsException || exception instanceof UsernameNotFoundException) {
			message = "账户名或者密码输入错误!";
		} else if (exception instanceof LockedException) {
			message = "账户被锁定,请联系管理员!";
		} else if (exception instanceof CredentialsExpiredException) {
			message = "密码过期,请联系管理员!";
		} else if (exception instanceof AccountExpiredException) {
			message = "账户过期,请联系管理员!";
		} else if (exception instanceof DisabledException) {
			message = "账户被禁用,请联系管理员!";
		} else if (exception instanceof ValidateCodeException) {
			// 图形验证码输入错误
			message = exception.getMessage();
		} else if (exception instanceof InsufficientAuthenticationException) {
			message = exception.getMessage();
		} else {
			message = "登录失败!";
		}

		// 返回json格式数据
		Response<Object> resp = Response.error(message);
		try (PrintWriter out = response.getWriter()) {
			out.write(resp.toString());
			out.flush();
		}
	}

}看代码也基本上看出来每一步的作用。有用户名密码错误,有用户被禁用,有过期,锁定等等。我这里前台都是ajax请求,所以这个也是返回json格式,如果你不需要json格式,那可以按照你的要求返回指定的格式。
④、注销相关。注销接口也不需要我们在controller里面写,框架会自动根据你的logoutUrl配置生成注销地址。也可以自定义一个logoutSuccessHandler去在注销后执行。
⑤、权限校验。当访问一个除开第一层免过滤列表里面的url的地址时,都会需要权限校验,就都会走到UrlAuthenticationInterceptor.hasPermission(request, authentication)这个方法里面去,这个里面可以根据你的项目的实际逻辑去校验。
⑥、异常处理。框架里面处理异常有好多种,这里常用的accessDeniedHandler(登录用户访问无权限的资源)、authenticationEntryPoint(匿名用户访问无权限的资源)这些都按照项目的实际需求去写异常处理。
⑦、session管理。security框架里面对session管理非常多,可以按照链式调用的方式打开看看。我这里使用了invalidSessionUrl来指定session无效后跳转到的地址,maximumSessions同一个账号最多同时在线数。
好了,这样一个最基本的权限控制框架就完成了。
其实我这里只使用了security的一些皮毛而且,他里面集成了非常复杂而又强大的功能,这个需要我们一点一点去发掘他。
以上是我在项目中使用的一些总结,完整的代码在我的github中 我的github ,欢迎大家留言讨论!!
到此这篇关于spring-security权限控制和校验的文章就介绍到这了,更多相关spring-security权限控制校验内容请搜索编程网以前的文章或继续浏览下面的相关文章希望大家以后多多支持编程网!
--结束END--
本文标题: 解析spring-security权限控制和校验的问题
本文链接: https://www.lsjlt.com/news/121788.html(转载时请注明来源链接)
有问题或投稿请发送至: 邮箱/279061341@qq.com QQ/279061341
下载Word文档到电脑,方便收藏和打印~
2024-03-01
2024-03-01
2024-03-01
2024-02-29
2024-02-29
2024-02-29
2024-02-29
2024-02-29
2024-02-29
2024-02-29
回答
回答
回答
回答
回答
回答
回答
回答
回答
回答


官方手机版

微信公众号

商务合作


0