技术背景 Latex在文档撰写方面是不可或缺的工具,尤其是在写文章方面,是必须要用到的文字排版工具。但是latex的环境部署并不是一个特别人性化的操作,尤其是在各种不同的平台上操作是
Latex在文档撰写方面是不可或缺的工具,尤其是在写文章方面,是必须要用到的文字排版工具。但是latex的环境部署并不是一个特别人性化的操作,尤其是在各种不同的平台上操作是完全不一样的,还经常容易报错。我们可以一个一个的去解决报错问题,但是这需要耗费极大的精力和时间,所以很多人选择了直接在overleaf进行latex的创作。但其实overleaf也有它的缺点,比如免费版本的带宽和速度都比较受限,尤其是在国内的网络,访问速度可谓是”一绝“。因此这里我们介绍一个更加人性化的方案,而且对各大平台的兼容性非常都非常好:使用Docker来部署latex环境。
在各大平台的官方源里面应该都会有提供docker容器,因此这里我们也不过多的赘述。作者过去写过一篇关于使用docker来部署MindSpore开发环境的博客,感兴趣的读者可以当作是拓展文章来阅读一下。
首先我们在Manjaro linux平台上启动docker(在其他平台上的操作可能有区别,比如service start docker等):
[dechin-root tex]# systemctl start docker注意上述指令要在root帐号下才能够启动,如果要选择在非root帐号下操作,docker容器是不支持的,但是我们可以选择singularity这一类似的容器解决方案,相关内容可以参考这篇博客。启动服务之后,正常状态下我们可以看到docker的status是处于active或者running的状态:
[dechin-root tex]# systemctl status docker
● docker.service - Docker Application Container Engine
  Loaded: loaded (/usr/lib/systemd/system/docker.service; disabled; vendor preset: disab>
  Active: active (running) since Sun 2021-03-28 18:50:47 CST; 7s aGo
TriggeredBy: ● docker.Socket
  Docs: https://docs.docker.com
 Main PID: 25366 (dockerd)
  Tasks: 123 (limit: 47875)
  Memory: 219.1M
  CGroup: /system.slice/docker.service
    ├─25366 /usr/bin/dockerd -H fd://
└─25378 containerd --config /var/run/docker/containerd/containerd.toml --log-l>首先我们可以访问dockerhub官网搜索一下是否存在我们所需要的容器镜像,比如我们的搜索结果如下:
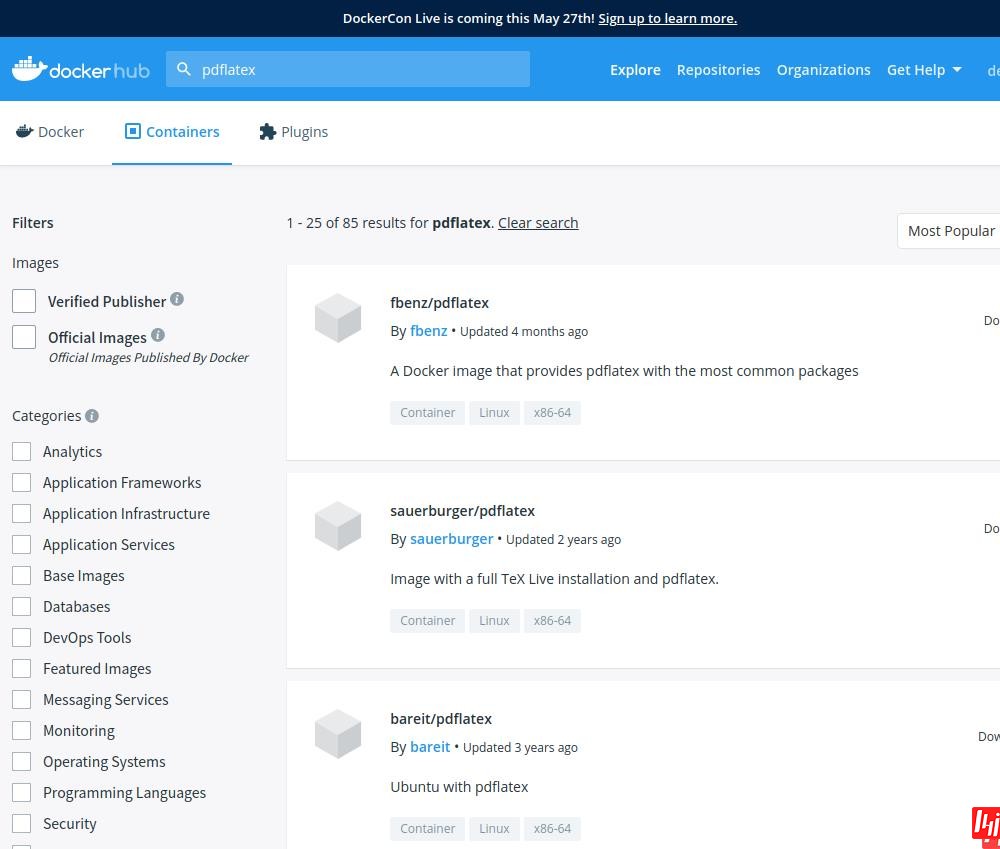
可以看到这里有很多的选项,一般我们可以直接选择星星最高的容器镜像进行下载使用:
[dechin-root tex]# docker pull fbenz/pdflatex
Using default tag: latest
latest: Pulling from fbenz/pdflatex
f22ccc0b8772: Already exists
3cf8fb62ba5f: Already exists
e80c964ece6a: Already exists
9aa2583757a3: Pull complete
2c3D7890d583: Pull complete
Digest: sha256:6ecca11b1a203faed5c0a2ace2a13aac100dd19d7a4e0db0474283bcded3c041
Status: Downloaded newer image for fbenz/pdflatex:latest
docker.io/fbenz/pdflatex:latest
下载需要一段的时间。下载完成后,可以在本地镜像仓库中找到刚才下载的这个镜像文件:
[dechin-root tex]# docker images
REPOSITORY             TAG  IMAGE ID  CREATED   SIZE
fbenz/pdflatex latest 8e7742722956 3 months ago 24GB我们可以测试一下这个容器镜像中的pdflatex功能是否正常:
[dechin-root tex]# docker run -it fbenz/pdflatex pdflatex --help
Usage: pdftex [OPTION]... [TEXNAME[.tex]] [COMMANDS]
 or: pdftex [OPTION]... \FIRST-LINE
 or: pdftex [OPTION]... &FMT ARGS
 Run pdfTeX on TEXNAME, usually creating TEXNAME.pdf.
 Any remaining COMMANDS are processed as pdfTeX input, after TEXNAME is read.
 If the first line of TEXNAME is %&FMT, and FMT is an existing .fmt file,
 use it. Else use `NAME.fmt', where NAME is the program invocation name,
 most commonly `pdftex'.

 Alternatively, if the first non-option argument begins with a backslash,
 interpret all non-option arguments as a line of pdfTeX input.

 Alternatively, if the first non-option argument begins with a &, the
 next Word is taken as the FMT to read, overriding all else. Any
 remaining arguments are processed as above.

 If no arguments or options are specified, prompt for input.

-draftmode    switch on draft mode (generates no output PDF)
-enc     enable encTeX extensions such as \mubyte
-etex     enable e-TeX extensions
[-no]-file-line-error disable/enable file:line:error style messages
-fmt=FMTNAME   use FMTNAME instead of program name or a %& line
-halt-on-error   stop processing at the first error
-ini     be pdfinitex, for dumping fORMats; this is implicitly
       true if the program name is `pdfinitex'
-interaction=STRING  set interaction mode (STRING=batchmode/nonstopmode/
       scrollmode/errorstopmode)
-ipc     send DVI output to a socket as well as the usual
       output file
-ipc-start    as -ipc, and also start the server at the other end
-jobname=STRING   set the job name to STRING
-kpathsea-debug=NUMBER set path searching debugging flags according to
       the bits of NUMBER
[-no]-mktex=FMT   disable/enable mktexFMT generation (FMT=tex/tfm/pk)
-mltex     enable MLTeX extensions such as \charsubdef
-output-comment=STRING use STRING for DVI file comment instead of date
       (no effect for PDF)
-output-directory=DIR use existing DIR as the directory to write files in
-output-format=FORMAT use FORMAT for job output; FORMAT is `dvi' or `pdf'
[-no]-parse-first-line disable/enable parsing of first line of input file
-progname=STRING  set program (and fmt) name to STRING
-recorder    enable filename recorder
[-no]-shell-escape  disable/enable \write18{SHELL COMMAND}
-shell-restricted  enable restricted \write18
-src-specials   insert source specials into the DVI file
-src-specials=WHERE  insert source specials in certain places of
       the DVI file. WHERE is a comma-separated value
       list: cr display hbox math par parend vbox
-synctex=NUMBER   generate SyncTeX data for previewers according to
       bits of NUMBER (`man synctex' for details)
-translate-file=TCXNAME use the TCX file TCXNAME
-8bit     make all characters printable by default
-help     display this help and exit
-version    output version information and exit

pdfTeX home page: <Http://pdftex.org>

Email bug reports to pdftex@tug.org.当我们看到help指令运行成功时,就表明容器镜像可以正常使用。使用容器还有一点需要注意的是,如果我们直接用docker run -it fbenz/pdflatex的话,没有绑定本地的目录,这样是无法看到本地所撰写的tex文件的。因此我们一般需要在运行的时候加上-v的选项来绑定本地的目录,基本使用方法是:-v 本地目录:容器目录,注意需要使用绝对路径,不能使用相对路径。
在上述章节中完成基于docker的pdflatex环境部署之后,我们可以开始撰写一些简单的tex文件用来测试一下环境。
首先最简单的我们测试一个hello world的案例,仅在pdf文档中输出一个Hello World!的字样,具体tex代码如下:
[dechin@dechin-manjaro tex]$ cat hello_world.tex
\documentclass{article}
\begin{document}
Hello world!
\end{document}
使用方法也不难,首先我们运行docker容器,注意需要绑定一个本地路径,然后进入到容器内对应的目录下:
[dechin-root tex]# docker run -it -v /home/dechin/projects/2021-python/tex/:/home/ fbenz/pdflatex
root@d7ed2229a244:/# ll
total 72
drwxr-xr-x 1 root root 4096 Mar 28 11:07 ./
drwxr-xr-x 1 root root 4096 Mar 28 11:07 ../
-rwxr-xr-x 1 root root 0 Mar 28 11:07 .dockerenv*
drwxr-xr-x 2 root root 4096 Nov 19 13:09 bin/
drwxr-xr-x 2 root root 4096 Apr 24 2018 boot/
drwxr-xr-x 5 root root 360 Mar 28 11:07 dev/
drwxr-xr-x 1 root root 4096 Mar 28 11:07 etc/
drwxr-xr-x 2 1000 1000 4096 Mar 28 04:43 home/
drwxr-xr-x 1 root root 4096 May 23 2017 lib/
drwxr-xr-x 2 root root 4096 Nov 19 13:09 lib64/
drwxr-xr-x 2 root root 4096 Nov 19 13:07 media/
drwxr-xr-x 2 root root 4096 Nov 19 13:07 mnt/
drwxr-xr-x 2 root root 4096 Nov 19 13:07 opt/
dr-xr-xr-x 323 root root 0 Mar 28 11:07 proc/
drwx------ 2 root root 4096 Nov 19 13:09 root/
drwxr-xr-x 1 root root 4096 Nov 25 22:25 run/
drwxr-xr-x 1 root root 4096 Nov 25 22:25 sbin/
drwxr-xr-x 2 root root 4096 Nov 19 13:07 srv/
dr-xr-xr-x 13 root root 0 Mar 28 11:07 sys/
drwxrwxrwt 1 root root 4096 Nov 28 18:34 tmp/
drwxr-xr-x 1 root root 4096 Nov 19 13:07 usr/
drwxr-xr-x 1 root root 4096 Nov 19 13:09 var/
root@d7ed2229a244:/# cd home/
root@d7ed2229a244:/home# ll
total 12
drwxr-xr-x 2 1000 1000 4096 Mar 28 04:43 ./
drwxr-xr-x 1 root root 4096 Mar 28 11:07 ../
-rw-r--r-- 1 1000 1000 69 Mar 28 04:43 hello_world.tex我们看到在容器内的目录下也能够看到这个tex文件,说明路径的绑定成功的执行了。运行指令很简单,直接在docker容器内运行pdflatex your_file.tex即可:
root@d7ed2229a244:/home# pdflatex hello_world.tex
This is pdfTeX, Version 3.14159265-2.6-1.40.18 (TeX Live 2017/Debian) (preloaded format=pdflatex)
 restricted \write18 enabled.
entering extended mode
(./hello_world.tex
LaTeX2e <2017-04-15>
Babel <3.18> and hyphenation patterns for 84 language(s) loaded.
(/usr/share/texlive/texmf-dist/tex/latex/base/article.cls
Document Class: article 2014/09/29 v1.4h Standard LaTeX document class
(/usr/share/texlive/texmf-dist/tex/latex/base/size10.clo))
No file hello_world.aux.
[1{/var/lib/texmf/fonts/map/pdftex/updmap/pdftex.map}] (./hello_world.aux) )</u
sr/share/texlive/texmf-dist/fonts/type1/public/amsfonts/cm/cmr10.pfb>
Output written on hello_world.pdf (1 page, 11916 bytes).
Transcript written on hello_world.log.
root@d7ed2229a244:/home# ll
total 32
drwxr-xr-x 2 1000 1000 4096 Mar 28 11:08 ./
drwxr-xr-x 1 root root 4096 Mar 28 11:07 ../
-rw-r--r-- 1 root root  8 Mar 28 11:08 hello_world.aux
-rw-r--r-- 1 root root 2408 Mar 28 11:08 hello_world.log
-rw-r--r-- 1 root root 11916 Mar 28 11:08 hello_world.pdf
-rw-r--r-- 1 1000 1000 69 Mar 28 04:43 hello_world.tex
root@d7ed2229a244:/home# chmod -R 777 .
root@d7ed2229a244:/home# ll
total 32
drwxrwxrwx 2 1000 1000 4096 Mar 28 11:08 ./
drwxr-xr-x 1 root root 4096 Mar 28 11:07 ../
-rwxrwxrwx 1 root root  8 Mar 28 11:08 hello_world.aux*
-rwxrwxrwx 1 root root 2408 Mar 28 11:08 hello_world.log*
-rwxrwxrwx 1 root root 11916 Mar 28 11:08 hello_world.pdf*
-rwxrwxrwx 1 1000 1000 69 Mar 28 04:43 hello_world.tex*运行完成后我们在目录中看到了几个新生成的文件,如果用root改成777的权限,那么在本地的非root帐号就可以对其进行编辑,否则就只能查看。我们可以在本地打开这个pdf文件看看:
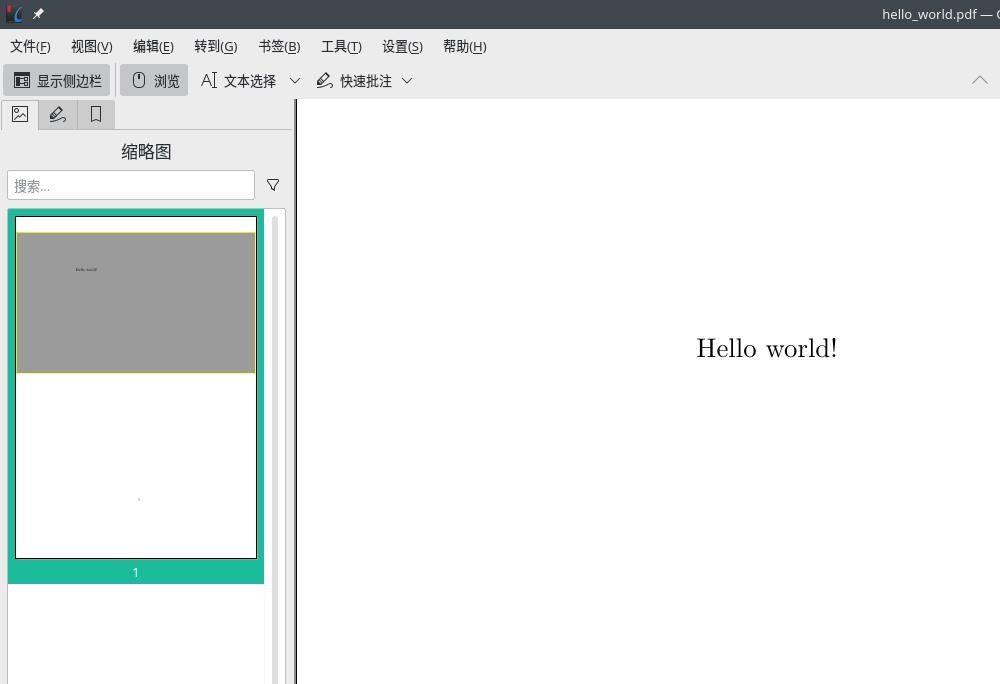
可以看到这个pdf文件生成成功。
上面hello world的案例比较简单,让我们来测试一下最常用的数学公式是否有问题:
[dechin@dechin-manjaro tex]$ cat equation_test.tex
\documentclass{article}
\begin{document}
Hello world!
\begin{equation}
  e^{iHt}\left|\psi\right>
\end{equation}
\end{document}
类似于上一章节的,我们也需要进入到容器的内部执行相关的指令,最后获得如下所示的一个pdf文件:

我们可以看到公式显示也是正常的。
最后我们测试一个比较难的,在前面写过一篇关于用ProjectQ生成Latex格式的量子线路图的博客,其中生成了如下所示的一个tex文件:
[dechin@dechin-manjaro quantum-circuit]$ cat circuit.tex
\documentclass{standalone}
\usepackage[margin=1in]{geometry}
\usepackage[hang,small,bf]{caption}
\usepackage{tikz}
\usepackage{braket}
\usetikzlibrary{backgrounds,shadows.blur,fit,decorations.pathreplacing,shapes}

\begin{document}
\begin{tikzpicture}[scale=0.8, transform shape]

\tikzstyle{basicshadow}=[blur shadow={shadow blur steps=8, shadow xshift=0.7pt, shadow yshift=-0.7pt, shadow scale=1.02}]\tikzstyle{basic}=[draw,fill=white,basicshadow]
\tikzstyle{operator}=[basic,minimum size=1.5em]
\tikzstyle{phase}=[fill=black,shape=circle,minimum size=0.1cm,inner sep=0pt,outer sep=0pt,draw=black]
\tikzstyle{none}=[inner sep=0pt,outer sep=-.5pt,minimum height=0.5cm+1pt]
\tikzstyle{measure}=[operator,inner sep=0pt,minimum height=0.5cm, minimum width=0.75cm]
\tikzstyle{xstyle}=[circle,basic,minimum height=0.35cm,minimum width=0.35cm,inner sep=-1pt,very thin]
\tikzset{
shadowed/.style={pReaction={transform canvas={shift={(0.5pt,-0.5pt)}}, draw=gray, opacity=0.4}},
}
\tikzstyle{swapstyle}=[inner sep=-1pt, outer sep=-1pt, minimum width=0pt]
\tikzstyle{edgestyle}=[very thin]

\node[none] (line0_gate0) at (0.1,-0) {$\Ket{0}$};
\node[none] (line0_gate1) at (0.5,-0) {};
\node[none,minimum height=0.5cm,outer sep=0] (line0_gate2) at (0.75,-0) {};
\node[none] (line0_gate3) at (1.0,-0) {};
\draw[operator,edgestyle,outer sep=0.5cm] ([yshift=0.25cm]line0_gate1) rectangle ([yshift=-0.25cm]line0_gate3) node[pos=.5] {H};
\draw (line0_gate0) edge[edgestyle] (line0_gate1);
\node[none] (line1_gate0) at (0.1,-1) {$\Ket{0}$};
\node[none] (line1_gate1) at (0.5,-1) {};
\node[none,minimum height=0.5cm,outer sep=0] (line1_gate2) at (0.75,-1) {};
\node[none] (line1_gate3) at (1.0,-1) {};
\draw[operator,edgestyle,outer sep=0.5cm] ([yshift=0.25cm]line1_gate1) rectangle ([yshift=-0.25cm]line1_gate3) node[pos=.5] {H};
\draw (line1_gate0) edge[edgestyle] (line1_gate1);
\node[none] (line2_gate0) at (0.1,-2) {$\Ket{0}$};
\node[none] (line2_gate1) at (0.5,-2) {};
\node[none,minimum height=0.5cm,outer sep=0] (line2_gate2) at (0.75,-2) {};
\node[none] (line2_gate3) at (1.0,-2) {};
\draw[operator,edgestyle,outer sep=0.5cm] ([yshift=0.25cm]line2_gate1) rectangle ([yshift=-0.25cm]line2_gate3) node[pos=.5] {H};
\draw (line2_gate0) edge[edgestyle] (line2_gate1);
\node[xstyle] (line1_gate4) at (1.4000000000000001,-1) {};
\draw[edgestyle] (line1_gate4.north)--(line1_gate4.south);
\draw[edgestyle] (line1_gate4.west)--(line1_gate4.east);
\node[phase] (line2_gate4) at (1.4000000000000001,-2) {};
\draw (line2_gate4) edge[edgestyle] (line1_gate4);
\draw (line1_gate3) edge[edgestyle] (line1_gate4);
\draw (line2_gate3) edge[edgestyle] (line2_gate4);
\node[xstyle] (line0_gate4) at (1.9500000000000002,-0) {};
\draw[edgestyle] (line0_gate4.north)--(line0_gate4.south);
\draw[edgestyle] (line0_gate4.west)--(line0_gate4.east);
\node[phase] (line1_gate5) at (1.9500000000000002,-1) {};
\draw (line1_gate5) edge[edgestyle] (line0_gate4);
\draw (line0_gate3) edge[edgestyle] (line0_gate4);
\draw (line1_gate4) edge[edgestyle] (line1_gate5);
\node[measure,edgestyle] (line0_gate5) at (2.6000000000000005,-0) {};
\draw[edgestyle] ([yshift=-0.18cm,xshift=0.07500000000000001cm]line0_gate5.west) to [out=60,in=180] ([yshift=0.035cm]line0_gate5.center) to [out=0, in=120] ([yshift=-0.18cm,xshift=-0.07500000000000001cm]line0_gate5.east);
\draw[edgestyle] ([yshift=-0.18cm]line0_gate5.center) to ([yshift=-0.07500000000000001cm,xshift=-0.18cm]line0_gate5.north east);
\draw (line0_gate4) edge[edgestyle] (line0_gate5);
\node[measure,edgestyle] (line1_gate6) at (2.6000000000000005,-1) {};
\draw[edgestyle] ([yshift=-0.18cm,xshift=0.07500000000000001cm]line1_gate6.west) to [out=60,in=180] ([yshift=0.035cm]line1_gate6.center) to [out=0, in=120] ([yshift=-0.18cm,xshift=-0.07500000000000001cm]line1_gate6.east);
\draw[edgestyle] ([yshift=-0.18cm]line1_gate6.center) to ([yshift=-0.07500000000000001cm,xshift=-0.18cm]line1_gate6.north east);
\draw (line1_gate5) edge[edgestyle] (line1_gate6);
\node[measure,edgestyle] (line2_gate5) at (2.0500000000000003,-2) {};
\draw[edgestyle] ([yshift=-0.18cm,xshift=0.07500000000000001cm]line2_gate5.west) to [out=60,in=180] ([yshift=0.035cm]line2_gate5.center) to [out=0, in=120] ([yshift=-0.18cm,xshift=-0.07500000000000001cm]line2_gate5.east);
\draw[edgestyle] ([yshift=-0.18cm]line2_gate5.center) to ([yshift=-0.07500000000000001cm,xshift=-0.18cm]line2_gate5.north east);
\draw (line2_gate4) edge[edgestyle] (line2_gate5);

\end{tikzpicture}
\end{document}
这个文件不仅结构复杂,对周边所依赖的tex文件其实也不少,此前在其他平台(Win10)测试这个tex文件的编译的时候,都需要手动的去下载很多的依赖文件,然后放到同一个文件夹下才能正常运行和使用。这里我们直接运行,发现也可以生成这个pdf文件:
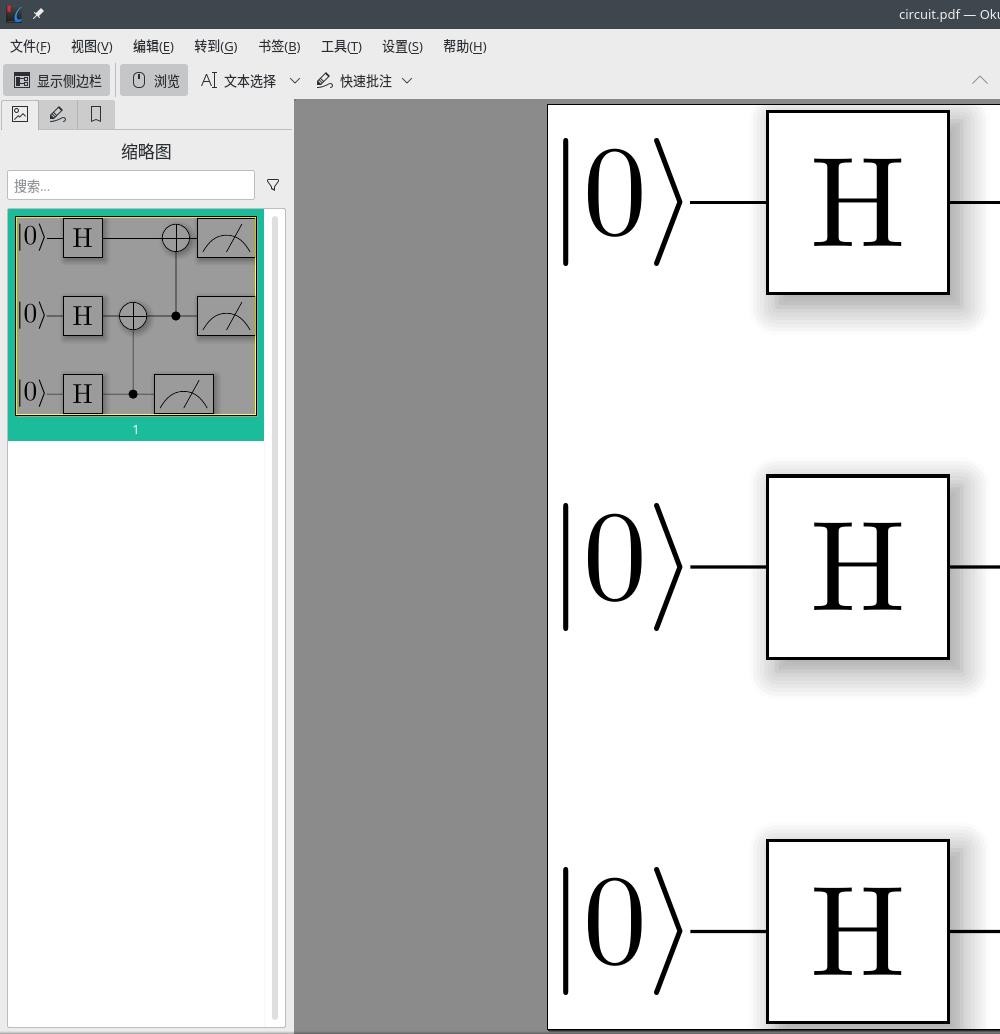
说明环境里面确实已经包含了很多必备的工具,跟overleaf的环境应该是比较类似的,使得我们可以在本地非常人性化的、轻便的可以编译tex文件。
为了在本地构建一个可用性强、易于部署的环境,我们选择了放弃直接安装pdflatex的方案,以及线上的overleaf的方案。这些方案各有利弊,但是综合起来看,对于个人使用的环境而言,还是在本地使用docker镜像直接部署一个tex编译环境是最方便、最人性化的。
版权声明
本文首发链接为:https://www.cnblogs.com/dechinphy/p/pdflatex.html
作者ID:DechinPhy
参考链接https://www.cnblogs.com/dechinphy/p/circuit.html
到此这篇关于docker的pdflatex环境配置的方法步骤的文章就介绍到这了,更多相关docker的pdflatex环境配置内容请搜索编程网以前的文章或继续浏览下面的相关文章希望大家以后多多支持编程网!
--结束END--
本文标题: docker的pdflatex环境配置的方法步骤
本文链接: https://www.lsjlt.com/news/122517.html(转载时请注明来源链接)
有问题或投稿请发送至: 邮箱/279061341@qq.com QQ/279061341
下载Word文档到电脑,方便收藏和打印~
2024-05-13
2024-05-13
2024-05-11
2024-05-11
2024-05-10
2024-05-07
2024-04-30
2024-04-30
2024-04-30
2024-04-29
回答
回答
回答
回答
回答
回答
回答
回答
回答
回答


官方手机版

微信公众号

商务合作


0