Python 官方文档:入门教程 => 点击学习
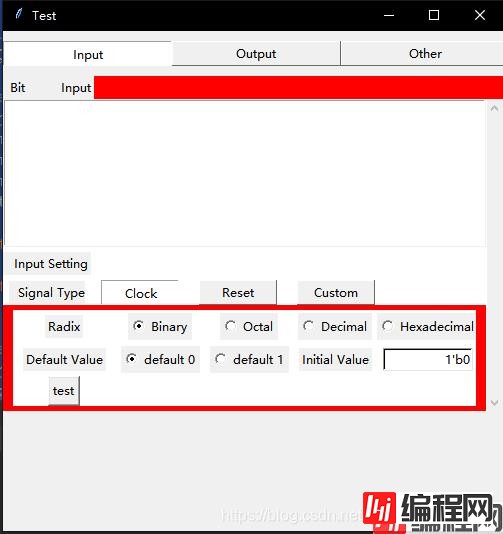
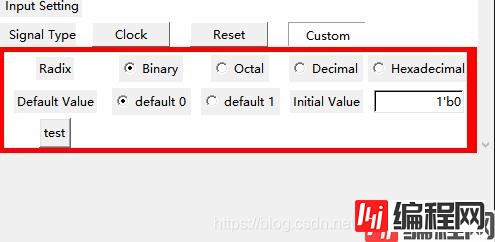
Tkinter实现UI分页标签显示: Input页,红色部分为当前Frame的位置,下半部分为第一页的子标签;三页标签的显示内容各不相同。实现分页显示的核心组件为Radiobutt
Tkinter实现UI分页标签显示:
Input页,红色部分为当前Frame的位置,下半部分为第一页的子标签;三页标签的显示内容各不相同。实现分页显示的核心组件为Radiobutton,Radiobutton只有一个选项能够生效,使用参数indicatoron=0能够将Radiobutton显示为Button的形状,通过选定的Radiobutton将原有的Frame forget掉,同时,将预定的Frame pack,实现分页的效果。使用时要将更换的组件放入一个Frame中,定义一个函数进行选定Radiobutton的参数传递,实现切换。如果对Radiobutton使用bind的话,当前选定的Radiobutton只能在下次事件触发时生效,始终慢着一拍,所以使用command选项赋值标签切换函数。
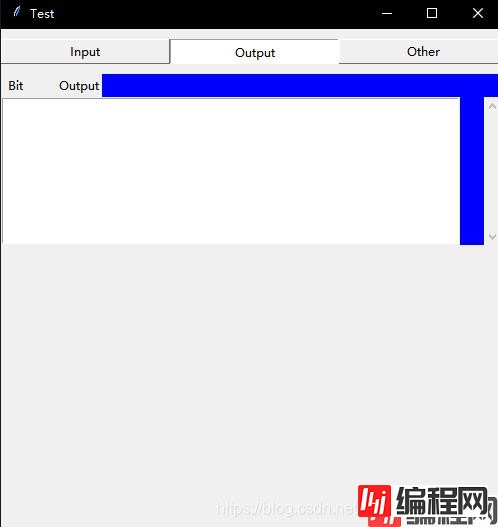
第二页Output
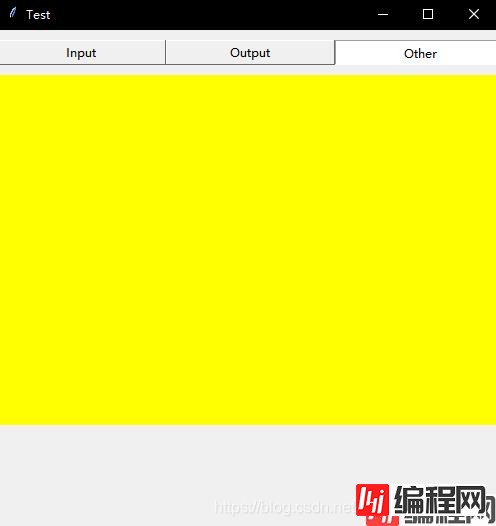
第三页Ohter
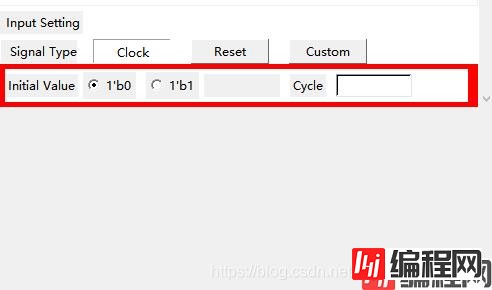
第一页的子标签,分为三部分,每页的内容独立
源码如下:
import tkinter as tk

class TestBenchMaker:

    def __init__(self):
        self.TITLE = "Test"
        self.WIDTH = 500
        self.HEIGHT = 500
        self.parseDic = {}

    # Initial GUI
    def initialGUI(self):

        # Change tag
        def changeTag(tag):
            frame3.pack_forget()
            frame4.pack_forget()
            frame5.pack_forget()
            if tag == 0:
                frame3.pack(fill=tk.X)
            elif tag == 1:
                frame4.pack(fill=tk.X)
            elif tag == 2:
                frame5.pack(fill=tk.X)

        # Change type
        def changeType(tag):
            clockSet.pack_forget()
            resetSet.pack_forget()
            customSet.pack_forget()
            if tag == 0:
                clockSet.pack(side=tk.TOP, fill=tk.BOTH, expand=tk.YES, pady=5, padx=10)
            elif tag == 1:
                resetSet.pack(side=tk.TOP, fill=tk.BOTH, expand=tk.YES, pady=5, padx=10)
            elif tag == 2:
                customSet.pack(side=tk.TOP, fill=tk.BOTH, expand=tk.YES, pady=5, padx=10)


        window = tk.Tk()
        window.title(self.TITLE)

        # Place GUI on the center of screen
        self.ws = window.winfo_screenwidth()
        self.hs = window.winfo_screenheight()
        x = (self.ws / 2) - (self.WIDTH / 2)
        y = (self.hs / 2) - (self.HEIGHT / 2)
        window.geometry('%dx%d+%d+%d' % (self.WIDTH, self.HEIGHT, x, y))


        # Tag: 0 --> input; 1 --> output; 2 --> other
        frame2 = tk.Frame(window)
        frame2.pack(fill=tk.Y, pady=10)
        tag = tk.IntVar()
        tagWidth = 23
        tk.Radiobutton(frame2, text="Input", command=lambda: changeTag(0), width=tagWidth, variable=tag, value=0, bd=1, indicatoron=0).grid(column=0, row=1)
        tk.Radiobutton(frame2, text="Output", command=lambda: changeTag(1), variable=tag, width=tagWidth, value=1, bd=1, indicatoron=0).grid(column=1, row=1)
        tk.Radiobutton(frame2, text="Other", command=lambda: changeTag(2), variable=tag, width=tagWidth, value=2, bd=1, indicatoron=0).grid(column=2, row=1)

        # frame3 --> Input
        # Signal info
        frame3 = tk.Frame(window, height=300, bg="red")
        frame3.pack(side=tk.TOP, fill=tk.X)
        tk.Label(frame3, text=" Bit         Input").pack(side=tk.TOP, anchor=tk.W)
        scroll = tk.Scrollbar(frame3)
        scroll.pack(side=tk.RIGHT, fill=tk.Y)
        self.inputBox = tk.Listbox(frame3, bd=1, selectmode=tk.SINGLE, yscrollcommand=scroll.set, height=8)
        self.inputBox.pack(side=tk.TOP, anchor=tk.NW, fill=tk.X, expand=tk.YES)
        scroll.config(command=self.inputBox.yview)

        # Input setting
        width = 10
        frameInputSet = tk.Frame(frame3, bg="white")
        frameInputSet.pack(side=tk.TOP, fill=tk.BOTH, expand=tk.YES)
        tk.Label(frameInputSet, text="  Input Setting").grid(row=0, column=0, pady=5)
        tk.Label(frameInputSet, text="  Signal Type", width=width).grid(row=1, column=0)
        # Tpye: 0 --> clock; 1 --> reset; 2 --> custom
        type = tk.IntVar()
        tk.Radiobutton(frameInputSet, text="Clock", variable=type, value=0, command=lambda:changeType(0), bd=1, indicatoron=0, width=width).grid(row=1, column=1, padx=10)
        tk.Radiobutton(frameInputSet, text="Reset", variable=type, value=1, command=lambda:changeType(1), bd=1, indicatoron=0, width=width).grid(row=1, column=2, padx=10)
        tk.Radiobutton(frameInputSet, text="Custom", variable=type, value=2, command=lambda:changeType(2), bd=1, indicatoron=0, width=width).grid(row=1, column=3, padx=10)
        # Clock setting
        initalValue = tk.StringVar()
        initalValue.set("1'b0")
        cycle = tk.StringVar()
        converse = tk.StringVar()
        clockSet = tk.Frame(frame3, bg="white")
        #clockSet.pack(side=tk.TOP, fill=tk.BOTH, expand=tk.YES, pady=5, padx=10)
        tk.Label(clockSet, text="Initial Value").grid(row=0, column=0, pady=5)
        tk.Radiobutton(clockSet, text="1'b0", variable=initalValue, value="1'b0").grid(row=0, column=1, padx=5)
        tk.Radiobutton(clockSet, text="1'b1", variable=initalValue, value="1'b1").grid(row=0, column=2, padx=5)
        tk.Label(clockSet, text="", width=10).grid(row=0, column=3)
        tk.Label(clockSet, text="Cycle").grid(row=0, column=4, pady=5, padx=10)
        tk.Entry(clockSet, textvariable=cycle, width=10, bd=2, bg="white").grid(row=0, column=5)
        # Reset setting
        resetSet = tk.Frame(frame3, bg="white")
        tk.Label(resetSet, text="Initial Value").grid(row=0, column=0, pady=5)
        tk.Radiobutton(resetSet, text="1'b0", variable=initalValue, value="1'b0").grid(row=0, column=1, padx=5)
        tk.Radiobutton(resetSet, text="1'b1", variable=initalValue, value="1'b1").grid(row=0, column=2, padx=5)
        tk.Label(resetSet, text="", width=10).grid(row=0, column=3)
        tk.Label(resetSet, text="Converse").grid(row=0, column=4, pady=5, padx=10)
        tk.Entry(resetSet, textvariable=converse, width=10, bd=2, bg="white").grid(row=0, column=5)
        # Custom setting
        defaultValue = tk.IntVar()
        radixValue = tk.IntVar()
        radixValue.set(0)
        customSet = tk.Frame(frame3, bg="white")
        customSet.pack(side=tk.TOP, fill=tk.BOTH, expand=tk.YES, pady=5, padx=10)
        # Radix 0 --> b, 1 --> o, 2 --> d, 3 --> h
        tk.Label(customSet, text="Radix").grid(row=0, column=0, pady=5, padx=1)
        tk.Radiobutton(customSet, text="Binary", variable=radixValue, value=0).grid(row=0, column=1)
        tk.Radiobutton(customSet, text="Octal", variable=radixValue, value=1).grid(row=0, column=2)
        tk.Radiobutton(customSet, text="Decimal", variable=radixValue, value=2).grid(row=0, column=3)
        tk.Radiobutton(customSet, text="Hexadecimal", variable=radixValue, value=3).grid(row=0, column=4)
        # Initial value
        tk.Label(customSet, text="Default Value").grid(row=1, column=0, pady=5, padx=10)
        tk.Radiobutton(customSet, text="default 0", variable=defaultValue, value=0).grid(row=1, column=1, padx=5)
        tk.Radiobutton(customSet, text="default 1", variable=defaultValue, value=1).grid(row=1, column=2, padx=5)
        tk.Label(customSet, text="Initial Value").grid(row=1, column=3, pady=5, padx=5)
        tk.Entry(customSet, textvariable=initalValue, width=12, bd=2, bg="white", justify=tk.RIGHT).grid(row=1, column=4)
        tk.Button(customSet, text="test", command=lambda :print(initalValue.get())).grid()

        # frame4 --> Output
        frame4 = tk.Frame(window, height=350, bg="blue")
        tk.Label(frame4, text=" Bit         Output").pack(anchor=tk.NW)
        scroll2 = tk.Scrollbar(frame4)
        scroll2.pack(side=tk.RIGHT, fill=tk.Y)

        self.outputBox = tk.Listbox(frame4, bd=1, selectmode=tk.SINGLE, yscrollcommand=scroll2.set, height=8, width=65)
        self.outputBox.pack(side=tk.LEFT)
        scroll2.config(command=self.outputBox.yview)

        # frame5 --> Other
        frame5 = tk.Frame(window, height=350, bg="yellow")

        window.mainloop()

if __name__ == "__main__":
    tbm = TestBenchMaker()
    tbm.initialGUI()
到此这篇关于python中Tkinter实现分页标签的示例代码的文章就介绍到这了,更多相关Python Tkinter分页标签内容请搜索编程网以前的文章或继续浏览下面的相关文章希望大家以后多多支持编程网!
--结束END--
本文标题: python中Tkinter实现分页标签的示例代码
本文链接: https://www.lsjlt.com/news/123198.html(转载时请注明来源链接)
有问题或投稿请发送至: 邮箱/279061341@qq.com QQ/279061341
下载Word文档到电脑,方便收藏和打印~
2024-03-01
2024-03-01
2024-03-01
2024-02-29
2024-02-29
2024-02-29
2024-02-29
2024-02-29
2024-02-29
2024-02-29
回答
回答
回答
回答
回答
回答
回答
回答
回答
回答


官方手机版

微信公众号

商务合作


0