Python 官方文档:入门教程 => 点击学习
目录1、SpringBoot整合elasticsearch的步骤2、索引的操作2.1 索引存在验证2.2 创建索引2.3 删除索引3、文档的
Elasticsearch 是一个分布式、可扩展、近实时的高性能搜索与数据分析引擎。Elasticsearch 基于 Apache Lucene 构建,采用 Java 编写,并使用 Lucene 构建索引、提供搜索功能。Elasticsearch 的目标是让全文搜索功能的落地变得简单。
本文是springBoot整合Elasticsearch与综合实例的第一篇,主要实现SpringBoot整合Elasticsearch实现索引和文档的相关操作。
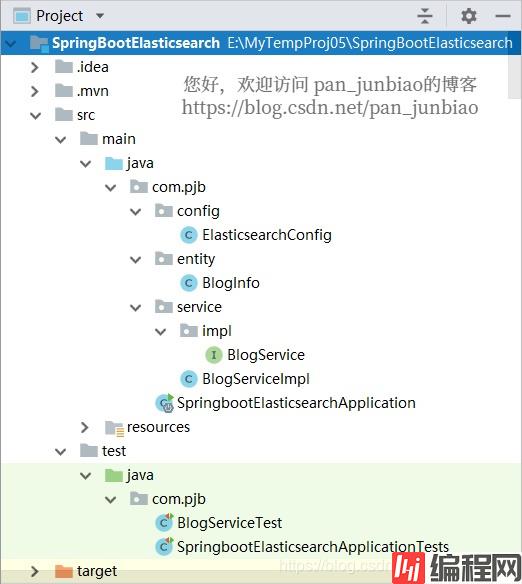
(1)创建SpringBoot项目,项目结构如下图:
(2)使用Maven添加依赖文件
在pom.xml配置信息文件中,添加 Elasticsearch服务、Elasticsearch高级客户端的依赖:
<!-- Elasticsearch服务 -->
<dependency>
    <groupId>org.elasticsearch</groupId>
    <artifactId>elasticsearch</artifactId>
    <version>7.11.1</version>
</dependency>

<!-- Elasticsearch高级客户端 -->
<dependency>
    <groupId>org.elasticsearch.client</groupId>
    <artifactId>elasticsearch-rest-high-level-client</artifactId>
    <version>7.11.1</version>
</dependency>
(3)Elasticsearch的配置
在 application.yml 配置文件中配置 Elasticsearch 信息:
# Elasticsearch配置
elasticsearch:
  hostname: 127.0.0.1
  port: 9200
  scheme: Http
(4)Elasticsearch配置类(config层)
创建 com.pjb.config 包,并创建 ElasticsearchConfig 类(Elasticsearch配置类),并使用 @Configuration 注解,标注该类为配置类。
package com.pjb.config;

import org.apache.http.HttpHost;
import org.elasticsearch.client.RestClient;
import org.elasticsearch.client.RestClientBuilder;
import org.elasticsearch.client.RestHighLevelClient;
import org.springframework.beans.factory.annotation.Value;
import org.springframework.context.annotation.Bean;
import org.springframework.context.annotation.Configuration;


@Configuration
public class ElasticsearchConfig
{
    @Value("${elasticsearch.hostname}")
    private String hostname;

    @Value("${elasticsearch.port}")
    private int port;

    @Value("${elasticsearch.scheme}")
    private String scheme;


    @Bean
    public RestHighLevelClient restHighLevelClient()
    {
        RestHighLevelClient restHighLevelClient = null;
        try
        {
            RestClientBuilder builder = RestClient.builder(new HttpHost(hostname, port, scheme));
            restHighLevelClient = new RestHighLevelClient(builder);
            return restHighLevelClient;
        }
        catch (Exception ex)
        {
            System.out.println("初始化Elasticsearch高级客户端失败");
            ex.printStackTrace();
        }
        return restHighLevelClient;
    }
}在 Elasticsearch 中开始为数据建立索引之前要做的第一步操作是创建——我们的数据主要容器。这里的索引类似于 sql 中的数据库概念。它是类型(相当于 SQL 中的表)和文档(相当于 SQL 中的记录)的容器。
存储数据的行为叫作索引。在 Elasticsearch 中,文档会归属于一种类型,这些类型会存在于索引中。
Elasticsearch 集群和数据库中核心概念的对应关系如下:
| Elasticsearch 集群 | 关系型数据库 |
|---|---|
| 索引 | 数据库 |
| 类型 | 表 |
| 文档 | 行数据 |
| 字段 | 列数据 |
定义一个博客信息(blog_info)的数据表结构:
| 字段 | 类型 | 说明 |
|---|---|---|
| blogId | long | 博客ID |
| blogName | text | 博客名称 |
| blogUrl | keyWord | 博客地址 |
| blogPoints | double | 博客积分 |
| createDate | date | 创建时间 |
| blogDescribe | text | 博客描述 |
字段类型必须映射到 Elasticsearch 的基本类型之一,并且需要添加有关如何索引字段的选项。
推荐本博客文章1:《Elasticsearch映射类型》
推荐本博客文章2:《Elasticsearch基本操作》
Elasticsearch教程:《Elasticsearch教程》
创建 com.pjb.entity 包,并创建BlogInfo类(博客信息实体类)。
package com.pjb.entity;

import java.util.Date;


public class BlogInfo
{
    private int blogId; //博客ID
    private String blogName; //博客名称
    private String blogUrl; //博客地址
    private double blogPoints; //博客积分
    private Date createDate; //创建时间
    private String blogDescribe; //博客描述

    //构建方法1
    public BlogInfo()
    {
    }

    //构建方法2
    public BlogInfo(int blogId, String blogName, String blogUrl, double blogPoints, Date createDate, String blogDescribe)
    {
        this.blogId = blogId;
        this.blogName = blogName;
        this.blogUrl = blogUrl;
        this.blogPoints = blogPoints;
        this.createDate = createDate;
        this.blogDescribe = blogDescribe;
    }

    public int getBlogId()
    {
        return blogId;
    }

    public void setBlogId(int blogId)
    {
        this.blogId = blogId;
    }

    public String getBlogName()
    {
        return blogName;
    }

    public void setBlogName(String blogName)
    {
        this.blogName = blogName;
    }

    public String getBlogUrl()
    {
        return blogUrl;
    }

    public void setBlogUrl(String blogUrl)
    {
        this.blogUrl = blogUrl;
    }

    public double getBlogPoints()
    {
        return blogPoints;
    }

    public void setBlogPoints(double blogPoints)
    {
        this.blogPoints = blogPoints;
    }

    public Date getCreateDate()
    {
        return createDate;
    }

    public void setCreateDate(Date createDate)
    {
        this.createDate = createDate;
    }

    public String getBlogDescribe()
    {
        return blogDescribe;
    }

    public void setBlogDescribe(String blogDescribe)
    {
        this.blogDescribe = blogDescribe;
    }
}(1)编写索引存在验证方法:
@Autowired
private RestHighLevelClient restHighLevelClient;


@Override
public boolean existsIndex(String indexName)
{
    boolean exists = false;

    //参数验证
    if(indexName==null || indexName.length()<=0)
    {
        return false;
    }

    try
    {
        //构建索引存在验证请求
        GetIndexRequest request = new GetIndexRequest(indexName);

        //执行请求
        exists = restHighLevelClient.indices().exists(request, RequestOptions.DEFAULT);
    }
    catch (Exception ex)
    {
        ex.printStackTrace();
    }

    return exists;
}(1)编写创建索引方法:
@Autowired
private RestHighLevelClient restHighLevelClient;


@Override
public boolean createIndex(String indexName)
{
    boolean result = false;

    //参数验证
    if(indexName==null || indexName.length()<=0)
    {
        return false;
    }

    try
    {
        //1.创建索引的请求
        CreateIndexRequest request = new CreateIndexRequest(indexName);

        //构建索引结构
        XContentBuilder builder = XContentFactory.JSONBuilder();
        builder.startObject();
        {
            builder.startObject("properties");
            {
                //创建博客ID文档字段
                builder.startObject("blogId");
                {
                    builder.field("type", "long");
                }
                builder.endObject();

                //创建博客名称文档字段
                builder.startObject("blogName");
                {
                    builder.field("type", "text");
                }
                builder.endObject();

                //创建博客地址文档字段
                builder.startObject("blogUrl");
                {
                    builder.field("type", "keyword");
                }
                builder.endObject();

                //创建博客积分字段
                builder.startObject("blogPoints");
                {
                    builder.field("type", "double");
                }
                builder.endObject();

                //创建创建时间字段
                builder.startObject("createDate");
                {
                    builder.field("type", "date");
                }
                builder.endObject();

                //创建博客描述字段
                builder.startObject("blogDescribe");
                {
                    builder.field("type", "text")
                            //插入时分词
                            .field("analyzer", "ik_smart")
                            //搜索时分词
                            .field("search_analyzer", "ik_max_word");
                }
                builder.endObject();
            }
            builder.endObject();
        }
        builder.endObject();
        request.mapping(builder);

        //2客户端执行请求,请求后获得响应
        CreateIndexResponse response = restHighLevelClient.indices().create(request, RequestOptions.DEFAULT);

        result = true;
    }
    catch (Exception ex)
    {
        ex.printStackTrace();
    }

    return result;
}
(2)编写测试方法:
package com.pjb;

import com.pjb.entity.BlogInfo;
import com.pjb.service.impl.BlogService;
import org.junit.jupiter.api.AfterEach;
import org.junit.jupiter.api.BeforeEach;
import org.junit.jupiter.api.Test;
import org.springframework.beans.factory.annotation.Autowired;
import org.springframework.boot.test.context.SpringBootTest;
import com.fasterxml.jackson.databind.ObjectMapper;

import java.util.ArrayList;
import java.util.Date;
import java.util.List;


@SpringBootTest
public class BlogServiceTest
{
    @BeforeEach
    private void setUp()
    {
    }

    @AfterEach
    private void tearDown()
    {
    }


    @Autowired
    private BlogService blogService;


    private String _indexName = "blog_info";


    @Test
    public void createIndex()
    {
        //判断索引是否存在
        boolean exists = blogService.existsIndex(_indexName);
        if(exists)
        {
            System.out.println("索引已经存在");
            return;
        }

        //创建索引
        boolean result = blogService.createIndex(_indexName);
        if(result)
        {
            System.out.println("索引创建成功");
        }
        else
        {
            System.out.println("索引创建失败");
        }
    }
}
(4)使用 ElasticSearch-head 插件查看执行结果:

(1)编写删除索引方法:
@Override
public boolean deleteIndex(String indexName)
{
boolean result = false;
//参数验证
if(indexName==null || indexName.length()<=0)
{
return false;
}
//注意:删除索引前,必须先判断索引是否存在,否则会报异常
if(!existsIndex(indexName))
{
//该索引不存在
return false;
}
try
{
//创建删除索引请求
DeleteIndexRequest request = new DeleteIndexRequest(indexName);
//执行请求返回响应结果
AcknowledgedResponse deleteIndexResponse = restHighLevelClient.indices().delete(request,RequestOptions.DEFAULT);
//解析响应结果
result = deleteIndexResponse.isAcknowledged();
}
catch (Exception ex)
{
ex.printStackTrace();
}
return result;
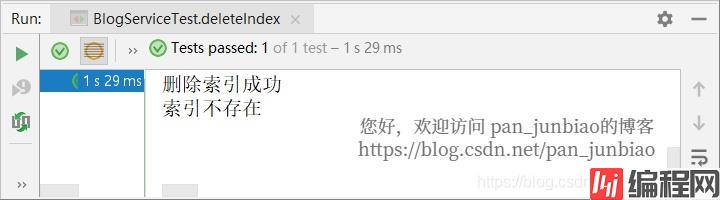
}(2)编写测试方法:
@Test
public void deleteIndex()
{
    //删除索引
    boolean result = blogService.deleteIndex(_indexName);
    if(result)
    {
        System.out.println("删除索引成功");
    }
    else
    {
        System.out.println("删除索引失败");
    }

    //判断索引是否存在
    boolean exists = blogService.existsIndex(_indexName);
    if(exists)
    {
        System.out.println("索引存在");
    }
    else
    {
        System.out.println("索引不存在");
    }
}
(3)通过控制器查看执行结果:
创建文档表示将一个或多个文档存储在索引中,这与在关系型数据库中插入记录的概念是类似的。
在 Elasticsearch 的核心引擎 Lucene 中,插入或更新文档的成本是相同的:在 Lucene 和 Elasticsearch 中,更新意味着替换。
(1)编写新增文档方法:
@Override
public boolean aDDDocument(String indexName, String documentId, BlogInfo blogInfo)
{
boolean result = false;
try
{
//将博客信息实体类转换为Map格式
Map<String, Object> blogMap = toBlogMap(blogInfo);
//1、构建新增文档请求
IndexRequest request = new IndexRequest(indexName).id(documentId).source(blogMap);
//2、执行请求,返回响应结果
IndexResponse response = restHighLevelClient.index(request,RequestOptions.DEFAULT);
result = true;
}
catch (Exception ex)
{
ex.printStackTrace();
}
return result;
}
private Map<String,Object> toBlogMap(BlogInfo blogInfo)
{
Map<String, Object> blogMap = new HashMap<>();
blogMap.put("blogId", blogInfo.getBlogId());
blogMap.put("blogName", blogInfo.getBlogName());
blogMap.put("blogUrl", blogInfo.getBlogUrl());
blogMap.put("blogPoints", blogInfo.getBlogPoints());
blogMap.put("createDate", blogInfo.getCreateDate());
blogMap.put("blogDescribe", blogInfo.getBlogDescribe());
return blogMap;
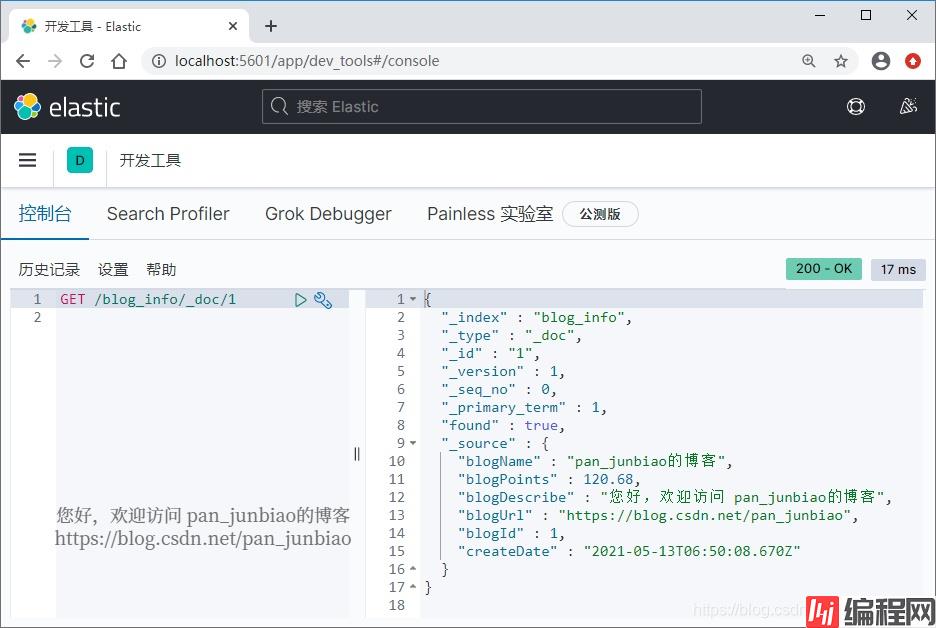
}(2)编写测试方法:
@Test
public void addDocument()
{
    //创建博客实体类
    BlogInfo blogInfo = new BlogInfo();
    blogInfo.setBlogId(1);
    blogInfo.setBlogName("pan_junbiao的博客");
    blogInfo.setBlogUrl("https://blog.csdn.net/pan_junbiao");
    blogInfo.setBlogPoints(120.68);
    blogInfo.setCreateDate(new Date());
    blogInfo.setBlogDescribe("您好,欢迎访问 pan_junbiao的博客");

    //文档ID(根据业务,我们以博客ID作为文档ID)
    String documentId = String.valueOf(blogInfo.getBlogId());

    //新增文档
    boolean result = blogService.addDocument(_indexName, documentId, blogInfo);
    if(result)
    {
        System.out.println("新增文档成功");
    }
    else
    {
        System.out.println("新增文档失败");
    }
}
(3)使用Kibana工具查看执行结果:
Elasticsearch查询命令:GET /blog_info/_doc/1
(1)编写批量新增文档方法:
@Override
public boolean addBulkDocument(String indexName, List<BlogInfo> blogList)
{
    boolean result = false;

    try
    {

        //1、构建批量请求
        BulkRequest request = new BulkRequest();

        //遍历博客列表,添加批量请求
        for(BlogInfo blogInfo : blogList)
        {
            //将博客信息实体类转换为Map格式
            Map<String, Object> blogMap = toBlogMap(blogInfo);

            //文档ID(根据业务,我们以博客ID作为文档ID)
            String documentId = String.valueOf(blogInfo.getBlogId());

            //加入请求
            request.add(new IndexRequest(indexName).id(documentId).source(blogMap));
        }

        //执行批量请求
        BulkResponse bulkItemResponses = restHighLevelClient.bulk(request,RequestOptions.DEFAULT);

        result = true;
    }
    catch (Exception ex)
    {
        ex.printStackTrace();
    }

    return result;
}
(2)编写测试方法:
@Test
public void addBulkDocument()
{
    //创建博客实体列表
    List<BlogInfo> blogInfoList = new ArrayList<>();
    blogInfoList.add(new BlogInfo(1,"pan_junbiao的博客","https://blog.csdn.net/pan_junbiao",120.68,new Date(),"您好,欢迎访问 pan_junbiao的博客"));
    blogInfoList.add(new BlogInfo(2,"pan_junbiao的博客","https://blog.csdn.net/pan_junbiao",85.12,new Date(),"您好,欢迎访问 pan_junbiao的博客"));
    blogInfoList.add(new BlogInfo(3,"pan_junbiao的博客","https://blog.csdn.net/pan_junbiao",94.37,new Date(),"您好,欢迎访问 pan_junbiao的博客"));
    blogInfoList.add(new BlogInfo(4,"pan_junbiao的博客","https://blog.csdn.net/pan_junbiao",365.19,new Date(),"您好,欢迎访问 pan_junbiao的博客"));
    blogInfoList.add(new BlogInfo(5,"pan_junbiao的博客","https://blog.csdn.net/pan_junbiao",287.33,new Date(),"您好,欢迎访问 pan_junbiao的博客"));

    //批量新增文档
    boolean result = blogService.addBulkDocument(_indexName, blogInfoList);
    if(result)
    {
        System.out.println("批量新增文档成功");
    }
    else
    {
        System.out.println("批量新增文档失败");
    }
}
(3)使用 ElasticSearch-head 插件查看执行结果:

(1)编写修改文档方法:
@Override
public boolean updateDocument(String indexName, String documentId, BlogInfo blogInfo)
{
    boolean result = false;

    try
    {
        //将博客信息实体类转换为Map格式
        Map<String, Object> blogMap = toBlogMap(blogInfo);

        //1、构建更新文档请求
        UpdateRequest request = new UpdateRequest(indexName,documentId).doc(blogMap);

        //2、执行请求,返回响应结果
        UpdateResponse response = restHighLevelClient.update(request,RequestOptions.DEFAULT);

        result = true;
    }
    catch (Exception ex)
    {
        ex.printStackTrace();
    }

    return result;
}
(2)编写测试方法:
@Test
public void updateDocument()
{
    //创建博客实体类
    BlogInfo blogInfo = new BlogInfo();
    blogInfo.setBlogId(2);
    blogInfo.setBlogName("pan_junbiao的博客_002");
    blogInfo.setBlogUrl("https://blog.csdn.net/pan_junbiao");
    blogInfo.setBlogPoints(120.68);
    blogInfo.setCreateDate(new Date());
    blogInfo.setBlogDescribe("您好,欢迎访问 pan_junbiao的博客_002");

    //文档ID(根据业务,我们以博客ID作为文档ID)
    String documentId = String.valueOf(blogInfo.getBlogId());

    //新增文档
    boolean result = blogService.updateDocument(_indexName, documentId, blogInfo);
    if(result)
    {
        System.out.println("修改文档成功");
    }
    else
    {
        System.out.println("修改文档失败");
    }
}
(3)使用Kibana工具查看执行结果:
Elasticsearch查询命令:GET /blog_info/_doc/2

(1)编写删除文档方法:
@Override
public boolean deleteDocument(String indexName, String documentId)
{
boolean result = false;
try
{
//1、构建删除文档请求
DeleteRequest request = new DeleteRequest(indexName,documentId);
//2、执行删除请求,返回响应结果
DeleteResponse deleteResponse = restHighLevelClient.delete(request,RequestOptions.DEFAULT);
result = true;
}
catch (Exception ex)
{
ex.printStackTrace();
}
return result;
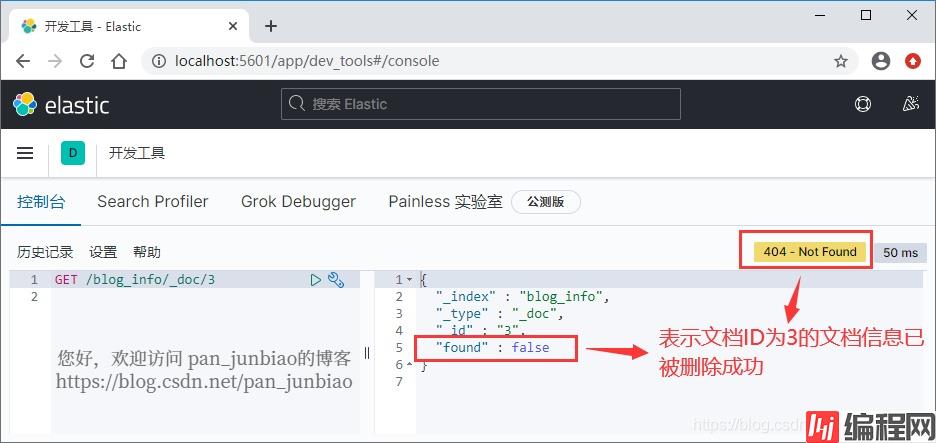
}(2)编写测试方法:
@Test
public void deleteDocument()
{
    //删除文档ID为3的文档信息
    String documentId = "3";
    boolean result = blogService.deleteDocument(_indexName, documentId);
    if(result)
    {
        System.out.println("修改文档成功");
    }
    else
    {
        System.out.println("修改文档失败");
    }
}
(3)使用Kibana工具查看执行结果:
Elasticsearch查询命令:GET /blog_info/_doc/3
(1)编写判断文档是否存在方法:
@Override
public boolean existsDocument(String indexName, String documentId)
{
    boolean result = false;

    try
    {
        //1、构建请求
        GetRequest getRequest = new GetRequest(indexName, documentId);
        //禁用提取源
        getRequest.fetchSourceContext(new FetchSourceContext(false));
        //禁用提取存储字段
        getRequest.storedFields("_none_");

        //2、执行请求,返回结果
        result = restHighLevelClient.exists(getRequest, RequestOptions.DEFAULT);
    }
    catch (Exception ex)
    {
        ex.printStackTrace();
    }

    return result;
}
(2)编写测试方法:
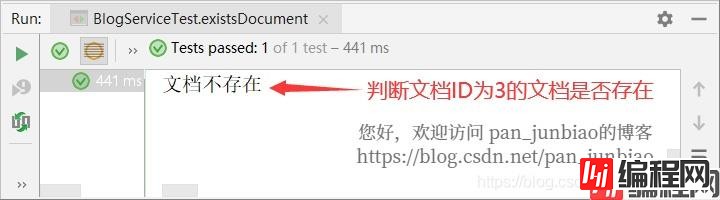
@Test
public void existsDocument()
{
    //判断文档ID为3的文档是否存在
    String documentId = "3";
    boolean result = blogService.existsDocument(_indexName, documentId);
    if(result)
    {
        System.out.println("文档存在");
    }
    else
    {
        System.out.println("文档不存在");
    }
}
(3)通过控制器查看执行结果:
(1)编写获取文档方法:
@Override
public <T> T getDocumentToBean(String indexName, String documentId, Class<T> beanType)
{
    T result = null;

    try
    {
        //1、构建请求
        GetRequest getRequest = new GetRequest(indexName, documentId);

        //2、执行请求,返回响应结果
        GetResponse getResponse = restHighLevelClient.get(getRequest, RequestOptions.DEFAULT);

        //3、解析响应结果
        if (getResponse != null)
        {
            //获取jsON结果
            String jsonString = getResponse.getSourceAsString();

            //使用Jackson工具,将JSON转换为实体类
            ObjectMapper mapper = new ObjectMapper();
            result = mapper.readValue(jsonString, beanType);
        }
    }
    catch (Exception ex)
    {
        ex.printStackTrace();
    }

    return result;
}
(2)编写测试方法:
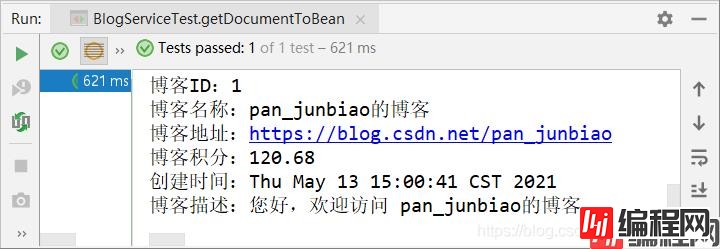
@Test
public void getDocumentToBean() throws Exception
{
    //判断文档ID为1的文档信息
    String documentId = "1";
    BlogInfo blogInfo = blogService.getDocumentToBean(_indexName, documentId,BlogInfo.class);

    //打印信息
    if(blogInfo!=null)
    {
        System.out.println("博客ID:" + blogInfo.getBlogId());
        System.out.println("博客名称:" + blogInfo.getBlogName());
        System.out.println("博客地址:" + blogInfo.getBlogUrl());
        System.out.println("博客积分:" + blogInfo.getBlogPoints());
        System.out.println("创建时间:" + blogInfo.getCreateDate());
        System.out.println("博客描述:" + blogInfo.getBlogDescribe());
    }
}
(3)通过控制器查看执行结果:
到此这篇关于SpringBoot整合Elasticsearch的详细步骤(索引、文档)的文章就介绍到这了,更多相关SpringBoot整合Elasticsearch内容请搜索编程网以前的文章或继续浏览下面的相关文章希望大家以后多多支持编程网!
--结束END--
本文标题: SpringBoot整合Elasticsearch实现索引和文档的操作方法
本文链接: https://www.lsjlt.com/news/125889.html(转载时请注明来源链接)
有问题或投稿请发送至: 邮箱/279061341@qq.com QQ/279061341
下载Word文档到电脑,方便收藏和打印~
2024-03-01
2024-03-01
2024-03-01
2024-02-29
2024-02-29
2024-02-29
2024-02-29
2024-02-29
2024-02-29
2024-02-29
回答
回答
回答
回答
回答
回答
回答
回答
回答
回答


官方手机版

微信公众号

商务合作


0