Python 官方文档:入门教程 => 点击学习
目录1. Redis 之管道(pipeline)2. SpringBoot 整合 Redis 管道实例1. Redis 之管道(pipeline) 执行一个Redis命令,Redis
执行一个Redis命令,Redis客户端和Redis服务器就需要执行以下步骤:
Redis命令所消耗的大部分时间都用在了发送命令请求和接收命令结果上面,把任意多条Redis命令请求打包在一起,然后一次性地将它们全部发送给服务器,而服务器则会把所有命令请求都处理完毕之后,一次性地将它们的执行结果全部返回给客户端。
注意事项:
Redis服务器并不会限制客户端在管道中包含的命令数量,但是却会为客户端的输入缓冲区设置默认值为1GB的体积上限:当客户端发送的数据量超过这一限制时,Redis服务器将强制关闭该客户端。因此最好不要一下把大量命令或者一些体积非常庞大的命令放到同一个管道中执行。
除此之外,很多客户端本身也带有隐含的缓冲区大小限制,如果你在使用流水线特性的过程中,发现某些流水线命令没有被执行,或者流水线返回的结果不完整,那么很可能就是你的程序触碰到了客户端内置的缓冲区大小限制。
SpringBoot 整合 redis 的实例
使用单个的 increment 命令,处理 200w个key:
public class RedisPipelineStudy extends BaseTest {

    @Autowired
    private StringRedisTemplate stringRedisTemplate;

    private static final String PREFIX = "test0:";

    @Test
    public void test() {
        StopWatch stopWatch = new StopWatch();
        stopWatch.start("test0");
        for (int times = 0; times < 2; times++) {
            for (int i = 0; i < 1000000; i++) {
                stringRedisTemplate.opsForValue().increment(PREFIX + i, 1L);
            }
        }
        stopWatch.stop();
        System.out.println(stopWatch.prettyPrint());
    }

}
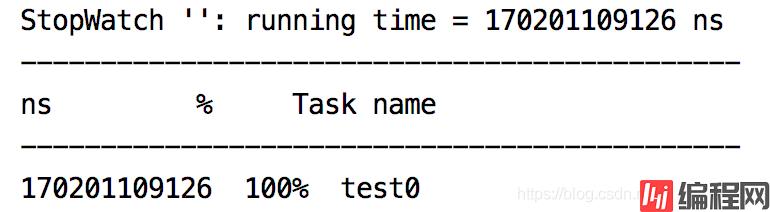
耗时如下所示:是 12 位 ,单位ns
使用管道 incrBy 处理 200w个key,每次打包300条命令发送给服务器,如下所示:
public class RedisPipelineStudy extends BaseTest {

    @Autowired
    private StringRedisTemplate stringRedisTemplate;

    private static final String PREFIX = "test1:";

    @Test
    public void test() {
        StopWatch stopWatch = new StopWatch();
        stopWatch.start("test1");
        List<Integer> recordList = new ArrayList<>();
        for (int times = 0; times < 2; times++) {
            for (int i = 0; i < 1000000; i++) {
                try {
                    recordList.add(i);
                    if (recordList.size() > 300) {
                        incrByPipeline(recordList);
                        recordList = new ArrayList<>();
                    }
                } catch (Exception e) {
                    System.out.println(e);
                }
            }
            if (!CollectionUtils.isEmpty(recordList)) {
                incrByPipeline(recordList);
                recordList = new ArrayList<>();
            }
        }
        stopWatch.stop();
        System.out.println(stopWatch.prettyPrint());
    }

    private void incrByPipeline(List<Integer> recordList) {
        stringRedisTemplate.executePipelined(new RedisCallback<Object>() {
            @Override
            public Object doInRedis(RedisConnection connection) throws DataAccessException {
                try {
                    for (Integer record : recordList) {
                        byte[] key = (PREFIX + record).getBytes();
                        connection.incrBy(key, 1);
                    }
                } catch (Exception e) {
                    System.out.println(e);
                }
                return null;
            }
        });
    }
}
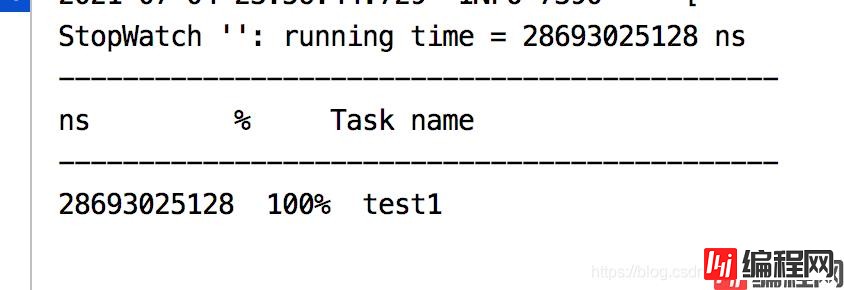
耗用时间: 11 位 ,单位 :ns,是单个命令耗时的 1/6。
到此这篇关于SpringBoot整合Redis管道的示例代码的文章就介绍到这了,更多相关SpringBoot整合Redis管道内容请搜索编程网以前的文章或继续浏览下面的相关文章希望大家以后多多支持编程网!
--结束END--
本文标题: SpringBoot整合Redis管道的示例代码
本文链接: https://www.lsjlt.com/news/129922.html(转载时请注明来源链接)
有问题或投稿请发送至: 邮箱/279061341@qq.com QQ/279061341
下载Word文档到电脑,方便收藏和打印~
2024-03-01
2024-03-01
2024-03-01
2024-02-29
2024-02-29
2024-02-29
2024-02-29
2024-02-29
2024-02-29
2024-02-29
回答
回答
回答
回答
回答
回答
回答
回答
回答
回答


官方手机版

微信公众号

商务合作


0