Python 官方文档:入门教程 => 点击学习
Connector启动过程 Connector是Tomcat提供的类。 // 通过此 Connector 开始处理请求 @Override protected void star
Connector是Tomcat提供的类。
// 通过此 Connector 开始处理请求
@Override
protected void startInternal() throws LifecycleException {

    // Validate settings before starting
    if (getPortWithOffset() < 0) {
        throw new LifecycleException(sm.getString(
                "coyoteConnector.invalidPort", Integer.valueOf(getPortWithOffset())));
    }

    setState(LifecycleState.STARTING);

    try {
    	// 核心动作
        protocolHandler.start();
    } catch (Exception e) {
        throw new LifecycleException(
                sm.getString("coyoteConnector.protocolHandlerStartFailed"), e);
    }
}SpringBoot默认会在8080端口提供 Http 服务,所以这里是一个处理HTTP协议请求的 Http11NioProtocol 实例,使用 NIO 方式处理 HTTP 协议。
Connector 对HTTP请求的接收和处理并非亲自完成,而是委托该 Http11NioProtocol protocolHandler 完成
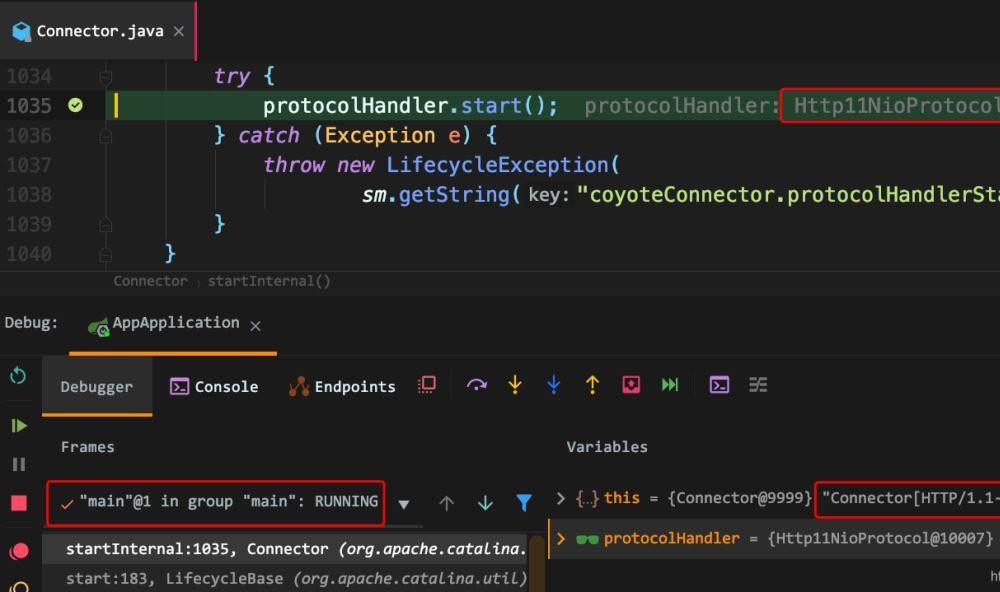
而 protocolHandler 又进一步将请求处理工作交给 NioEndpoint 完成。
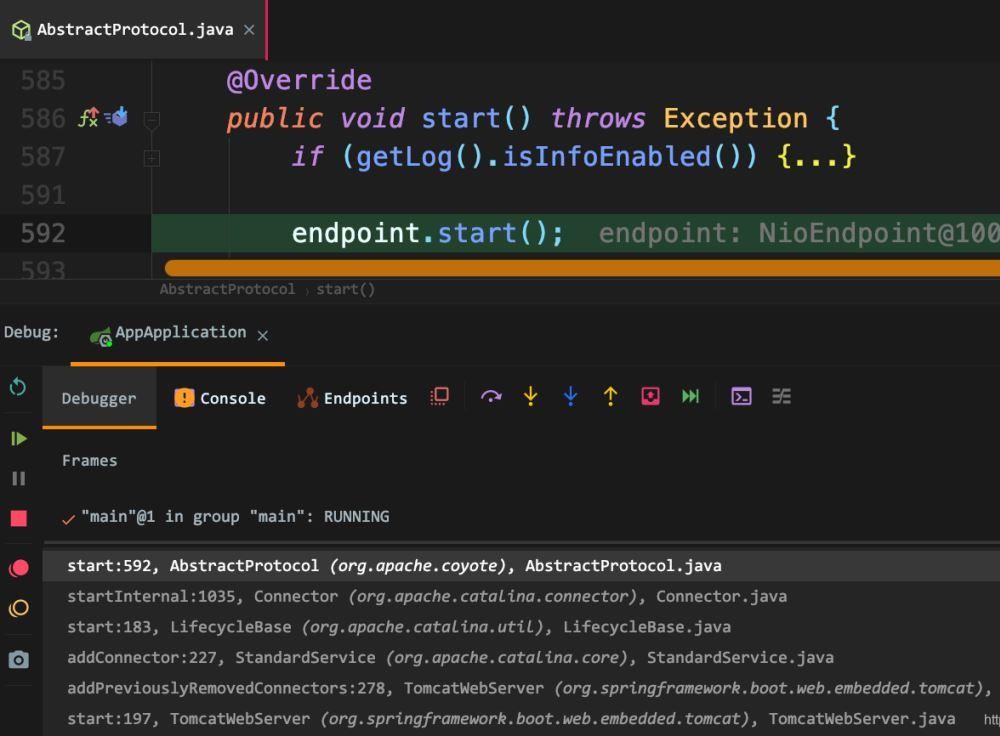
@Override
public void start() throws Exception {
    if (getLog().isInfoEnabled()) {
        getLog().info(sm.getString("abstractProtocolHandler.start", getName()));
        logPortOffset();
    }

    endpoint.start();
    monitorFuture = getUtilityExecutor().scheduleWithFixedDelay(
            new Runnable() {
                @Override
                public void run() {
                    if (!isPaused()) {
                        startAsyncTimeout();
                    }
                }
            }, 0, 60, TimeUnit.SECONDS);
}
调用链 :
start成员变量endpoint,一个 NioEndpoint 实例。Http11NioProtocol 类实例也并非最终处理请求,具体这些请求的处理都委托给了 NioEndpint endpoint 来完成
AbstractEndpoint
public final void start() throws Exception {
    if (bindState == BindState.UNBOUND) {
        bindWithCleanup();
        bindState = BindState.BOUND_ON_START;
    }
    startInternal();
}
可见 tomcat 的三种模式,默认使用 NIO 模式。

@Override
public void bind() throws Exception {
    initServerSocket();

    setStopLatch(new CountDownLatch(1));

    // Initialize SSL if needed
    initialiseSsl();

    selectorPool.open(getName());
}
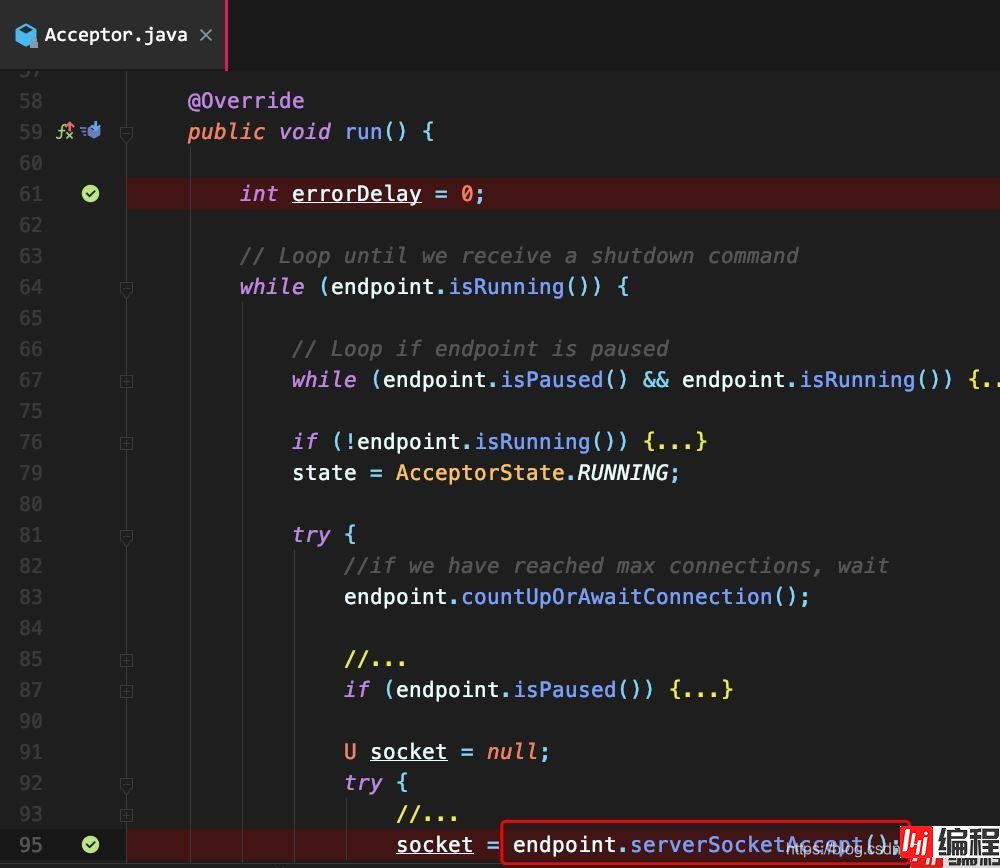
protected void initServerSocket() throws Exception {
    if (!getUseInheritedChannel()) {
    	// 建立服务套接字
        serverSock = ServerSocketChannel.open();
        socketProperties.setProperties(serverSock.socket());
        InetSocketAddress addr = new InetSocketAddress(getAddress(), getPortWithOffset());
        // 绑定到指定端口
        serverSock.socket().bind(addr,getAcceptCount());
    } else {
        // Retrieve the channel provided by the OS
        Channel ic = System.inheritedChannel();
        if (ic instanceof ServerSocketChannel) {
            serverSock = (ServerSocketChannel) ic;
        }
        if (serverSock == null) {
            throw new IllegalArgumentException(sm.getString("endpoint.init.bind.inherited"));
        }
    }
    // 设置 serverSock 为阻塞模式
    serverSock.configureBlocking(true); //mimic APR behavior
}
serverSocket配置的是阻塞模式,明明默认使用NIO 模式,为何还要设置阻塞模式呢?
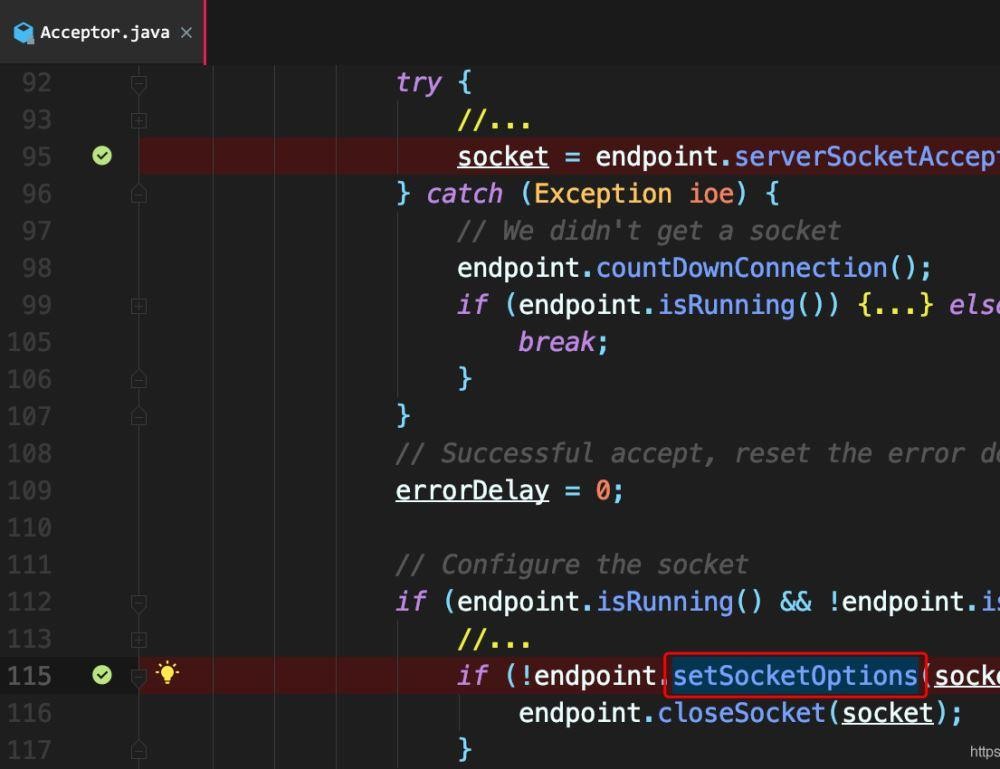
为什么使用NIO,因为BIO的accept是阻塞方法,write和read也都是阻塞的。只能当新连接到来时,去创建新线程去处理这个连接。如此,最大问题是不能同时处理大量连接,因为大量连接带来的是创建很多线程,大量线程很容易让操作系统崩溃,而且虽然并发度很高,但是很多线程都在空转,很多时间都浪费在线程空跑和线程切换上,效率也很差。
于是诞生了NIO。
其实处理连接的操作不必放在后台线程,因为后台线程很可能会处理连接建立不及时,不如将其置于主线程,增加并发度(虽然优势并不是特别明显)。
重点关心的是连接建立后获得的与客户端交互的那个socket,它的操作必须是非阻塞的,这很显然。因为在处理长连接时,我们关心的是在本次连接之内数据的读写。
NioEndpoint 正在使用阻塞模式的 ServerSocketChannel 以使其阻塞并等待连接传入,并且只有在accept后,才以非阻塞方式处理此传入的socket channel (见setSocketOptions 方法)。
正如作者指出的那样,使 ServerSocketChannel 成为非阻塞的将导致忙读取,即一个线程将不断轮询有无传入的连接,因为在非阻塞模式下 accept() 可能返回 null。
APR 代表 Apache Portable Runtime
Tomcat在接收到socket的时候做了如下操作:

参考
https://blog.csdn.net/andy_zhang2007/article/details/78641974
https://stackoverflow.com/questions/23168910/why-tomcats-non-blocking-connector-is-using-a-blocking-socket
到此这篇关于springBoot应用启动内置Tomcat的过程分析的文章就介绍到这了,更多相关SpringBoot 内置Tomcat启动内容请搜索编程网以前的文章或继续浏览下面的相关文章希望大家以后多多支持编程网!
--结束END--
本文标题: SpringBoot应用启动内置Tomcat的过程源码分析
本文链接: https://www.lsjlt.com/news/130556.html(转载时请注明来源链接)
有问题或投稿请发送至: 邮箱/279061341@qq.com QQ/279061341
下载Word文档到电脑,方便收藏和打印~
2024-03-01
2024-03-01
2024-03-01
2024-02-29
2024-02-29
2024-02-29
2024-02-29
2024-02-29
2024-02-29
2024-02-29
回答
回答
回答
回答
回答
回答
回答
回答
回答
回答


官方手机版

微信公众号

商务合作


0