Python 官方文档:入门教程 => 点击学习
目录一、SpringBoot随机端口1.基础介绍2.实现步骤二、springBoot多实例运行一、SpringBoot随机端口 1.基础介绍 随机端口可以自动找指定范围内可
创建ServerPortUtil .java端口工具类,使用socket连接指定端口,例如有以下条件
a. 指定端口范围为8000-65535
b. 识别端口是否使用,已被使用则继续随机产生
c. 如果全部端口不可使用则直接抛出错误,中断运行
import java.net.InetAddress;
import java.net.Socket;
import java.util.Random;

public class ServerPortUtil {
    private static final int MAX_PORT = 65535;
    private static final int MIN_PORT = 8000;

    public static String getAvailablePort() {
        Random random = new Random();
		// 最大尝试次数为端口范围
        int maxRetryCount = MAX_PORT - MIN_PORT;
        while (maxRetryCount > 0) {
        	// 指定范围内随机端口,随便写的算法,根据自己需要调整
            int port = random.nextInt(MAX_PORT - MIN_PORT) + MIN_PORT;
            boolean isUsed = isLocalePortUsing(port);
            if (!isUsed) {
                return String.valueOf(port);
            }
            --maxRetryCount;
        }
        System.out.println("系统暂无端口可用,运行结束");
        System.exit(1);
        return null;
    }


    public static boolean isLocalePortUsing(int port) {
        try {
            // 建立一个Socket连接, 如果该端口还在使用则返回true, 否则返回false, 127.0.0.1代表本机
            new Socket(InetAddress.getByName("127.0.0.1"), port);
            return true;
        } catch (Exception e) {
            // 异常说明端口连接不上,端口能使用
        }
        return false;
    }
}
创建StartCommand.java命令类,调用随机端口功能获取端口信息,然后将端口信息写入运行环境中
a. 如果传入的参数包含了端口则使用指定的,否则使用自动生成
import com.codecoord.randomport.util.ServerPortUtil;
import org.springframework.util.StringUtils;

public class StartCommand {

    private static final String SERVER_PORT = "auto.port";

    public StartCommand(String[] args) {
        boolean isServerPort = false;
        String serverPort = "";
        if (args != null) {
            for (String arg : args) {
                if (StringUtils.hasText(arg) && arg.startsWith("--server.port" )) {
                    isServerPort = true;
                    serverPort = arg;
                    break;
                }
            }
        }

        String port;
        if (isServerPort) {
           port = serverPort.split("=")[1];
        } else {
            port = ServerPortUtil.getAvailablePort();
        }
        System.out.println("Current project port is " + port);
        System.setProperty(SERVER_PORT, port);
    }
}
在启动类启动前向环境写入端口信息
import com.codecoord.randomport.config.StartCommand;
import org.springframework.boot.SpringApplication;
import org.springframework.boot.autoconfigure.SpringBootApplication;

@SpringBootApplicatio
public class SpringbootRandomPortApplication {
    public static void main(String[] args) {
        // 写入端口信息
        new StartCommand(args);
        SpringApplication.run(SpringbootRandomPortApplication.class, args);
    }
}
在配置文件中指定端口为随机生成的端口信息
server:
  # 随机端口配置
  port: ${auto.port}
项目测试 正常启动项目,可以在控制台看到启动的端口信息


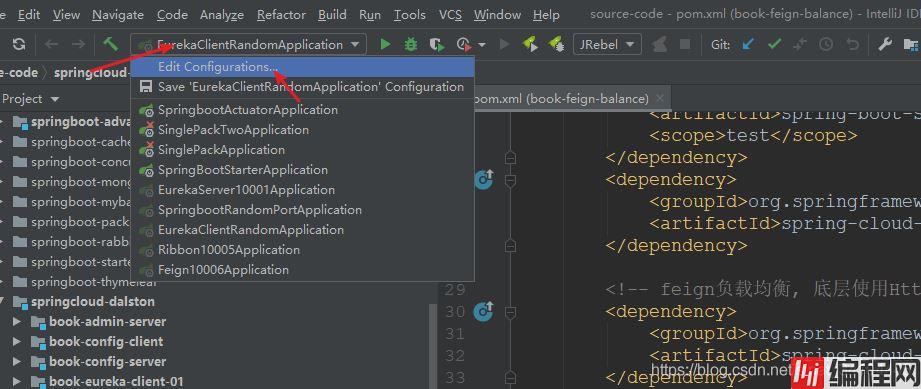
SpringBoot的多实例运行在idea中配置如下
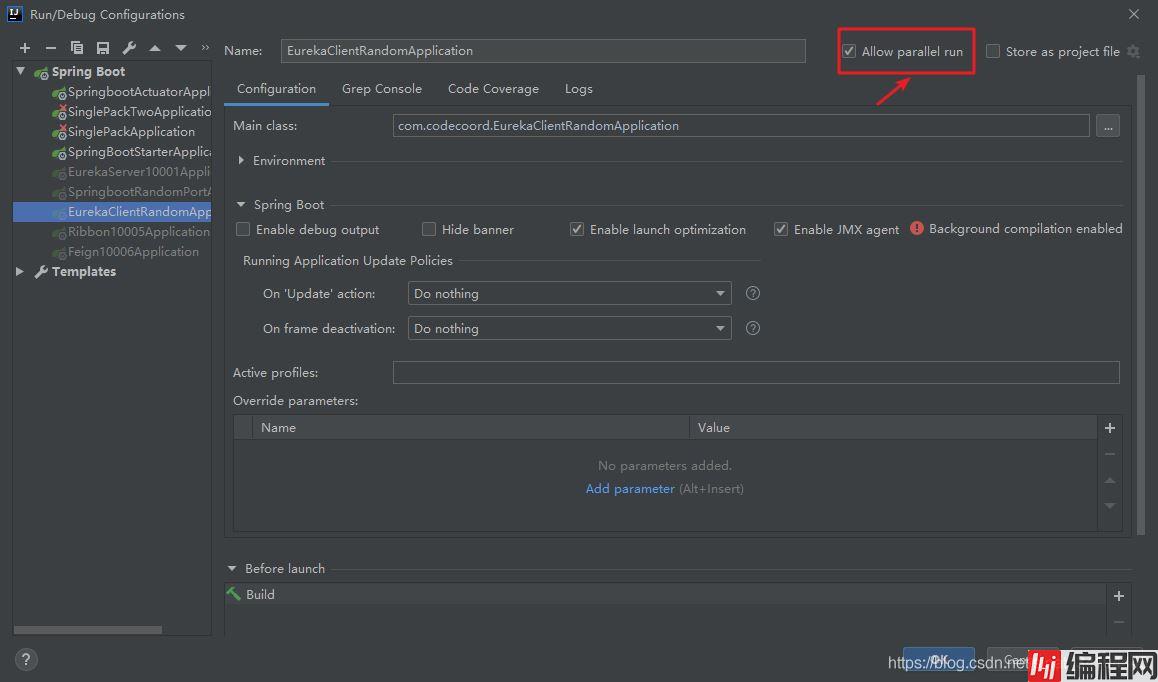
然后在启动上run/debug启动即可
到此这篇关于SpringBoot随机端口启动的实现的文章就介绍到这了,更多相关SpringBoot随机端口启动内容请搜索编程网以前的文章或继续浏览下面的相关文章希望大家以后多多支持编程网!
--结束END--
本文标题: SpringBoot随机端口启动的实现
本文链接: https://www.lsjlt.com/news/130888.html(转载时请注明来源链接)
有问题或投稿请发送至: 邮箱/279061341@qq.com QQ/279061341
下载Word文档到电脑,方便收藏和打印~
2024-03-01
2024-03-01
2024-03-01
2024-02-29
2024-02-29
2024-02-29
2024-02-29
2024-02-29
2024-02-29
2024-02-29
回答
回答
回答
回答
回答
回答
回答
回答
回答
回答


官方手机版

微信公众号

商务合作


0