Python 官方文档:入门教程 => 点击学习
目录什么是Spring Boot?SpringBoot特点springboot快速搭建项目新建项目springboot_mybatis_jsp项目配置配置项目目录配置工作目录(wor
Spring Boot是一种全新的框架(相对而言),是用来简化Spring应用的初始搭建以及开发过程。该框架使用了特定的方式来进行配置。通过这种方式Spring Boot将在蓬勃发展的快速应用开发领域(rapid application development)成为领导者。
springboot的东西很多,其余的东西后面有机会再做补充吧。
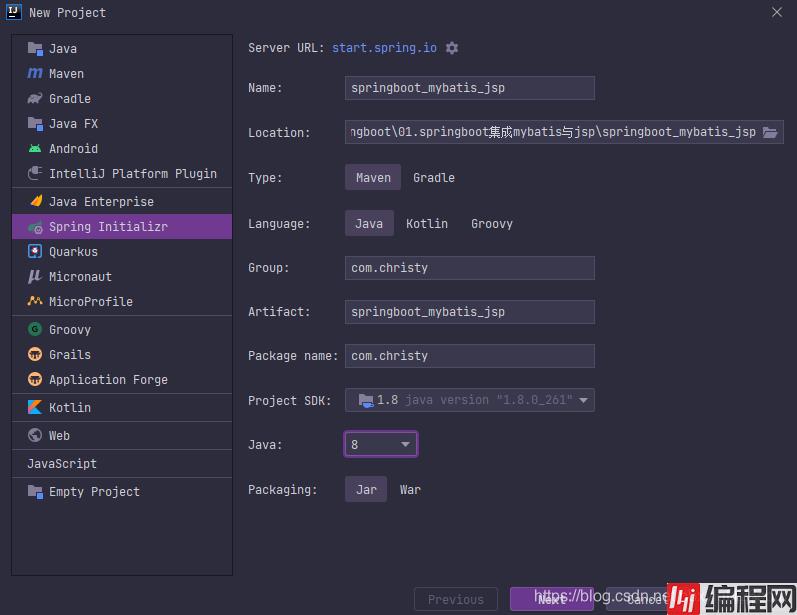
今天主要以标题springboot集成mybatis与jsp为例演示springboot快速搭建项目
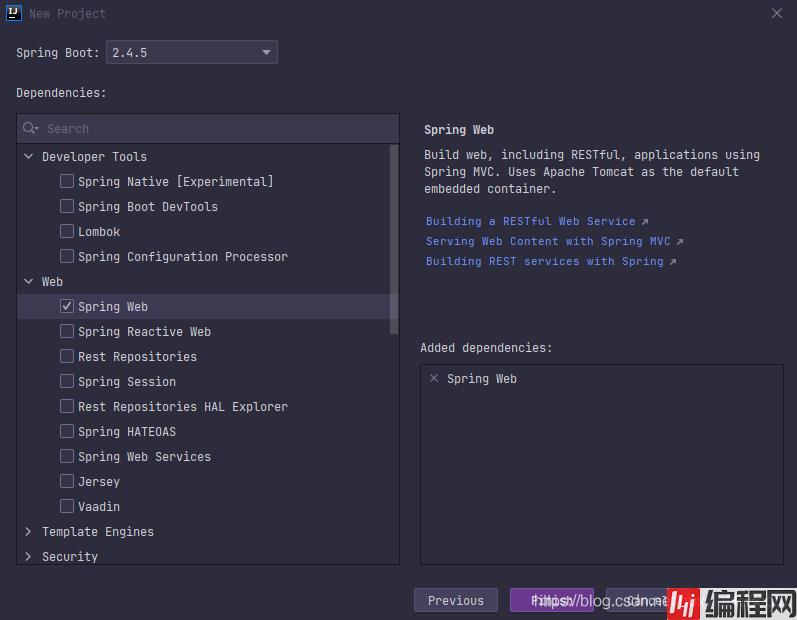
这里我们目前只选一个WEB依赖,剩下的我们需要的时候再手动添加;
springboot的版本我们选择2.4.5,后面我们手动改成2.2.5.RELEASE。
最后我们点击Finish。至此我们项目的初始化就完成了。

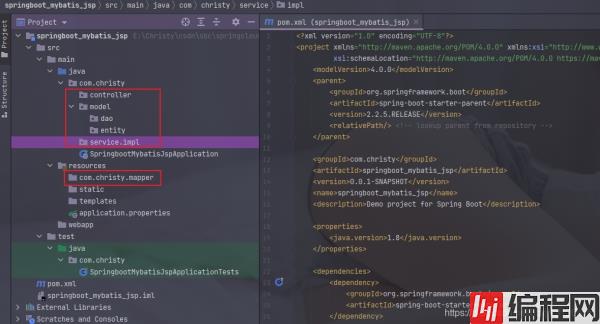
mapper目录的添加要注意是com/christy/mapper,这里不要搞错了
这一步一定要做,否则无法访问到项目的jsp页面
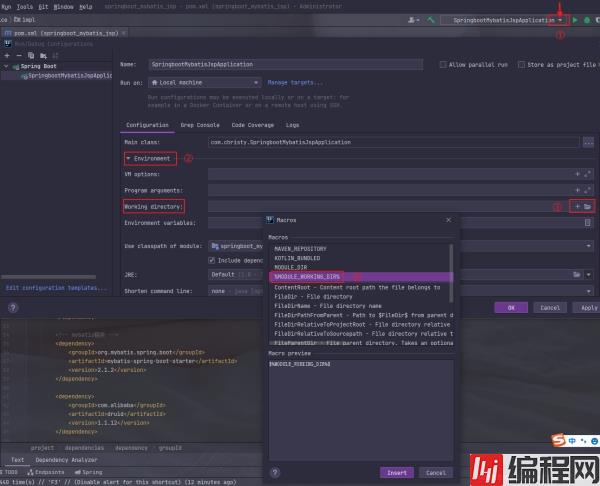
第一步中点击下拉三角形选择Edit Configurations
第四步直接双击完后记得点击Apply->OK
我们说了要实现springboot集成mybatis和jsp,所以首先要假如他们的依赖和相关依赖,这里放整个pom.xml内容
<?xml version="1.0" encoding="UTF-8"?>
<project xmlns="Http://maven.apache.org/POM/4.0.0" 								     xmlns:xsi="http://www.w3.org/2001/XMLSchema-instance"
         xsi:schemaLocation="http://maven.apache.org/POM/4.0.0 https://maven.apache.org/xsd/maven-4.0.0.xsd">
    <modelVersion>4.0.0</modelVersion>
    <parent>
        <groupId>org.springframework.boot</groupId>
        <artifactId>spring-boot-starter-parent</artifactId>
        <version>2.2.5.RELEASE</version>
        <relativePath/> <!-- lookup parent from repository -->
    </parent>
    <groupId>com.christy</groupId>
    <artifactId>springboot_mybatis_jsp</artifactId>
    <version>0.0.1-SNAPSHOT</version>
    <name>springboot_mybatis_jsp</name>
    <description>Demo project for Spring Boot</description>
    <properties>
        <java.version>1.8</java.version>
    </properties>
    <dependencies>
        <dependency>
            <groupId>org.springframework.boot</groupId>
            <artifactId>spring-boot-starter-web</artifactId>
        </dependency>
        <dependency>
            <groupId>org.springframework.boot</groupId>
            <artifactId>spring-boot-starter-test</artifactId>
            <scope>test</scope>
        </dependency>
        <!-- mybatis相关 -->
        <dependency>
            <groupId>org.mybatis.spring.boot</groupId>
            <artifactId>mybatis-spring-boot-starter</artifactId>
            <version>2.1.2</version>
        </dependency>
        <dependency>
            <groupId>com.alibaba</groupId>
            <artifactId>druid</artifactId>
            <version>1.1.12</version>
        </dependency>
        <dependency>
            <groupId>Mysql</groupId>
            <artifactId>mysql-connector-java</artifactId>
            <version>5.1.38</version>
        </dependency>
        <!-- jsp相关 -->
        <dependency>
            <groupId>org.apache.tomcat.embed</groupId>
            <artifactId>tomcat-embed-jasper</artifactId>
        </dependency>
        <dependency>
            <groupId>jstl</groupId>
            <artifactId>jstl</artifactId>
            <version>1.2</version>
        </dependency>
    </dependencies>
    <build>
        <plugins>
            <plugin>
                <groupId>org.springframework.boot</groupId>
                <artifactId>spring-boot-maven-plugin</artifactId>
                <configuration>
                    <JVMArguments>-Dfile.encoding=UTF-8</jvmArguments>
                </configuration>
            </plugin>
        </plugins>
    </build>
</project>
server.port=8899
# 开启jso的自动编译
server.servlet.jsp.init-parameters.development=true
# 配置视图解析器
spring.mvc.view.prefix=/
spring.mvc.view.suffix=.jsp
# 编写mybatis相关配置
spring.datasource.type=com.alibaba.druid.pool.DruidDataSource
spring.datasource.driver-class-name=com.mysql.jdbc.Driver
spring.datasource.url=jdbc:mysql://localhost:3306/christy?characterEncoding=UTF-8
spring.datasource.username=root
spring.datasource.passWord=123456
# 创建这个目录一定要使用 "/"
mybatis.mapper-locations=classpath:com/christy/mapper
    List<User> findAll();

    void save(User user);

    User findById(Integer id);

    void update(User user);

    void deleteById(Integer id);
}
<?xml version="1.0" encoding="UTF-8" ?>
<!DOCTYPE mapper PUBLIC "-//mybatis.org//DTD Mapper 3.0//EN" "http://mybatis.org/dtd/mybatis-3-mapper.dtd">
<mapper namespace="com.christy.model.dao.UserDao">
    <!--findAll-->
    <select id="findAll" resultType="com.christy.model.entity.User">
        select id,name,age,salary from t_user
    </select>
    <!--save 采用数据库自动生成(useGeneratedKeys="true")并返回主键的值(keyProperty保存主键的属性名)-->
    <insert id="save" parameterType="com.christy.model.entity.User" useGeneratedKeys="true" keyProperty="id" >
        insert into t_user values(#{id},#{name},#{age},#{salary})
    </insert>
    <!--findById-->
    <select id="findById" parameterType="Integer" resultType="com.christy.model.entity.User">
        select id,name,age,salary from t_user where id = #{id}
    </select>
    <!--update-->
    <update id="update" parameterType="com.christy.model.entity.User">
        update t_user
        set
            name=#{name},
            age=#{age},
            salary=#{salary}
        where id = #{id}
    </update>
    <!--deleteById-->
    <select id="deleteById" parameterType="Integer" >
        delete from t_user where id = #{id}
    </select>
</mapper>
public interface UserService {

    List<User> findAll();

    void save(User user);

    User findById(Integer id);

    void update(User user);

    void deleteById(Integer id);
}
@Service // 通知springboot扫描该注解 用来在工厂中创建对象
@Transactional  // 控制事务 修饰范围: 类 方法
public class UserServiceImpl implements UserService {
    @Autowired
    private UserDao userDao;

    @Override
    @Transactional(propagation = Propagation.SUPPORTS)  // propagation: 事务的传播属性
    public List<User> findAll() {
        return userDao.findAll();
    }

    @Override
    public void save(User user) {
        userDao.save(user);
    }

    @Override
    public User findById(Integer id) {
        return userDao.findById(id);
    }

    @Override
    public void update(User user) {
        userDao.update(user);
    }

    @Override
    public void deleteById(Integer id) {
        userDao.deleteById(id);
    }
}
@Controller
@RequestMapping("user")
public class UserController {
    @Autowired
    private UserService userService;

    @RequestMapping("findAll")
    public String findAll(HttpServletRequest request, Model model){
        List<User> users = userService.findAll();
        //保存到作用域
        model.addAttribute("users",users);
        return "user_list";
    }

    @RequestMapping("save")
    public String save(String name,User user){
        userService.save(user);
        return "redirect:/user/findAll";
    }

    @RequestMapping("findById")
    public String findById(Integer id,Model model){
        User user = userService.findById(id);
        model.addAttribute("user",user);
        return "user_detail";
    }

    @RequestMapping("update")
    public String update(User user){
        userService.update(user);
        return "redirect:/user/findAll";
    }

    @RequestMapping("deleteById")
    public String deleteById(Integer id){
        userService.deleteById(id);
        return "redirect:/user/findAll";
    }
}
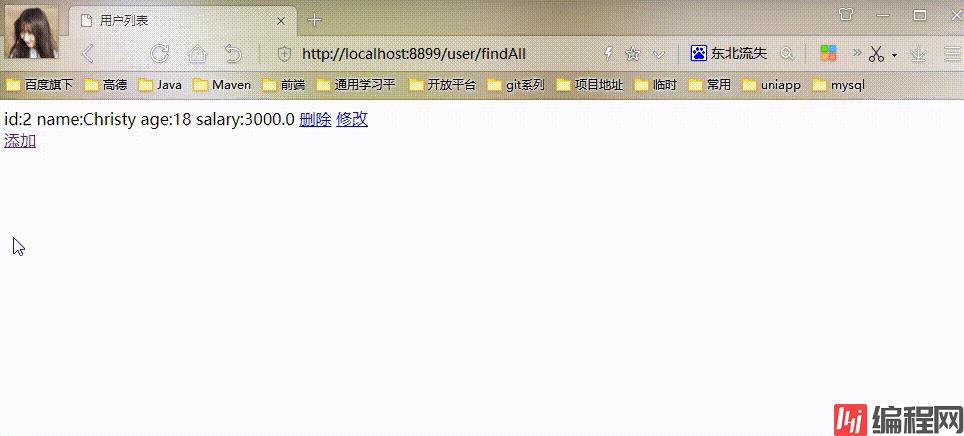
我们启动项目,访问列表页面http://localhost:8899/user/findAll,然后按下图操作我们预编写的功能
以上就是Springboot集成mybatis与jsp过程详解的详细内容,更多关于Springboot集成的资料请关注编程网其它相关文章!
--结束END--
本文标题: Springboot集成mybatis与jsp过程详解
本文链接: https://www.lsjlt.com/news/134219.html(转载时请注明来源链接)
有问题或投稿请发送至: 邮箱/279061341@qq.com QQ/279061341
下载Word文档到电脑,方便收藏和打印~
2024-03-01
2024-03-01
2024-03-01
2024-02-29
2024-02-29
2024-02-29
2024-02-29
2024-02-29
2024-02-29
2024-02-29
回答
回答
回答
回答
回答
回答
回答
回答
回答
回答


官方手机版

微信公众号

商务合作


0