Python 官方文档:入门教程 => 点击学习
目录索引操作简单索引Numpy 式索引使用 : 进行索引tf.gathertf.gather_ndtf.boolean_mask切片操作简单切片step 切片维度变换tf.resha
索引 (index) 可以帮助我们快速的找到张量中的特定信息.
例子:
a = tf.reshape(tf.range(12), [2, 2, 3])
print(a)

print(a[0])
print(a[0][0])
输出结果:
tf.Tensor(
[[[ 0 1 2]
[ 3 4 5]][[ 6 7 8]
[ 9 10 11]]], shape=(2, 2, 3), dtype=int32)
tf.Tensor(
[[0 1 2]
[3 4 5]], shape=(2, 3), dtype=int32)
tf.Tensor([0 1 2], shape=(3,), dtype=int32)
我们也可以按照 numpy 的写法来操作索引.
例子:
a = tf.reshape(tf.range(12), [2, 2, 3])
print(a)

print(a[0])
print(a[0, 0])
输出结果:
tf.Tensor(
[[[ 0 1 2]
[ 3 4 5]][[ 6 7 8]
[ 9 10 11]]], shape=(2, 2, 3), dtype=int32)
tf.Tensor(
[[0 1 2]
[3 4 5]], shape=(2, 3), dtype=int32)
tf.Tensor([0 1 2], shape=(3,), dtype=int32)
例子:
c = tf.ones([4, 14, 14, 4])
print(c[0, :, :, :].shape)
print(c[0, 1, :, :].shape)
输出结果:
(14, 14, 4)
(14, 4)
我们假设一个有 3 个餐馆, 每个餐馆有 8 种菜系, 128 道菜data: [resturants, cuisines, dishes].

例子:
data = tf.zeros([3, 8, 128])

g1 = tf.gather(data, axis=0, indices=[0, 2])
print(g1.shape)

g2 = tf.gather(data, axis=1, indices=[0, 1, 2, 3])
print(g2.shape)
输出结果:
(2, 8, 128)
(3, 4, 128)
例子:
g1 = tf.gather_nd(data, [0])
print(g1.shape)

g2 = tf.gather_nd(data, [0, 1])
print(g2.shape)

g3 = tf.gather_nd(data, [0, 1, 2])
print(g3.shape)
输出结果:
(8, 128)
(128,)
()
格式:
tf.boolean_mask(
    tensor, mask, axis=None, name='boolean_mask'
)
例子:
data = tf.zeros([3, 8, 128])

b1 = tf.boolean_mask(data, mask=[True, True, False])
print(b1.shape)

b2 = tf.boolean_mask(data, mask=[True, False, True, False, True, False, True, False], axis=1)
print(b2.shape)
输出结果:
(2, 8, 128)
(3, 4, 128)
借助切片技术, 我们可以灵活的处理张量对象.

格式:
tensor[start : end]
其中 start 为开始索引, end 为结束索引 (不包括)
例子:
tf.Tensor([0 1 2], shape=(3,), dtype=int32)
tf.Tensor([9], shape=(1,), dtype=int32)
tf.Tensor([0 1 2 3 4 5 6 7 8], shape=(9,), dtype=int32)
格式:
tensor[start : end: step]
例子:
d = tf.range(6)
print(d[::-1])  # 实现倒序
print(d[::2])  # 步长为2
输出结果:
tf.Tensor([5 4 3 2 1 0], shape=(6,), dtype=int32)
tf.Tensor([0 2 4], shape=(3,), dtype=int32)

tf.reshape 可以帮助我们进行维度转换.
格式:
tf.reshape(
    tensor, shape, name=None
)
参数:
例子:
a = tf.random.nORMal([3, 8, 128])
print(a.shape)

b = tf.reshape(a, [3, 1024])
print(b.shape)

c = tf.reshape(a, [3, -1])
print(c.shape)
输出结果:
(3, 8, 128)
(3, 1024)
(3, 1024)
格式:
tf.transpose(
    a, perm=None, conjugate=False, name='transpose'
)
例子:
a = tf.random.normal([4, 3, 2, 1])
print(a.shape)

b = tf.transpose(a)
print(b.shape)

c = tf.transpose(a, perm=[0, 1, 3, 2])
print(c.shape)
输出结果:
(4, 3, 2, 1)
(1, 2, 3, 4)
(4, 3, 1, 2)
格式:
tf.expand_dims(
    input, axis, name=None
)
参数:
例子:
a = tf.random.normal([4, 3, 2, 1])
print(a.shape)

b = tf.expand_dims(a, axis=0)
print(b.shape)

c = tf.expand_dims(a, axis=1)
print(c.shape)

d = tf.expand_dims(a, axis=-1)
print(d.shape)
输出结果:
(4, 3, 2, 1)
(1, 4, 3, 2, 1)
(4, 1, 3, 2, 1)
(4, 3, 2, 1, 1)
tf.squeeze 可以帮助我们删去所有维度为1 的维度.

格式:
tf.squeeze(
    input, axis=None, name=None
)
参数:
例子:
a = tf.zeros([2, 1, 1, 3, 5])

s1 = tf.squeeze(a)
print(s1.shape)

s2 = tf.squeeze(a, axis=1)
print(s2.shape)

s3 = tf.squeeze(a, axis=2)
print(s3.shape)
输出结果:
(2, 3, 5)
(2, 1, 3, 5)
(2, 1, 3, 5)
广播机制 (Boardcasting) 是一种张量复制的手段. Boardcasting 可以帮助我们扩张张量的形状但无需实际复制数据.
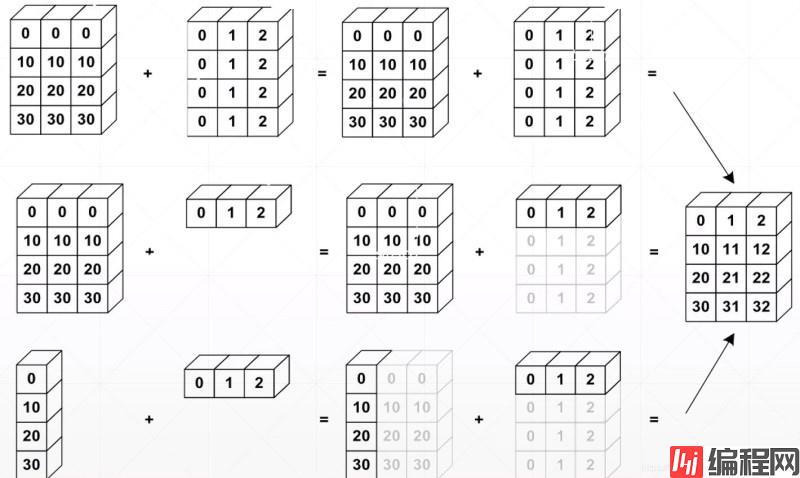
广播机制允许我们在隐式情况下进行填充, 从而使得我们的代码更加简洁, 更有效率地使用内存.
boardcast_to:
tf.broadcast_to(
    input, shape, name=None
)
参数:
例子:
a = tf.broadcast_to(tf.random.normal([4, 1, 1, 1]), [4, 32, 32, 3])
print(a.shape)

b = tf.broadcast_to(tf.zeros([128, 1, 1, 1]), [128, 32, 32, 3])
print(b.shape)
输出结果:
(4, 32, 32, 3)
(128, 32, 32, 3)
格式:
tf.tile(
    input, multiples, name=None
)
参数:
例子:
a = tf.zeros([4, 1, 1, 1])
print(a.shape)

b = tf.tile(a, [1, 32, 32, 3])
print(b.shape)
输出结果:
(4, 1, 1, 1)
(4, 32, 32, 3)
注: boardcast_to 和 tile 的区别在于 boardcast_to 可以在不复制内存的情况下自动扩张 tensor.

例子:
# 定义张量
t1 = tf.ones([3, 3])
t2 = tf.fill([3, 3], 3.0)

# 加
add = t1 + t2
print(add)

# 减
minus = t1 - t2
print(minus)

# 乘
multiply = t1 * t2
print(multiply)

# 除
divide = t1 / t2
print(divide)
输出结果:
tf.Tensor(
[[4. 4. 4.]
[4. 4. 4.]
[4. 4. 4.]], shape=(3, 3), dtype=float32)
tf.Tensor(
[[-2. -2. -2.]
[-2. -2. -2.]
[-2. -2. -2.]], shape=(3, 3), dtype=float32)
tf.Tensor(
[[3. 3. 3.]
[3. 3. 3.]
[3. 3. 3.]], shape=(3, 3), dtype=float32)
tf.Tensor(
[[0.33333334 0.33333334 0.33333334]
[0.33333334 0.33333334 0.33333334]
[0.33333334 0.33333334 0.33333334]], shape=(3, 3), dtype=float32)
例子:
# log
a = tf.fill([2], 100.0)
print(a)

b = tf.math.log(a)  # 以e为底
print(b)

# exp
c = tf.ones([2])
print(c)

d = tf.exp(c)
print(d)
输出结果:
tf.Tensor([100. 100.], shape=(2,), dtype=float32)
tf.Tensor([4.6051702 4.6051702], shape=(2,), dtype=float32)
tf.Tensor([1. 1.], shape=(2,), dtype=float32)
tf.Tensor([2.7182817 2.7182817], shape=(2,), dtype=float32)
例子:
# 定义张量
a = tf.fill([2], 4.0)
print(a)

# pow
b = tf.pow(a, 2)
print(b)

# sqrt
c = tf.sqrt(a, 2)
print(c)
输出结果:
tf.Tensor([4. 4.], shape=(2,), dtype=float32)
tf.Tensor([16. 16.], shape=(2,), dtype=float32)
tf.Tensor([2. 2.], shape=(2,), dtype=float32)
我们可以使用tf.matmul或@来实现矩阵相乘.

例子:
# 定义张量
a = tf.fill([2, 2], 2)
b = tf.fill([2, 2], 3)

# matmul
c = tf.matmul(a, b)
print(c)

# @
d = a@b
print(d)
输出结果:
tf.Tensor(
[[12 12]
[12 12]], shape=(2, 2), dtype=int32)
tf.Tensor(
[[12 12]
[12 12]], shape=(2, 2), dtype=int32)
到此这篇关于一小时学会Tensorflow2之基本操作2实例代码的文章就介绍到这了,更多相关TensorFlow2基本操作内容请搜索编程网以前的文章或继续浏览下面的相关文章希望大家以后多多支持编程网!
--结束END--
本文标题: 一小时学会TensorFlow2之基本操作2实例代码
本文链接: https://www.lsjlt.com/news/134580.html(转载时请注明来源链接)
有问题或投稿请发送至: 邮箱/279061341@qq.com QQ/279061341
下载Word文档到电脑,方便收藏和打印~
2024-03-01
2024-03-01
2024-03-01
2024-02-29
2024-02-29
2024-02-29
2024-02-29
2024-02-29
2024-02-29
2024-02-29
回答
回答
回答
回答
回答
回答
回答
回答
回答
回答
一口价域名售卖能注册吗?域名是网站的标识,简短且易于记忆,为在线用户提供了访问我们网站的简单路径。一口价是在域名交易中一种常见的模式,而这种通常是针对已经被注册的域名转售给其他人的一种方式。
一口价域名买卖的过程通常包括以下几个步骤:
1.寻找:买家需要在域名售卖平台上找到心仪的一口价域名。平台通常会为每个可售的域名提供详细的描述,包括价格、年龄、流
443px" 443px) https://www.west.cn/docs/wp-content/uploads/2024/04/SEO图片294.jpg https://www.west.cn/docs/wp-content/uploads/2024/04/SEO图片294-768x413.jpg 域名售卖 域名一口价售卖 游戏音频 赋值/切片 框架优势 评估指南 项目规模 安全指南 Osprey 游戏分析 游戏调试 游戏图形 游戏物理 开源库 魔方破解 游戏安全 反作弊 安全最佳实践 游戏逻辑

官方手机版

微信公众号

商务合作


0