Python 官方文档:入门教程 => 点击学习
目录开发目标:实现小红帽所挂脚本的自动生成下图为生成的最终目标主程序具体python代码如下:所设置的TMPL文件如下:自动生成的C#代码展示如下:开发目标:实现小红帽所挂脚本的自动

本项目是从JSON中读取角色场景等信息,因此为了更好地判断所用属性是否需要,设置为bool类型,False表示在c#代码中注释掉该类属性,True代表使用该属性(属性暂时设置为)
    Timer = True # 计时器
    speed = False # 速度
    IsTrigger = True # 触发器
    start_point = True # 起始位置
    localScale = True # 起始大小
from string import Template
class BuildData:
    def Init(self):
        # 初始化各类$
        Timer = True
        speed = False
        IsTrigger = True
        start_point = True
        localScale = True
        # 输出a.cs文件
        filePath = 'a.cs'
        class_file = open(filePath, 'w')
        # mycode用来存放生成的代码
        mycode = []
        # 加载模板文件
        template_file = open('TMPL1.tmpl', 'rb')
        template_file = template_file.read().decode('utf-8')
        tmpl = Template(template_file)
        ##  模板替换
        # 1.需要判断是否使用的模板,不使用的给他注释掉
        if(Timer):
            TimerContent = ' '
        else:
            TimerContent = '///'
        if (speed):
            speedContent = ' '
        else:
            speedContent = '///'

        if (IsTrigger):
           IsTriggerContent =' '
        else:
            IsTriggerContent ='///'

        if (start_point):
            start_pointcontent= ' '
        else:
            start_pointcontent= '///'

        if (localScale):
            localScalecontent = ' '
        else:
            localScalecontent='///'
        # 2.固定的模板值更替
        mycode.append(tmpl.safe_substitute(
            TimerContent=TimerContent,
            speedContent=speedContent,
            IsTriggerContent=IsTriggerContent,
            start_pointcontent=start_pointcontent,
            localScalecontent=localScalecontent,
            role='Small_red_hat',
            x_start_point='12',
            y_start_point='-2',
            z_start_point='0',
            x_scale='0.45f',
            y_scale='0.5f',
            z_scale='1'
        ))
        # 将代码写入文件
        class_file.writelines(mycode)
        class_file.close()
        print('代码已生成')
if __name__ == '__main__':
    build = BuildData()
    build.Init()
using System.Collections;
using System.Collections.Generic;
using UnityEngine;
public class ${role} : MonoBehaviour
{
    ${TimerContent} public float Timer;         //set a Timer
    ${speedContent} public float speed;   //speed
    ${IsTriggerContent} public bool IsTrigger;      //set a trigger
    void Start()
    {
        //the start_point of ${role}
        ${start_pointcontent}transfORM.position = new Vector3(${x_start_point}, ${y_start_point}, ${z_start_point});
        //the scale of ${role}
        ${localScalecontent}transform.localScale = new Vector3(${x_scale},${y_scale}, ${z_scale});
    }
    void Update()
    {
        //Timer countdown
        ${TimerContent} Timer += Time.deltaTime;
        //when to move
        ${TimerContent} if (Timer >= 2f && Timer <= 4f) {  IsTrigger = true;}
        //when to stop
        ${TimerContent} else if (Timer > 3.5f){  IsTrigger = false;}
        //the speed of ${role}
        ${IsTriggerContent}if(IsTrigger){ transform.Translate(-0.04f, 0, 0);}

    }
}
using System.Collections;
using System.Collections.Generic;
using UnityEngine;
public class Small_red_hat : MonoBehaviour
{
      public float Timer;         //set a Timer
    /// public float speed;   //speed
      public bool IsTrigger;      //set a trigger
    void Start()
    {
        //the start_point of Small_red_hat
         transform.position = new Vector3(12, -2, 0);
        //the scale of Small_red_hat
         transform.localScale = new Vector3(0.45f,0.5f, 1);
    }
    void Update()

    {
        //Timer countdown
          Timer += Time.deltaTime;
        //when to move
         if (Timer >= 2f && Timer <= 4f) {  IsTrigger = true;}
        //when to stop
          else if (Timer > 3.5f){  IsTrigger = false;}
        //the speed of Small_red_hat
        if (IsTrigger){ transform.Translate(-0.04f, 0, 0);}
    }
}
仔细观察生成的结果,代码与目标生成的代码基本一致,(注释暂时只能使用英文编辑。) 随即把生成的代码放在unity中,观察运行情况。
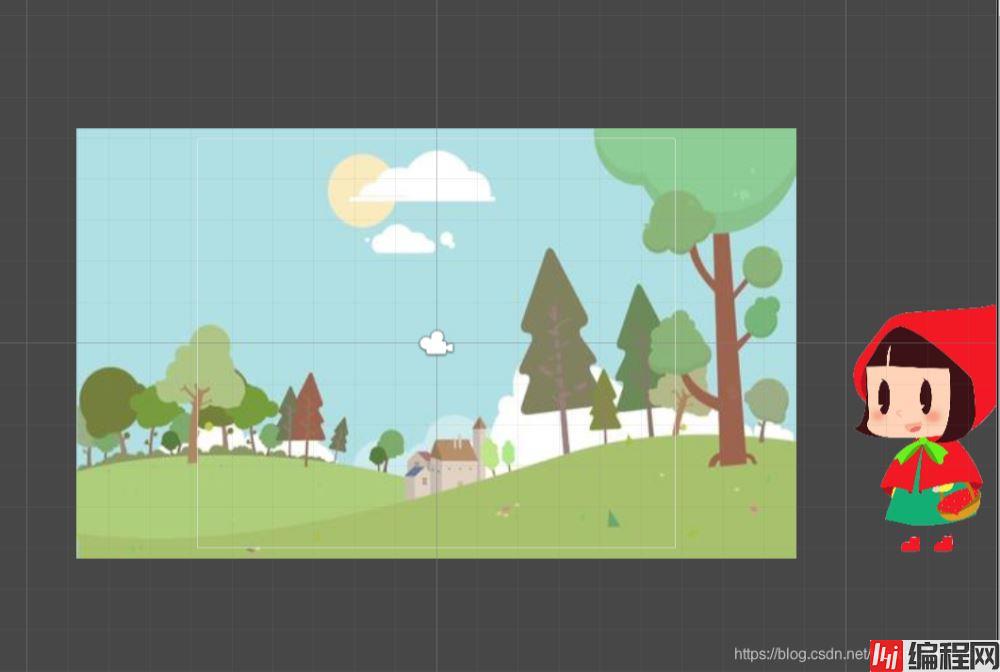
运行前:
运行后:

可见,小红帽的控制器实现基本无误。 具体视频已放在b站:
unity的2d的animation纯代码实现,场景切换。
以上就是Python实现C#代码生成器应用服务于Unity示例解析的详细内容,更多关于Python实现C#代码生成器应用Unity的资料请关注编程网其它相关文章!
--结束END--
本文标题: Python实现C#代码生成器应用服务于Unity示例解析
本文链接: https://www.lsjlt.com/news/137339.html(转载时请注明来源链接)
有问题或投稿请发送至: 邮箱/279061341@qq.com QQ/279061341
下载Word文档到电脑,方便收藏和打印~
2024-03-01
2024-03-01
2024-03-01
2024-02-29
2024-02-29
2024-02-29
2024-02-29
2024-02-29
2024-02-29
2024-02-29
回答
回答
回答
回答
回答
回答
回答
回答
回答
回答


官方手机版

微信公众号

商务合作


0