WrapPanel:环绕面板 WrapPanel布局面板将各个控件从左至右按照行或列的顺序罗列,当长度或高度不够时就会自动调整进行换行,后续排序按照从上至下或从右至左的顺序进行。 O
WrapPanel布局面板将各个控件从左至右按照行或列的顺序罗列,当长度或高度不够时就会自动调整进行换行,后续排序按照从上至下或从右至左的顺序进行。
示例效果图如下2图所示,图1是窗体宽度较小时候的效果,图2是窗体宽度拉大以后的效果

图1

图2
使用XAML代码实现:
<Window x:Class="WPFDemo.MainWindow"
        xmlns="Http://schemas.microsoft.com/winfx/2006/xaml/presentation"
        xmlns:x="http://schemas.microsoft.com/winfx/2006/xaml"
        Title="WrapPanel面板" Height="237" Width="525" windowstartupLocation="CenterScreen">
    <WrapPanel Orientation="Horizontal">
        <Button Width="100">按钮1</Button>
        <Button Width="100">按钮2</Button>
        <Button Width="100">按钮3</Button>
        <Button Width="100">按钮4</Button>
        <Button Width="100">按钮5</Button>
        <Button Width="100">按钮6</Button>
    </WrapPanel>
</Window>示例效果图如下2图所示,图1是窗体高度较大时候的效果,图2是窗体高度较小时的效果
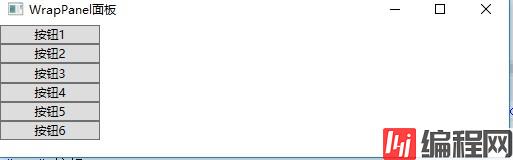
图1
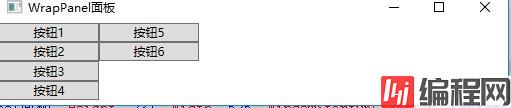
图2
使用XAML代码实现:
<Window x:Class="WpfDemo.MainWindow"
        xmlns="http://schemas.microsoft.com/winfx/2006/xaml/presentation"
        xmlns:x="http://schemas.microsoft.com/winfx/2006/xaml"
        Title="WrapPanel面板" Height="237" Width="525" WindowStartupLocation="CenterScreen">
    <WrapPanel Orientation="Vertical">
        <Button Width="100">按钮1</Button>
        <Button Width="100">按钮2</Button>
        <Button Width="100">按钮3</Button>
        <Button Width="100">按钮4</Button>
        <Button Width="100">按钮5</Button>
        <Button Width="100">按钮6</Button>
    </WrapPanel>
</Window>到此这篇关于WPF使用WrapPanel环绕面板布局的文章就介绍到这了。希望对大家的学习有所帮助,也希望大家多多支持编程网。
--结束END--
本文标题: WPF使用WrapPanel环绕面板布局
本文链接: https://www.lsjlt.com/news/140493.html(转载时请注明来源链接)
有问题或投稿请发送至: 邮箱/279061341@qq.com QQ/279061341
下载Word文档到电脑,方便收藏和打印~
2023-05-21
2023-05-21
2023-05-21
2023-05-21
2023-05-20
2023-05-20
2023-05-20
2023-05-20
2023-05-20
2023-05-20
回答
回答
回答
回答
回答
回答
回答
回答
回答
回答


官方手机版

微信公众号

商务合作


0