Python 官方文档:入门教程 => 点击学习
目录1. Server端服务开发1.1. 引入核心依赖1.2. application.yml配置文件1.3. Security配置文件1.4. 主启动类2. Client端服务开发
Spring Boot Admin用于管理和监控一个或多个Spring Boot服务,其分为Server端和Client端,Server端相当于一个注册中心,Client端通过Http请求向Server端进行注册,也可以结合Eureka、Nacos等注册中心实现服务注册。
<dependency>
    <groupId>de.codecentric</groupId>
    <artifactId>spring-boot-admin-starter-server</artifactId>
    <version>2.3.1</version>
</dependency>
<dependency>
    <groupId>org.springframework.boot</groupId>
    <artifactId>spring-boot-starter-security</artifactId>
</dependency>
<dependency>
    <groupId>org.springframework.boot</groupId>
    <artifactId>spring-boot-starter-WEB</artifactId>
</dependency>server:
port: 8138
servlet:
context-path: /admin
spring:
application:
name: SpringBoot-admin-server
security:
user:
name: admin
passWord: 123456@Configuration
public class SecurityConfig extends WebSecurityConfigurerAdapter {
private String adminSecurityContextPath;
public SecurityConfig(AdminServerProperties adminServerProperties) {
this.adminSecurityContextPath = adminServerProperties.getContextPath();
}
@Override
protected void configure(httpsecurity http) throws Exception {
SavedRequestAwareAuthenticationSuccesshandler successHandler = new SavedRequestAwareAuthenticationSuccessHandler();
successHandler.setTargetUrlParameter("redirectTo");
http.authorizeRequests()
.antMatchers(adminSecurityContextPath + "/assets/**").permitAll()
.antMatchers(adminSecurityContextPath + "/login").permitAll()
.anyRequest().authenticated()
.and()
.fORMLogin().loginPage(adminSecurityContextPath + "/login").successHandler(successHandler)
.loGout().logoutUrl(adminSecurityContextPath + "/logout")
.httpBasic()
.csrf()
.ignoringAntMatchers(adminSecurityContextPath + "/instances", adminSecurityContextPath + "/actuator/**")
.disable();
}@EnableAdminServer
@SpringBootApplication
public class AdminServerApplication {
public static void main(String[] args) {
SpringApplication.run(AdminServerApplication.class, args);
}
}<dependency>
<groupId>de.codecentric</groupId>
<artifactId>spring-boot-admin-starter-client</artifactId>
<version>2.3.1</version>
</dependency>
<dependency>
<groupId>org.springframework.boot</groupId>
<artifactId>spring-boot-starter-web</artifactId>
</dependency>server:
port: 8238
spring:
application:
name: springboot-admin-client
boot:
admin:
client:
url: http://localhost:8138/admin
instance:
prefer-ip: true
username: admin
password: 123456
management:
endpoints:
web:
exposure:
include: '*'
endpoint:
health:
show-details: always
shutdown:
enabled: true
logfile:
external-file: ./logs/log_file.log
logging:
config: classpath:logback-spring.xml
level:
com.xlhj.boot.admin: debug
info:
author: caijliu
projectName: springboot整合springboot admin
version: 1.0<?xml version="1.0" encoding="UTF-8" ?>
<configuration>
<property name="log.path" value="./logs"/>
<!--彩色日志依赖的渲染类-->
<conversionRule conversionWord="clr" converterClass="org.springframework.boot.logging.logback.ColorConverter"/>
<conversionRule conversionWord="wex" converterClass="org.springframework.boot.logging.logback.WhitespaceThrowableProxyConverter" />
<conversionRule conversionWord="wEx" converterClass="org.springframework.boot.logging.logback.ExtendedWhitespaceThrowableProxyConverter" />
<property name="CONSOLE_LOG_PATTERN" value="${CONSOLE_LOG_PATTERN:-%clr(%d{yyyy-MM-dd HH:mm:ss.SSS}){faint} %clr(${LOG_LEVEL_PATTERN:-%5p}) %clr(${PID:- }){magenta} %clr(---){faint} %clr([%15.15t]){faint} %clr(%-40.40logger{39}){cyan} %clr(:){faint} %m%n${LOG_EXCEPTION_CONVERSION_WORD:-%wEx}}"/>
<include resource="org/springframework/boot/logging/logback/console-appender.xml"/>
<include resource="org/springframework/boot/logging/logback/file-appender.xml"/>
<appender name="console" class="ch.qos.logback.core.ConsoleAppender">
<encoder>
<pattern>${CONSOLE_LOG_PATTERN}</pattern>
<charset>UTF-8</charset>
</encoder>
</appender>
<!--配置日志输出到文件-->
<appender name="file" class="ch.qos.logback.core.rolling.RollingFileAppender">
<file>${log.path}/log_file.log</file>
<pattern>%d{yyyy-MM-dd HH:mm:ss.SSS} [%thread] %-5level %logger{50} - %msg%n</pattern>
<rollingPolicy class="ch.qos.logback.core.rolling.TimeBasedRollingPolicy">
<!-- 每天日志归档路径以及格式 -->
<FileNamePattern>${log.path}/log_file-%d{yyyy-MM-dd}-%i.log</FileNamePattern>
<timeBasedFileNamingAndTriggeringPolicy class="ch.qos.logback.core.rolling.SizeAndTimeBasedFNATP">
<maxFileSize>10MB</maxFileSize>
</timeBasedFileNamingAndTriggeringPolicy>
<!--日志文件保留天数-->
<maxHistory>15</maxHistory>
</rollingPolicy>
<logger name="com.xlhj.boot.admin" level="info"/>
<root level="info">
<appender-ref ref="console"/>
<appender-ref ref="file"/>
</root>
</configuration>@SpringBootApplication
public class AdminClientApplication {
private static Logger logger = LoggerFactory.getLogger(AdminClientApplication.class);
public static void main(String[] args) {
SpringApplication.run(AdminClientApplication.class, args);
logger.info("服务启动成功,当前时间为:{}", LocalDateTime.now());
logger.error("服务启动成功,当前时间为:{}", LocalDateTime.now());
}
}分别启动Server和Client服务,在浏览器输入地址:http://localhost:8138/admin

输入用户名和密码:admin/123456,登陆成功后,可以看到如下页面

点击该服务可以进入具体的监控页面,注意需要点击下图箭头所指位置

点击进入服务后,可以看到如下信息

将滚动条往下拉,可以看到内存、线程等信息

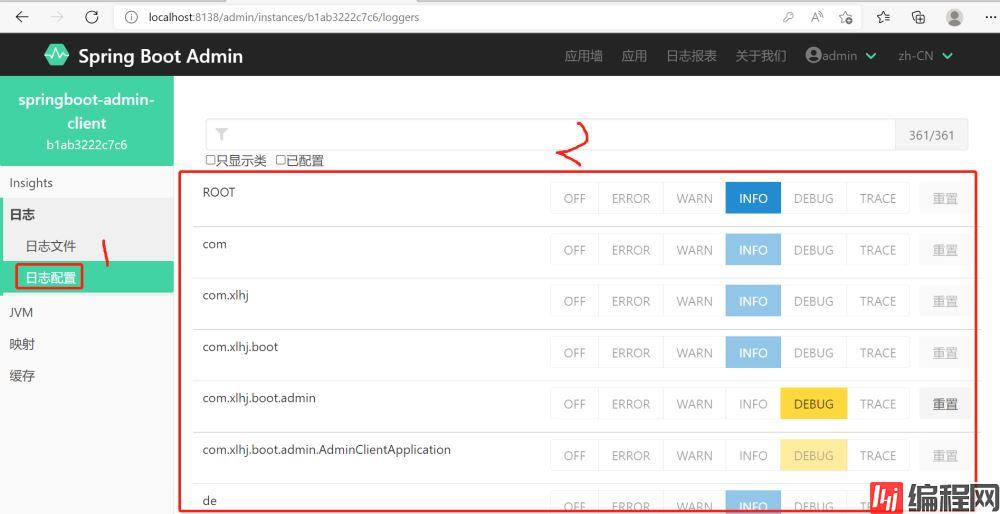
选择日志—>日志文件可以查看到服务的日志信息

点击日志配置可以动态调节每个包/类的日志级别
选择应用墙选项,可以查看到应用有哪些服务被监控

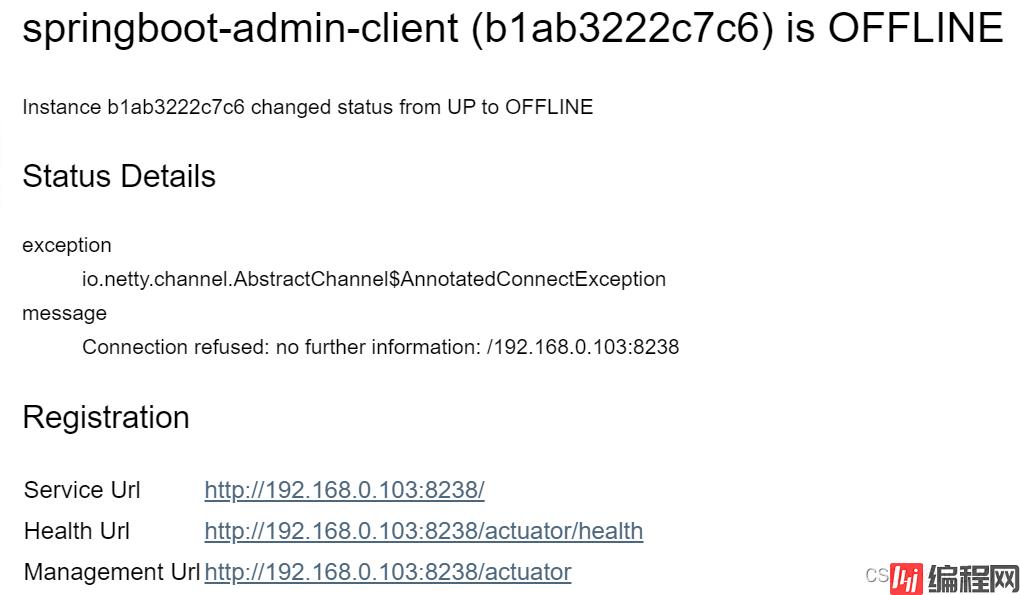
Spring Boot Admin还可以对其监控的服务提供告警功能,当出现重大故障,如服务宕机时,可以及时以邮件方式通知运维人员
在Server服务中引入邮件依赖
<dependency>
   <groupId>org.springframework.boot</groupId>
    <artifactId>spring-boot-starter-mail</artifactId>
</dependency>
4.2. application.yml
在yml配置文件中加入如下配置信息
spring:
  mail:
    host: smtp.qq.com
    username: xxxxx@qq.com
    password: 授权码
  boot:
    admin:
      notify:
        mail:
          to: 收件人邮箱
from: 发件人邮箱@Configuration
public class NotificationConfig {
private InstanceRepository instanceRepository;
private ObjectProvider<List<Notifier>> provider;
public NotificationConfig(InstanceRepository instanceRepository, ObjectProvider<List<Notifier>> provider) {
this.instanceRepository = instanceRepository;
this.provider = provider;
}
@Bean
public FilteringNotifier filteringNotifier() {
CompositeNotifier compositeNotifier = new CompositeNotifier(this.provider.getIfAvailable(Collections::emptyList));
return new FilteringNotifier(compositeNotifier, this.instanceRepository);
}
@Bean
@Primary
public RemindingNotifier remindingNotifier() {
RemindingNotifier remindingNotifier = new RemindingNotifier(filteringNotifier(), this.instanceRepository);
//配置每隔多久提示
remindingNotifier.setReminderPeriod(Duration.ofMinutes(1));
//配置每隔多久检查
remindingNotifier.setCheckReminderInverval(Duration.ofSeconds(10));
return remindingNotifier;
}
}先将Client服务关闭,稍等一会便会收到宕机提示邮件
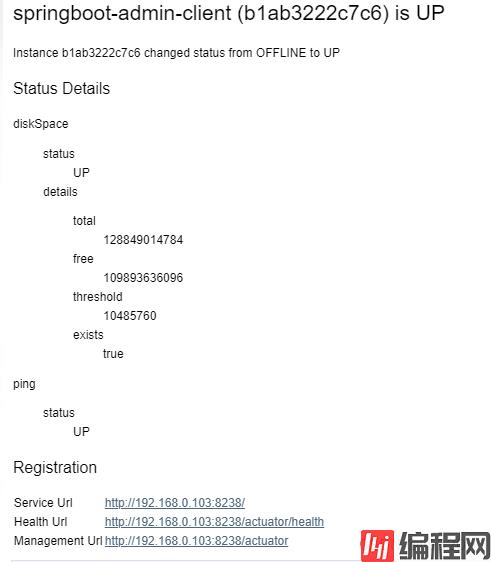
再次将Client服务启动
到此这篇关于SpringBoot整合Spring Boot Admin实现服务监控的文章就介绍到这了,更多相关Spring Boot Admin服务监控内容请搜索编程网以前的文章或继续浏览下面的相关文章希望大家以后多多支持编程网!
--结束END--
本文标题: SpringBoot整合Spring Boot Admin实现服务监控的方法
本文链接: https://www.lsjlt.com/news/143082.html(转载时请注明来源链接)
有问题或投稿请发送至: 邮箱/279061341@qq.com QQ/279061341
下载Word文档到电脑,方便收藏和打印~
2024-03-01
2024-03-01
2024-03-01
2024-02-29
2024-02-29
2024-02-29
2024-02-29
2024-02-29
2024-02-29
2024-02-29
回答
回答
回答
回答
回答
回答
回答
回答
回答
回答


官方手机版

微信公众号

商务合作


0