目录看效果须知:1.uni.getSystemInfoSync()获取手机的信息接口2.uni.createSelectorQuery().in(this)3.touchmove滑动

这是一个全局的按钮,可以换成图片,自己写样式,每个页面都有;
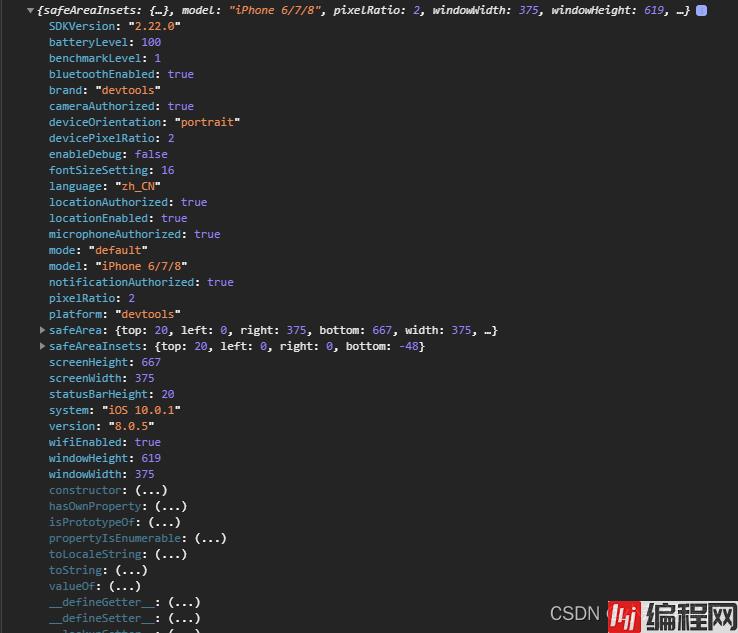
可以拿到手机屏幕的宽高
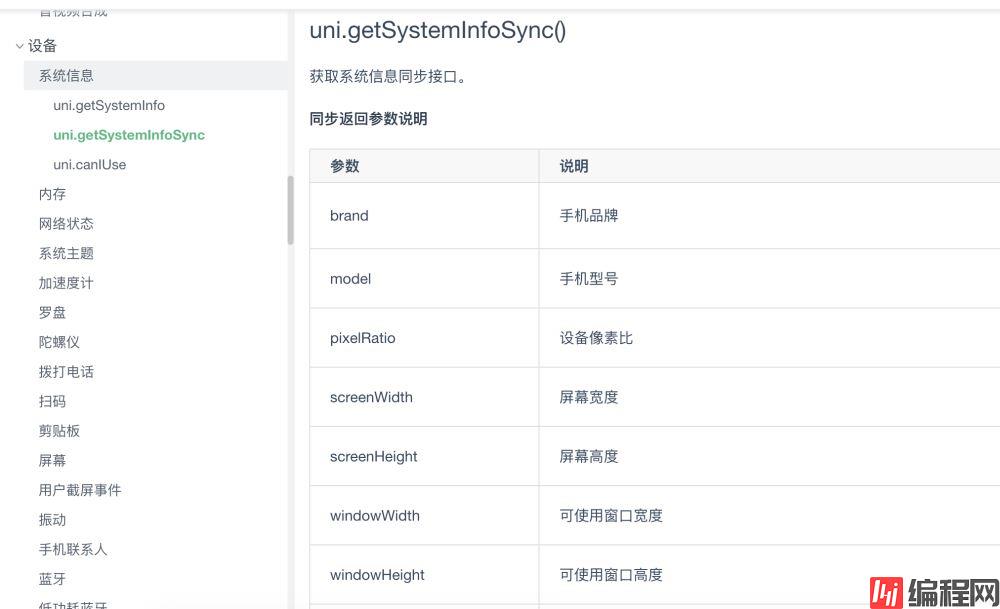
uniapp中式没有window对象,和dom元素的,但是有时我们需要获取页面上节点的一些几何信息;
@touchcancel 手指触摸被打断,如来电提醒,弹窗
@touchend 手指触摸动作结束,如松开按钮
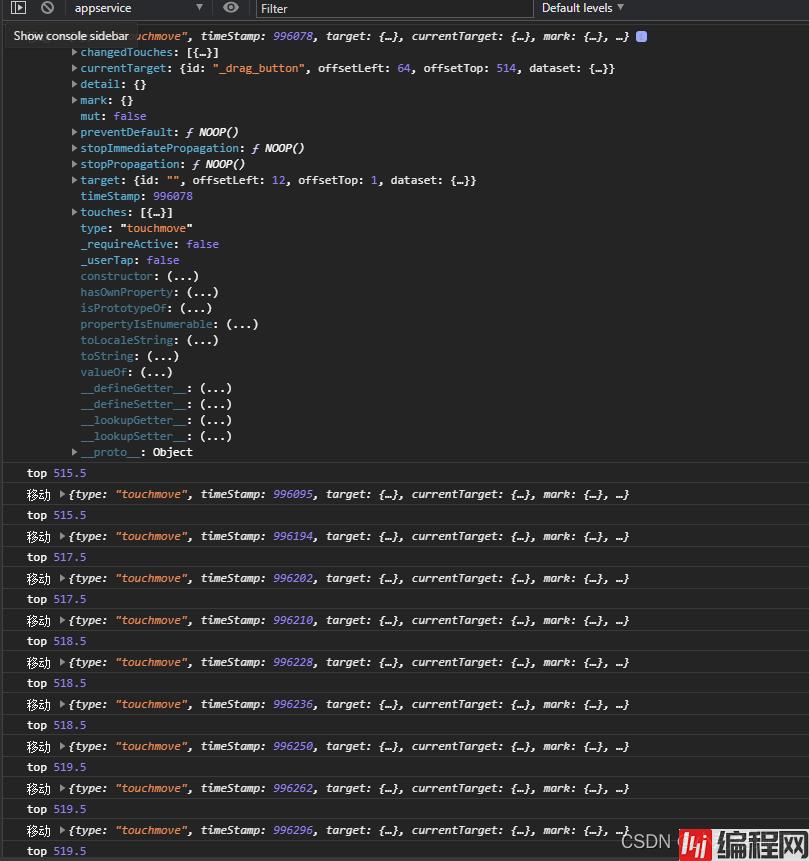
@touchmove 手指触摸后移动
@touchstart 手指触摸动作开始
@touchcancel 手指触摸被打断,如来电提醒,弹窗
@touchend 手指触摸动作结束,如松开按钮
@touchmove 手指触摸后移动
@touchstart 手指触摸动作开始
记录用户按下屏幕的坐标 x 和 y
touchmove(e) {
				// 单指触摸
				if (e.touches.length !== 1) {
					return false;
				}
				console.log('移动',e);
				this.isMove = true;

				this.left = e.touches[0].clientX - this.offsetWidth;
				let clientY = e.touches[0].clientY - this.offsetHeight;
				// #ifdef H5
				clientY += this.height;
				// #endif
				let edgeBottom = this.windowHeight - this.height - this.edge;
				// 上下触及边界
				if (clientY < this.edge) {
					this.top = this.edge;
				} else if (clientY > edgeBottom) {
					this.top = edgeBottom;
				} else {
					this.top = clientY
				//将top存入本地存储
				 uni.setStorageSync("top", this.top);
			},
			touchend(e) {
				if (this.isDock) {
					let edgeRigth = this.windowWidth - this.width - this.edge;
					if (this.left < this.windowWidth / 2 - this.offsetWidth) {
						this.left = this.edge;
					} else {
						this.left = edgeRigth;
					}
				//将left存入本地存储
				 uni.setStorageSync("left", this.left);
				this.isMove = false;
				this.$emit('btnTouchend');
		}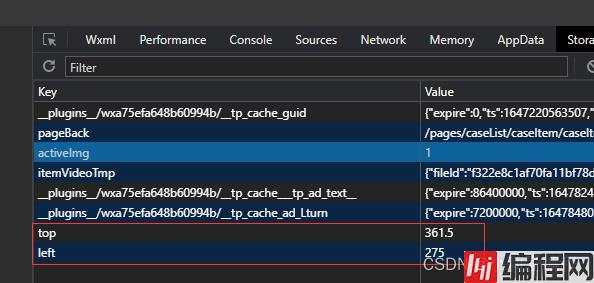
每次移动这个按钮,本地存储的值都会改变;
onShow() {
			//获取手机信息配置接口
			const sys = uni.getSystemInfoSync();
			//屏幕的宽高
			this.windowWidth = sys.windowWidth;
			this.windowHeight = sys.windowHeight;
			// #ifdef APP-PLUS
			this.existTabBar && (this.windowHeight -= 50);
			// #endif
			if (sys.windowTop) {
				this.windowHeight += sys.windowTop;
			}
			//获取元素
			const query = uni.createSelectorQuery().in(this);
			query.select('#_drag_button').boundinGClientRect(data => {
				console.log(data);
				this.width = data.width;
				this.height = data.height;
				this.offsetWidth = data.width / 2;
				this.offsetHeight = data.height / 2;
				// this.left = this.windowWidth - this.width - this.edge;
				// this.top = this.windowHeight - this.height - this.edge;
				this.left = uni.getStorageSync('left')
				this.top=uni.getStorageSync('top')
				this.$nextTick(() => {
					this.firstIn = true
				})
			}).exec();
		},
<view id="_drag_button" class="drag" :style="{top:top+'px',left:left+'px',opacity:firstIn?1:0}"
			@touchstart="touchstart" @touchmove.stop.prevent="touchmove" @touchend="touchend"
			@click.stop.prevent="click" :class="{transition: isDock && !isMove }">
			<button class="btn" open-type="contact" style="border: none;padding: 0;margin: 0;">
				<image class="img"
					src="图片地址">
				</image>
			</button>
		</view>
因为我这个项目是vue3,所以注册组件的时候,不需要全局引入,
这个组件,需要在每个页面引入;
组件代码:需要换个图片就可以用了;
<template>
	<view>
		<view id="_drag_button" class="drag" :style="{top:top+'px',left:left+'px',opacity:firstIn?1:0}"
			@touchstart="touchstart" @touchmove.stop.prevent="touchmove" @touchend="touchend"
			@click.stop.prevent="click" :class="{transition: isDock && !isMove }">
			<button class="btn" open-type="contact" style="border: none;padding: 0;margin: 0;">
				<image class="img"
					src="图片地址">
				</image>
			</button>
		</view>
	</view>
</template>

<script>
	export default {
		name: 'drag-button',
		props: {
			isDock: {
				type: Boolean,
				default: false
			},
			existTabBar: {
			}
		},
		data() {
			return {
				top: 0,
				left: 0,
				width: 0,
				height: 0,
				offsetWidth: 0,
				offsetHeight: 0,
				windowWidth: 0,
				windowHeight: 0,
				isMove: true,
				edge: 10,
				text: ' ',
				firstIn: false
		onShow() {
			//获取手机信息配置接口
			const sys = uni.getSystemInfoSync();
			//屏幕的宽高
			this.windowWidth = sys.windowWidth;
			this.windowHeight = sys.windowHeight;
			// #ifdef APP-PLUS
			this.existTabBar && (this.windowHeight -= 50);
			// #endif
			if (sys.windowTop) {
				this.windowHeight += sys.windowTop;
			//获取元素
			const query = uni.createSelectorQuery().in(this);
			query.select('#_drag_button').boundingClientRect(data => {
				console.log(data);
				this.width = data.width;
				this.height = data.height;
				this.offsetWidth = data.width / 2;
				this.offsetHeight = data.height / 2;
				// this.left = this.windowWidth - this.width - this.edge;
				// this.top = this.windowHeight - this.height - this.edge;
				this.left = uni.getStorageSync('left')
				this.top=uni.getStorageSync('top')
				this.$nextTick(() => {
					this.firstIn = true
				})
			}).exec();
		methods: {
			click() {
				this.$emit('btnClick');
			touchstart(e) {
				this.$emit('btnTouchstart');
			touchmove(e) {
				// 单指触摸
				if (e.touches.length !== 1) {
					return false;
				}
				console.log('移动',e);
				this.isMove = true;
				this.left = e.touches[0].clientX - this.offsetWidth;
				let clientY = e.touches[0].clientY - this.offsetHeight;
				// #ifdef H5
				clientY += this.height;
				// #endif
				let edgeBottom = this.windowHeight - this.height - this.edge;
				// 上下触及边界
				if (clientY < this.edge) {
					this.top = this.edge;
				} else if (clientY > edgeBottom) {
					this.top = edgeBottom;
				} else {
					this.top = clientY
				 uni.setStorageSync("top", this.top);
			touchend(e) {
				if (this.isDock) {
					let edgeRigth = this.windowWidth - this.width - this.edge;
					if (this.left < this.windowWidth / 2 - this.offsetWidth) {
						this.left = this.edge;
					} else {
						this.left = edgeRigth;
					}
				 uni.setStorageSync("left", this.left);
				this.isMove = false;
				this.$emit('btnTouchend');
		}
	}
</script>
<style lang="sCSS">
	.drag {
		display: flex;
		justify-content: center;
		align-items: center;
		width: 180rpx;
		height: 135rpx;
		border-radius: 50%;
		font-size: $uni-font-size-sm;
		position: fixed;
		z-index: 999999;
		&.transition {
			transition: left .3s ease, top .3s ease;
	.btn {
		background-color: transparent;
		width: 135rpx;
		height: 130rpx;
		z-index: 9999;
	button::after {
		border: none;
	.img {
		height: 100%;
		width: 100%;
</style>
页面引入:
<drag-button :isDock="true" :existTabBar="true" @btnClick="btnClick" @btnTouchstart="btnTouchstart"
			@btnTouchend="btnTouchend">
引入组件
components: {
			dragButton
		},

到此这篇关于uniapp开发小程序如何实现全局悬浮按钮的文章就介绍到这了,更多相关uniapp小程序悬浮按钮内容请搜索编程网以前的文章或继续浏览下面的相关文章希望大家以后多多支持编程网!
--结束END--
本文标题: uniapp开发小程序实现全局悬浮按钮的代码
本文链接: https://www.lsjlt.com/news/143435.html(转载时请注明来源链接)
有问题或投稿请发送至: 邮箱/279061341@qq.com QQ/279061341
下载Word文档到电脑,方便收藏和打印~
2024-01-12
2023-05-20
2023-05-20
2023-05-20
2023-05-20
2023-05-20
2023-05-20
2023-05-20
2023-05-20
2023-05-20
回答
回答
回答
回答
回答
回答
回答
回答
回答
回答


官方手机版

微信公众号

商务合作


0