Python 官方文档:入门教程 => 点击学习
目录1. flask-RESTful2. fastapi + Nacos服务注册2.1 post2.2 get请求接收list参数2.3 请求URL进行文件下载2.4 获取Reque
1.安装pip依赖
[root@bigdata001 ~]#
[root@bigdata001 ~]# pip3 install flask
[root@bigdata001 ~]#
[root@bigdata001 ~]# pip3 install flask_restful
[root@bigdata001 ~]#
2.运行程序如下:
#!/usr/bin/python3
from flask import Flask
from flask_restful import Resource, Api, reqparse
host = '0.0.0.0'
port = 5600
app = Flask(__name__)
api = Api(app)
class HelloWorld(Resource):
    def __init__(self):
        self.parser = reqparse.RequestParser()
        self.parser.add_argument("key1", type = str)
        self.parser.add_argument("key2", type = str)
    def get(self):
        data = self.parser.parse_args()
        value1 = data.get("key1")
        value2 = data.get("key2")
        return {'hello':'world', value1:value2}
api.add_resource(HelloWorld, '/query')
if __name__ == '__main__':
    app.run(host = host, port = port, debug = True)
3.请求URL: Http://192.168.23.21:5600/query?key1=fruit&key2=apple
4.查看WEB页面返回结果如下:
{
"hello": "world",
"fruit": "apple"
}
1.安装pip依赖
[root@bigdata001 ~]#
[root@bigdata001 ~]# pip install fastapi
[root@bigdata001 ~]#
[root@bigdata001 ~]# pip install uvicorn
[root@bigdata001 ~]#
[root@bigdata001 ~]# pip3 install nacos-sdk-python
[root@bigdata001 ~]#
2.router模块程序如下:
from typing import Optional
from fastapi import APIRouter, Query, Path
fastapi_router=APIRouter()
@fastapi_router.get(path="/")
async def read_root():
return {"Hello": "World"}
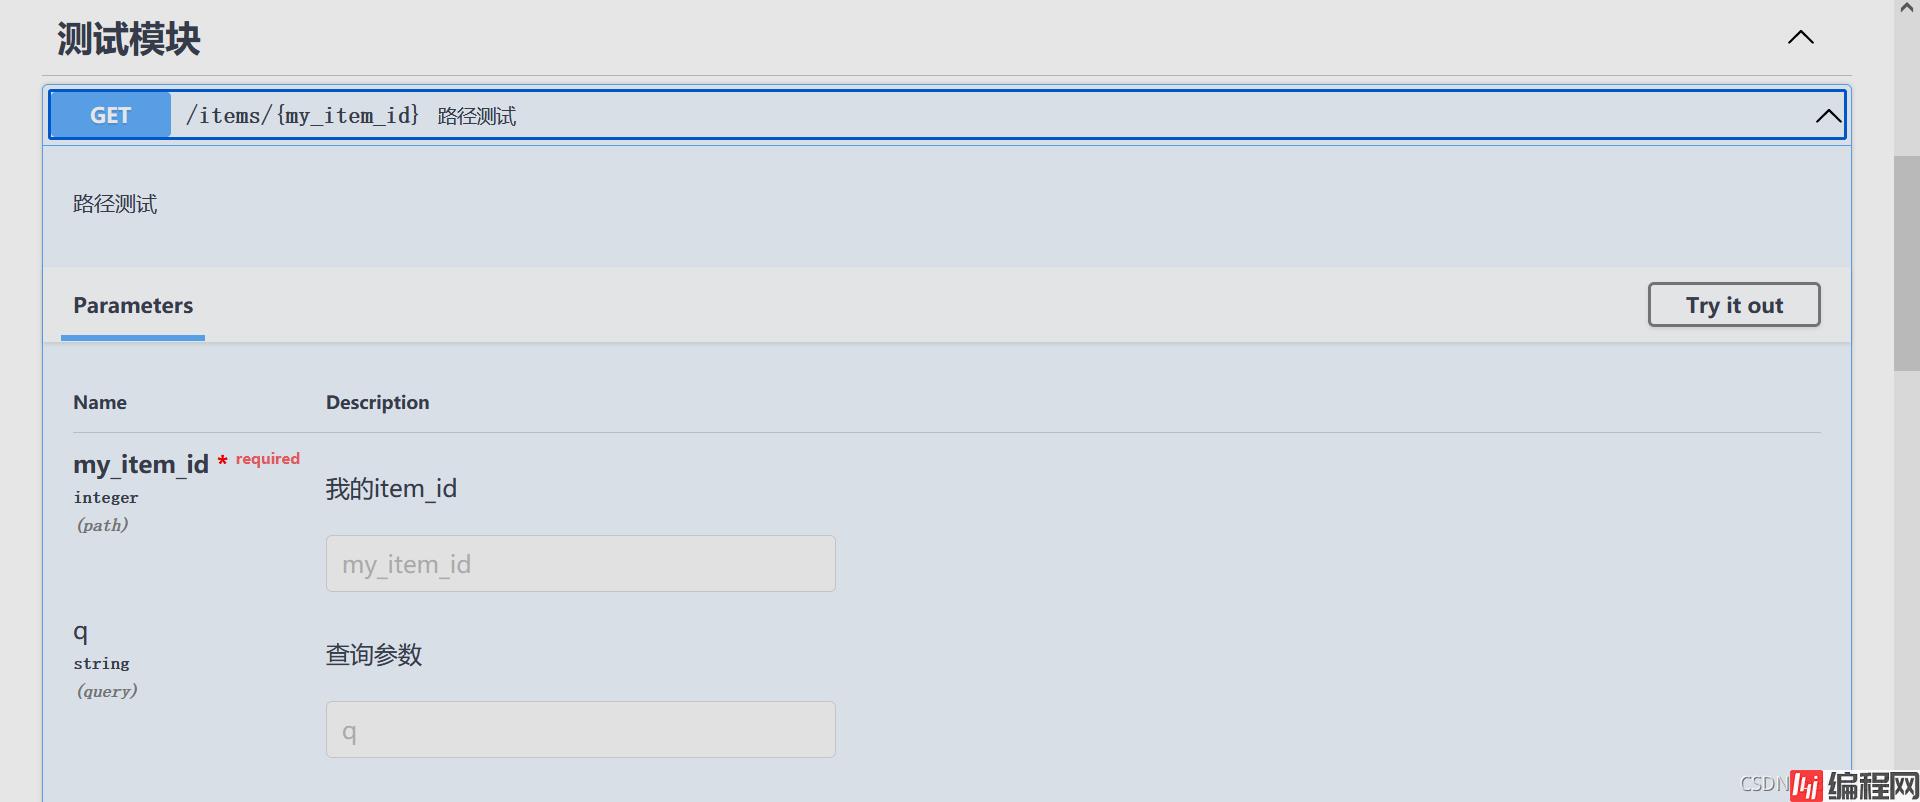
@fastapi_router.get(path = "/items/{my_item_id}",
summary='路径测试',
description='路径测试',
tags=['测试模块'],
response_description='{"my_item_id": my_item_id, "q": q}')
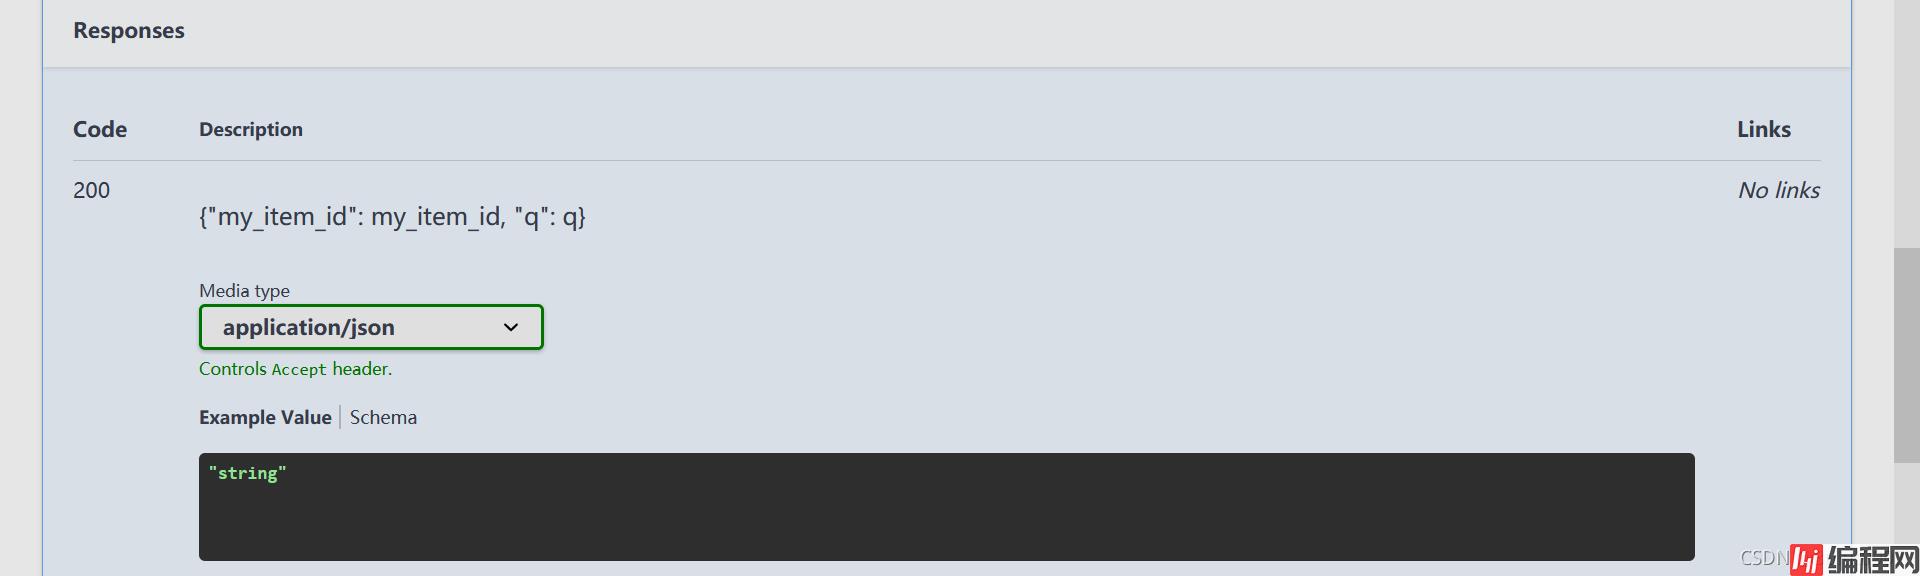
async def read_item(my_item_id: int=Path(None, description="我的item id"),
q: Optional[str] = Query(None, description="查询参数")):
return {"my_item_id": my_item_id, "q": q}3.app模块程序如下:
import nacos
from fastapi import FastAPI
import fastapi_router
def reGISter_server_to_nacos():
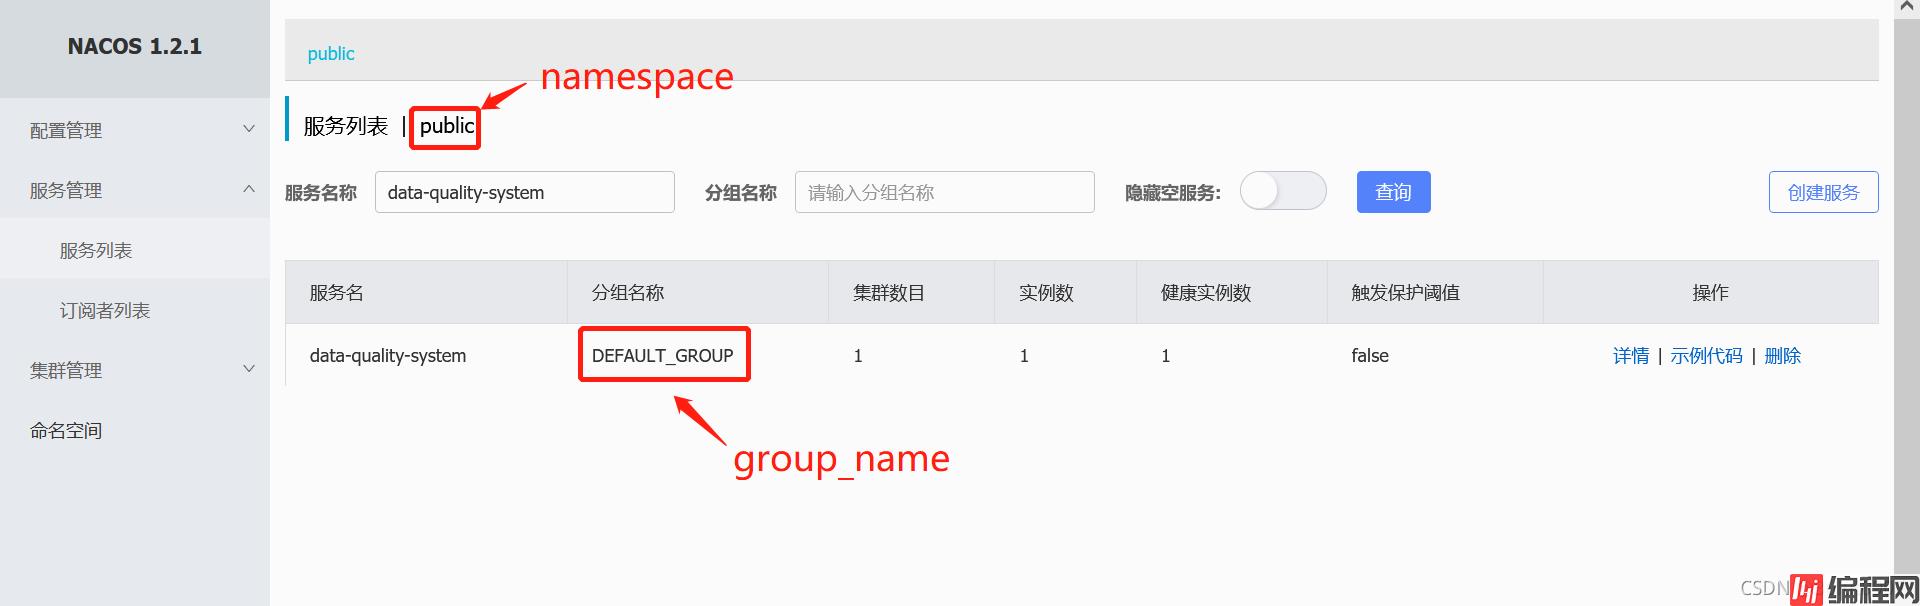
nacos_server_addresses = '192.168.8.246:8848'
nacos_namespace = 'public'
nacos_user = 'xxxxxx'
nacos_passWord = '123456'
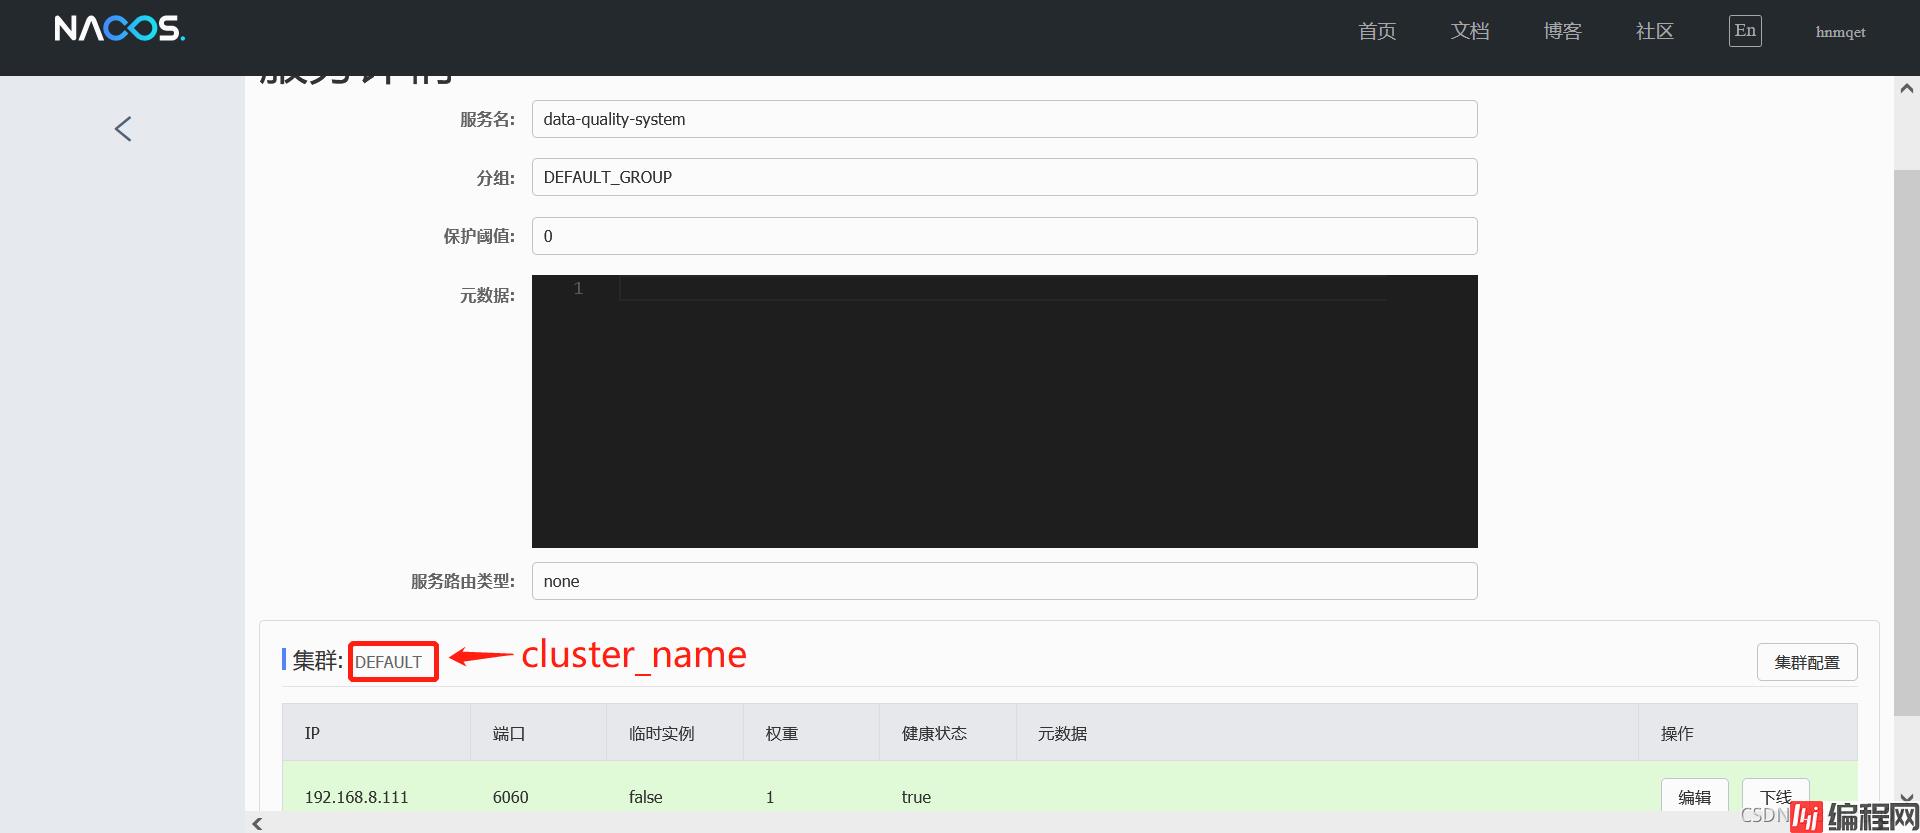
nacos_cluster_name = 'DEFAULT'
nacos_group_name = 'DEFAULT_GROUP'
nacos_project_service_name = 'data-quality-system'
nacos_project_service_ip = '192.168.8.111'
nacos_project_service_port = 6060
client = nacos.NacosClient(nacos_server_addresses,
namespace=nacos_namespace,
username=nacos_user,
password=nacos_password)
client.add_naming_instance(nacos_project_service_name,
nacos_project_service_ip,
nacos_project_service_port,
cluster_name = nacos_cluster_name,
weight = 1,
metadata = None,
enable = True,
healthy = True,
ephemeral = False,
group_name = nacos_group_name)
client.send_heartbeat(nacos_project_service_name,
nacos_project_service_ip,
nacos_project_service_port,
cluster_name=nacos_cluster_name,
weight=1,
metadata=None,
ephemeral=False,
group_name=nacos_group_name)
app = FastAPI(title='my_fastapi_docs',description='my_fastapi_docs')
app.include_router(router=fastapi_router.fastapi_router)
if __name__ == '__main__':
register_server_to_nacos()
import uvicorn
uvicorn.run(app=app, host="0.0.0.0",port=8080, workers=1)4.请求URL: http://192.168.43.50:8080/items/6?q=fastapi
5.查看Web页面返回结果如下:
{"my_item_id":6,"q":"fastapi"}
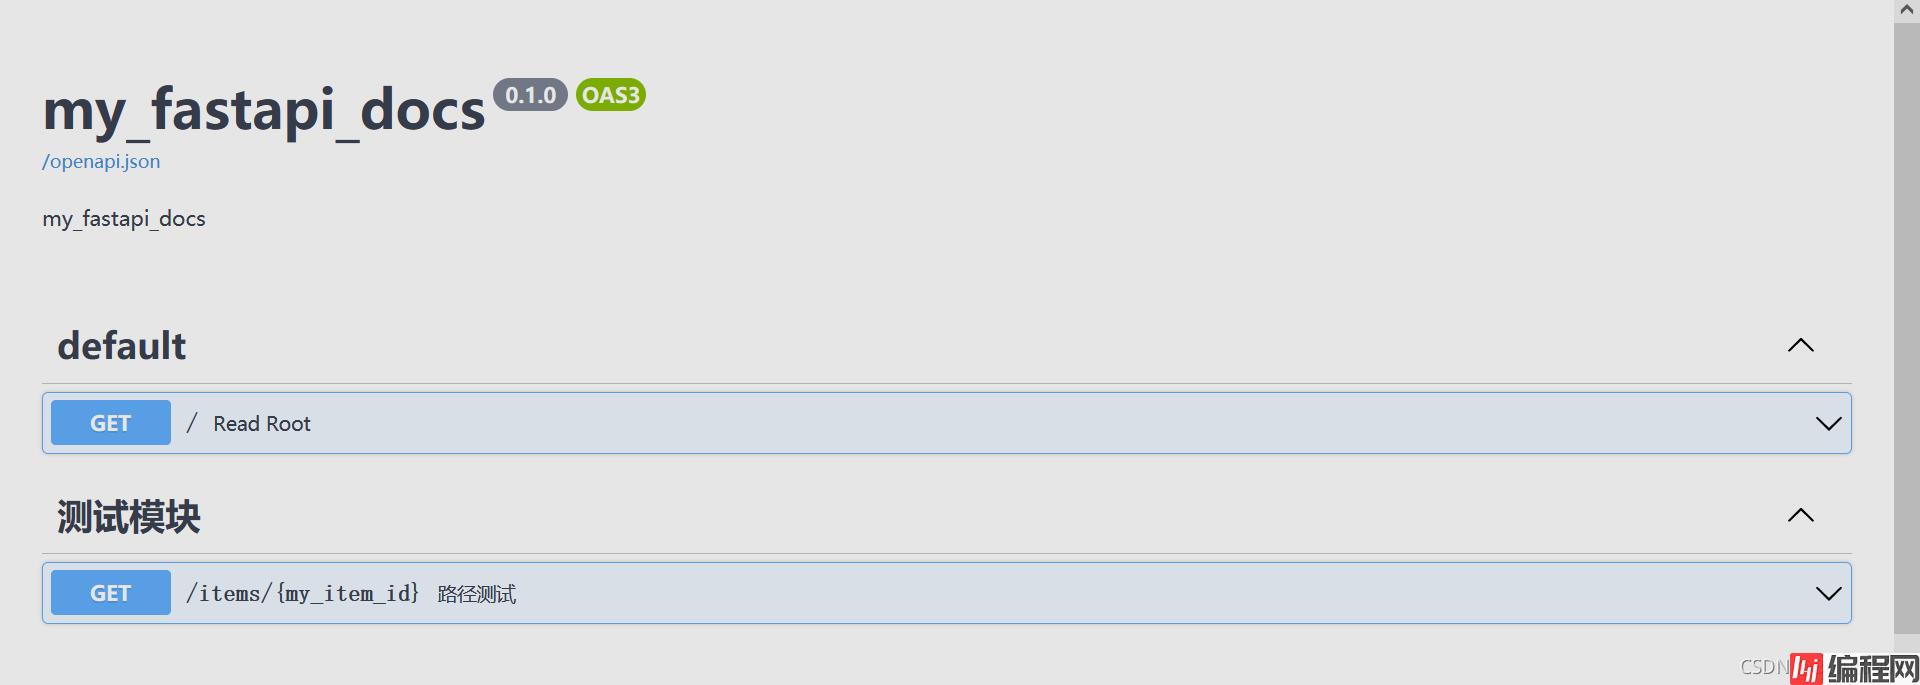
查看fastapi docs路径:http://192.168.43.50:8080/docs,结果如下:
查看nacos页面如下:
post代码片段如下:
from pydantic import BaseModel

class Item(BaseModel):
    name: str
    description: Optional[str] = None
    price: float
    tax: Optional[float] = None

@fastapi_router.post("/items/")
async def create_item(item: Item):
    print(item.dict())
    return item
执行requestTest.py
import requests
url = "http://192.168.88.177:6060/items"
data = {
    "name" : "bigdataboy",
    "price": 100,
}
response = requests.post(url=url,JSON=data)
print(response.json())
post代码片段和requestTest.py的执行结果都是
{'name': 'bigdataboy', 'description': None, 'price': 100.0, 'tax': None}
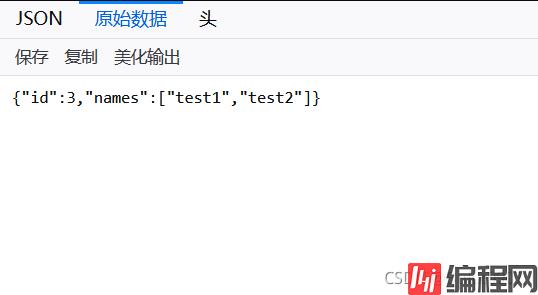
get代码片段如下:
from typing import List

@fastapi_router.get(path = "/items/get_list")
async def get_list(id: int = Query(None),
                    names: List[str] = Query(None)
                   ):
    return {"id":id, "names":names}
访问http://192.168.88.177:8080/items/get_list?id=3&names=test1&names=test2,得到的结果如下:
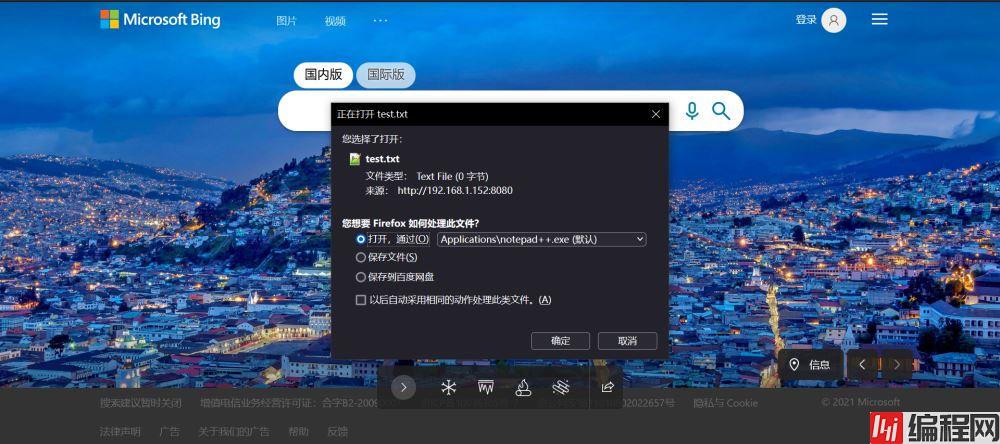
get代码片段如下:
from starlette.responses import FileResponse
@fastapi_router.get(path = "/items/downloadFile")
async def downloadFile():
    return FileResponse('C:\\Users\\dell\\Desktop\\test.txt', filename='test.txt')
访问http://192.168.88.177:8080/items/downloadFile,得到的结果如下:
使用浏览器F12查看的Authorization如下:

以上URL的请求是公司的前端向后端请求数据,只是记录下来,并自己并没有做模拟测试
jwt的安装
from starlette.responses import FileResponse

@fastapi_router.get(path = "/items/downloadFile")
async def downloadFile():
    return FileResponse('C:\\Users\\dell\\Desktop\\test.txt', filename='test.txt')
demo如下:
from fastapi import Request
import jwt
@fastapi_router.get(path = "/items/get_authorization")
async def get_authorization(request:Request,
                       name: str):

    authorization = request.headers.get('authorization')
    token = authorization[7:]
    token_dict = jwt.decode(token, options={"verify_signature": False})
	return token_dict
访问http://192.168.88.177:8080/items/get_authorization?name=zhang_san,得到的结果如下:
{
'key1': value1,
'key2': 'value2'
}
到此这篇关于Python进行Restful API开发实例的文章就介绍到这了,更多相关Python Restful API开发内容请搜索编程网以前的文章或继续浏览下面的相关文章希望大家以后多多支持编程网!
--结束END--
本文标题: Python进行Restful API开发实例详解
本文链接: https://www.lsjlt.com/news/144419.html(转载时请注明来源链接)
有问题或投稿请发送至: 邮箱/279061341@qq.com QQ/279061341
下载Word文档到电脑,方便收藏和打印~
2024-03-01
2024-03-01
2024-03-01
2024-02-29
2024-02-29
2024-02-29
2024-02-29
2024-02-29
2024-02-29
2024-02-29
回答
回答
回答
回答
回答
回答
回答
回答
回答
回答


官方手机版

微信公众号

商务合作


0