Python 官方文档:入门教程 => 点击学习
目录前言源码环境开发工具正文commons 工程commons 工程 - POM 文件commons 工程 - 项目结构配置文件service 工程reGIStry-service(
SpringCloud 是微服务中的翘楚,最佳的落地方案。
spring cloud Config 是一个解决分布式系统的配置管理方案,它包含了 server 和 client 两个部分。
server 用来获取远程的配置信息(默认为 git 仓库),并且以接口的形式提供出去;
client 根据 server 提供的接口读取配置文件,以便于初始化自己的应用。
如果配置中心出现了问题,将导致灾难性的后果,因此在生产环境下配置中心都会做集群,来保证高可用。
此处配置高可用实际就是把多个配置中心(指定同一个 Git 远程仓库)注册到注册中心。
GitHub地址:https://github.com/intomylife/springCloud
IntelliJ IDEA
<?xml version="1.0" encoding="UTF-8"?>
<project xmlns="Http://maven.apache.org/POM/4.0.0" xmlns:xsi="http://www.w3.org/2001/XMLSchema-instance"
         xsi:schemaLocation="http://maven.apache.org/POM/4.0.0 http://maven.apache.org/xsd/maven-4.0.0.xsd">
    <modelVersion>4.0.0</modelVersion>
    <!-- 三坐标 -->
    <groupId>com.zwc</groupId>
    <artifactId>springcloud-config-eureka-commons</artifactId>
    <version>1.0</version>
    <!-- 工程名称和描述 -->
    <name>springcloud-config-eureka-commons</name>
    <description>公用工程</description>
    <!-- 打包方式 -->
    <packaging>jar</packaging>
    <!-- 在 properties下声明相应的版本信息,然后在dependency下引用的时候用 ${} 就可以引入该版本jar包了 -->
    <properties>
        <!-- 编码 -->
        <project.build.sourceEncoding>UTF-8</project.build.sourceEncoding>
        <!-- jdk -->
        <java.version>1.8</java.version>
        <!-- SpringBoot -->
        <platfORM-bom.version>Cairo-SR3</platform-bom.version>
        <!-- SpringCloud -->
        <spring-cloud-dependencies.version>Finchley.RELEASE</spring-cloud-dependencies.version>
    </properties>
    <!-- 加入依赖 -->
    <dependencies>
    </dependencies>
    <!-- 依赖 jar 包版本管理的管理器 -->
    <!-- 如果 dependencies 里的 dependency 自己没有声明 version 元素,那么 maven 就此处来找版本声明。 -->
    <!-- 如果有,就会继承它;如果没有就会报错,告诉你没有版本信息 -->
    <!-- 优先级:如果 dependencies 里的 dependency 已经声明了版本信息,就不会生效此处的版本信息了 -->
    <dependencyManagement>
        <dependencies>
            <!-- SpringBoot -->
            <dependency>
                <groupId>io.spring.platform</groupId>
                <artifactId>platform-bom</artifactId>
                <version>${platform-bom.version}</version>
                <type>pom</type>
                <scope>import</scope>
            </dependency>
            <!-- SpringCloud -->
            <dependency>
                <groupId>org.springframework.cloud</groupId>
                <artifactId>spring-cloud-dependencies</artifactId>
                <version>${spring-cloud-dependencies.version}</version>
                <type>pom</type>
                <scope>import</scope>
            </dependency>
        </dependencies>
    </dependencyManagement>
    <!-- 插件依赖 -->
    <build>
        <plugins>
            <plugin>
                <groupId>org.springframework.boot</groupId>
                <artifactId>spring-boot-maven-plugin</artifactId>
            </plugin>
        </plugins>
    </build>
</project>
配置一些共用依赖

创建一个 Git 库,里面存放配置文件,文件夹名称为:config-repo;这里模拟不同的环境,所以分别构建了
dev(开发)、uat(测试)以及online(线上)三种不同的配置文件;此文件夹存在此项目的根目录中
- springcloud-config-eureka
? - config-repo
? ? -?system-dev.properties
? ? -?system-online.properties
? ? -?system-uat.properties
  + springcloud-config-eureka-commons
  + springcloud-config-eureka-service
① 此工程下有四个模块:一个注册中心,二个 server 以及一个 client
② 二个 server 除端口不一致以外,其他代码基本一致
<?xml version="1.0" encoding="UTF-8"?>
<project xmlns="http://maven.apache.org/POM/4.0.0" xmlns:xsi="http://www.w3.org/2001/XMLSchema-instance"
         xsi:schemaLocation="http://maven.apache.org/POM/4.0.0 http://maven.apache.org/xsd/maven-4.0.0.xsd">
    <modelVersion>4.0.0</modelVersion>

    <!-- 继承父 -->
    <parent>
        <groupId>com.zwc</groupId>
        <artifactId>springcloud-config-eureka-service</artifactId>
        <version>1.0</version>
    </parent>
    <!-- 三坐标 -->
    <groupId>com.zwc</groupId>
    <artifactId>springcloud-config-eureka-registry-service</artifactId>
    <version>1.0</version>
    <!-- 工程名称描述 -->
    <name>springcloud-config-eureka-registry-service</name>
    <description>注册中心</description>
    <!-- 打包方式 -->
    <packaging>jar</packaging>
    <!-- 在 properties下声明相应的版本信息,然后在dependency下引用的时候用 ${} 就可以引入该版本jar包了 -->
    <properties>
    </properties>
    <!-- 加入依赖 -->
    <dependencies>
        <!-- commons工程 依赖 -->
        <dependency>
            <groupId>com.zwc</groupId>
            <artifactId>springcloud-config-eureka-commons</artifactId>
            <version>1.0</version>
        </dependency>
        <!-- 服务注册中心 -->
            <groupId>org.springframework.cloud</groupId>
            <artifactId>spring-cloud-starter-netflix-eureka-server</artifactId>
    </dependencies>
    <!-- 插件依赖 -->
    <build>
        <plugins>
            <plugin>
                <groupId>org.springframework.boot</groupId>
                <artifactId>spring-boot-maven-plugin</artifactId>
            </plugin>
        </plugins>
    </build>
</project>
主要加入spring-cloud-starter-netflix-eureka-server依赖
# 端口
server:
  port: 8761
# 应用名称
spring:
  application:
    name: eureka-server
eureka:
  instance:
    # 使用 ip 代替实例名
    prefer-ip-address: true
    # 实例的主机名
    hostname: ${spring.cloud.client.ip-address}
    # 实例的 ID 规则
    instance-id: ${spring.cloud.client.ip-address}:${spring.application.name}:${server.port}
  client:
    # 是否向注册中心注册自己
    registerWithEureka: false
    # 是否向注册中心获取注册信息
    fetchRegistry: false
    serviceUrl:
      # 注册中心地址
      defaultZone: http://${eureka.instance.hostname}:${server.port}/eureka/
这里使用了默认的 8761 端口,当然也可以更改,不过在发现调用服务端的注册中心地址端口要与它一致
package com.zwc;
import org.springframework.boot.SpringApplication;
import org.springframework.boot.autoconfigure.SpringBootApplication;
import org.springframework.cloud.netflix.eureka.server.EnableEurekaServer;
@SpringBootApplication
@EnableEurekaServer
public class SpringcloudConfigEurekaRegistryServiceApplication {
    public static void main(String[] args) {
        SpringApplication.run(SpringcloudConfigEurekaRegistryServiceApplication.class, args);
    }
}
在启动类中添加 @EnableEurekaServer 注解表示此工程是注册中心
1. 项目启动成功后访问http://localhost:8761/即可看到eureka-server 主页面

注:一共有两个 server,但是除端口以外的代码基本上一致,所有这里就列举其中一个
<?xml version="1.0" encoding="UTF-8"?>
<project xmlns="http://maven.apache.org/POM/4.0.0" xmlns:xsi="http://www.w3.org/2001/XMLSchema-instance"
         xsi:schemaLocation="http://maven.apache.org/POM/4.0.0 http://maven.apache.org/xsd/maven-4.0.0.xsd">
    <modelVersion>4.0.0</modelVersion>

    <!-- 继承父 -->
    <parent>
        <groupId>com.zwc</groupId>
        <artifactId>springcloud-config-eureka-service</artifactId>
        <version>1.0</version>
    </parent>
    <!-- 三坐标 -->
    <groupId>com.zwc</groupId>
    <artifactId>springcloud-config-eureka-serverfirst-service</artifactId>
    <version>1.0</version>
    <!-- 工程名称描述 -->
    <name>springcloud-config-eureka-serverfirst-service</name>
    <description>config server</description>
    <!-- 打包方式 -->
    <packaging>jar</packaging>
    <!-- 在 properties下声明相应的版本信息,然后在dependency下引用的时候用 ${} 就可以引入该版本jar包了 -->
    <properties>
    </properties>
    <!-- 加入依赖 -->
    <dependencies>
        <!-- commons工程 依赖 -->
        <dependency>
            <groupId>com.zwc</groupId>
            <artifactId>springcloud-config-eureka-commons</artifactId>
            <version>1.0</version>
        </dependency>
        <!-- config server 依赖 -->
            <groupId>org.springframework.cloud</groupId>
            <artifactId>spring-cloud-config-server</artifactId>
        <!-- 提供者消费者 -->
            <artifactId>spring-cloud-starter-netflix-eureka-client</artifactId>
    </dependencies>
    <!-- 插件依赖 -->
    <build>
        <plugins>
            <plugin>
                <groupId>org.springframework.boot</groupId>
                <artifactId>spring-boot-maven-plugin</artifactId>
            </plugin>
        </plugins>
    </build>
</project># 端口
server:
port: 8000
spring:
application:
# 应用名称
name: config-eureka-server
cloud:
config:
server:
git:
# 仓库地址
uri: https://github.com/intomylife/SpringCloud
# 对应 {label} 部分,即 Git 的分支
label: master
# 仓库文件夹名称,多个以逗号分隔
search-paths: springcloud-config-eureka/config-repo
# git 仓库用户名(公开库可以不用填写)
username:
# git 仓库密码(公开库可以不用填写)
passWord:
eureka:
instance:
# 使用 ip 代替实例名
prefer-ip-address: true
# 实例的主机名
hostname: ${spring.cloud.client.ip-address}
# 实例的 ID 规则
instance-id: ${spring.cloud.client.ip-address}:${spring.application.name}:${server.port}
client:
serviceUrl:
# 注册中心地址
defaultZone: http://${eureka.instance.hostname}:8761/eureka/package com.zwc;
import org.springframework.boot.SpringApplication;
import org.springframework.boot.autoconfigure.SpringBootApplication;
import org.springframework.cloud.config.server.EnableConfigServer;
import org.springframework.cloud.netflix.eureka.EnableEurekaClient;
@SpringBootApplication
@EnableConfigServer
@EnableEurekaClient
public class SpringcloudConfigEurekaServerfirstServiceApplication {
public static void main(String[] args) {
SpringApplication.run(SpringcloudConfigEurekaServerfirstServiceApplication.class, args);
}
}1.项目启动成功后访问:http://localhost:8761/(注册中心)可以看到服务已经被注册进来了

2. 访问地址:http://localhost:8000/config-repo/dev(获取完整配置信息)
3.输出内容:
{
"name":"config-repo",
"profiles":[
"dev"
],
"label":null,
"version":"0d6480b5ba6f7f2be87b3130de8163Dcb0af9f5f",
"state":null,
"propertySources":[]
}
4. 访问地址:http://localhost:8000/system/dev(获取完整配置信息)
5. 输出内容:
{
"name":"system",
"profiles":[
"dev"
],
"label":null,
"version":"0d6480b5ba6f7f2be87b3130de8163dcb0af9f5f",
"state":null,
"propertySources":[
{
"name":"https://github.com/intomylife/SpringCloud/springcloud-config-eureka/config-repo/system-dev.properties",
"source":{
"hello":"I'm dev."
}
}
]
}
6. 访问地址:http://localhost:8000/system-dev.properties(获取指定配置文件内容)
7. 输出内容:‘hello: I’m dev.’
8. 启动另一个 server(springcloud-config-eureka-serversecond-service)
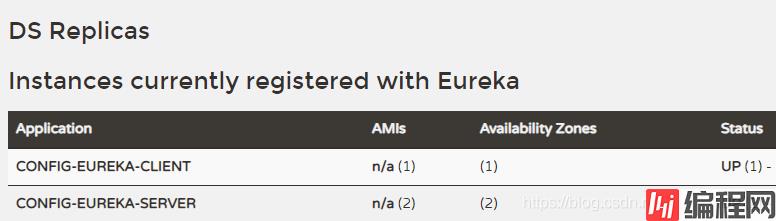
9.项目启动成功后访问:http://localhost:8761/(注册中心)可以看到服务已经被注册进来了

10.访问地址:http://localhost:8001/config-repo/uat(获取完整配置信息)
11. 输出内容:
{
"name":"config-repo",
"profiles":[
"uat"
],
"label":null,
"version":"0d6480b5ba6f7f2be87b3130de8163dcb0af9f5f",
"state":null,
"propertySources":[]
}
12.访问地址:http://localhost:8001/system/uat(获取完整配置信息)
13.输出内容:
{
"name":"system",
"profiles":[
"uat"
],
"label":null,
"version":"0d6480b5ba6f7f2be87b3130de8163dcb0af9f5f",
"state":null,
"propertySources":[
{
"name":"https://github.com/intomylife/SpringCloud/springcloud-config-eureka/config-repo/system-uat.properties",
"source":{
"hello":"I'm uat."
}
}
]
}
14.访问地址:http://localhost:8001/system-uat.properties(获取指定配置文件内容)
15. 输出内容:‘hello: I’m uat.’
16. 证明两个 server 都已经成功从远程仓库中获取到了配置信息
注:接口访问有如下规则:
/{application}/{profile}[/{label}]
/{application}-{profile}.yml
/{label}/{application}-{profile}.yml
/{application}-{profile}.properties
/{label}/{application}-{profile}.properties
<?xml version="1.0" encoding="UTF-8"?>
<project xmlns="http://maven.apache.org/POM/4.0.0" xmlns:xsi="http://www.w3.org/2001/XMLSchema-instance"
         xsi:schemaLocation="http://maven.apache.org/POM/4.0.0 http://maven.apache.org/xsd/maven-4.0.0.xsd">
    <modelVersion>4.0.0</modelVersion>

    <!-- 继承父 -->
    <parent>
        <groupId>com.zwc</groupId>
        <artifactId>springcloud-config-eureka-service</artifactId>
        <version>1.0</version>
    </parent>
    <!-- 三坐标 -->
    <groupId>com.zwc</groupId>
    <artifactId>springcloud-config-eureka-client-service</artifactId>
    <version>1.0</version>
    <!-- 工程名称描述 -->
    <name>springcloud-config-eureka-client-service</name>
    <description>config client</description>
    <!-- 打包方式 -->
    <packaging>jar</packaging>
    <!-- 在 properties下声明相应的版本信息,然后在dependency下引用的时候用 ${} 就可以引入该版本jar包了 -->
    <properties>
    </properties>
    <!-- 加入依赖 -->
    <dependencies>
        <!-- commons工程 依赖 -->
        <dependency>
            <groupId>com.zwc</groupId>
            <artifactId>springcloud-config-eureka-commons</artifactId>
            <version>1.0</version>
        </dependency>
        <!-- config 依赖 -->
            <groupId>org.springframework.cloud</groupId>
            <artifactId>spring-cloud-starter-config</artifactId>
        <!-- 提供者消费者 -->
            <artifactId>spring-cloud-starter-netflix-eureka-client</artifactId>
    </dependencies>
    <!-- 插件依赖 -->
    <build>
        <plugins>
            <plugin>
                <groupId>org.springframework.boot</groupId>
                <artifactId>spring-boot-maven-plugin</artifactId>
            </plugin>
        </plugins>
    </build>
</project># 端口
server:
port: 8002
spring:
application:
# 应用名称
name: config-eureka-clientspring:
cloud:
config:
# 对应 {label} 部分,即 Git 的分支
label: master
# 对应 {application} 部分
name: system
# 对应 {profile} 部分
profile: dev
discovery:
# 开启 Config 服务发现与注册
enabled: true
# 指定 server
service-id: config-eureka-server
eureka:
instance:
# 使用 ip 代替实例名
prefer-ip-address: true
# 实例的主机名
hostname: ${spring.cloud.client.ip-address}
# 实例的 ID 规则
instance-id: ${spring.cloud.client.ip-address}:${spring.application.name}:${server.port}
client:
serviceUrl:
# 注册中心地址
defaultZone: http://${eureka.instance.hostname}:8761/eureka/package com.zwc.client.controller;
import org.springframework.beans.factory.annotation.Value;
import org.springframework.WEB.bind.annotation.RequestMapping;
import org.springframework.web.bind.annotation.RestController;
@RestController
public class HelloController {
@Value("${hello}")
private String hello;
@RequestMapping("/hello")
public String hello() {
return this.hello;
}
}直接使用@Value 注解就可以从注册中心的server 中读取到对应的配置信息
package com.zwc;
import org.springframework.boot.SpringApplication;
import org.springframework.boot.autoconfigure.SpringBootApplication;
import org.springframework.cloud.netflix.eureka.EnableEurekaClient;
@SpringBootApplication
@EnableEurekaClient
public class SpringcloudConfigEurekaClientServiceApplication {
    public static void main(String[] args) {
        SpringApplication.run(SpringcloudConfigEurekaClientServiceApplication.class, args);
    }
}
添加 @EnableEurekaClient 注解表示此工程可以向注册中心提供服务
1.项目启动成功后访问:http://localhost:8761/(注册中心)可以看到服务已经被注册进来了
2.访问地址:http://localhost:8002/hello
3. 输出内容:‘I’m dev.’
4. 证明 client 已经成功从注册中心的 server 中读取到了配置信息
5. 此时当 client 已经启动完毕后,配置文件就已经全部读取到了,所以即使停止其中一个 server 或者停止
全部 server,client 依然可以读取到配置文件。此处高可用应该是指在 client 启动时能保证有 server 可用

希望能够帮助到你
到此这篇关于SpringCloud之配置中心Config(高可用)的文章就介绍到这了,更多相关SpringCloud配置中心Config内容请搜索编程网以前的文章或继续浏览下面的相关文章希望大家以后多多支持编程网!
--结束END--
本文标题: SpringCloud高可用配置中心Config详解
本文链接: https://www.lsjlt.com/news/147490.html(转载时请注明来源链接)
有问题或投稿请发送至: 邮箱/279061341@qq.com QQ/279061341
下载Word文档到电脑,方便收藏和打印~
2024-03-01
2024-03-01
2024-03-01
2024-02-29
2024-02-29
2024-02-29
2024-02-29
2024-02-29
2024-02-29
2024-02-29
回答
回答
回答
回答
回答
回答
回答
回答
回答
回答


官方手机版

微信公众号

商务合作


0