Python 官方文档:入门教程 => 点击学习
目录Zxing原生方式添加依赖二维码生成工具类添加Controller添加测试页面Hutool的方式添加依赖创建QRCodeService添加Controller效果测试我们使用两种
我们使用两种方式,去生成二维码,但是其实,二维码的生成基础,都是zxing包,这是Google开源的一个包,第一种是使用原始的zxing方式去实现,第二种是使用hutool来实现,hutool其实也是对于zxing的一个封装,但是封装前后,确实比较简单了。
<!-- zxing生成二维码 -->
<dependency>
    <groupId>com.google.zxing</groupId>
    <artifactId>core</artifactId>
    <version>3.3.3</version>
</dependency>
<dependency>
    <groupId>com.google.zxing</groupId>
    <artifactId>javase</artifactId>
    <version>3.3.3</version>
</dependency>下面是把生成二维码的方法,封装到了QRCodeUtil的类之中,这个方法看起来还是比较多的,但是也谈不上太复杂,主要是对于BufferedImage生成图片,然后就是ImageIO.write()方法,write的位置,可以是普通的磁盘文件,也可以是WEB的流,我们使用web流的时候,就需要添加com.google.zxing-javase的依赖。
@Component
@Slf4j
public class QRCodeUtil {

    private static final int CODE_WIDTH = 400;
    private static final int CODE_HEIGHT = 400;
    private static final int FRONT_COLOR = 0x000000;
    private static final int BACKGROUND_COLOR = 0xFFFFFF;

    public static void createCodeToFile(String codeContent, File codeImgFileSaveDir, String fileName) {
        try {
            if (codeContent == null || "".equals(codeContent)) {
                log.info("二维码内容为空,不进行操作...");
                return;
            }
            codeContent = codeContent.trim();
            if (codeImgFileSaveDir == null || codeImgFileSaveDir.isFile()) {
                codeImgFileSaveDir = FileSystemView.getFileSystemView().getHomeDirectory();
                log.info("二维码图片存在目录为空,默认放在桌面...");
            }
            if (!codeImgFileSaveDir.exists()) {
                codeImgFileSaveDir.mkdirs();
                log.info("二维码图片存在目录不存在,开始创建...");
            }
            if (fileName == null || "".equals(fileName)) {
                fileName = new Date().getTime() + ".png";
                log.info("二维码图片文件名为空,随机生成 png 格式图片...");
            }
            BufferedImage bufferedImage = getBufferedImage(codeContent);

            File codeImgFile = new File(codeImgFileSaveDir, fileName);
            ImageIO.write(bufferedImage, "png", codeImgFile);
            log.info("二维码图片生成成功:" + codeImgFile.getPath());
        } catch (Exception e) {
            e.printStackTrace();
        }
    }

    public static void createCodeToOutputStream(String codeContent, OutputStream outputStream) {
        try {
            if (codeContent == null || "".equals(codeContent.trim())) {
                log.info("二维码内容为空,不进行操作...");
                return;
            }
            codeContent = codeContent.trim();
            BufferedImage bufferedImage = getBufferedImage(codeContent);

            ImageIO.write(bufferedImage, "png", outputStream);
            log.info("二维码图片生成到输出流成功...");
        } catch (Exception e) {
            e.printStackTrace();
            log.error("发生错误: {}!", e.getMessage());
        }
    }
    private static BufferedImage getBufferedImage(String codeContent) throws WriterException {

        Map<EncodeHintType, Object> hints = new HashMap();
        hints.put(EncodeHintType.CHARACTER_SET, "UTF-8");
        hints.put(EncodeHintType.ERROR_CORRECTION, ErrorCorrectionLevel.M);
        hints.put(EncodeHintType.MARGIN, 1);

        MultiFORMatWriter multiFormatWriter = new MultiFormatWriter();
        BitMatrix bitMatrix = multiFormatWriter.encode(codeContent, BarcodeFormat.QR_CODE, CODE_WIDTH, CODE_HEIGHT, hints);

        BufferedImage bufferedImage = new BufferedImage(CODE_WIDTH, CODE_HEIGHT, BufferedImage.TYPE_INT_BGR);
        for (int x = 0; x < CODE_WIDTH; x++) {
            for (int y = 0; y < CODE_HEIGHT; y++) {
                bufferedImage.setRGB(x, y, bitMatrix.get(x, y) ? FRONT_COLOR : BACKGROUND_COLOR);
            }
        }
        return bufferedImage;
    }

    public static String parseQRCodeByFile(File file) {
        String resultStr = null;
        if (file == null || file.isDirectory() || !file.exists()) {
            return resultStr;
        }
        try {

            BufferedImage bufferedImage = ImageIO.read(file);

            BufferedImageLuminanceSource source = new BufferedImageLuminanceSource(bufferedImage);
            BinaryBitmap bitmap = new BinaryBitmap(new HybridBinarizer(source));
            Hashtable hints = new Hashtable();
            hints.put(DecodeHintType.CHARACTER_SET, "UTF-8");

            Result result = new MultiFormatReader().decode(bitmap, hints);
            resultStr = result.getText();
        } catch (IOException e) {
            e.printStackTrace();
        } catch (NotFoundException e) {
            e.printStackTrace();
            log.error("图片非二维码图片, 路径是: {}!", file.getPath());
        }
        return resultStr;
    }

    public static String parseQRCodeByUrl(URL url) {
        String resultStr = null;
        if (url == null) {
            return resultStr;
        }
        try {

            BufferedImage bufferedImage = ImageIO.read(url);

            BufferedImageLuminanceSource source = new BufferedImageLuminanceSource(bufferedImage);
            BinaryBitmap bitmap = new BinaryBitmap(new HybridBinarizer(source));
            Hashtable hints = new Hashtable();

            hints.put(DecodeHintType.CHARACTER_SET, "UTF-8");

            Result result = new MultiFormatReader().decode(bitmap, hints);
            resultStr = result.getText();
        } catch (IOException e) {
            e.printStackTrace();
            log.error("二维码图片地址错误, 地址是: {}!", url);
        } catch (NotFoundException e) {
            e.printStackTrace();
            log.error("图片非二维码图片, 地址是: {}!", url);
        }
        return resultStr;
}public class QRCodeController {
@GetMapping("qrCode")
public void getQRCode(String codeContent, httpservletResponse response) {
System.out.println("codeContent=" + codeContent);
try {
QRCodeUtil.createCodeToOutputStream(codeContent, response.getOutputStream());
log.info("成功生成二维码!");
} catch (IOException e) {
log.error("发生错误, 错误信息是:{}!", e.getMessage());
}
}
}<!DOCTYPE html>
<html lang="en">
<head>
<meta charset="UTF-8">
<title>二维码生成器</title>
<style type="text/CSS">
textarea {
font-size: 16px;
width: 300px;
height: 100px;
}
.hint {
color: red;
display: none;
}
.qrCodeDiv {
width: 200px;
height: 200px;
border: 2px solid sandybrown;
}
.qrCodeDiv img {
max-height: 100%;
max-width: 100%;
}
</style>
<script src="Https://cdn.bootcss.com/Jquery/2.1.1/jquery.min.js"></script>
<script type="text/javascript">
$(function () {
$("button").click(function () {
var codeContent = $("textarea").val();
console.log(codeContent);
if (codeContent.trim() == "") {
$(".hint").text("二维码内容不能为空").fadeIn(500);
} else {
$(".hint").text("").fadeOut(500);
$("#codeImg").attr("src", "/qrCode?codeContent=" + codeContent);
}
});
});
</script>
</head>
<body>
<textarea placeholder="二维码内容..."></textarea><br>
<button>生成二维码</button>
<span class="hint"></span>
<div class="qrCodeDiv">
<img src="" id="codeImg">
</div>
</body>
</html>Hutool的是非强制依赖性,因此zxing需要用户自行引入,我们需要加入依赖。使用hutool的时候,com.google.zxing-javase的依赖可以不需要。
<dependency>
    <groupId>cn.hutool</groupId>
    <artifactId>hutool-all</artifactId>
    <version>5.3.10</version>
</dependency>
<dependency>
    <groupId>com.google.zxing</groupId>
    <artifactId>core</artifactId>
    <version>3.3.3</version>
</dependency>QRCodeService其实就是对QrCodeUtil的功能的封装,QrCodeUtil此处的类是hutool工具提供的,和我们在上面与自己与自己提供的QRCodeUtil类,不是同一个,这个需要注意一下。QrCodeUtil的功能此处主要使用到了的是生成二维码,到文件或者流之中,QrConfig是Hutool工具QrCodeUtil的配置类。
@Service
@Slf4j
public class QRCodeService {
    // 自定义参数,这部分是Hutool工具封装的
    private static QrConfig initQrConfig() {
        QrConfig config = new QrConfig(300, 300);
        // 设置边距,既二维码和背景之间的边距
        config.setMargin(3);
        // 设置前景色,既二维码颜色(青色)
        config.setForeColor(Color.CYAN.getRGB());
        // 设置背景色(灰色)
        config.setBackColor(Color.GRAY.getRGB());
        return config;
    }

    public void createQRCode2File(String content, String filepath) {
        try {
            QrCodeUtil.generate(content, initQrConfig(), FileUtil.file(filepath));
            log.info("生成二维码成功, 位置在:{}!", filepath);
        } catch (QrCodeException e) {
            log.error("发生错误! {}!", e.getMessage());
        }
    }

    public void createQRCode2Stream(String content, HttpServletResponse response) {
        try {
            QrCodeUtil.generate(content, initQrConfig(), "png", response.getOutputStream());
            log.info("生成二维码成功!");
        } catch (QrCodeException | IOException e) {
            log.error("发生错误! {}!", e.getMessage());
        }
    }
}@RestController
@Slf4j
public class QRCodeController {
@Autowired
private QRCodeService qrCodeService;
@GetMapping("qrCode")
public void getQRCode(String codeContent, HttpServletResponse response) {
try {
qrCodeService.createQRCode2Stream(codeContent, response);
log.info("成功生成二维码!");
} catch (Exception e) {
log.error("发生错误, 错误信息是:{}!", e.getMessage());
}
}
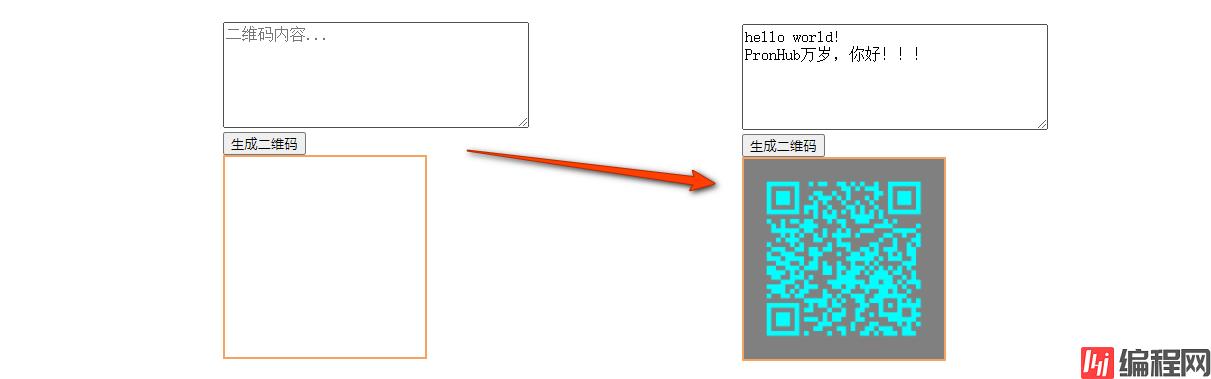
}我们使用的页面和上述相同,所以,页面的情况是一样的,效果展示如下:
到此这篇关于使用google.zxing结合SpringBoot生成二维码功能的文章就介绍到这了,更多相关springboot生成二维码内容请搜索编程网以前的文章或继续浏览下面的相关文章希望大家以后多多支持编程网!
--结束END--
本文标题: 教你如何使用google.zxing结合springboot生成二维码功能
本文链接: https://www.lsjlt.com/news/148131.html(转载时请注明来源链接)
有问题或投稿请发送至: 邮箱/279061341@qq.com QQ/279061341
下载Word文档到电脑,方便收藏和打印~
2024-03-01
2024-03-01
2024-03-01
2024-02-29
2024-02-29
2024-02-29
2024-02-29
2024-02-29
2024-02-29
2024-02-29
回答
回答
回答
回答
回答
回答
回答
回答
回答
回答


官方手机版

微信公众号

商务合作


0