目录 1.map遍历快速实现边距,文字自适应改变大小2.使用SafeArea 添加边距3.布局思路4.获取当前屏幕的大小5.文本溢出显示省略号6.一个圆角带搜索icon的搜
Container(
    // padding: EdgeInsets.symmetric(horizontal: 50),
    // constraints: BoxConstraints.tightFor(width: 200.0, height: 150.0),
    color: Colors.white,
    child: Align(
        alignment: Alignment.center,
        child: FittedBox( // 当一行放不下时会自适应调整组件大小
            child: Row(
                children: [
                    ElevatedButton(onPressed: () => {}, child: Text("电塔")),
                    ElevatedButton(onPressed: () => {}, child: Text("嘿嘿")),
                    ElevatedButton(onPressed: () => {}, child: Text("哟西")),
                    ElevatedButton(onPressed: () => {}, child: Text("是蚕丝")),
                ]
                .map((e) => Padding( // 遍历设置组件左内边距
                    padding: EdgeInsets.only(left: 30), child: e))
                .toList()),
        ),
    ));
在页面的最外层组件中包裹一个SafeArea
SafeArea( // 实质就是添加一个边距,解决iOS最外边弧角导致的被遮挡
        minimum: EdgeInsets.all(30),
    chird:...
    )
1.堆叠:使用stack
2.竖直可滚动:listView
3.多格,超出自动换行:wrap
Wrap(
    children: dataList
    .map((item) => Container(
        decoration: BoxDecoration(color: Colors.red),
        width: (MediaQuery.of(context).size.width - 10 * 3) / 2, // 适配屏幕一行放两个,并且三个缝隙间隔
    ))
    .toList(),
)
Text(
    data.title,
    maxLines: 1,
    overflow: TextOverflow.ellipsis,
),
Expanded(
    child: Container(
        height: 34,
        decoration: BoxDecoration(
            color: Colors.grey[200],
            borderRadius: BorderRadius.circular(17)),
        margin: const EdgeInsets.only(right: 10),
        child: const TextField(
            decoration: InputDecoration(
                hintText: "请输入搜索词",
                hintStyle: TextStyle(color: Colors.grey, fontSize: 14),
                contentPadding: EdgeInsets.only(top: 1, left: -10),
                border: InputBorder.none,
                icon: Padding(
                    padding: EdgeInsets.only(left: 10, top: 5),
                    child: Icon(
                        Icons.search,
                        size: 18,
                        color: Colors.grey,
                    )),
                suffixIcon: Icon(
                    Icons.close,
                    size: 18,
                ))),
    )),
ElevatedButton(
    onPressed: () {
        CommonToast.showToast("退出登录");
    },
    style: ButtonStyle(
        backgroundColor: MaterialStateProperty.all<Color>(Colors.red),
    ),
    child: const Text(
        '退出登录',
        style: TextStyle(color: Colors.white),
    )
),
TextButton(
  style: TextButton.styleFrom(primary: Colors.green),
)

import 'package:Flutter/material.dart';
import 'package:hook_up_rent/pages/home/tab_search/data_list.dart';
import 'package:hook_up_rent/widgets/room_list_item_widget.dart';
class RoomManagePage extends StatelessWidget {
  const RoomManagePage({Key? key}) : super(key: key);
  @override
  Widget build(BuildContext context) {
    return DefaultTabController(
        length: 2,
        initialIndex: 0,
        child: Scaffold(
          appBar: AppBar(
            title: Text("房屋管理"),
            centerTitle: true,
            bottom: TabBar(
              tabs: [
                Tab(
                  text: "空置",
                ),
                Tab(
                  text: "已租",
                )
              ],
            ),
          ),
          body: TabBarView(
            children: [
              ListView(
                children:
                    dataList.map((item) => RoomListItemWidget(item)).toList(),
              ),
              ListView(
                children:
                    dataList.map((item) => RoomListItemWidget(item)).toList(),
              )
            ],
          ),
        ));
  }
}
GestureDetector(
  behavior: HitTestBehavior.translucent, // 加上即可
var buttonTextStyle = TextStyle(
    color: Theme.of(context).primaryColor,
    fontWeight: FontWeight.w600);
往模拟器的sdcard目录下的DCIM目录里面丢图片即可,然后点一下手机上的图片应用加载一下即可

Text(
    data.subTitle ?? '暂无房屋概况',
    maxLines: showAllText ? null : 2,
),
给appbar添加此属性即可
actions: [Container()], // 填一个空元素占位,可以填充掉默认的抽屉图标,此时通过左右滑动打开对应抽屉
Container(
    decoration: BoxDecoration(
        image: DecorationImage(
            image: AssetImage('static/images/loading.jpg'),
            fit: BoxFit.fill)),
);
@override
void initState() {
    super.initState();
    ///循环执行
    ///间隔1秒
    _timer = Timer.periodic(Duration(milliseconds: 1000), (timer) {
        ///自增
        curentTimer++;
        ///到5秒后停止
        if (curentTimer == 5) {
            _timer.cancel();
        }
        setState(() {});
    });
}
@override
void dispose() {
    ///取消计时器
    _timer.cancel();
    super.dispose();
}
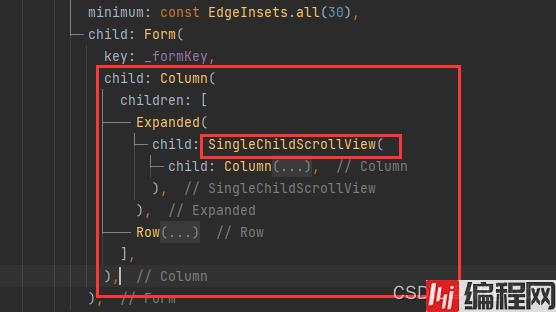
1.当内容不会滚动时可以直接在固定底部的组件上方加一个spacer组件即可。
2.当内容会滚动时需要使用epanded,且该组件只能放置在row、column等组件【不能放在listview,container,stack…】如下所示:
// 直接给Container加上如下属性即可
decoration: BoxDecoration(
    color: Colors.white,
    borderRadius: BorderRadius.circular(8.0),
    boxShadow: [
        BoxShadow(
            color: Colors.black12,
            offset: Offset(0.0, 15.0), //阴影xy轴偏移量
            blurRadius: 15.0, //阴影模糊程度
            spreadRadius: 1.0 //阴影扩散程度
        )
    ]),
// 关闭键盘
void _hideKeyboard() {
    FocusScopenode currentFocus = FocusScope.of(context);
    if (!currentFocus.hasPrimaryFocus && currentFocus.focusedChild != null) {
        /// 取消焦点,相当于关闭键盘
        FocusManager.instance.primaryFocus!.unfocus();
    }
}
// 在页面最外层包裹一个点击事件
GestureDetector(
        onTap: _hideKeyboard,
        child: Scaffold(
在原来的build方法中返回组件外面套一层layoutBuilder即可
return LayoutBuilder(builder: (context, constrains) {
      var maxWidth = constrains.maxWidth; // 获取父级容器大小
    return Wrap()
}
GestureDetector组件会阻止事件冒泡,此时用Listenner组件替换即可
Listener(
// 使用listener事件能够继续传递
  onPointerDown: (event) {
    setState(() {
      isExpand = !isExpand;
    });
  },
  child: Text('点我'),
),
以上就是Android开发组件flutter的20个常用技巧示例总结的详细内容,更多关于Android开发组件flutte的资料请关注编程网其它相关文章!
--结束END--
本文标题: Android开发组件flutter的20个常用技巧示例总结
本文链接: https://www.lsjlt.com/news/148918.html(转载时请注明来源链接)
有问题或投稿请发送至: 邮箱/279061341@qq.com QQ/279061341
下载Word文档到电脑,方便收藏和打印~
2024-01-21
2023-10-28
2023-10-28
2023-10-27
2023-10-27
2023-10-27
2023-10-27
回答
回答
回答
回答
回答
回答
回答
回答
回答
回答


官方手机版

微信公众号

商务合作


0