目录场景搭建环境创建组件创建调用组件的hook函数Dialog的缓存、隐藏隐藏缓存完整代码总结场景 在项目中,我们经常会遇到使用弹窗的场景,但有时组件库自带的弹窗不能满足我们的需求,
在项目中,我们经常会遇到使用弹窗的场景,但有时组件库自带的弹窗不能满足我们的需求,需要我们自己封装,这时我们如何去自定义一个更加方便调用的弹窗?
首先我们需要搭建一个vue3+ts的环境。
用vite的官方模板:
yarn create vite demo-app --template Vue-ts
进入并安装依赖
cd demo-app
yarn
依赖安装完成后启动app
yarn dev
先在src/components目录下创建MyDialog.vue,搭建一个组件的基本框架
<script lang="ts" setup>
import { ref, Reactive } from "vue";
defineProps({
  message: {
    type: String,
    default: "",
  },
  title: {
    type: String,
    default: "",
  },
});
const emits = defineEmits<{
  (e: "confirm"): void;
  (e: "close"): void;
}>();
const visible = ref(true);
function clickConfirm() {
  console.log("确认");
  emits("confirm");
}
function clickClose() {
  console.log("取消");
  emits("close");
}
</script>
<template>
  <div class="wrap" v-if="visible">
    <div class="container">
      <div class="title">{{ title }}</div>
      <div class="content">
        <div>{{ message }}</div>
      </div>
      <div class="controll">
        <button @click="clickConfirm">确认</button>
        <button @click="clickClose">取消</button>
      </div>
    </div>
  </div>
</template>
<style scoped>
.wrap {
  position: absolute;
  top: 0;
  left: 0;
  background: rgba(15, 15, 15, 0.5);
  width: 100%;
  height: 100%;
}
.container {
  position: absolute;
  top: 50%;
  left: 50%;
  transfORM: translate(-50%, -50%);
  min-width: 300px;
  min-height: 200px;
  padding: 10px;
  background: white;
  display: flex;
  flex-direction: column;
}
.content {
  flex: 1;
  padding: 10px;
  text-align: left;
}
.title {
  min-height: 30px;
}
.controll {
  display: flex;
  width: 100%;
  justify-content: space-around;
}
</style>
在src目录下创建hooks目录,然后再hooks目录下创建useMyDialog.ts.
函数调用组件我们需要:
import { createVNode, render, ComponentPublicInstance } from "vue";
export default function useMyDialog(option?: any) {
  const props = {
    ...option,
  };
  const vm = createVNode(MyDialog, props);
  const container = document.createElement("div");
  render(vm, container);
  document.querySelector("#app")?.appendChild(container.firstElementChild!);
}
ps:
container.firstElementChild!中的!表示container.firstElementChild不为null或者undefined
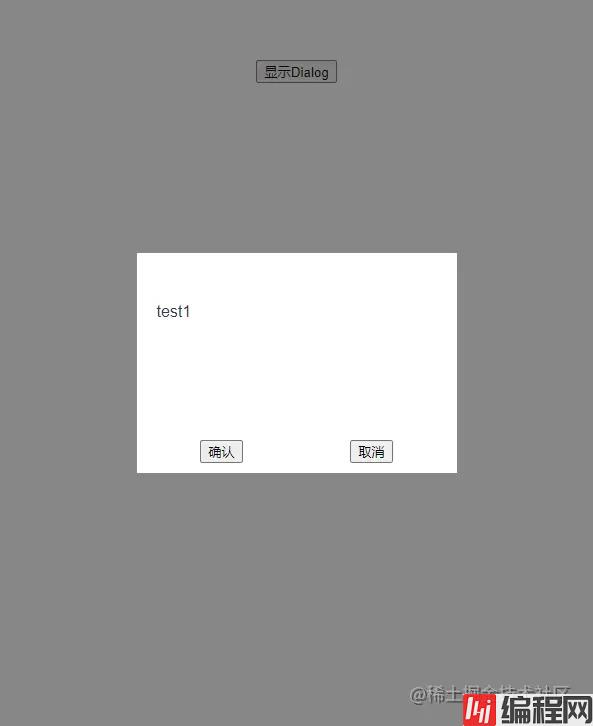
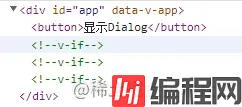
接下来我们在App.vue中测试一下
<script setup lang="ts">
import useMyDialog from "./hooks/useMyDialog";
function showDialog() {
  useMyDialog({
    message: "test1",
    onClose: () => {
      console.log("self");
    },
  });
}
</script>
<template>
  <button @click="showDialog">显示Dialog</button>
</template>
我们需要将close返回出去,这样我们就可以手动调用close函数关闭Dialog.
在useMyDialog.ts中添加
import { ComponentPublicInstance,VNode } from "vue";
export default function useMyDialog(option?: any) {
  const userCloseFn = option?.onClose;
  props.onClose = () => {
    close();
    userCloseFn ?? userCloseFn();
  };
  function close(vm: VNode) {
    (
      vm.component!.proxy as ComponentPublicInstance<{ visible: boolean }>
    ).visible = false;
  }
  return {
    close: close.bind(null, vm),
  }
}
现在每次点击显示Dialog按钮时都会创建一个新的组件实例,这不是我们的预期,所以我们需要将组件进行缓存.
在useMyDialog.ts中添加
import { ComponentPublicInstance } from 'vue'
const instances: any[] = [];
export default function useMyDialog(option?: any) {
  const tempVm: any = instances.find(
    (item) =>
      `${item.vm.props?.message ?? ""}` === `${(option as any).message ?? ""}`
  );
  if (tempVm) {
    (
      tempVm.vm.component!.proxy as ComponentPublicInstance<{
        visible: boolean;
      }>
    ).visible = true;
    return {
      close: close.bind(null, tempVm.vm),
    };
  }
}
src/hooks/useMyDialog.ts
import { createVNode, render, ComponentPublicInstance, VNode } from "vue";
import MyDialog from "../components/MyDialog.vue";
const instances: any[] = [];
export default function useMyDialog(option?: any) {
  const props = {
    ...option,
  };
  const userCloseFn = option?.onClose;
  props.onClose = () => {
    close(vm);
    userCloseFn ?? userCloseFn();
  };
  function close(vm: VNode) {
    (
      vm.component!.proxy as ComponentPublicInstance<{ visible: boolean }>
    ).visible = false;
  }
  const tempVm: any = instances.find(
    (item) =>
      `${item.vm.props?.message ?? ""}` === `${(option as any).message ?? ""}`
  );
  if (tempVm) {
    (
      tempVm.vm.component!.proxy as ComponentPublicInstance<{
        visible: boolean;
      }>
    ).visible = true;
    return {
      close: close.bind(null, tempVm.vm),
    };
  }
  const vm = createVNode(MyDialog, props);
  const container = document.createElement("div");
  render(vm, container);
  document.querySelector("#app")?.appendChild(container.firstElementChild!);
  instances.push({ vm });
  return {
    close: close.bind(null, vm),
  };
}
这种调用方式不局限于Dialog组件,其他有需要的业务组件也可以通过这种封装方式去简化调用.
以上代码其实是element-plus的message组件的简化版,有兴趣的可以去看看element-plus的源码,链接贴在下方.
element-plus源码
以上就是封装一个更易用的Dialog组件过程详解的详细内容,更多关于Dialog组件封装的资料请关注编程网其它相关文章!
--结束END--
本文标题: 封装一个更易用的Dialog组件过程详解
本文链接: https://www.lsjlt.com/news/149077.html(转载时请注明来源链接)
有问题或投稿请发送至: 邮箱/279061341@qq.com QQ/279061341
下载Word文档到电脑,方便收藏和打印~
2024-01-12
2023-05-20
2023-05-20
2023-05-20
2023-05-20
2023-05-20
2023-05-20
2023-05-20
2023-05-20
2023-05-20
回答
回答
回答
回答
回答
回答
回答
回答
回答
回答


官方手机版

微信公众号

商务合作


0