目录element-ui组件按需引入按需引入完整引入Vue项目搭建 + 引入element-ui初始化单页系统ElementUI整合项目element-ui组件按需引入 按需引入 1
1.借助 babel-plugin-component ,引入我们需要的组件,减少项目体积
npm install babel-plugin-component -D2.修改 babel.config.js 的内容
//babel.config.js 全文内容如下
module.exports = {
  presets: [
    '@vue/cli-plugin-babel/preset'
  ],
  plugins: [
    [
      'component',
      {
        libraryName: 'element-ui',
        styleLibraryName: 'theme-chalk'
      }
    ]
  ]
}
3.创建文件 element.js(名字自定义)
// element.js 全文内容如下,按自己需要引入就好了
import Vue from 'vue'
import {
    Button,
    FORM,
    FormItem,
    Input,
    Message,
    Container,
    Header,
    Aside,
    Main,
    Menu,
    Submenu,
    MenuItem,
    Breadcrumb,
    BreadcrumbItem,
    Card,
    Row,
    Col,
    Table,
    TableColumn,
    Switch,
    Tooltip,
    Pagination,
    Dialog,
    MessageBox,
    Tag,
    Tree,
    Select,
    Option,
    Cascader,
    Alert,
    Tabs,
    Tabpane
} from 'element-ui'
Vue.use(Button)
Vue.use(Form)
Vue.use(FormItem)
Vue.use(Input)
Vue.use(Container)
Vue.use(Header)
Vue.use(Aside)
Vue.use(Main)
Vue.use(Menu)
Vue.use(Submenu)
Vue.use(MenuItem)
Vue.use(Breadcrumb)
Vue.use(BreadcrumbItem)
Vue.use(Card)
Vue.use(Row)
Vue.use(Col)
Vue.use(Table)
Vue.use(TableColumn)
Vue.use(Switch)
Vue.use(Tooltip)
Vue.use(Pagination)
Vue.use(Dialog)
Vue.use(Tag)
Vue.use(Tree)
Vue.use(Select)
Vue.use(Option)
Vue.use(Cascader)
Vue.use(Alert)
Vue.use(Tabs)
Vue.use(TabPane)
Vue.prototype.$message = Message
Vue.prototype.$confirm = MessageBox.confirm
4.最后在 main.js 中引入这个文件
//main.js 中添加下面这行代码(路径和文件名按自己的来)
import './plugins/element.js'在 main.js 中添加如下代码
import ElementUI from 'element-ui';
Vue.use(ElementUI);在学习Vue的过程中,官方网站都是给了非常详细的介绍,所以初始化大型单页应用,官网给的参考资料地址:https://cn.vuejs.org/v2/guide/installation.html
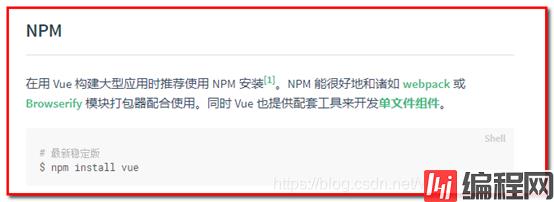
1、NPM
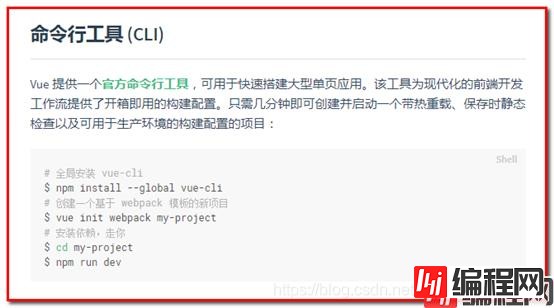
2、命令行工具 (CLI)
3、具体操作步骤
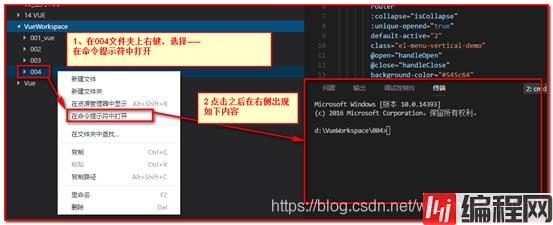
【第一步】在004目录下右键,然后选择------在命令提示符中打开
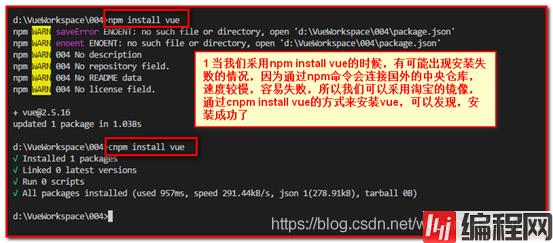
【第二步】输入npm install vue
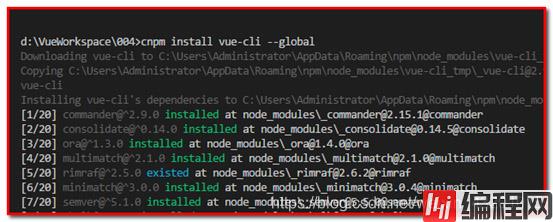
【第三步】安装命令行工具vue-cli:cnpm install vue-cli --global
【第四步】初始化项目的命令:vue init webpack 项目名
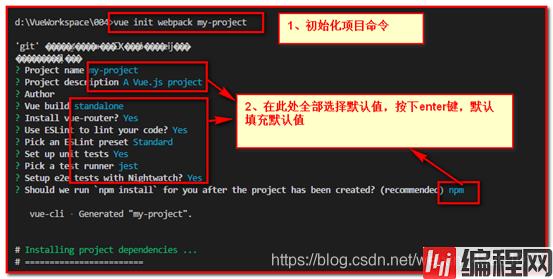
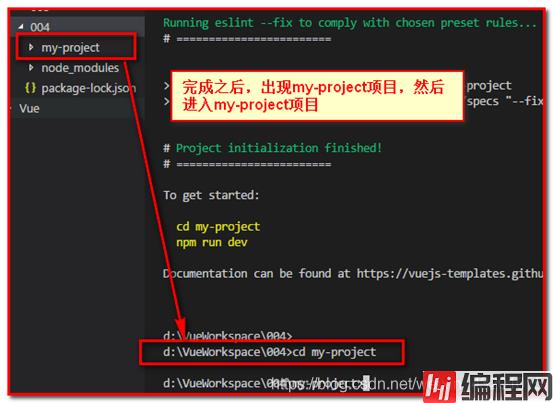
【第五步】进入项目命令:cd my-project
【第六步】运行项目:npm run dev
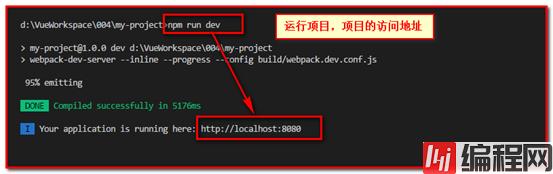
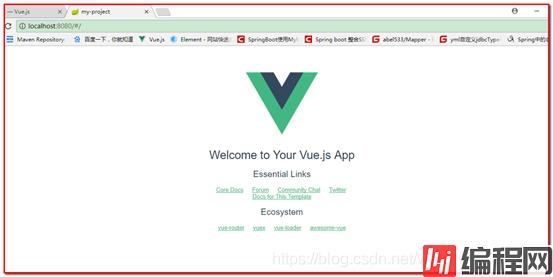
【第七步】访问项目,如果一切成功,那么会出现下图所示页面,系统初始化成功
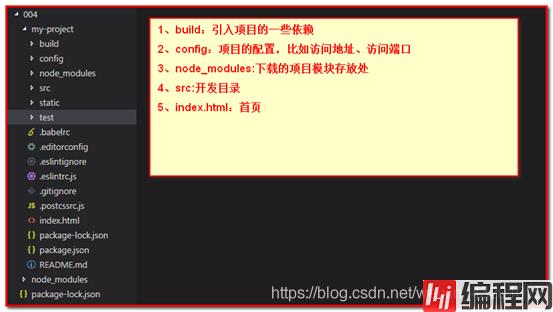
系统目录介绍
1、经过操作,项目my-project已经初始化成功,目录结构如下:
修改项目
1、修改App.vue,删除无关内容
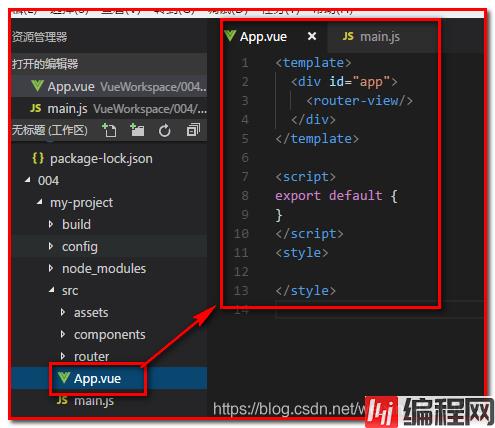
<template>
<div id="app">
<router-view/>
</div>
</template>
<script>
export default {
}
</script>
<style>
</style>
2、修改main.js代码
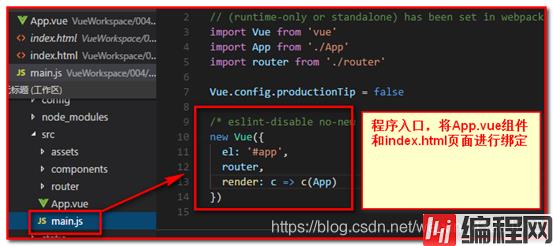
// The Vue build version to load with the `import` command
// (runtime-only or standalone) has been set in WEBpack.base.conf with an alias.
import Vue from 'vue'
import App from './App'
import 'element-ui/lib/theme-chalk/index.CSS'
Vue.config.productionTip = false

new Vue({
el: '#app',
router,
render: c=> c(App)
})
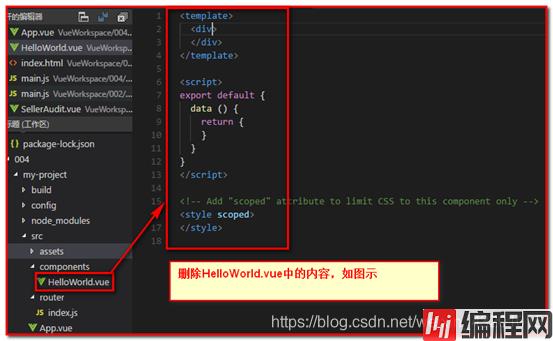
3、修改HelloWorld.vue组件中的代码
在项目中,我们采用ElementUI作为系统框架,所以需要安装ElementUI框架
ElementUI框架官网地址:Http://element-cn.eleme.io/#/zh-CN/component/installation
1、安装ElementUI: cnpm i element-ui -S
i : 安装指令,全拼:install-S :生产环境,全拼:--save-D :开发环境,全拼:--save--dev-O :可选依赖,全拼:--save--optional-E :精确安装指定模块版本,全称:--save--exact-g:全局安装,全拼:--global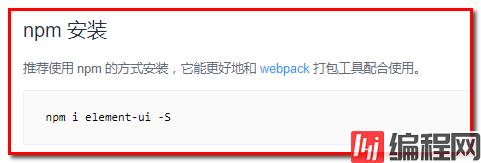
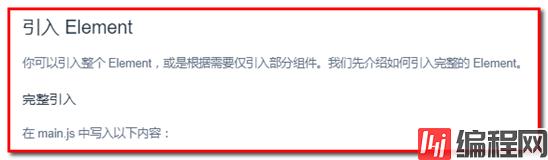
2、在main.js中引入ElementUI模块
// The Vue build version to load with the `import` command
// (runtime-only or standalone) has been set in webpack.base.conf with an alias.
import Vue from 'vue'
import App from './App'
import router from './router'
import ElementUI from 'element-ui'
import 'element-ui/lib/theme-chalk/index.css'
Vue.config.productionTip = false
Vue.use(ElementUI)

new Vue({
  el: '#app',
  router,
  render: c => c(App)
})
以上为个人经验,希望能给大家一个参考,也希望大家多多支持编程网。
--结束END--
本文标题: vue项目中如何实现element-ui组件按需引入
本文链接: https://www.lsjlt.com/news/149566.html(转载时请注明来源链接)
有问题或投稿请发送至: 邮箱/279061341@qq.com QQ/279061341
下载Word文档到电脑,方便收藏和打印~
2024-01-12
2023-05-20
2023-05-20
2023-05-20
2023-05-20
2023-05-20
2023-05-20
2023-05-20
2023-05-20
2023-05-20
回答
回答
回答
回答
回答
回答
回答
回答
回答
回答


官方手机版

微信公众号

商务合作


0