Python 官方文档:入门教程 => 点击学习
目录一、前期准备1.1 创建工程1.2 创建Controller二、探究过程2.1 探究目标2.2 探究过程2.2.1 回顾容器bean的创建与刷新2.2.2 springAppli
参考视频:https://www.bilibili.com/video/BV1Bq4y1Q7GZ?p=6
创建SpringBoot项目,springboot版本为2.5.0,引入spring-boot-starter-web依赖,pom文件如下:
<?xml version="1.0" encoding="UTF-8"?>
<project xmlns="Http://Maven.apache.org/POM/4.0.0" xmlns:xsi="http://www.w3.org/2001/XMLSchema-instance"
         xsi:schemaLocation="http://maven.apache.org/POM/4.0.0 https://maven.apache.org/xsd/maven-4.0.0.xsd">
    <modelVersion>4.0.0</modelVersion>
    <parent>
        <groupId>org.springframework.boot</groupId>
        <artifactId>spring-boot-starter-parent</artifactId>
        <version>2.5.0</version>
        <relativePath/> <!-- lookup parent from repository -->
    </parent>
    <groupId>com.example</groupId>
    <artifactId>springboot</artifactId>
    <version>0.0.1-SNAPSHOT</version>
    <name>springboot</name>
    <description>Demo project for Spring Boot</description>
    <properties>
        <java.version>1.8</java.version>
    </properties>
    <dependencies>
        <dependency>
            <groupId>org.springframework.boot</groupId>
            <artifactId>spring-boot-starter</artifactId>
        </dependency>
        <dependency>
            <groupId>org.springframework.boot</groupId>
            <artifactId>spring-boot-starter-web</artifactId>
        </dependency>
        <dependency>
            <groupId>org.springframework.boot</groupId>
            <artifactId>spring-boot-starter-test</artifactId>
            <scope>test</scope>
        </dependency>
    </dependencies>
    <build>
        <plugins>
            <plugin>
                <groupId>org.springframework.boot</groupId>
                <artifactId>spring-boot-maven-plugin</artifactId>
            </plugin>
        </plugins>
    </build>
</project>创建一个简单的Controller用于测试
@RestController
public class HelloController {
    public void helloController() {
        System.out.println("创建了");
    }
    @RequestMapping("hello")
    public String hello() {
        return "hello";
    }
}
在项目中我们创建了Controller,这个Controller是如何被spring自动加载的呢?为什么Controller必须放在启动类的同级目录下呢?
如果我们想要加载不在启动类同级目录下的bean对象,需要在启动类中使用@ComponentScan注解。
目标:SpringBoot项目中我们没有设置组件扫描的包,为什么它会默认扫描启动类目录下所有的包。
在SpringApplication的run()方法中,创建了spring容器context,并通过refreshContext(context)更新容器加载我们自定义的bean对象。

我们发现在执行完refreshContext(context)代码后,自定义的bean对象(HelloController)就已经被创建了,说明refreshContext(context)过程中创建了自定义bean对象。
下面我们看看究竟是refreshContext(context)中哪些方法创建了自定义bean对象。
我接着看refreshContext(context)方法
? refreshContext()方法

? refresh()方法

再调用父类的refresh()方法

? refresh()方法

在执行完这行代码后创建了自定义bean的beanDefination对象。下面来看看这行代码。
? invokeBeanFactoryPostProcessors()方法
根据这个名字可以看出来是调用了bean工厂的后置处理器。

? invokeBeanFactoryPostProcessors()方法
调用bean工厂的后置处理器,这个方法很长,最终找到了是这行代码,调用BeanDefinition注册的后置处理。

? invokeBeanDefinitionRegistryPostProcessors()方法
拿到后置处理器,调用后置处理器的BeanDefinition注册。

? postProcessBeanDefinitionRegistry()方法

? processConfigBeanDefinitions()方法
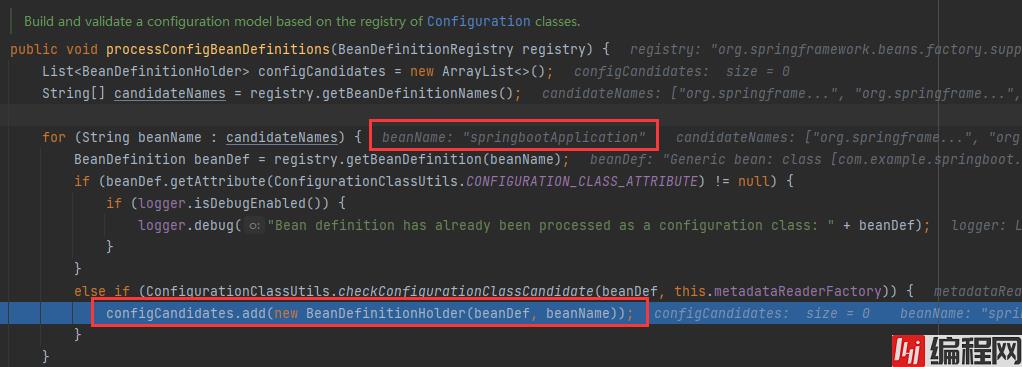
把启动类的beanDefinition对象添加到了confiGCandidates集合中,后面将要用到。

这行代码执行结束后就有了helloController。
这个parser是配置类的处理器,通过传入很多参数构造了这个parser处理器。

parser.parse(candidates)中,把启动类对应的beanDefinitionHolder对象传进去了。
下面看看这个parse方法。
? parse()方法

? parse()方法

? processConfigurationClass()方法

? doProcessConfigurationClass()方法

if (configClass.getMetadata().isAnnotated(Component.class.getName())) { ... }
判断启动类上是否加上了@Component注解,这里的if条件成立。
因为@SpringBootApplication包含@SpringBootConfiguration,@SpringBootConfiguration包含@Configuration,@Configuration包含@Component,所以加上了@SpringBootApplication注解就相当于加上了@Component注解。
? proceSSMemberClasses()方法
里面有很多处理各类注解的方法
// Process any @PropertySource annotations
// Process any @ComponentScan annotations
// Process any @Import annotations
// Process any @ImportResource annotations
// Process individual @Bean methods

后续将要对这个集合进行扫描,那么看看它是如何扫描的。
? parse()方法

ClassUtils.getPackageName(declaringClass):获取启动类所在的包,根据传入类的全类名获取包名。
scanner.doScan(StringUtils.toStringArray(basePackages)):扫描启动类所在的包
在容器刷新时会调用BeanFactoryPostProcessor(Bean工厂后置处理器)进行处理。其中就有一个ConfigurationClassPostProcessor(配置类处理器)。在这个处理器中使用ConfigurationClassParser(配置类解析器)的parse方法去解析处理我们的配置类,其中就有对ComponentScan注解的解析处理。会去使用ComponentScanAnnotationParser的parse方法去解析。解析时如果发现没有配置basePackage,它会去获取我们加载了注解的这个类所在的包,作为我们的basepackage进行组件扫描。
到此这篇关于SpringBoot详细探究讲解默认组件扫描的文章就介绍到这了,更多相关SpringBoot组件扫描内容请搜索编程网以前的文章或继续浏览下面的相关文章希望大家以后多多支持编程网!
--结束END--
本文标题: SpringBoot详细探究讲解默认组件扫描
本文链接: https://www.lsjlt.com/news/150965.html(转载时请注明来源链接)
有问题或投稿请发送至: 邮箱/279061341@qq.com QQ/279061341
下载Word文档到电脑,方便收藏和打印~
2024-03-01
2024-03-01
2024-03-01
2024-02-29
2024-02-29
2024-02-29
2024-02-29
2024-02-29
2024-02-29
2024-02-29
回答
回答
回答
回答
回答
回答
回答
回答
回答
回答


官方手机版

微信公众号

商务合作


0