目录最终效果图实现思维斑马纹(45°角,向左倾斜)画笔斑马纹坐标位置计算圆角裁剪(如果需要)作为背景代码使用处 main_page.dart斑马纹具体实现类 zebra_st
其中的斑马纹背景需要根据接口返回的颜色来渲染,所以不能只是图片形式,无法通过decoration属性配置图片背景板。
楼主这边想到的方法就是通过 实现一个canvas绘制斑马纹类。使用Stack布局,将斑马纹放在下方作为背景板,需要展示的内容在上方。实现 “斑马纹”背景(需要变换颜色)
文章主要分为 效果图、实现思维、代码、计算过程解释。希望对大家有所帮助

使用CustomPaint(size: Size(width, height), painter: 画笔)
CustomPaint(
   size: Size(widget.width, widget.height),
   painter: 画笔,
)
继承 CustomPainter类,实现paint(Canvas canvas, Size size)方法,根据 宽度、高度、画笔宽度、间距 计算出各个点位。使用canvas. drawLine方法 绘制出斑马纹。
@override
void paint(Canvas canvas, Size size) {
  …
  canvas. drawLine();
}
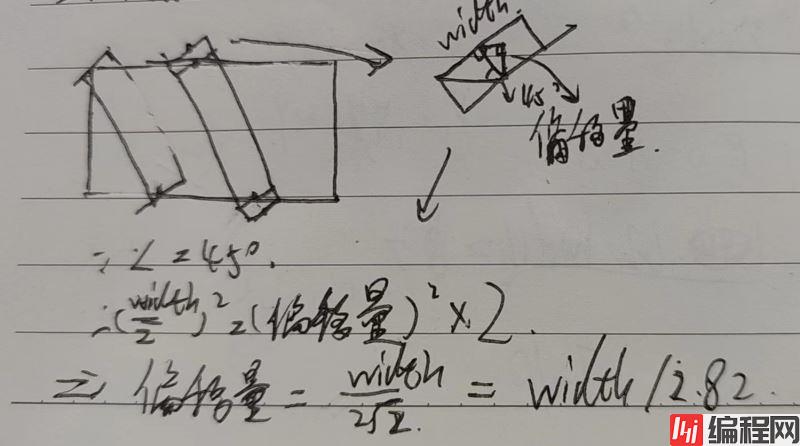
2.82 = 2倍根号2
1.41 = 根号二
由于画笔绘制的是直角的,所以作为背景板会超出,需要裁剪掉四个角。使用
ClipRRect(
   borderRadius: BorderRadius.all(Radius.circular(10)),
   child: xxx
)
使用Stack布局,实现斑马纹在下方作为背景板,需要展示的内容在上方
Stack(
  children: [
  	buildZebraBack(…),
  	需要展示的内容
  ]
)
Stack(
  children: [
    Positioned(
      child: ZebraStripesBack(
          width: 335,
          height: 44,
          lineWidth: 10,
          spacing: 10,
          borderRaduis: 10,
          lineColor: Colors.blue),
      top: 0,
      left: 0,
    ),
    Container(
      width: 335,
      height: 44,
      alignment: Alignment.center,
      padding: EdgeInsets.only(
          top: 10,
          left: 12,
          bottom: 10,
          right: 12),
      child: Text(
              "英语",
              style: TextStyle(
                color: Color(0xFFFFFFFF),
                fontSize: 14.sp,
                fontWeight: FontWeight.w500),
            )
      )
  ]
)
import 'dart:math';
import 'package:flutter/material.dart';

// 斑马纹具体实现类
class ZebraStripesBack extends StatefulWidget {
  ZebraStripesBack({
    this.width: 0,
    this.height: 0,
    this.spacing: 4,
    this.lineWidth: 4,
    this.lineColor: Colors.transparent,
    this.borderRaduis: 0,
  });

  final double width; // 容器宽度
  final double height; // 容器高度
  final double lineWidth; // 斑马纹宽度
  final double spacing; // 间距
  final double borderRaduis; // 容器圆角
  final Color lineColor; // 斑马纹颜色

  @override
  State<StatefulWidget> createState() => _ZebraStripesBackState();
}

class _ZebraStripesBackState extends State<ZebraStripesBack> {
  @override
  void initState() {
    super.initState();
  }

  @override
  void dispose() {
    super.dispose();
  }

  @override
  Widget build(BuildContext context) {
    return ClipRRect(
        borderRadius: BorderRadius.all(Radius.circular(widget.borderRaduis)),
        child: CustomPaint(
          size: Size(widget.width, widget.height),
          painter: _ZebraStripesBackPainter(
            maxWidth: widget.width,
            maxHeight: widget.height,
            spacing: widget.spacing,
            lineWidth: widget.lineWidth,
            lineColor: widget.lineColor,
            borderRaduis: widget.borderRaduis,
          ),
        ));
  }
}

class _ZebraStripesBackPainter extends CustomPainter {
  _ZebraStripesBackPainter({
    this.maxWidth: 0,
    this.maxHeight: 0,
    this.spacing: 4,
    this.lineWidth: 4,
    this.lineColor: Colors.black12,
    this.borderRaduis: 0,
  });

  final double maxWidth;
  final double maxHeight;
  final double spacing;
  final double lineWidth;
  final Color lineColor;
  final double borderRaduis;

  @override
  void paint(Canvas canvas, Size size) {

    var paint = Paint()
      ..isAntiAlias = true
      ..style = PaintingStyle.fill
      ..color = lineColor
      ..strokeWidth = lineWidth;

    int number = 0; // 个数
    int fillNumber = 0; // 填充个数
    double lineAndSpace = lineWidth *1.41 + spacing; // 单个条纹宽 + 间距宽
    if (lineWidth > 0) {
      number = (maxWidth / lineAndSpace).ceil();
      fillNumber = (maxHeight / lineAndSpace).ceil(); // 填充个数
    }

    double deviation = lineWidth / 2.82; // x y轴偏移量 = width / 2倍根号2
    for (int i = -fillNumber; i < number; i++) {
      var left = lineAndSpace * i - deviation;
      double dx = left;
      double dy = -deviation;
      double dx1 = left + maxHeight;
      double dy1 = maxHeight + deviation;
      canvas.drawLine(
        Offset(dx, dy),
        Offset(dx1, dy1),
        paint,
      );
    }
  }

  @override
  bool shouldRepaint(CustomPainter oldDelegate) => true;
}
偏移量计算过程
填充个数计算过程

为什么画笔宽度需要乘 根号二?

缺少-填充

缺少-偏移量

以上就是Android Flutter实现"斑马纹"背景的示例代码的详细内容,更多关于Flutte斑马纹背景的资料请关注编程网其它相关文章!
--结束END--
本文标题: Android Flutter实现"斑马纹"背景的示例代码
本文链接: https://www.lsjlt.com/news/151865.html(转载时请注明来源链接)
有问题或投稿请发送至: 邮箱/279061341@qq.com QQ/279061341
下载Word文档到电脑,方便收藏和打印~
2024-01-21
2023-10-28
2023-10-28
2023-10-27
2023-10-27
2023-10-27
2023-10-27
回答
回答
回答
回答
回答
回答
回答
回答
回答
回答


官方手机版

微信公众号

商务合作


0