Python 官方文档:入门教程 => 点击学习
目录1.spring加载yml文件2.spring 加载 properties 文件3.spring加载系统磁盘(properties)文件4.spring加载xml文件5.Java
本文默认 spring 版本是 spring5
1 spring 加载 yml 文件
2 spring 加载 properties 文件
3 spring 加载 系统磁盘 文件
4 spring 加载 xml 文件
5 Java 基于 InputStream 读取 properties 配置文件
spring框架默认加载配置:
resources 下的文件名称为application的 application.yml 以及 application.properties, 默认会被spring加载到容器 Container
中,如果他们有重复的配置项,会被默认合并,并且 application.properties优先级更高. 下面的 LoadYmlTest.java 有详细解释
示例:
# application.yml
user:
userName: ifredom_name
age: 30 # 定义了属性 age
# application.properties
# 也定义了属性 age
user.age=99
user.sex=2
package com.example.commonmybatisplus.config;
import lombok.Data;
import org.springframework.boot.context.properties.ConfigurationProperties;
import org.springframework.context.annotation.Configuration;
import org.springframework.context.annotation.PropertySource;

@Data
@Configuration
@ConfigurationProperties(prefix = "user")
public class LoadPropertySourceYmlConfig {
    private String userName;
    private int sex;
    private int age;
}
package com.example.commonmybatisplus.PropertySourceTest;
import com.example.commonmybatisplus.config.LoadPropertySourceYmlConfig;
import com.example.commonmybatisplus.entity.UserEntity;
import org.junit.jupiter.api.Test;
import org.springframework.beans.factory.annotation.Autowired;
import org.springframework.boot.test.context.SpringBootTest;
import org.springframework.core.env.Environment;

@SpringBootTest
public class LoadYmlTest {
    @Autowired
    private LoadPropertySourceYmlConfig ymlConfig;
    @Test
    public void testYml() {
        String name = ymlConfig.getUserName();
        int sex = ymlConfig.getSex();
        int age = ymlConfig.getAge();
        System.out.println(name); // ifredom
        System.out.println(sex);  // 2
        System.out.println(age);  // 99
    }
}
上面已经通过默认的方式演示了如何加载默认的application.yml,但是更好的写法是,将我们自定义的配置独立为一个单独的文件。
比如我们开发微信公众号,小程序开发时,就需要用到配置,此时的配置就应该独立为一个额外的文件。(此处将演示加载为 List)
一共有3步:
wechat-config.ymlLoadPropertySourceYmlConfig,用来加载yml中的数据 (指定配置类的加载器) (因为 spring 配置类的默认加载器是 PropertiesLoader加载器,所以我们需要自定义 yml加载器。可以自行查看注解 @PropertySource 源码)YamlSourceFactory,继承Spring提供的默认配置类构造器 DefaultPropertySourceFactory示例:
# main/resources/chat-config.yml
#微信小程序的appid
appid: app-xxx
#微信小程序的Secret
secret: secretxxx
#微信小程序消息服务器配置的token
token: token-xxx
#微信小程序消息服务器配置的EncodingAESKey
aesKey: aesKey-xxxwx:
configs:
#微信小程序的appid
- appid: app1
#微信小程序的Secret
secret: secret1
#微信小程序消息服务器配置的token
token: token1
#微信小程序消息服务器配置的EncodingAESKey
aesKey: aesKey1#微信小程序的appid
- appid: appid2
#微信小程序的Secret
secret: secret2
#微信小程序消息服务器配置的token
token: token2
#微信小程序消息服务器配置的EncodingAESKey
aesKey: aesKey2def-my-var1: 定义配置属性var1
def-my-var2: 定义配置属性var2
这里需要注意,在上面的配置文件中是 wx.configs, 因此在配置类中,也必须用同名的 configs 来接收
package com.example.commonmybatisplus.config;
import lombok.Data;
import org.springframework.boot.context.properties.ConfigurationProperties;
import org.springframework.context.annotation.Configuration;
import org.springframework.context.annotation.PropertySource;
import org.springframework.core.io.support.PropertySourceFactory;
import org.springframework.stereotype.Component;
import java.util.List;

@Data
@Configuration
@PropertySource(value = "classpath:wechat-config.yml", factory = YamlSourceFactory.class)
@ConfigurationProperties(prefix = "wx")
public class LoadPropertySourceYmlConfig {
    private List<Config> configs;
    @Data
    public static class Config {
        private String appid;
        private String secret;
        private String token;
        private String aesKey;
    }
    private String appid;
    private String secret;
    private String token;
    private String aesKey;
}
// 自定义记载器
package com.example.commonmybatisplus.config;
import org.springframework.boot.env.YamlPropertySourceLoader;
import org.springframework.core.env.PropertySource;
import org.springframework.core.io.support.DefaultPropertySourceFactory;
import org.springframework.core.io.support.EncodedResource;
import java.io.IOException;
import java.util.List;
public class YamlSourceFactory extends DefaultPropertySourceFactory {
@Override
public PropertySource<?> createPropertySource(String name, EncodedResource resource) throws IOException {
// 这里使用Yaml配置加载类来读取yml文件信息
List<PropertySource<?>> sources = new YamlPropertySourceLoader().load(resource.getResource().getFilename(), resource.getResource());
return sources.get(0);
}
}
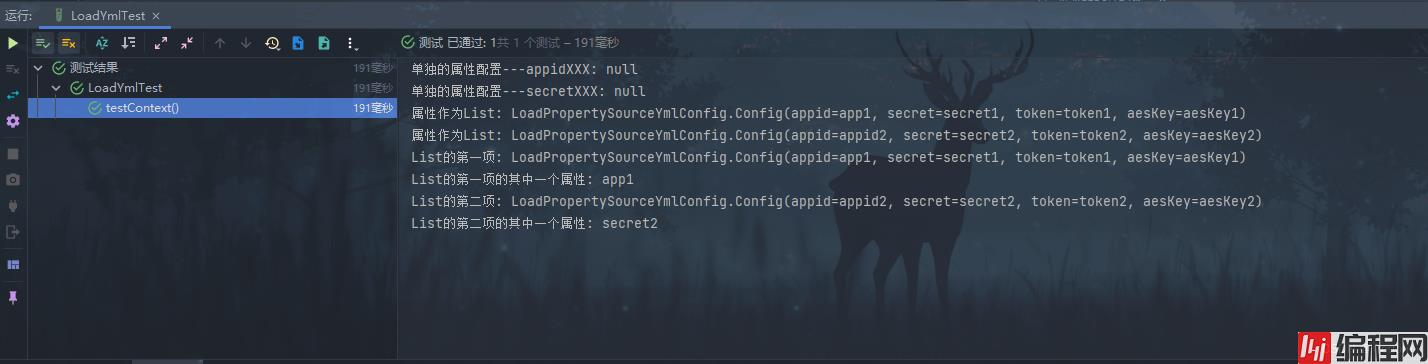
测试结果
package com.example.commonmybatisplus.PropertySourceTest;
import com.example.commonmybatisplus.config.LoadPropertySourceYmlConfig;
import org.junit.jupiter.api.Test;
import org.springframework.beans.factory.annotation.Autowired;
import org.springframework.boot.test.context.SpringBootTest;
import java.util.List;

@SpringBootTest
public class LoadYmlTest {
    @Autowired
    private LoadPropertySourceYmlConfig ymlConfig;
    @Test
    public void testYml() {
        String appidXXX = ymlConfig.getAppid();
        String secretXXX = ymlConfig.getSecret();
        System.out.println("单独的属性配置---appidXXX: " + appidXXX);
        System.out.println("单独的属性配置---secretXXX: " + secretXXX);
        // 以下演示 配置项作为 List
        List<LoadPropertySourceYmlConfig.Config> configs = ymlConfig.getConfigs();
        // 迭代 List 每一项
        for (LoadPropertySourceYmlConfig.Config config : configs) {
            System.out.println("属性作为List: " + config);
        }
        // 获取List种的某一项
        LoadPropertySourceYmlConfig.Config configFirst = configs.get(0);
        String appidFirst = configFirst.getAppid();
        System.out.println("List的第一项: " + configFirst);
        System.out.println("List的第一项的其中一个属性: " + appidFirst);
        LoadPropertySourceYmlConfig.Config configSecond = configs.get(1);
        String secretSecond = configSecond.getSecret();
        System.out.println("List的第二项: " + configSecond);
        System.out.println("List的第二项的其中一个属性: " + secretSecond);
    }
}
从上一步我们已经知道了, spring 默认使用 properties 文件的加载器。因此,我们可以少一步构造加载器
alibaba-config.propertiesLoadPropertySourceConfig,用来加载yml中的数据# main/resources/alibaba-config.properties
ali-yun.username="ifredom"
ali-yun.passWord="123456"
ali-yun.blog="Http://www.ifredom.com"
package com.example.commonmybatisplus.config;
import lombok.Data;
import org.springframework.boot.context.properties.ConfigurationProperties;
import org.springframework.context.annotation.Configuration;
import org.springframework.context.annotation.PropertySource;
@Data
@Configuration
@PropertySource("classpath:alibaba-config.properties")
@ConfigurationProperties(prefix = "aliyun")
public class LoadPropertySourceConfig {
    private String username;
    private String password;
    private String blog;
}
测试:
package com.example.commonmybatisplus.PropertySourceTest;
import com.example.commonmybatisplus.config.LoadPropertySourceConfig;
import com.example.commonmybatisplus.config.LoadPropertySourceYmlConfig;
import org.junit.jupiter.api.Test;
import org.springframework.beans.factory.annotation.Autowired;
import org.springframework.boot.test.context.SpringBootTest;
import java.util.List;

@SpringBootTest
public class LoadYmlTest {
    @Autowired
    private LoadPropertySourceYmlConfig ymlConfig;
    @Autowired
    private LoadPropertySourceConfig propertyConfig;
    @Test
    public void testProperty() {
        String username = propertyConfig.getUsername();
        String password = propertyConfig.getPassword();
        String blog = propertyConfig.getBlog();
        System.out.println("单独的属性配置---username: " + username);
        System.out.println("单独的属性配置---password: " + password);
        System.out.println("单独的属性配置---blog: " + blog);
    }
    @Test
    public void testYml() {
    }
}细心的同学应该发现了,在配置文件中定义的是ali-yun中间明明有一个短横线,读取属性的时候怎么没了?
这是因为 Spring 配置加载器类对诸如 空格,下划线,短横线,大小写都做了替空处理,也就是:配置文件是不分大小写的; 并且 下划线,短横线也会忽略: user_name -> username, pass-word -> password.因此取名你可以很随意
有时候我们会需要加载其他项目下的数据库,而配置文件并不在当前项目路劲下,因此需要指定文件路径。
@PropertySource(value = {"file:project1.properties"})@PropertySource(value = {"file:./project1.properties"})@PropertySource(value = {"file:D:\\project\\project1.properties"})@PropertySource(value = {"file:${user.dir}/project1.properties"})由于加载xml文件还需要对xml文件进行解析,此处不做讲解。仅仅使用 properties 文件做例子。 示例:
# 位于D盘下的配置文件 D:\project1.properties
driverClassName=com.Mysql.cj.jdbc.Driver
url="https://www.ifredom.com"
username="ifredom"
password="123456"
由于配置文件没有前缀,因此 配置类 必须使用@Value()进行映射
package com.example.commonmybatisplus.config;
import lombok.Data;
import org.springframework.beans.factory.annotation.Value;
import org.springframework.context.annotation.Configuration;
import org.springframework.context.annotation.PropertySource;
@Data
@Configuration
@PropertySource(value = {"file:D:\\project1.properties"})
public class LoadDiskConfig {
    @Value("driverClassName")
    private String driverClassName;
    @Value("url")
    private String url;
    @Value("username")
    private String username;
    @Value("password")
    private String password;
}
@SpringBootTest
public class LoadYmlTest {
    @Autowired
    private LoadDiskConfig diskConfig;
    @Test
    public void testDisk() {
        String username = diskConfig.getUsername();
        String url = diskConfig.getUrl();
        System.out.println(username);
        System.out.println(url);
    }
}
applicationContext.xml,并在其中定义一个beanApplicationContext 来加载读取xml文件不再推介使用 xml 来读取文件了,过于复杂
示例:
<?xml version="1.0" encoding="UTF-8"?>
<beans xmlns="http://www.springframework.org/schema/beans"
       xmlns:xsi="http://www.w3.org/2001/XMLSchema-instance"
       xmlns:context="http://www.springframework.org/schema/context"
       xmlns:tx="http://www.springframework.org/schema/tx"
       xsi:schemaLocation="http://www.springframework.org/schema/beans http://www.springframework.org/schema/beans/spring-beans.xsd
       http://www.springframework.org/schema/context http://www.springframework.org/schema/context/spring-context.xsd
       http://www.springframework.org/schema/tx http://www.springframework.org/schema/tx/spring-tx.xsd ">
    <bean id="blog" name="author" class="com.example.commonmybatisplus.entity.UserEntity">
        <property name="id" value="1"/>
        <property name="name" value="ifredom"/>
        <property name="age" value="30"/>
    </bean>
</beans>
@Data
public class UserEntity {
    private Long id;
    private String name;
    private int sex;
    private int age;
}
@SpringBootTest
public class LoadYmlTest {
@Test
public void testXml() {
ClassPathXmlApplicationContext context = new ClassPathXmlApplicationContext("applicationContext.xml");
UserEntity author = context.getBean("author", UserEntity.class);
System.out.println(author.getName());
}
}import java.io.BufferedReader;
import java.io.FileReader;
import java.io.IOException;
import java.util.List;
import java.util.Properties;
@SpringBootTest
public class LoadYmlTest {
@Test
public void testInputStream() throws IOException {
Properties properties = new Properties();
// 使用InPutStream流读取properties文件
BufferedReader bufferedReader = new BufferedReader(new FileReader("D:/project1.properties"));
properties.load(bufferedReader);
// 获取key对应的value值
String driverClassName = properties.getProperty("driverClassName");
String username = properties.getProperty("username");
System.out.println(driverClassName);
System.out.println(username);
}
}
到此这篇关于Spring详解四种加载配置项的方法的文章就介绍到这了,更多相关Spring加载配置项内容请搜索编程网以前的文章或继续浏览下面的相关文章希望大家以后多多支持编程网!
--结束END--
本文标题: Spring详解四种加载配置项的方法
本文链接: https://www.lsjlt.com/news/152246.html(转载时请注明来源链接)
有问题或投稿请发送至: 邮箱/279061341@qq.com QQ/279061341
下载Word文档到电脑,方便收藏和打印~
2024-03-01
2024-03-01
2024-03-01
2024-02-29
2024-02-29
2024-02-29
2024-02-29
2024-02-29
2024-02-29
2024-02-29
回答
回答
回答
回答
回答
回答
回答
回答
回答
回答


官方手机版

微信公众号

商务合作


0