Python 官方文档:入门教程 => 点击学习
目录什么是 shiroShiro 架构Shiro 架构图Shiro 工作原理Shiro 详细架构图SpringBoot 整合 shirospringboot 整合 shiro 思路项
Shiro 是一个强大的简单易用的 Java 安全框架,主要用来更便捷的 认证,授权,加密,会话管理。Shiro 首要的和最重要的目标就是容易使用并且容易理解,通过 Shiro 易于理解的api,您可以快速、轻松地获得任何应用程序——从最小的移动应用程序最大的网络和企业应用程序
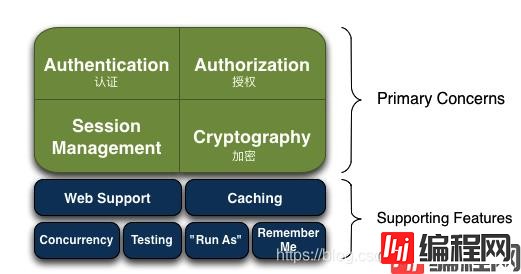
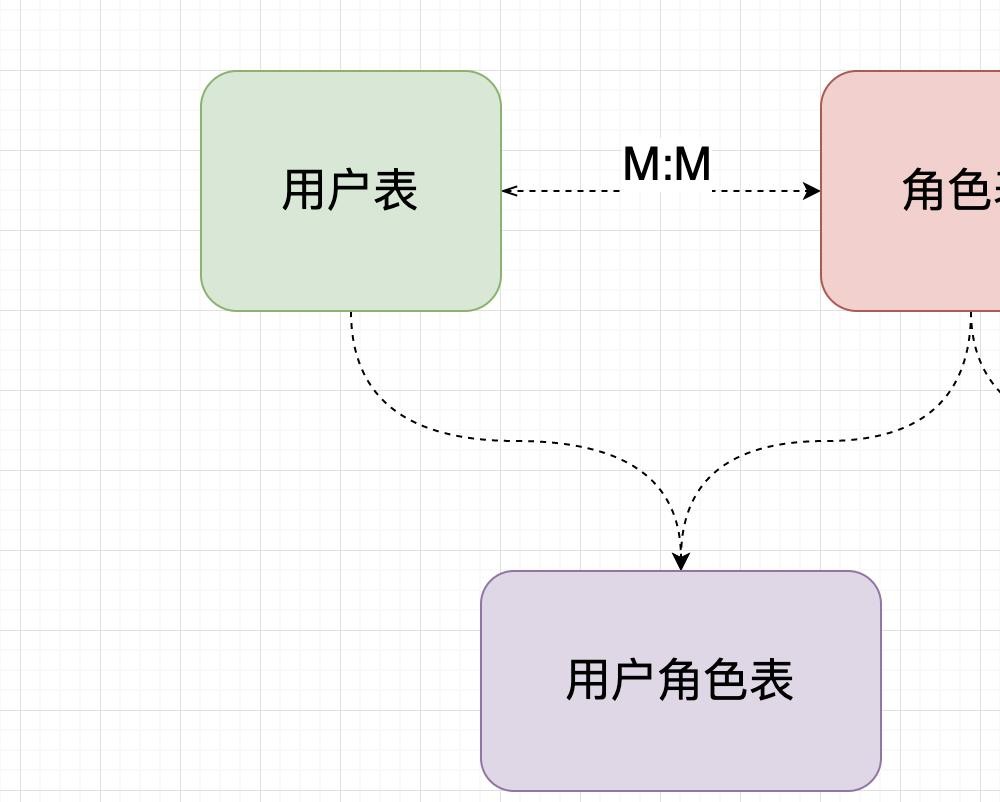
Authentication:身份认证/登录Authorization:验证权限,即,验证某个人是否有做某件事的权限Session Management:会话管理。管理用户特定的会话,支持 WEB 与非 webCryptography: 加密,保证数据安全Caching:缓存Remember Me:记住我,即记住登录状态,一次登录后,下次再来的话不用登录了Shiro 的架构有三个主要概念:Subject,SecurityManager 和 Realms
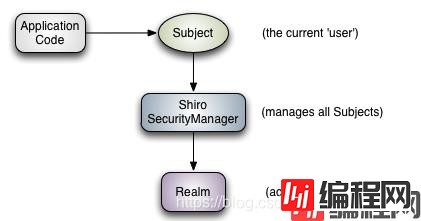
Subject:当前参与应用安全部分的主角。可以是用户,可以试第三方服务,可以是 cron 任务,或者任何东西。主要指一个正在与当前软件交互的东西。所有 Subject 都需要 SecurityManager,当你与 Subject 进行交互,这些交互行为实际上被转换为与 SecurityManager 的交互SecurityManager:安全管理器,Shiro 架构的核心,它就像 Shiro 内部所有原件的保护伞。然而一旦配置了 SecurityManager,SecurityManager 就用到的比较少,开发者大部分时间都花在 Subject 上面。当你与 Subject 进行交互的时候,实际上是 SecurityManager在 背后帮你举起 Subject 来做一些安全操作Realms:Realms 作为 Shiro 和你的应用的连接桥,当需要与安全数据交互的时候,像用户账户,或者访问控制,Shiro 就从一个或多个 Realms 中查找。Shiro 提供了一些可以直接使用的 Realms,如果默认的 Realms不能满足你的需求,你也可以定制自己的 Realms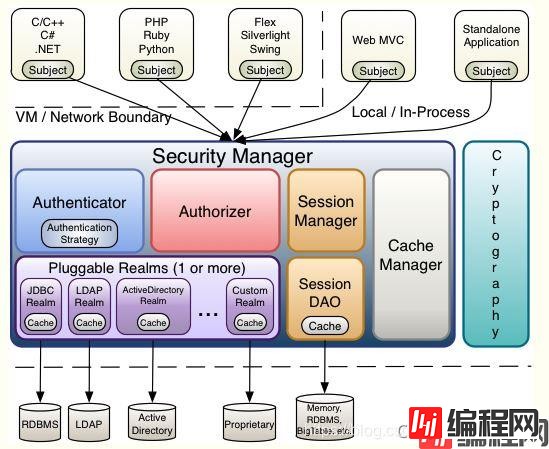
Subject:与应用交互的主体,例如用户,第三方应用等SecurityManager:shiro 的核心,负责整合所有的组件,使他们能够方便快捷完成某项功能。例如:身份验证,权限验证等Authenticator:认证器,负责主体认证的,这是一个扩展点,如果用户觉得 Shiro 默认的不好,可以自定义实现;其需要认证策略(Authentication Strategy),即什么情况下算用户认证通过了。Authorizer:决定主体是否有权限进行相应的操作;即控制着用户能访问应用中的哪些功能SessionManager:会话管理。CacheManager:缓存管理器。创建和管理缓存,为 authentication, authorization 和 session management 提供缓存数据,避免直接访问数据库,提高效率Cryptography;密码模块,提供加密组件Realms:可以有 1 个或多个 Realm,可以认为是安全实体数据源,即用于获取安全实体的;可以是 JDBC 实现,也可以是 LDAP 实现,或者内存实现等等;由用户提供;注意:Shiro 不知道你的用户/权限存储在哪及以何种格式存储;所以我们一般在应用中都需要实现自己的 Realm
<!--thymeleaf 模板引擎-->
<dependency>
	<groupId>org.springframework.boot</groupId>
	<artifactId>spring-boot-starter-thymeleaf</artifactId>
</dependency>
<!--shiro-->
<dependency>
	<groupId>org.apache.shiro</groupId>
	<artifactId>shiro-spring-boot-starter</artifactId>
	<version>1.4.0</version>
</dependency>
<!-- thymeleaf 集成 shiro -->
<dependency>
	<groupId>com.GitHub.theborakompaNIOni</groupId>
    <artifactId>thymeleaf-extras-shiro</artifactId>
	<version>2.0.0</version>
</dependency>
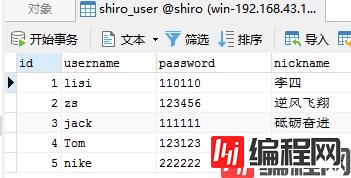
CREATE TABLE `shiro_user` (
  `id` int(11) NOT NULL AUTO_INCREMENT,
  `username` varchar(255) NOT NULL,
  `passWord` varchar(255) NOT NULL,
  `nickname` varchar(255) NOT NULL,
  PRIMARY KEY (`id`),
  UNIQUE KEY `index_username` (`username`) USING BTREE
) ENGINE=InnoDB AUTO_INCREMENT=6 DEFAULT CHARSET=utf8mb4;

INSERT INTO `shiro_user` VALUES (1, 'lisi', '110110', '李四');
INSERT INTO `shiro_user` VALUES (2, 'zs', '123456', '逆风飞翔');
INSERT INTO `shiro_user` VALUES (3, 'jack', '111111', '砥砺奋进');
INSERT INTO `shiro_user` VALUES (4, 'Tom', '123123', '静夜思');
INSERT INTO `shiro_user` VALUES (5, 'nike', '222222', '杀伤力巨大');

CREATE TABLE `shiro_user_role` (
  `id` int(11) NOT NULL AUTO_INCREMENT,
  `user_id` int(11) NOT NULL,
  `role_id` int(11) NOT NULL,
  PRIMARY KEY (`id`)
) ENGINE=InnoDB AUTO_INCREMENT=5 DEFAULT CHARSET=utf8mb4;

INSERT INTO `shiro_user_role` VALUES (1, 1, 1);
INSERT INTO `shiro_user_role` VALUES (2, 2, 3);
INSERT INTO `shiro_user_role` VALUES (3, 3, 3);
INSERT INTO `shiro_user_role` VALUES (4, 4, 2);

CREATE TABLE `shiro_role` (
  `id` int(11) NOT NULL AUTO_INCREMENT,
  `role_code` varchar(255) NOT NULL,
  `role_name` varchar(255) NOT NULL,
  PRIMARY KEY (`id`)
) ENGINE=InnoDB AUTO_INCREMENT=5 DEFAULT CHARSET=utf8mb4;

INSERT INTO `shiro_role` VALUES (1, '1', '管理员');
INSERT INTO `shiro_role` VALUES (2, '2', '普通一级用户');
INSERT INTO `shiro_role` VALUES (3, '3', '普通二级用户');
INSERT INTO `shiro_role` VALUES (4, '4', '普通三级用户');

CREATE TABLE `shiro_auth_role` (
  `id` int(11) NOT NULL AUTO_INCREMENT,
  `auth_id` int(11) NOT NULL,
  `role_id` int(11) NOT NULL,
  PRIMARY KEY (`id`)
) ENGINE=InnoDB AUTO_INCREMENT=10 DEFAULT CHARSET=utf8mb4;

INSERT INTO `shiro_auth_role` VALUES (1, 1, 1);
INSERT INTO `shiro_auth_role` VALUES (2, 2, 1);
INSERT INTO `shiro_auth_role` VALUES (3, 3, 1);
INSERT INTO `shiro_auth_role` VALUES (4, 4, 1);
INSERT INTO `shiro_auth_role` VALUES (5, 3, 2);
INSERT INTO `shiro_auth_role` VALUES (6, 4, 2);
INSERT INTO `shiro_auth_role` VALUES (7, 4, 3);
INSERT INTO `shiro_auth_role` VALUES (8, 4, 4);
INSERT INTO `shiro_auth_role` VALUES (9, 1, 3);

CREATE TABLE `shiro_auth` (
  `id` int(11) NOT NULL AUTO_INCREMENT,
  `auth_code` varchar(255) NOT NULL,
  `auth_name` varchar(255) NOT NULL,
  `parent_id` int(11) NOT NULL,
  PRIMARY KEY (`id`)
) ENGINE=InnoDB AUTO_INCREMENT=5 DEFAULT CHARSET=utf8mb4;

INSERT INTO `shiro_auth` VALUES (1, 'user:add', '添加', 1);
INSERT INTO `shiro_auth` VALUES (2, 'user:delete', '删除', 2);
INSERT INTO `shiro_auth` VALUES (3, 'user:update', '更新', 3);
INSERT INTO `shiro_auth` VALUES (4, 'user:list', '查看', 4);
public class User implements Serializable {
    private Integer id;

    @NotBlank(message = "账号不能为空")
    private String username;

    @NotEmpty(message = "密码不能为空")
    private String password;

    private String nickname;

	// set/get方法省略
}

public class Role {
    private Integer id;

    private String roleCode;

    private String roleName;

	// set/get方法省略
}

public class Auth {
    private Integer id;

    private String authCode;

    private String authName;

    private Integer parentId;

	// set/get方法省略
}
realm 是 shiro 进行登录认证,权限,角色校验的关键,我们需要重写里面的方法
@Component
@Slf4j
public class UserRealm extends AuthorizingRealm {

    @Autowired
    private UserService userService;

    // 授权,权限操作
    @Override
    protected AuthorizationInfo doGetAuthorizationInfo(@NotNull PrincipalCollection principals) {
        log.info("------进入授权操作了------");
        User user = (User) principals.getPrimaryPrincipal();
        SimpleAuthorizationInfo info = new SimpleAuthorizationInfo();
        // 通过账号来查询相应的角色,权限数据
        List<AuthAndRoleVO> authAndRoleVOS = userService.selectAuthAndRole(user.getUsername());
        authAndRoleVOS.forEach(item -> {
            log.info("查询到的权限,角色:" + item.toString());
            String roleName = item.getRoleName();
            String authCode = item.getAuthCode();
            info.addStringPermission(authCode);
            info.addRole(roleName);
        });
        return info;
    }

    // 认证操作
    @Override
    protected AuthenticationInfo doGetAuthenticationInfo(AuthenticationToken token) throws AuthenticationException {
        log.info("------进入认证操作了------");
        // 拿到UsernamePasswordToken,它里面有用户名,密码数据
        UsernamePasswordToken usernamePasswordToken = (UsernamePasswordToken) token;
        // 查询数据库
        User user = userService.selectOne(usernamePasswordToken.getUsername(), String.valueOf(usernamePasswordToken.getPassword()));
        if (user == null) {
            return null;
        }
        return new SimpleAuthenticationInfo(user, token.getCredentials(), getName());
    }
}
ORM 持久层不再赘述,用 mybatis 或 jpa 等都可以doGetAuthorizationInfo(): 权限认证。即登录过后,每个用户的身份不一样,对应的所能看的页面也不一样,也就是拥有的权限也不一样doGetAuthenticationInfo():身份认证。即登录通过账号和密码验证登陆人的身份信息
@Configuration
public class ShiroConfig {


    @Bean
    public DefaultWebSecurityManager getDefaultWebSecurityManager(UserRealm userRealm) {
        DefaultWebSecurityManager defaultWebSecurityManager = new DefaultWebSecurityManager();
        defaultWebSecurityManager.setRealm(userRealm);
        return defaultWebSecurityManager;
    }


    @Bean
    public ShiroDialect getShiroDialect() {
        return new ShiroDialect();
    }

    @Bean
    public ShiroFilterFactoryBean shiroFilter(DefaultWebSecurityManager defaultWebSecurityManager) {
        ShiroFilterFactoryBean shiroFilterFactoryBean = new ShiroFilterFactoryBean();
        shiroFilterFactoryBean.setSecurityManager(defaultWebSecurityManager);
        // 设置登录页面url
        shiroFilterFactoryBean.setLoginUrl("/user/login");
        shiroFilterFactoryBean.setSuccessUrl("/user/index");
        shiroFilterFactoryBean.setUnauthorizedUrl("/user/unauthorized");

        // 注意此处使用的是LinkedHashMap是有顺序的,shiro会按从上到下的顺序匹配验证,匹配了就不再继续验证
        Map<String, String> filterChainDefinitionMap = new LinkedHashMap<>();
		// 静态资源放行
        filterChainDefinitionMap.put("/layer/**", "anon");
        filterChainDefinitionMap.put("/img/**", "anon");
        filterChainDefinitionMap.put("/Jquery/**", "anon");
        // add.html页面放行
        filterChainDefinitionMap.put("/user/add", "anon");
        // update.html必须认证
        filterChainDefinitionMap.put("/user/update", "authc");
        // index.html必须认证
        filterChainDefinitionMap.put("/user/index", "authc");
        // 设置授权,只有user:add权限的才能请求/user/add这个url
        filterChainDefinitionMap.put("/user/add", "perms[user:add]");
        filterChainDefinitionMap.put("/user/update", "perms[user:update]");

        shiroFilterFactoryBean.setFilterChainDefinitionMap(filterChainDefinitionMap);
        return shiroFilterFactoryBean;
    }
}
<!DOCTYPE html>
<html lang="en" xmlns:th="Http://www.thymeleaf.org">
<head>
    <meta charset="UTF-8">
    <title>登录</title>
    <link rel="shortcut icon" type="image/x-icon" th:href="@{/img/favicon.ico}" rel="external nofollow"  rel="external nofollow"  rel="external nofollow"  rel="external nofollow"  rel="external nofollow" />
</head>
<body>
<form action="" method="post">
    <p>
        账号:
        <label><input type="text" class="username" name="username"></label>
    </p>
    <p>
        密码:
        <label><input type="text" class="password" name="password"></label>
    </p>
    <p>
        <label><input id="checkbox1" type="checkbox" name="rememberMe"></label>记住我
    </p>
    <p><button type="button" class="loginBtn">登录</button></p>
</form>
</body>
<script type="text/javascript" th:src="@{/jquery/jquery-3.3.1.min.js}"></script>
<script type="text/javascript" th:src="@{/layer/layer.js}"></script><!--layui的弹出层-->
<script type="text/javascript">
    $(document).ready(function () {
        $('.loginBtn').on('click', function () { // 登录按钮
            const username = $('.username').val();
            const password = $('.password').val();
            $.ajax({// 用户登录
                type: 'post',
                url: '/user/doLogin',
                dataType: 'JSON',
                data: ({
                    'username': username,
                    'password': password
                }),
                success: function (resp) {
                    console.log(resp);
                    if (resp.code !== 200) {
                        layer.msg(resp.message, function () {// layui的弹窗
                        });
                    } else if (resp.code === 200) {
                        window.location.href = 'http://127.0.0.1:8080'+ resp.action;
                    }
                },
                error: function () {// 此处添加错误处理
                    layer.open({
                        title: '提示信息',
                        content: '后台访问错误,请联系管理员',
                        skin: 'layui-layer-molv',
                        icon: 0
                    });
                }
            });
        });
    });
</script>
</html>
<!DOCTYPE html>
<html lang="en" xmlns:th="http://www.thymeleaf.org">
<head>
    <meta charset="UTF-8">
    <title>首页</title>
    <link rel="shortcut icon" type="image/x-icon" th:href="@{/img/favicon.ico}" rel="external nofollow"  rel="external nofollow"  rel="external nofollow"  rel="external nofollow"  rel="external nofollow" />
</head>
<body>
    <h1>首页</h1>

    <a th:href="@{/user/add}" rel="external nofollow" >add</a> | <a th:href="@{/user/update}" rel="external nofollow" >update</a><br>

    <a th:href="@{/user/logout}" rel="external nofollow"  rel="external nofollow"  rel="external nofollow" >退出登录</a>
</body>
</html>
<!DOCTYPE html>
<html lang="en" xmlns:th="http://www.thymeleaf.org">
<head>
    <meta charset="UTF-8">
    <title>add</title>
    <link rel="shortcut icon" type="image/x-icon" th:href="@{/img/favicon.ico}" rel="external nofollow"  rel="external nofollow"  rel="external nofollow"  rel="external nofollow"  rel="external nofollow" />
</head>
<body>
    <h1>add</h1><br>

    <a th:href="@{/user/logout}" rel="external nofollow"  rel="external nofollow"  rel="external nofollow" >退出登录</a>
</body>
</html>
<!DOCTYPE html>
<html lang="en" xmlns:th="http://www.thymeleaf.org">
<head>
    <meta charset="UTF-8">
    <title>update</title>
    <link rel="shortcut icon" type="image/x-icon" th:href="@{/img/favicon.ico}" rel="external nofollow"  rel="external nofollow"  rel="external nofollow"  rel="external nofollow"  rel="external nofollow" />
</head>
<body>
    <h1>update</h1><br>

    <a th:href="@{/user/logout}" rel="external nofollow"  rel="external nofollow"  rel="external nofollow" >退出登录</a>
</body>
</html>
<!DOCTYPE html>
<html lang="en" xmlns:th="http://www.thymeleaf.org" xmlns="http://www.w3.org/1999/html">
<head>
    <meta charset="UTF-8">
    <title>未授权</title>
    <link rel="shortcut icon" type="image/x-icon" th:href="@{/img/favicon.ico}" rel="external nofollow"  rel="external nofollow"  rel="external nofollow"  rel="external nofollow"  rel="external nofollow" />
</head>
<body>
    <p1>未授权,无法访问此页面</p1></br>
    <a th:href="@{/user/index}" rel="external nofollow" >回到上一页</a>
</body>
</html>
鉴于文章篇幅,这里只展示主要的逻辑代码
@Controller
@RequestMapping(path = "/user")
@Slf4j
public class UserController {

	@GetMapping(path = "/login")
    public String login() {
        return "login";
    }

    @GetMapping(path = "/index")
    public String index() {
        return "index";
    }

    @GetMapping(path = "/add")
    public String add() {
        return "add";
    }

    @GetMapping(path = "/update")
    public String update() {
        return "update";
    }

	// 未授权页面
    @GetMapping(path = "/unauthorized")
    public String unauthorized() {
        return "unauthorized";
    }

    // 用户登录
    @PostMapping(path = "/doLogin")
    @ResponseBody
    public ResultMap doLogin(@NotNull @Valid User user, @NotNull BindingResult bindingResult) {
        // ------参数校验------
        if (bindingResult.hasErrors()) {
            String message = Objects.requireNonNull(bindingResult.getFieldError()).getDefaultMessage();
            log.info("校验的message信息为:" + message);
            return new ResultMap().fail().message(message);
        }
        // 将用户名,密码交给shiro
        UsernamePasswordToken token = new UsernamePasswordToken(user.getUsername(), user.getPassword());
        String msg;
        try {
            // shiro帮我们匹配密码什么的,我们只需要把东西传给它,它会根据我们在UserRealm里认证方法设置的来验证
            Subject subject = SecurityUtils.getSubject();
            subject.login(token);
            return new ResultMap().success().action("/user/index");
        } catch (AuthenticationException e) {
            if (e instanceof IncorrectCredentialsException) {
                msg = "密码错误";
            } else if (e instanceof LockedAccountException) {
                msg = "用户被禁用";
            } else if (e instanceof UnknownAccountException) {
                msg = "用户不存在";
            } else {
                msg = "用户认证失败";
            }
        }
        return new ResultMap().error().message(msg);
    }

    // 用户退出登录
    @GetMapping(path = "/logout")
    public String logout() {
        SecurityUtils.getSubject().logout();
        return "login";
    }
}
在 contrller 的这些方法中,也可以使用 shiro 提供的一些注解来校验用户,认证用户。不过个人认为使用这些注解有点麻烦(因为有些注解会抛出异常,然后再 controller 层还要捕获异常),所以我在 ShiroConfig 配置类中进行了配置
启动项目,首先进入登录页面 login.html,如下

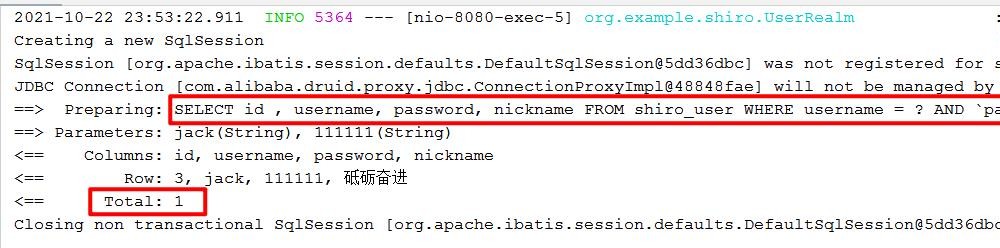
我们分别以数据库中的 {jack,111111} 和 {Tom,123123} 账号与密码进行测试
首先使用 {jack,111111} 来进行登录,如下

进入首页页面,如下

我们在接着查看控制台日志,如下
我们看到首页页面有两个超链接页面,以用户 jack 的身份分别进入两个页面。首先进入 add.html 页面,如下
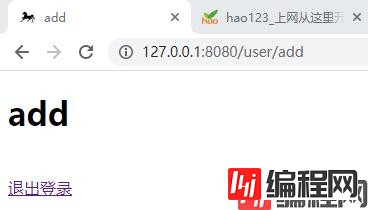
说明用户 jack 拥有访问 add.html 的权限,此时在查看控制台日志,如下
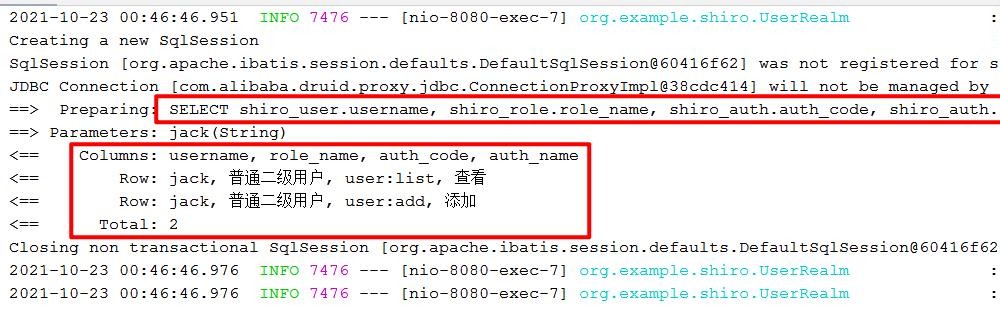
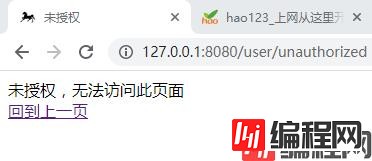
注意查看用户 jack 的数据,他的权限只有 user/add 和 user/list,是没有 user/update 权限的,也就是没有权限访问 update.html 页面的。可以验证,我们再以用户 jack 的身份进入 update.html 页面,如下
关于测试,到此为止。当然,依然可以使用其他的数据在进行测试
shiro 最为关键的就是 realm 了,继承 AuthorizingRealm,然后重写两个方法
在 controller 中的核心登录操作,就是将前端页面用户的登录数据(如账号,密码)交给 UsernamePasswordToken,然后使用当前的 Subject 对象调用 login(token) 方法即可,如下
// 将用户名,密码交给shiro
UsernamePasswordToken token = new UsernamePasswordToken(user.getUsername(), user.getPassword());

// shiro帮我们匹配密码什么的,我们只需要把东西传给它,它会根据我们在UserRealm里认证方法设置的来验证
Subject subject = SecurityUtils.getSubject();
subject.login(token);
源码:springboot-shiro
到此这篇关于springboot整合shiro的文章就介绍到这了,更多相关springboot整合shiro内容请搜索编程网以前的文章或继续浏览下面的相关文章希望大家以后多多支持编程网!
--结束END--
本文标题: springboot整合shiro的过程详解
本文链接: https://www.lsjlt.com/news/155458.html(转载时请注明来源链接)
有问题或投稿请发送至: 邮箱/279061341@qq.com QQ/279061341
下载Word文档到电脑,方便收藏和打印~
2024-03-01
2024-03-01
2024-03-01
2024-02-29
2024-02-29
2024-02-29
2024-02-29
2024-02-29
2024-02-29
2024-02-29
回答
回答
回答
回答
回答
回答
回答
回答
回答
回答


官方手机版

微信公众号

商务合作


0