目录Android内存泄漏常见场景以及解决方案资源性对象未关闭注册对象未注销类的静态变量持有大数据单例造成的内存泄漏非静态内部类的静态实例Handler临时性内存泄漏容器中的对象没清
本文主要探讨以下几个问题:
对于资源性对象不再使用时,应该立即调用它的close()函数,将其关闭,然后再置为null。例如Bitmap等资源未关闭会造成内存泄漏,此时我们应该在Activity销毁时及时关闭。
例如BraodcastReceiver、EventBus未注销造成的内存泄漏,我们应该在Activity销毁时及时注销。
对象尽量避免使用静态变量存储数据,特别是大数据对象,建议使用数据库存储。
优先使用Application的Context,如需使用Activity的Context,可以在传入Context时使用弱引用进行封装,然后,在使用到的地方从弱引用中获取Context,如果获取不到,则直接return即可。
该实例的生命周期和应用一样长,这就导致该静态实例一直持有该Activity的引用,Activity的内存资源不能正常回收。此时,我们可以将该内部类设为静态内部类或将该内部类抽取出来封装成一个单例,如果需要使用Context,尽量使用Application Context,如果需要使用Activity Context,就记得用完后置空让GC可以回收,否则还是会内存泄漏。
Message发出之后存储在MessageQueue中,在Message中存在一个target,它是Handler的一个引用,Message在Queue中存在的时间过长,就会导致Handler无法被回收。如果Handler是非静态的,则会导致Activity或者Service不会被回收。并且消息队列是在一个Looper线程中不断地轮询处理消息,当这个Activity退出时,消息队列中还有未处理的消息或者正在处理的消息,并且消息队列中的Message持有Handler实例的引用,Handler又持有Activity的引用,所以导致该Activity的内存资源无法及时回收,引发内存泄漏。解决方案如下所示:
1. 使用一个静态Handler内部类,然后对Handler持有的对象(一般是Activity)使用弱引用,这样在回收时,也可以回收Handler持有的对象。
2. 在Activity的Destroy或者Stop时,应该移除消息队列中的消息,避免Looper线程的消息队列中有待处理的消息需要处理。需要注意的是,AsyncTask内部也是Handler机制,同样存在内存泄漏风险,但其一般是临时性的。对于类似AsyncTask或是线程造成的内存泄漏,我们也可以将AsyncTask和Runnable类独立出来或者使用静态内部类。
在退出程序之前,将集合里的东西clear,然后置为null,再退出程序
WebView都存在内存泄漏的问题,在应用中只要使用一次WebView,内存就不会被释放掉。我们可以为WebView开启一个独立的进程,使用aiDL与应用的主进程进行通信,WebView所在的进程可以根据业务的需要选择合适的时机进行销毁,达到正常释放内存的目的。
在构造Adapter时,使用缓存的convertView。
//  leakcanary 添加支持库即可,只在debug下使用
debugImplementation 'com.squareup.leakcanary:leakcanary-android:2.3'
leakcanary 不需要初始化,用的是 ContentProvider!
ContentProvider.onCreate 方法比 Application.onCreate 更早执行。LeakCanary 源码的 Manifest.xml 里有声明ContentProvider,apk打包流程中会把所有的Manifest合并到app 的 Manifest 里,即APP就有了ContentProvider。
//	package="com.squareup.leakcanary.leaksentry"
  <application>
    <provider
        android:name="leakcanary.internal.LeakSentryInstaller"
        android:authorities="${applicationId}.leak-sentry-installer"
        android:exported="false"/>
  </application>
下面是初始化的代码
internal class LeakSentryInstaller : ContentProvider() {

  override fun onCreate(): Boolean {
    CanaryLog.logger = DefaultCanaryLog()
    val application = context!!.applicationContext as Application
     // 进行初始化工作,核心
    InternalLeakSentry.install(application)
    return true
  }
监听实现
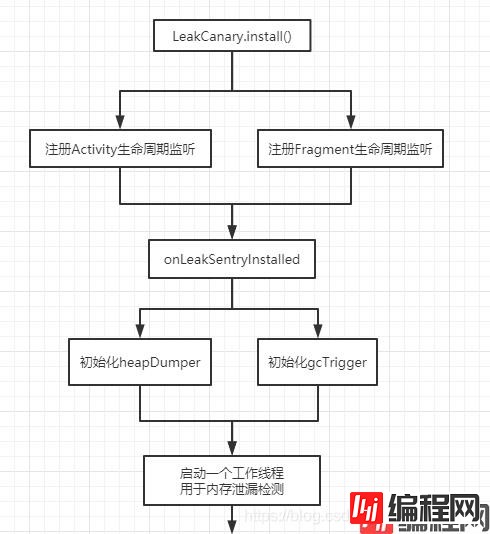
  fun install(application: Application) {
    CanaryLog.d("Installing LeakSentry")
    // 只能在主线程调用,否则会抛出异常
    checkMainThread()
    if (this::application.isInitialized) {
      return
    }
    InternalLeakSentry.application = application

    val configProvider = { LeakSentry.config }
    // 监听 Activity.onDestroy()
    ActivityDestroyWatcher.install(
        application, refWatcher, configProvider
    )
    // 监听 Fragment.onDestroy()
    FragmentDestroyWatcher.install(
        application, refWatcher, configProvider
    )
    // Sentry 哨兵
    listener.onLeakSentryInstalled(application)
  }
在了解监听过程前有必要了解下 ActivityLifecycleCallbacks 与 FragmentLifeCycleCallbacks
// ActivityLifecycleCallbacks 接口
public interface ActivityLifecycleCallbacks {
    void onActivityCreated(Activity var1, Bundle var2);

    void onActivityStarted(Activity var1);

    void onActivityResumed(Activity var1);

    void onActivityPaused(Activity var1);

    void onActivityStopped(Activity var1);

    void onActivitySaveInstanceState(Activity var1, Bundle var2);

    void onActivityDestroyed(Activity var1);
}
// FragmentLifecycleCallbacks 接口
public abstract static class FragmentLifecycleCallbacks {

    public void onFragmentCreated(FragmentManager fm, Fragment f, Bundle savedInstanceState) {}

    public void onFragmentViewDestroyed(FragmentManager fm, Fragment f) {}

    public void onFragmentDestroyed(FragmentManager fm, Fragment f) {}

    // 省略其他的生命周期 ...
  }
Application 类提供了 reGISterActivityLifecycleCallbacks 和 unregisterActivityLifecycleCallbacks 方法用于注册和反注册 Activity 的生命周期监听类,这样我们就能在 Application 中对所有的 Activity 生命周期回调中做一些统一处理。同理,FragmentManager 类提供了 registerFragmentLifecycleCallbacks 和 unregisterFragmentLifecycleCallbacks 方法用户注册和反注册 Fragment 的生命周期监听类,这样我们对每一个 Activity 进行注册,就能获取所有的 Fragment 生命周期回调。
下面是 ActivityDestroyWatcher 的实现,refWatcher 监听 activity 的 onActivityDestroyed
internal class ActivityDestroyWatcher private constructor(
  private val refWatcher: RefWatcher,
  private val configProvider: () -> Config
) {

  private val lifecycleCallbacks = object : ActivityLifecycleCallbacksAdapter() {
    override fun onActivityDestroyed(activity: Activity) {
      if (configProvider().watchActivities) {
        // 监听到 onDestroy() 之后,通过 refWatcher 监测 Activity
        refWatcher.watch(activity)
      }
    }
  }

  compaNIOn object {
    fun install(
      application: Application,
      refWatcher: RefWatcher,
      configProvider: () -> Config
    ) {
      val activityDestroyWatcher =
        ActivityDestroyWatcher(refWatcher, configProvider)
      // 注册 Activity 生命周期监听
      application.registerActivityLifecycleCallbacks(activityDestroyWatcher.lifecycleCallbacks)
    }
  }
}
如此一来Activity、Fragment在调用onDestroy时我们都能知道。讲道理,如果在调用onDestroy时被GC是正常的,如果没有被回收则是发生了内存泄漏,这是我们要处理的。那 refWatcher.watch(activity) 监听到销毁后怎么处理?
在读这块代码前举个栗子比较好理解:比如我们去科技中心面试
RefWatcher 的实现原理跟上面的栗子神似:
咱们先看下 refWatcher.watch(activity) 的实现
  @Synchronized fun watch(
    watchedReference: Any,
    referenceName: String
  ) {
    if (!isEnabled()) {
      return
    }
    // 移除队列中将要被 GC 的引用
    removeWeaklyReachableReferences()
    val key = UUID.randomUUID().toString()
    val watchUptimeMillis = clock.uptimeMillis()
    // 构建当前引用的弱引用对象,并关联引用队列 queue
    val reference = KeyedWeakReference(watchedReference, key, referenceName, watchUptimeMillis, queue)
    if (referenceName != "") {
      CanaryLog.d(
          "Watching instance of %s named %s with key %s", reference.className,
          referenceName, key
      )
    } else {
      CanaryLog.d(
          "Watching instance of %s with key %s", reference.className, key
      )
    }
    // 将引用存入 watchedReferences
    watchedReferences[key] = reference
    checkRetainedExecutor.execute {
      // 如果当前引用未被移除,仍在 watchedReferences  队列中,
      // 说明仍未被 GC,移入 retainedReferences 队列中,暂时标记为泄露
      moveToRetained(key)
    }
  }
分析上面这段代码都做了什么:
下面是细节分析 —》removeWeaklyReachableReferences() 逻辑
  private fun removeWeaklyReachableReferences() {
    // WeakReferences are enqueued as soon as the object to which they point to becomes weakly
    // reachable. This is before finalization or garbage collection has actually happened.
    // 弱引用一旦变得弱可达,就会立即入队。这将在 finalization 或者 GC 之前发生。
    var ref: KeyedWeakReference?
    do {
      // 队列 queue 中的对象都是会被 GC 的
      ref = queue.poll() as KeyedWeakReference?
      //说明被释放了
      if (ref != null) {
        val removedRef = watchedReferences.remove(ref.key)//获取被释放的引用的key
        if (removedRef == null) {
          retainedReferences.remove(ref.key)
        }
        // 移除 watchedReferences 队列中的会被 GC 的 ref 对象,剩下的就是可能泄露的对象
      }
    } while (ref != null)
  }
removeWeaklyReachableReferences 函数会根据 ReferenceQueue 出来的 KeyedWeakReference 的 key 移除 watchedReferences(观察队列)和 retainedReferences(怀疑队列)中的引用,即把已经释放的移出,剩下的是内存泄漏的
moveToRetained(key) 逻辑实现
  @Synchronized private fun moveToRetained(key: String) {
    // 再次调用,防止遗漏
    removeWeaklyReachableReferences()
    val retainedRef = watchedReferences.remove(key)
    //说明可能存在内存泄漏
    if (retainedRef != null) {
      retainedReferences[key] = retainedRef
      onReferenceRetained()
    }
  }
此函数的作用:
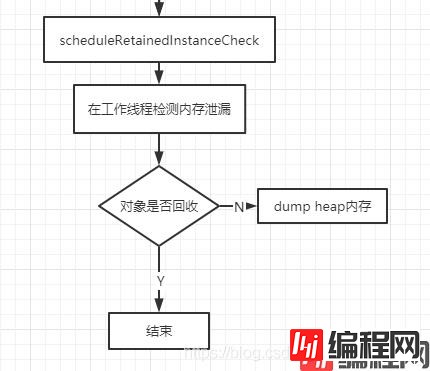
下面是 checkRetainedInstances 的具体实现
  private fun checkRetainedInstances(reason: String) {
    CanaryLog.d("Checking retained instances because %s", reason)
    val config = configProvider()
    // A tick will be rescheduled when this is turned back on.
    if (!config.dumpHeap) {
      return
    }

    var retainedKeys = refWatcher.retainedKeys

    // 当前泄露实例个数小于 5 个,不进行 heap dump
    if (checkRetainedCount(retainedKeys, config.retainedVisibleThreshold)) return

    if (!config.dumpHeapWhenDebugging && DebuggerControl.isDebuggerAttached) {
      showRetainedCountWithDebuggerAttached(retainedKeys.size)
      scheduleRetainedInstanceCheck("debugger was attached", WAIT_FOR_DEBUG_MILLIS)
      CanaryLog.d(
          "Not checking for leaks while the debugger is attached, will retry in %d ms",
          WAIT_FOR_DEBUG_MILLIS
      )
      return
    }

    // 可能存在被观察的引用将要变得弱可达,但是还未入队引用队列。
    // 这时候应该主动调用一次 GC,可能可以避免一次 heap dump
    gcTrigger.runGc()

    retainedKeys = refWatcher.retainedKeys

    if (checkRetainedCount(retainedKeys, config.retainedVisibleThreshold)) return

    HeapDumpMemoryStore.setRetainedKeysForHeapDump(retainedKeys)

    CanaryLog.d("Found %d retained references, dumping the heap", retainedKeys.size)
    HeapDumpMemoryStore.heapDumpUptimeMillis = SystemClock.uptimeMillis()
    dismissNotification()
    val heapDumpFile = heapDumper.dumpHeap() // AndroidHeapDumper
    if (heapDumpFile == null) {
      CanaryLog.d("Failed to dump heap, will retry in %d ms", WAIT_AFTER_DUMP_FAILED_MILLIS)
      scheduleRetainedInstanceCheck("failed to dump heap", WAIT_AFTER_DUMP_FAILED_MILLIS)
      showRetainedCountWithHeapDumpFailed(retainedKeys.size)
      return
    }

    refWatcher.removeRetainedKeys(retainedKeys) // 移除已经 heap dump 的 retainedKeys

    HeapAnalyzerService.runAnalysis(application, heapDumpFile) // 分析 heap dump 文件
  }

到此这篇关于Android 进阶实现性能优化之OOM与Leakcanary详解原理的文章就介绍到这了,更多相关Android 性能优化内容请搜索编程网以前的文章或继续浏览下面的相关文章希望大家以后多多支持编程网!
--结束END--
本文标题: Android 进阶实现性能优化之OOM与Leakcanary详解原理
本文链接: https://www.lsjlt.com/news/156123.html(转载时请注明来源链接)
有问题或投稿请发送至: 邮箱/279061341@qq.com QQ/279061341
下载Word文档到电脑,方便收藏和打印~
2024-01-21
2023-10-28
2023-10-28
2023-10-27
2023-10-27
2023-10-27
2023-10-27
回答
回答
回答
回答
回答
回答
回答
回答
回答
回答


官方手机版

微信公众号

商务合作


0