背景: 本人在一位大佬的Colder框架中看到了这个接口注入,然后呢就想学习一下ioc思想与di设计模式。此写法给我的感觉就是 非常的 优雅 ,优雅永不过时。关于接口注入具体是什
本人在一位大佬的Colder框架中看到了这个接口注入,然后呢就想学习一下ioc思想与di设计模式。此写法给我的感觉就是
非常的 优雅 ,优雅永不过时。关于接口注入具体是什么可以最后推荐的地址。话不多说,开撸。
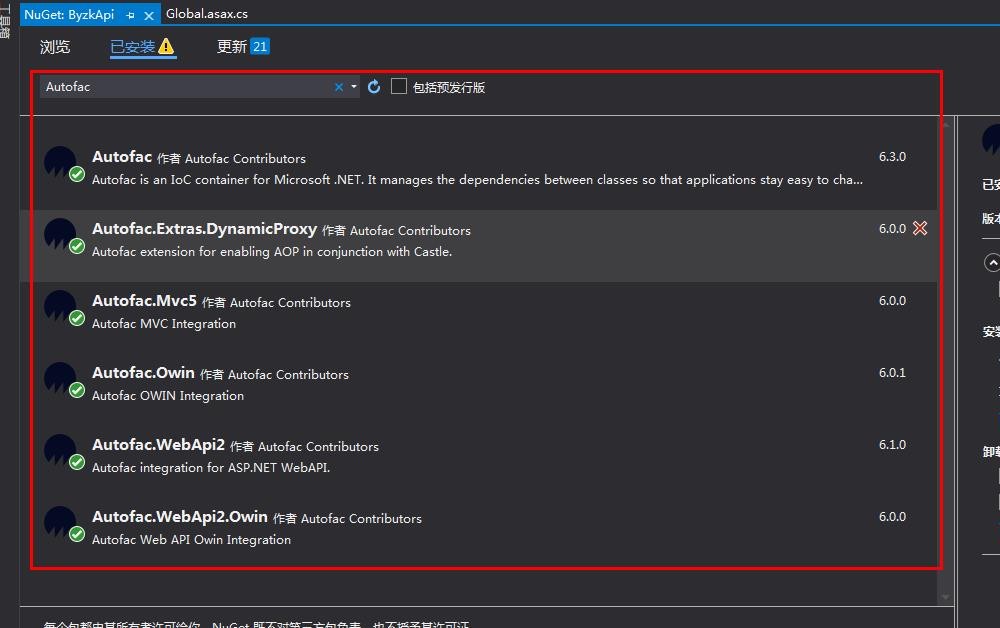
打开nuget管理工具,将我下面标红色的包都进行安装(注:千万别安装错了,按照名字不差的安装)
我们新建一个DI的文件夹,在文件夹中增加一个接口:IDependency.cs
namespace Coldairarrow
{
    /// <summary>
    /// 注入标记
    /// </summary>
    public interface IDependency
    {

    }
}
先不要问问什么后面会解释。
后面:其实。。就是这个依赖注入的一个原理吧。根据这个接口去找依赖的实现。
推荐去这个地址看一下:https://www.jb51.net/article/206284.htm
好了,继续分别新建Student.cs,StudentRepository.cs,IStudentRepository.cs三个类。StudentRepository.cs里面的具体业务根据需要自行修改,这里是为了测试使用。
using System;
using System.Collections.Generic;
using System.Linq;
using System.WEB;

namespace Byzkapi
{
    public  class Student
    {
        public int Id { get; set; }
        public string Name { get; set; }
        public string Graduation { get; set; }
        public string School { get; set; }
        public string Major { get; set; }
    }
}
using Coldairarrow;
using System;
using System.Collections.Generic;
using System.Linq;
using System.Web;

namespace ByzkApi
{
    public class StudentRepository : IStudentRepository,IDependency
    {
        public Student Add(Student item)
        {
            throw new NotImplementedException();
        }

        public bool Delete(int id)
        {
            throw new NotImplementedException();
        }

        public Student Get(int id)
        {
            return new Student() { Name = "张三" };
        }

        public IEnumerable<Student> GetAll()
        {
            throw new NotImplementedException();
        }

        public bool Update(Student item)
        {
            throw new NotImplementedException();
        }
    }
}
using System;
using System.Collections.Generic;
using System.Linq;
using System.Text;
using System.Threading.Tasks;

namespace ByzkApi
{
    public interface IStudentRepository
    {
        IEnumerable<Student> GetAll();
        Student Get(int id);
        Student Add(Student item);
        bool Update(Student item);
        bool Delete(int id);

    }
}
注意:这里好好看一下StudentRepository 是实现了两个接口分别是 IStudentRepositoryIDependency(注入标记)
最关键的地方来了,我们打开项目启动的函数Application_Start,然后注入一下接口依赖。
using Autofac;
using Autofac.Extras.DynamicProxy;
using Autofac.Integration.mvc;
using Autofac.Integration.webapi;
using ByzkApi.Controllers;
using ByzkApi.Interface;
using Coldairarrow;
using Microsoft.Extensions.DependencyInjection;
using System.Linq;
using System.Reflection;
using System.Web.Compilation;
using System.Web.Http;
using System.Web.Mvc;
using System.Web.Optimization;
using System.Web.Routing;

namespace ByzkApi
{
    public class WebApiApplication : System.Web.HttpApplication
    {
        protected void Application_Start()
        {
            //初始化Autofac
            InitAutofac(GlobalConfiguration.Configuration);


            AreaReGIStration.RegisterAllAreas();
            GlobalConfiguration.Configure(WebApiConfig.Register);
            FilterConfig.RegisterGlobalFilters(GlobalFilters.Filters);
            RouteConfig.RegisterRoutes(RouteTable.Routes);
            BundleConfig.RegisterBundles(BundleTable.Bundles);
        }


        private void InitAutofac(HttpConfiguration config)
        {
            var builder = new ContainerBuilder();


            var baseType = typeof(IDependency);

            //可以进行筛选如: Where(x => x.FullName.Contains("Coldairarrow"))
            var assemblys = BuildManager.GetReferencedAssemblies().Cast<Assembly>()
                .ToList();

            //自动注入IDependency接口,支持aop,生命周期为InstancePerDependency
            builder.RegisterAssemblyTypes(assemblys.ToArray())
                .Where(x => baseType.IsAssignableFrom(x) && x != baseType)
                .AsImplementedInterfaces()
                .PropertiesAutowired()
                .InstancePerDependency()
                .EnableInterfaceInterceptors()
                .InterceptedBy(typeof(Interceptor));

            //注册Controller
            builder.RegisterControllers(assemblys.ToArray())
                .PropertiesAutowired();
            builder.RegisterApiControllers(assemblys.ToArray()).PropertiesAutowired();

            //AOP
            builder.RegisterType<Interceptor>();
            builder.RegisterWebApiFilterProvider(config);

            var container = builder.Build();
            DependencyResolver.SetResolver(new AutofacDependencyResolver(container));
            var resolver = new AutofacWebApiDependencyResolver(container);
            GlobalConfiguration.Configuration.DependencyResolver = resolver;
            AutofacHelper.Container = container;
        }

    }
}
到此为止就已经注入完成了~
这个接口注入好了之后可以在普通的Controller使用,也可以在apiController进行使用,分别看一下效果,结束。
Controller:
using System;
using System.Collections.Generic;
using System.Linq;
using System.Web;
using System.Web.Mvc;

namespace ByzkApi.Controllers
{
    public class HomeController : Controller
    {
        readonly IStudentRepository repository;
        //构造器注入
        public HomeController(IStudentRepository repository)
        {
            this.repository = repository;
        }


        public ActionResult Index()
        {

            var a = repository.Get(1);

            ViewBag.Title = a.Name;

            return View();
        }
    }
}
ApiController:(如果想要多个接口只需要实现接口的时候进行继承IDependency就可)
using ByzkApi.Interface;
using Coldairarrow.Web;
using System;
using System.Collections.Generic;
using System.Data;
using System.Linq;
using System.Web;
using System.Web.Http;

namespace ByzkApi.Controllers
{
    public class TestApiController : ApiController
    {
        readonly IStudentRepository repository;

        public ITest _test { get; }
        //构造器注入
        public TestApiController(IStudentRepository repository, ITest test)
        {
            this.repository = repository;
            _test = test;
        }

        [HttpGet]
        public DataTable test(string sql)
        {
            repository.Get(1);
            var data = _test.GetTest("sql 语句");
            //repository.GetTest(sql);
            return data;
        }
    }
}
到此这篇关于C# 利用Autofac批量接口注入依赖的文章就介绍到这了,更多相关C# Autofac批量注入内容请搜索编程网以前的文章或继续浏览下面的相关文章希望大家以后多多支持编程网!
--结束END--
本文标题: C# 利用Autofac批量接口注入依赖的问题小结
本文链接: https://www.lsjlt.com/news/161028.html(转载时请注明来源链接)
有问题或投稿请发送至: 邮箱/279061341@qq.com QQ/279061341
下载Word文档到电脑,方便收藏和打印~
2024-03-01
2024-03-01
2024-02-29
2024-02-29
2024-02-29
2024-02-29
2024-02-29
2024-02-29
2024-02-29
2024-02-29
回答
回答
回答
回答
回答
回答
回答
回答
回答
回答


官方手机版

微信公众号

商务合作


0