目录图例1.选择图片2.预览图片2.1添加图片预览代码 两种方法的对比3.裁剪图片4.上传选择图片 -> 预览图片 -> 裁剪图片 -> 上传图片 我会以
选择图片 -> 预览图片 -> 裁剪图片 -> 上传图片
我会以事例贯穿图片接下来,就详细的介绍每个步骤具体实现。
选择图片有什么好讲的呢?不就一个 input[type=file] ,然后点击就可以了吗?确实是这样的,但是,我们想要做得更加的友好一些,比如需要过滤掉非图片文件, 或只允许从摄像头拍照获取图片等,还是需要进行一些简单配置的。
下面就先来看看最简单的选择文件:
<input type="file" />上面可以查看到非图片类型的文件,这并不是我们想要的结果,毕竟我们只想要图片类型。可以通过 accept 属性来实现,如下:
<input type="file" accept="image/*">这样就可以过滤掉非图片类型了。但是图片的类型可能也太多了, 有些可能服务器不支持,所以,如果想保守一些,只允许 jpg 和 png 类型,可以写成这样:
<input type="file" accept="image/jpg, image/jpeg, image/png">或这样
<input type="file" accept=".jpg, .jpeg, .jpg">OK, 过滤非图片的需求搞定了。但是有时候 ,产品还要求只能从摄像头采集图片,比如需要上传证件照,防止从网上随便找别人的证件上传,那capture 属性就可以派上用场了:
<input type="file" accept="image/*" capture>这时候,就不能从文件系统中选择照片了,只能从摄像头采集。到了这一步,可能觉得很完美了,但是还有个问题,可能有些变态产品要求默认打开前置摄像头采集图片,比如就是想要你的自拍照片。 capture 默认调用的是后置摄像头。默认启用前置摄像头可以设置 capture="user" ,如下:
<input type="file" accept="image/*" capture="user">好啦,关于选择图片的就讲么这么多了,有个注意的地方是,可能有些配置在兼容性上会有一些问题,所以需要在不同的机型上测试一下看看效果。
下面再来谈谈预览图片的实现。
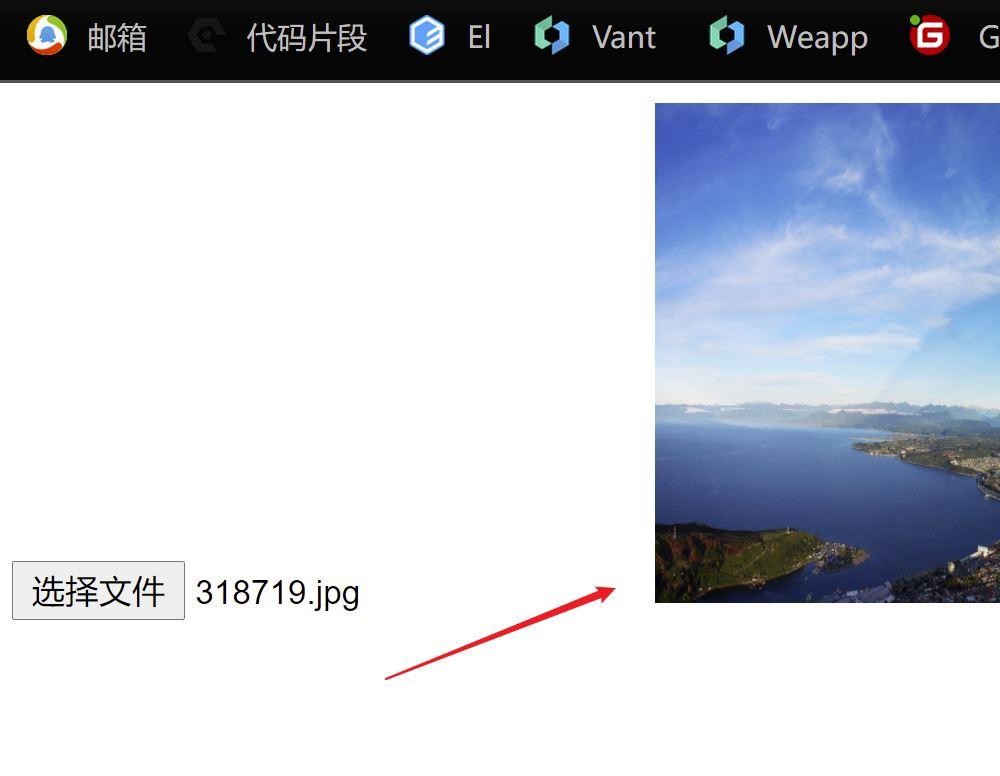
不使用图片预览,点击上传图片后无法查看 例如下图:我重新换了图片,图片路径变了,但图片没变
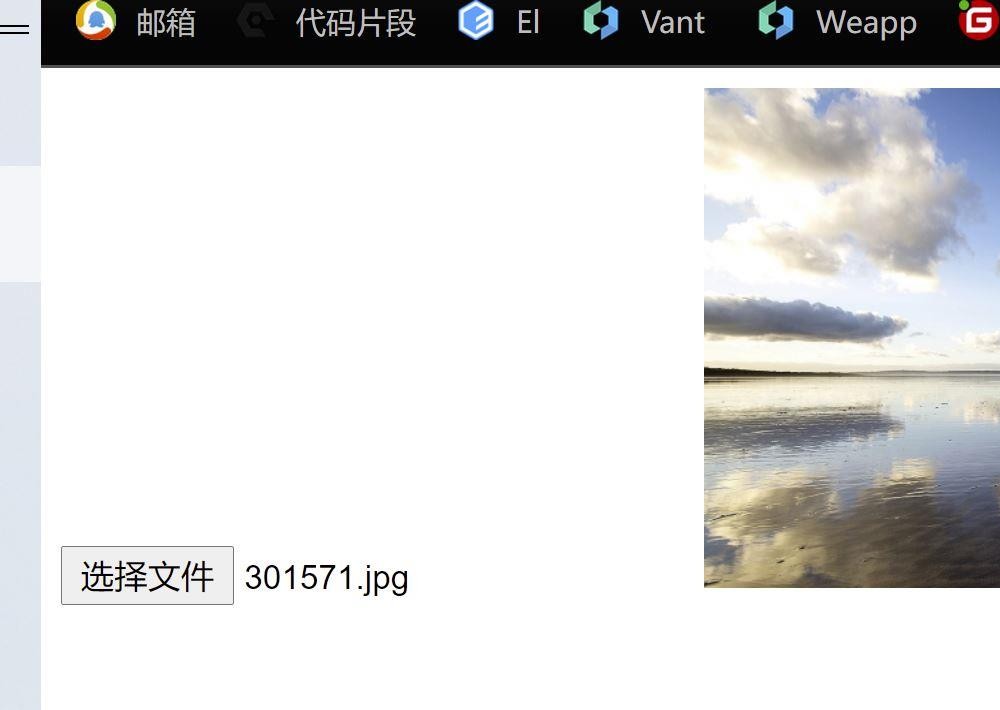
图片变了可以预览查看
源码1: 使用 URL.createObjectURL 预览
<!DOCTYPE html>
<html lang="en">

<head>
    <meta charset="UTF-8">
    <meta Http-equiv="X-UA-Compatible" content="IE=edge">
    <meta name="viewport" content="width=device-width, initial-scale=1.0">
    <title>Document</title>
    <style>
        img {
            width: 300px;
            height: 200px;
        }
    </style>
</head>

<body>
    <fORM action="" method="get">
        <input id="inputFile" type="file" accept="image/*">
        <img src="./301571.jpg" id="previewImage" alt="图片预览" title="活在风浪里...">
    </form>
    <!-- 图片预览 -->
    <script>
        const $ = document.getElementById.bind(document);
        const $inputFile = $('inputFile');
        const $previewImage = $('previewImage');
        $inputFile.addEventListener('change', function() {
            const file = this.files[0];
            $previewImage.src = file ? URL.createObjectURL(file) : '';
        }, this);
    </script>

</body>

</html>
源码2:使用 FileReader 预览
<!DOCTYPE html>
<html lang="en">

<head>
    <meta charset="UTF-8">
    <meta http-equiv="X-UA-Compatible" content="IE=edge">
    <meta name="viewport" content="width=device-width, initial-scale=1.0">
    <title>Document</title>
    <style>
        img {
            width: 300px;
            height: 200px;
        }
    </style>
</head>

<body>
    <form action="" method="get">
        <input id="inputFile" type="file" accept="image/*">
        <img src="./301571.jpg" id="previewImage" alt="图片预览">
    </form>
    <!-- 图片预览 -->

    <script>
        const $ = document.getElementById.bind(document);
        const $inputFile = $('inputFile');
        const $previewImage = $('previewImage');
        $inputFile.addEventListener('change', function() {
            const file = this.files[0];
            const reader = new FileReader();
            reader.addEventListener('load', function() {
                $previewImage.src = reader.result;
            }, false);

            if (file) {
                reader.readAsDataURL(file);
            }
        }, false)
    </script>


</body>

</html>预览图片总结:
我个人更加倾向于使用 URL.createObjectURL() 。主要原先它的 api 简洁,同步读取,并且他返回的是一个 URL ,比 FileReaer 返回的base64 更加精简。兼容性上,两者都差不多,都是在 WD 的阶段。性能上的对比, 在 chrome 上, 选择了一张 2M 的图片, URL.createObjectURL() 用时是 0 , 而 FileReader 用时 20ms 左右。 0 感觉不太合理,虽然这个方法立刻就会返回一个 URL ,但是我猜测实际上这个 URL 指定的内容还没有生成好,应该是异步生成的,然后才渲染出来的。所以并没有很好的办法来对比他们的性能。
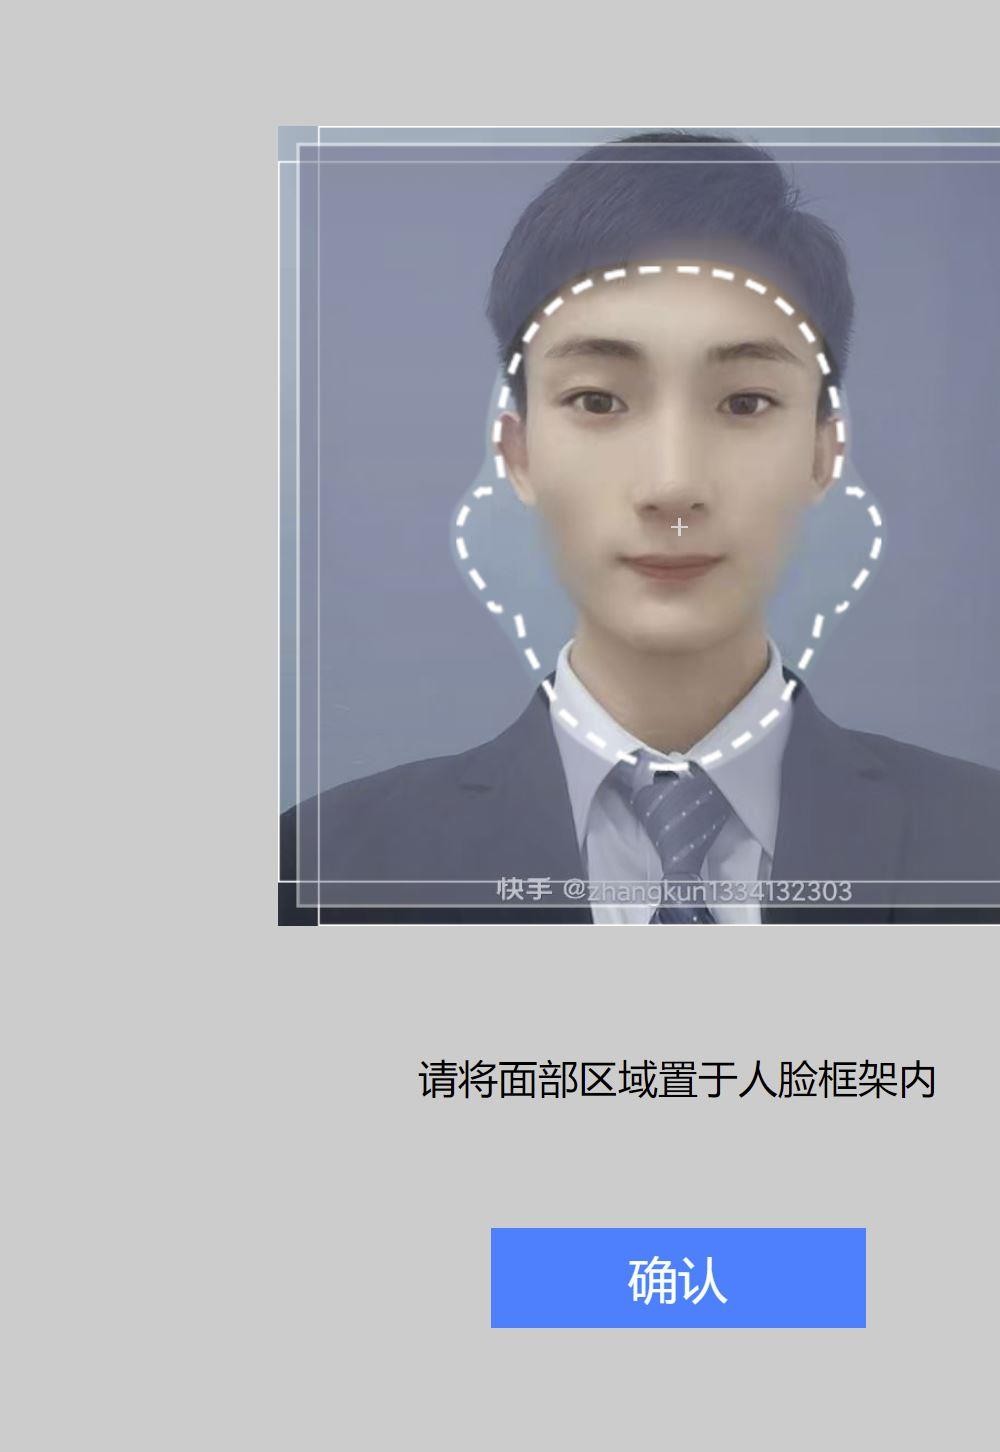
关于图片的裁剪,很自然的会想到使用 canvas ,确实是要通过 canvas, 但是如果全部我们自己来实现,可能需要做比较多的工作,所以为了省力,我们可以站在巨人的肩膀上。比较优秀的图片裁剪库是cropperjs , 该库可以对图片进行缩放、移动和旋转。随后会持续更新canvas,(我也在学..永远保持谦逊,人外人天外天,拒绝凡尔赛 )
cropperjs 的详细配置这里就不展开了 ,需要的可以自己去看文档就好。下面我们就以这个库为基础,实现一个裁剪人脸的例子:
源码: 当然这个只是简单的写下,为了写博客在电脑操作小伙伴要自行查看下移动端兼容
<!DOCTYPE html>
<html lang="en">

<head>
    <meta charset="UTF-8">
    <meta http-equiv="X-UA-Compatible" content="IE=edge">
    <meta name="viewport" content="width=device-width, initial-scale=1.0">
    <title>Document</title>
    <link rel="stylesheet" href="https://cdnjs.cloudflare.com/ajax/libs/cropperjs/1.5.6/cropper.min.CSS">
    <script src="https://cdnjs.cloudflare.com/ajax/libs/cropperjs/1.5.6/cropper.min.js"></script>
    <style>
        .preview-image,
        .cropper-image {
            max-width: 100%;
        }

        .cropper {
            display: none;
            position: absolute;
            top: 0;
            right: 0;
            bottom: 0;
            left: 0;
            background: #ccc;
            font-size: 0.27rem;
            text-align: center;
        }

        .inner {
            height: 100%;
            display: flex;
            flex-direction: column;
            justify-content: center;
            align-items: center;
        }

        .face-container {
            position: relative;
            width: 320px;
            height: 320px;
            margin: 50px auto;
        }

        .cropper-modal {
            background: url('https://ok.166.net/gameyw-misc/opd/squash/20191028/152551-m37snfsyu1.png') center no-repeat;
            background-size: 100% 100%;
            opacity: 1;
        }

        .cropper-bg {
            background: none;
        }

        .cropper-view-box {
            opacity: 0;
        }

        .tips {
            font-size: 16px;
        }

        .toolbar {
            display: flex;
            justify-content: center;
            margin: 50px 0;
        }

        .btn {
            width: 150px;
            line-height: 40px;
            font-size: 20px;
            text-align: center;
            color: #fff;
            background: #007fff;
        }
    </style>


</head>

<body>
    <form name="input" action="html_form_action.PHP" method="get">
        <input id="inputFile" type="file" accept="image/*">
        <img class="preview-image" id="previewImage" src="" alt="">
        <!-- cropper裁剪框 -->
        <div class="cropper" id="cropper">
            <div class="inner">
                <div class="face-container">
                    <img class="cropper-image" id="cropperImage">
                </div>
                <div class="tips">请将面部区域置于人脸框架内</div>
                <div class="toolbar">
                    <div class="btn" id="confirm">确认</div>
                </div>
            </div>
        </div>
    </form>
</body>
<script>
    const $ = document.getElementById.bind(document);
    const $cropper = $('cropper');
    const $inputFile = $('inputFile');
    const $previewImage = $('previewImage');
    const $cropperImage = $('cropperImage');
    const $confirmBtn = $('confirm')
    let cropperInstance = null;

    // 选择图片后,显示图片裁剪框
    $inputFile.addEventListener('change', function() {
        const file = this.files[0];
        if (!file) return;
        $cropperImage.src = URL.createObjectURL(file);
        showCropper();
    }, false);

    // 点击确认按钮,将裁剪好的图片放到 img 标签显示。
    $confirmBtn.addEventListener('click', function() {
        const url = cropperInstance.getCroppedCanvas().toDataURL("image/jpeg", 1.0);
        $cropper.style.display = 'none';
        $previewImage.src = url;
    }, false);


    function showCropper() {
        $cropper.style.display = 'block';
        cropperInstance && cropperInstance.destroy();
        cropperInstance = new Cropper($cropperImage, {
            viewMode: 1,
            aspectRatio: 1,
            autoCropArea: 1,
            dragMode: 'move',
            guides: false,
            highlight: false,
            cropBoxMovable: false,
            cropBoxResizable: false
        });
    }
</script>
</html>前面的操作已经完成了图片上传前的准备,包括选择图片、预览图片、编辑图片等,那接下来就可以上传图片了。上面的例子中,使用了 cropperInstance.getCroppedCanvas() 方法来获取到对应的 canvas 对象 。有了 canvas 对象就好办了,因为 canvas.toBlob() 方法可以取得相应的 Blob 对象,然后,我们就可以把这个 Blob 对象添加到 FromData 进行无刷新的提交了。大概的代码如下:
  change(e) {
      // 1.手写的input需要一个对象将本地图片转换为对应的格式来上传
      let formData = new FormData();

      //2. e.target.files就是选中的图片的一个
      formData.append("file", e.target.files[0]);

      // 3. 将formData这个对象传给修改头像的接口
      updateImg(formData).then((res) => {
        //4.此时已经传到修改头像接口了
        //4.1 传到修改头像的接口后 , 在更新接口中  再次更新头像属性

        update({ avatar: res.data.path });

        //存到本地 //info是本地存储点击头像获取的个人信息,在此页面初始调用本地存储数据,
    //这里赋值info对象,因为上面渲染头像用的是本地,所以(修改后端图片路径,重新调用后端更新接口后),
//还要重新赋值本地存储,才能后端变化.本地页面,因为是点击头像进入修改页,才存储的数据,不会随后端更新,
//所以还要重新赋值本地存储
        this.info.avatar = res.data.path;
        localStorage.setItem("userInfo-Avatar", JSON.stringify(this.info));
        this.show2 = false;
      });
    },
浪哥tips: 如果在移动端,有的手机会检测自动校正角度,导致有些角度不对可以使用 CSS 的 transfrom: rotate(-90deg) 顺时针旋转 90 度抵消掉这个角度就好。
到此这篇关于Vue项目实现HTML5图片上传的示例代码的文章就介绍到这了,更多相关Vue html5图片上传内容请搜索编程网以前的文章或继续浏览下面的相关文章希望大家以后多多支持编程网!
--结束END--
本文标题: Vue项目实现html5图片上传的示例代码
本文链接: https://www.lsjlt.com/news/162291.html(转载时请注明来源链接)
有问题或投稿请发送至: 邮箱/279061341@qq.com QQ/279061341
下载Word文档到电脑,方便收藏和打印~
2024-01-12
2023-05-20
2023-05-20
2023-05-20
2023-05-20
2023-05-20
2023-05-20
2023-05-20
2023-05-20
2023-05-20
回答
回答
回答
回答
回答
回答
回答
回答
回答
回答


官方手机版

微信公众号

商务合作


0