Python 官方文档:入门教程 => 点击学习
入口 相关逻辑的入口是listener类:ConfigFileApplicationListener,当容器广播器触发ApplicationEnvironmentPreparedEv
入口
相关逻辑的入口是listener类:ConfigFileApplicationListener,当容器广播器触发ApplicationEnvironmentPreparedEvent事件时,ConfigFileApplicationListener会收到广播器的通知,进而执行onApplicationEnvironmentPreparedEvent方法
入口处代码:
	@Override
	public void onApplicationEvent(ApplicationEvent event) {
		if (event instanceof ApplicationEnvironmentPreparedEvent) {
			onApplicationEnvironmentPreparedEvent((ApplicationEnvironmentPreparedEvent) event);
		}
		if (event instanceof ApplicationPreparedEvent) {
			onApplicationPreparedEvent(event);
		}
	}
接下来onApplicationEnvironmentPreparedEvent方法会加载容器中的EnvironmentPostProcessor并进行遍历,调用他们的postProcessEnvironment方法,我们可以看一下此时的PostProcessor有哪些:
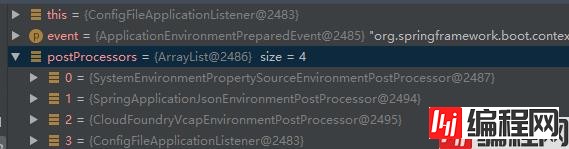
我们发现ConfigFileApplicationListener本身也是其中一个PostProcessor :)
我们直接进入ConfigFileApplicationListener的postProcessEnvironment方法,它会调用一个addPropertySources方法
	protected void addPropertySources(ConfigurableEnvironment environment, ResourceLoader resourceLoader) {
		RandomValuePropertySource.addToEnvironment(environment);
		new Loader(environment, resourceLoader).load();
	}
随机属性值部分暂且不表,我们看下loader.load方法
		public void load() {
			this.profiles = new LinkedList<>();
			this.processedProfiles = new LinkedList<>();
			this.activatedProfiles = false;
			this.loaded = new LinkedHashMap<>();
			initializeProfiles();
			while (!this.profiles.isEmpty()) {
				Profile profile = this.profiles.poll();
				if (profile != null && !profile.isDefaultProfile()) {
					addProfileToEnvironment(profile.getName());
				}
				load(profile, this::getPositiveProfileFilter, addToLoaded(MutablePropertySources::addLast, false));
				this.processedProfiles.add(profile);
			}
			resetEnvironmentProfiles(this.processedProfiles);
			load(null, this::getNegativeProfileFilter, addToLoaded(MutablePropertySources::addFirst, true));
			addLoadedPropertySources();
		}
load方法的重点逻辑-initializeProfiles()
private void initializeProfiles() {
// The default profile for these purposes is represented as null. We add it
// first so that it is processed first and has lowest priority.
this.profiles.add(null);
Set<Profile> activatedViaProperty = getProfilesActivatedViaProperty();
this.profiles.addAll(getOtherActiveProfiles(activatedViaProperty));
// Any pre-existing active profiles set via property sources (e.g.
// System properties) take precedence over those added in config files.
addActiveProfiles(activatedViaProperty);
if (this.profiles.size() == 1) { // only has null profile
for (String defaultProfileName : this.environment.getDefaultProfiles()) {
Profile defaultProfile = new Profile(defaultProfileName, true);
this.profiles.add(defaultProfile);
}
}
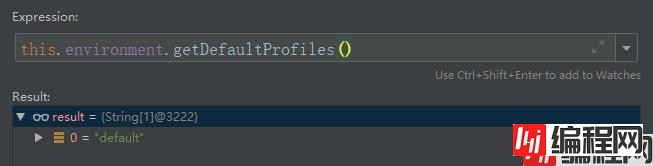
}add(null) 可以处理application.properties/yml,接下来getProfilesActivatedViaProperty方法会从spring.profiles.active和spring.profiles.include配置中读取激活的profile~(这两者也是相对常用的配置);再接下来会判断profiles大小是否为1,是的话会添加一个default profile,如图所示:
这也解释了为什么spring.profiles.default必须定义在其他属性源(命令行启动参数),因为这时候分散文件属性元还没有被解析到!
回到load方法,如果profiles不为空,就会进行while遍历,对其调用另外一个load方法:
(load-number2方法):
		private void load(Profile profile, DocumentFilterFactory filterFactory, DocumentConsumer consumer) {
			getSearchLocations().forEach((location) -> {
				boolean isFolder = location.endsWith("/");
				Set<String> names = isFolder ? getSearchNames() : NO_SEARCH_NAMES;
				names.forEach((name) -> load(location, name, profile, filterFactory, consumer));
			});
		}
我们可以看到还会调用到另一个load方法
(load-number3方法):
private void load(String location, String name, Profile profile, DocumentFilterFactory filterFactory,
		DocumentConsumer consumer) {
	if (!StringUtils.hasText(name)) {
		for (PropertySourceLoader loader : this.propertySourceLoaders) {
			if (canLoadFileExtension(loader, location)) {
				load(loader, location, profile, filterFactory.getDocumentFilter(profile), consumer);
				return;
			}
		}
	}
	Set<String> processed = new HashSet<>();
	for (PropertySourceLoader loader : this.propertySourceLoaders) {
		for (String fileExtension : loader.getFileExtensions()) {
			if (processed.add(fileExtension)) {
				loadForFileExtension(loader, location + name, "." + fileExtension, profile, filterFactory,
						consumer);
			}
		}
	}
}
这里的propertySourceLoaders包括:
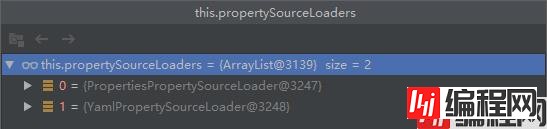
是不是很熟悉?这就是properties和yaml分别对应的PropertySourceLoader~
下面代码会调用loadForFileExtension方法,而这个方法又会调用新的load方法(?):
(load-number4方法):
private void load(PropertySourceLoader loader, String location, Profile profile, DocumentFilter filter,
		DocumentConsumer consumer) {
	try {
		Resource resource = this.resourceLoader.getResource(location);
		if (resource == null || !resource.exists()) {
			if (this.logger.isTraceEnabled()) {
				StringBuilder description = getDescription("Skipped missing config ", location, resource,
						profile);
				this.logger.trace(description);
			}
			return;
		}
		if (!StringUtils.hasText(StringUtils.getFilenameExtension(resource.getFilename()))) {
			if (this.logger.isTraceEnabled()) {
				StringBuilder description = getDescription("Skipped empty config extension ", location,
						resource, profile);
				this.logger.trace(description);
			}
			return;
		}
		String name = "applicationConfig: [" + location + "]";
		List<Document> documents = loadDocuments(loader, name, resource);
		if (CollectionUtils.isEmpty(documents)) {
			if (this.logger.isTraceEnabled()) {
				StringBuilder description = getDescription("Skipped unloaded config ", location, resource,
						profile);
				this.logger.trace(description);
			}
			return;
		}
		List<Document> loaded = new ArrayList<>();
		for (Document document : documents) {
			if (filter.match(document)) {
				addActiveProfiles(document.getActiveProfiles());
				addIncludedProfiles(document.getIncludeProfiles());
				loaded.add(document);
			}
		}
		Collections.reverse(loaded);
		if (!loaded.isEmpty()) {
			loaded.forEach((document) -> consumer.accept(profile, document));
			if (this.logger.isDebugEnabled()) {
				StringBuilder description = getDescription("Loaded config file ", location, resource, profile);
				this.logger.debug(description);
			}
		}
	}
	catch (Exception ex) {
		throw new IllegalStateException("Failed to load property " + "source from location '" + location + "'",
				ex);
	}
}
这个方法会读取application-profile.properties/yaml文件,并加载文件内激活的profile(如果有的话)
到这里已经读取到了所有的配置信息,主逻辑大概结束了,还差最后一个步骤:addLoadedPropertySources:
		private void addLoadedPropertySources() {
			MutablePropertySources destination = this.environment.getPropertySources();
			List<MutablePropertySources> loaded = new ArrayList<>(this.loaded.values());
			Collections.reverse(loaded);
			String lastAdded = null;
			Set<String> added = new HashSet<>();
			for (MutablePropertySources sources : loaded) {
				for (PropertySource<?> source : sources) {
					if (added.add(source.getName())) {
						addLoadedPropertySource(destination, lastAdded, source);
						lastAdded = source.getName();
					}
				}
			}
		}
这里会将所有属性加入到“destination”,即environment.getPropertySources(),到这里,加载配置属性的逻辑就完成了。
到此这篇关于Spring Boot常用功能Profile详解的文章就介绍到这了,更多相关Spring Boot Profile内容请搜索编程网以前的文章或继续浏览下面的相关文章希望大家以后多多支持编程网!
--结束END--
本文标题: Spring Boot常用功能Profile详解
本文链接: https://www.lsjlt.com/news/164285.html(转载时请注明来源链接)
有问题或投稿请发送至: 邮箱/279061341@qq.com QQ/279061341
下载Word文档到电脑,方便收藏和打印~
2024-03-01
2024-03-01
2024-03-01
2024-02-29
2024-02-29
2024-02-29
2024-02-29
2024-02-29
2024-02-29
2024-02-29
回答
回答
回答
回答
回答
回答
回答
回答
回答
回答


官方手机版

微信公众号

商务合作


0