Python 官方文档:入门教程 => 点击学习
目录1.作用域定义Bean 的作用域Bean 的 6 种作用域单例作用域(singleton)和全局作用域(application)区别2.设置作用域3.Bean 原理分析3.1 B
限定程序中变量的可用范围叫做作用域,或者说在源代码中定义变量的某个区域就叫做作用域。
而 Bean 的作用域是指 Bean 在 Spring 整个框架中的某种行为模式,比如 singleton 单例作用域,就表示 Bean 在整个 Spring 中只有一份,它是全局共享的,那么当其他人修改了这个值之后,那么另一个人读取到的就是被修改的值。
Spring 容器在初始化一个 Bean 的实例时,同时会指定该实例的作用域。Spring有 6 种作用域,最后四种是基于 Spring mvc 生效的:
注意后 4 种状态是 Spring MVC 中的值,在普通的 Spring 项目中只有前两种。
1,2为Spring普通项目(Spring Core) 3,4,5为Spring MVC 6属于Spring WebSocket
singleton
prototype
request
session
application(了解)
websocket(了解)
singleton 是 Spring Core 的作用域;
application 是 Spring Web 中的作用域;
singleton 作 于 IoC 的容器, application 作 于 Servlet 容器。
使用@Scope标签就可以声明Bean的作用域,比如设置Bean的作用域
@Scope标签可以修饰方法,也可以修饰类,@Scope有两种设置方式:
1.直接设置值:@Scope("prototype")
2.直接枚举设置:@Scope("ConfigurableBeanFactory.SCOPE_PROTOTYPE")

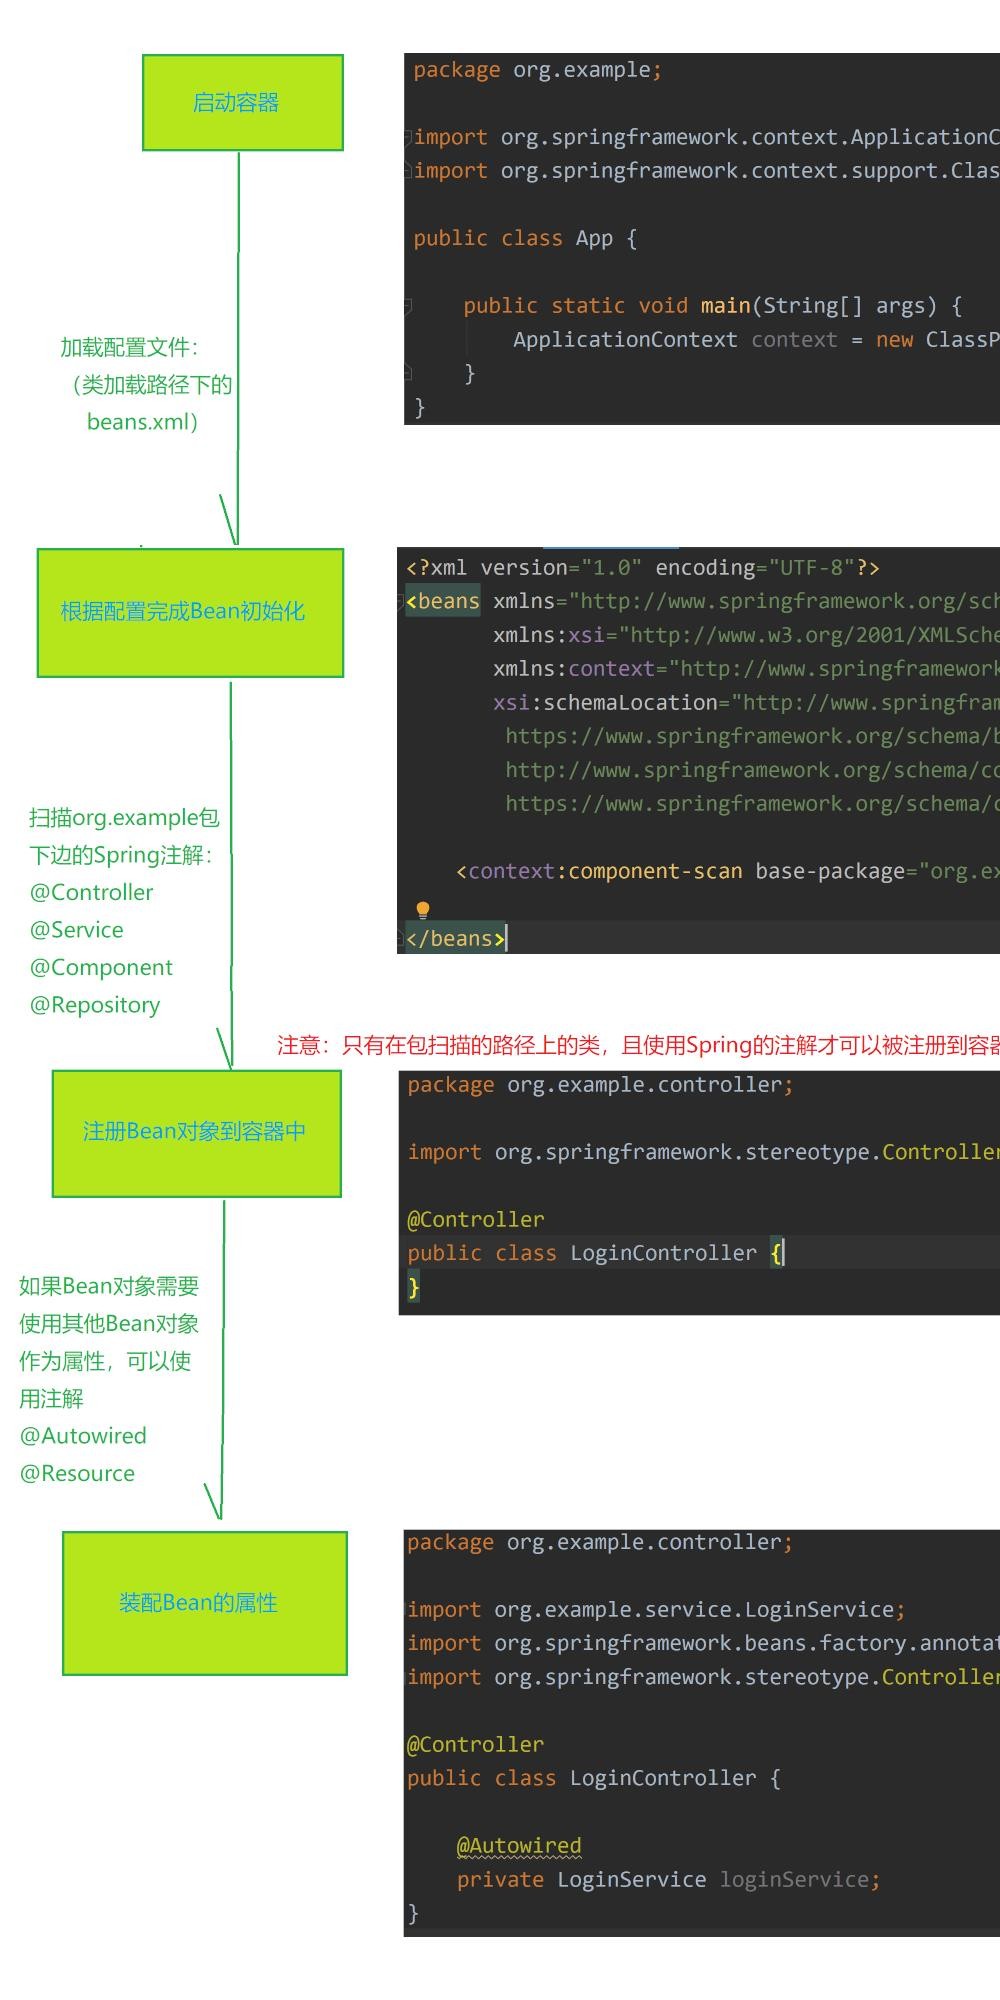
Bean 执行 流程(Spring 执 流程):启动 Spring 容器 -> 实例化 Bean(分配内存空间,从 到有) -> Bean 注册到 Spring 中(存操作) -> 将 Bean 装配到需要的类中(取操作)。
所谓的生命周期指的是一个对象从诞生到销毁的整个生命过程,我们把这个过程就叫做一个对象的生命周期。
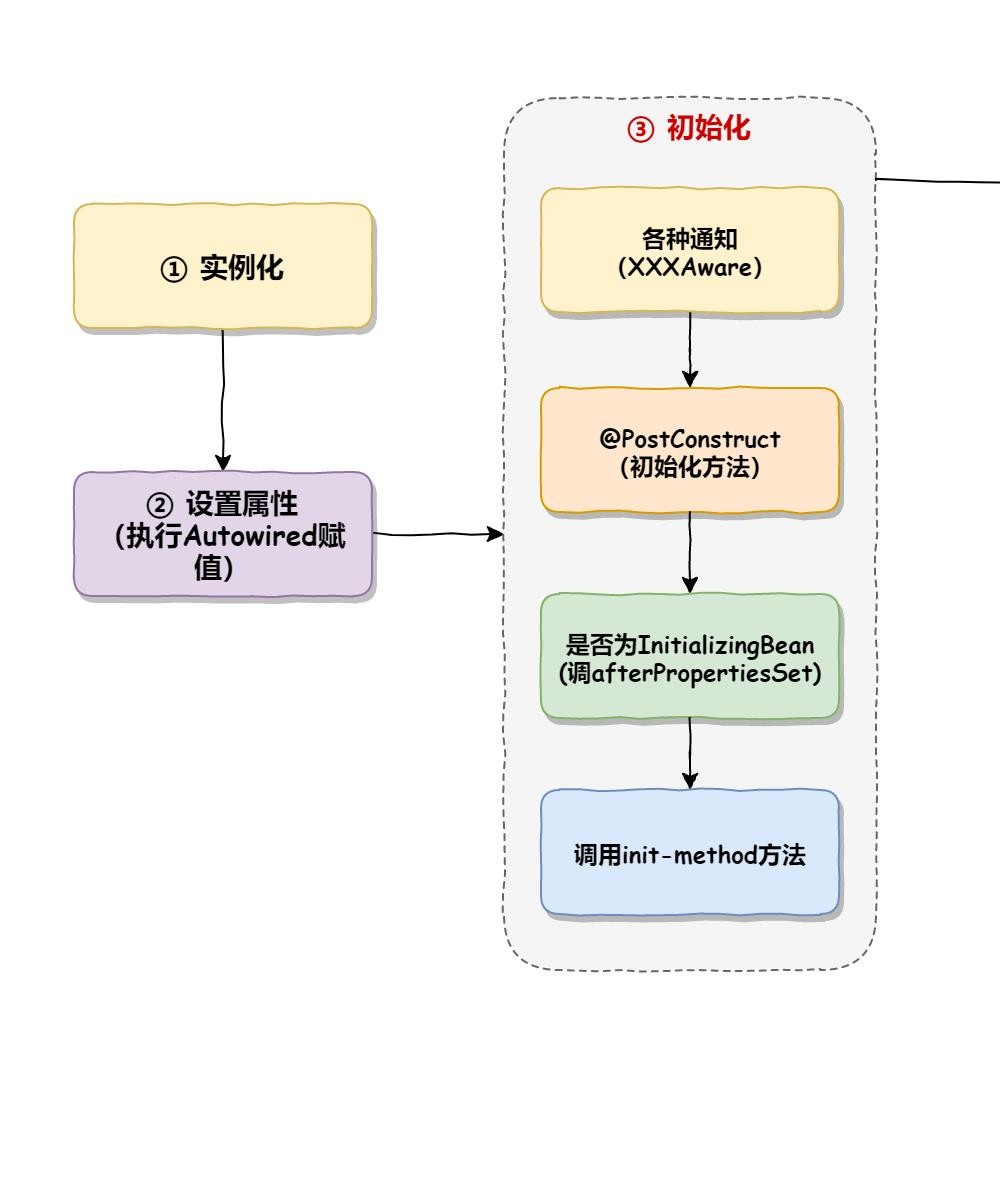
Bean 的生命周期分为以下 5 部分:
实例化 Bean(为 Bean 分配内存空间)【实例化!=初始化;只是执行分配内存空间的功能】
设置属性(Bean 注入和装配)【执行依赖类的注入A需要使用B的方法,先初始化并将B加载到当前类】
Bean 初始化
@PostConstruct初始化方法,依赖注入操作之后被执行;使用Bean
销毁 Bean
销毁容器的各种 法,如 @PreDestroy、DisposableBean 接口方法、destroy-method。
执行流程如下图所示:
实例化和初始化的区别
实例化和属性设置是 Java 级别的系统“事件”,其操作过程不可人工干预和修改;而初始化是给开发者提供的,可以在实例化之后,类加载完成之前进行自定义“事件”处理。
生命流程的“故事”
Bean 的生命流程看似繁琐,但咱们可以以生活中的场景来理解它,比如我们现在需要买一栋房子,那么我们的流程是这样的:
生命周期演示:
package com.beans;
import org.springframework.beans.factory.BeanNameAware;
import javax.annotation.PostConstruct;
import javax.annotation.PreDestroy;
public class BeanLifeComponent implements BeanNameAware {
    @PostConstruct
    public void postConstruct() {
        System.out.println("执行 PostConstruct()");
    }
    public void init() {
        System.out.println("执行 BeanLifeComponent init-method");
    }
    public void destory() {
        System.out.println("执行了 destory 方法");
    }
    @PreDestroy
    public void preDestroy() {
        System.out.println("执行:preDestroy()");
    }
    public void setBeanName(String s) {
        System.out.println("执行了 setBeanName 方法:" + s);
    }
}
xml 配置如下:
<?xml version="1.0" encoding="UTF-8"?>
<beans xmlns="http://www.springframework.org/schema/beans"
       xmlns:xsi="http://www.w3.org/2001/XMLSchema-instance"
       xmlns:content="http://www.springframework.org/schema/context"
       xsi:schemaLocation="http://www.springframework.org/schema/beans http://www.springframework.org/schema/beans/spring-beans.xsd http://www.springframework.org/schema/context https://www.springframework.org/schema/context/spring-context.xsd">
    <!-- 设置需要存储到 spring 中的 bean 根目录 -->
    <content:component-scan base-package="com.beans"></content:component-scan>
    <bean id="beanlife" class="com.beans.BeanLifeComponent"
          init-method="init" destroy-method="destory"></bean>
</beans>
调用类:
package com;
import com.beans.BeanLifeComponent;
import org.springframework.context.support.ClassPathXmlApplicationContext;
public class App2 {
    public static void main(String[] args) {
        ClassPathXmlApplicationContext context =
                new ClassPathXmlApplicationContext("spring-config.xml");
        BeanLifeComponent beanLifeComponent = context.getBean(BeanLifeComponent.class);
        System.out.println("执行销毁方法");
        beanLifeComponent.destory(); // 执行销毁方法
    }
}
步骤 2 和步骤 3 的顺序不能打个颠倒!!!
到此这篇关于Spring Bean作用域与生命周期深入讲解的文章就介绍到这了,更多相关Spring Bean作用域与生命周期内容请搜索编程网以前的文章或继续浏览下面的相关文章希望大家以后多多支持编程网!
--结束END--
本文标题: SpringBean作用域与生命周期深入讲解
本文链接: https://www.lsjlt.com/news/164499.html(转载时请注明来源链接)
有问题或投稿请发送至: 邮箱/279061341@qq.com QQ/279061341
下载Word文档到电脑,方便收藏和打印~
2024-03-01
2024-03-01
2024-03-01
2024-02-29
2024-02-29
2024-02-29
2024-02-29
2024-02-29
2024-02-29
2024-02-29
回答
回答
回答
回答
回答
回答
回答
回答
回答
回答


官方手机版

微信公众号

商务合作


0