目录搭建实验环境小试牛刀实战尝试CMake添加汇编支持实现汇编Neon优化搭建实验环境 首先新建一个包含native代码的项目: 然后在gradle中添加对neon的支持:
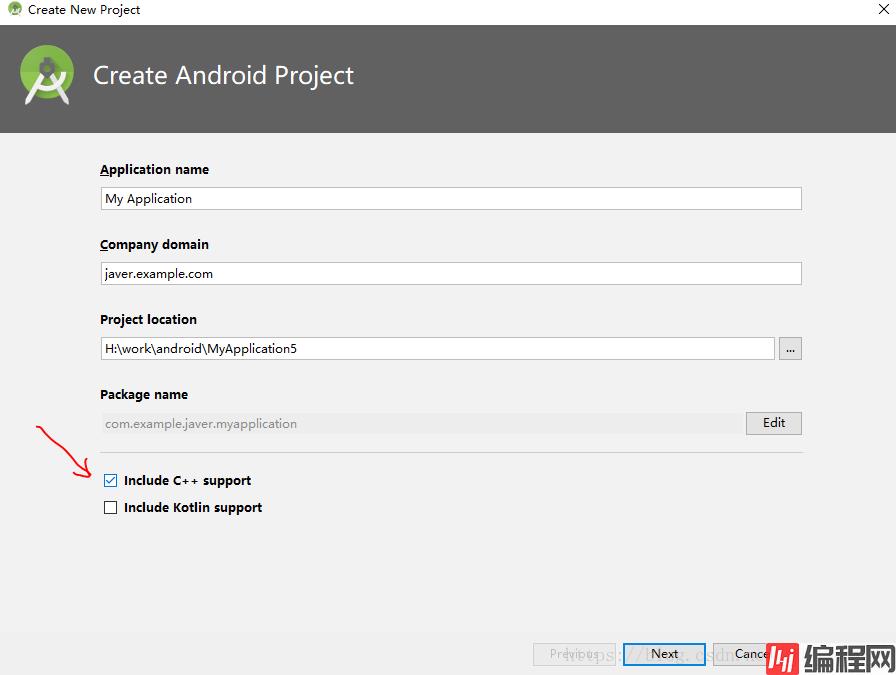
首先新建一个包含native代码的项目:
然后在gradle中添加对neon的支持:
这样,项目就可以支持neon加速了。
一个最简单的neon编程的流程大致是这样的: 1、装载数据到neon寄存器 2、执行运算 3、从neon寄存器中把结果写回内存。
没有例子不知从何说起,先上一个超级简单的例子吧:
#include <jni.h>
#include <string>
#include <arm_neon.h>
#include <android/log.h>
#define LOG_TAG "TEST_NEON"
#define LOGD(...) __android_log_print(ANDROID_LOG_DEBUG, LOG_TAG, __VA_ARGS__)
#define LOGI(...) __android_log_print(ANDROID_LOG_INFO, LOG_TAG, __VA_ARGS__)
extern "C"{
void test()
{
    int16_t result[8];
    int8x8_t a = vdup_n_s8(121);
    int8x8_t b = vdup_n_s8(2);
    int16x8_t c;
    c = vmull_s8(a,b);
    vst1q_s16(result,c);
    for(int i=0;i<8;i++){
        LOGD("data[%d] is %d ",i,result[i]);
    }
}
JNIEXPORT jstring
JNICALL
Java_com_example_javer_myapplication_MainActivity_stringFromJNI(
        JNIEnv *env,
        jobject ) {
    std::string hello = "Hello from C++";
    test();
    return env->NewStringUTF(hello.c_str());
}
}
执行结果:
09-07 12:03:08.335 11709-11709/? D/TEST_NEON:
data[0] is 242
data[1] is 242
data[2] is 242
data[3] is 242
data[4] is 242
data[5] is 242
data[6] is 242
data[7] is 242
代码中,test函数中实现了两个64位neon寄存器的乘法。
vdup是数据复制指令,这里把128这个8位的数复制到一个64位的寄存器中,64位能存放8个8位的数,因此,此时a指向的neon寄存器存放了8个128。
两个8位的数相乘,结果可能是16位的,因此,结果需要用一个128位的寄存器来保存。int16x8就表示的是一个128位的寄存器。
vmull_s8把a,b相乘,并将结果保存在c中。c指向的是neon的128位寄存器,因此,我们需要把结果写回内存。
vst1q_s16把c中的数据协会result指向的内存中。
这是一个简单的测试neon指令的代码,通过这个代码我们能清晰的认识到neon加速的原理:一次装载8个8位的数到64位寄存器,一条指令能把实现两个8*8的数据块的乘法。
这样效率不就接近提升8倍么?当然没有这么理想,毕竟装载数据和写回数据也是需要时间的。
接下来,尝试一个比较简单的rgb转灰度图的code:
void nORMal_convert (uint8_t * __restrict dest, uint8_t * __restrict src, int n)
{
    int i;
    for (i=0; i<n; i++)
    {
        int r = *src++; // load red
        int g = *src++; // load green
        int b = *src++; // load blue
        // build weighted average:
        int y = (r*77)+(g*151)+(b*28);
        // undo the scale by 256 and write to memory:
        *dest++ = (y>>8);
    }
}
void neon_convert (uint8_t * __restrict dest, uint8_t * __restrict src, int n)
{
    int i;
    uint8x8_t rfac = vdup_n_u8 (77);
    uint8x8_t gfac = vdup_n_u8 (151);
    uint8x8_t bfac = vdup_n_u8 (28);
    n/=8;
    for (i=0; i<n; i++)
    {
        uint16x8_t  temp;
        uint8x8x3_t rgb  = vld3_u8 (src);
        uint8x8_t result;
        temp = vmull_u8 (rgb.val[0],      rfac);
        temp = vmlal_u8 (temp,rgb.val[1], gfac);
        temp = vmlal_u8 (temp,rgb.val[2], bfac);
        result = vshrn_n_u16 (temp, 8);
        vst1_u8 (dest, result);
        src  += 8*3;
        dest += 8;
    }
}
void test1()
{
    //准备一张图片,使用软件模拟生成,格式为rgb rgb ..
    uint32_t const array_size = 2048*2048;
    uint8_t * rgb = new uint8_t[array_size*3];
    for(int i=0;i<array_size;i++){
        rgb[i*3]=234;
        rgb[i*3+1]=94;
        rgb[i*3+2]=23;
    }
    //灰度图大小为rgb的1/3
    uint8_t * gray = new uint8_t[array_size];
    struct timeval tv1,tv2;
    gettimeofday(&tv1,NULL);
    normal_convert(gray,rgb,array_size);
    gettimeofday(&tv2,NULL);
    LOGD("pure cpu cost time:%ld",(tv2.tv_sec-tv1.tv_sec)*1000000+(tv2.tv_usec-tv1.tv_usec));
    gettimeofday(&tv1,NULL);
    neon_convert(gray,rgb,array_size);
    gettimeofday(&tv2,NULL);
    LOGD("neon cost time:%ld",(tv2.tv_sec-tv1.tv_sec)*1000000+(tv2.tv_usec-tv1.tv_usec));
    delete[] rgb;
    delete[] gray;
}
JNIEXPORT jstring
JNICALL
Java_com_example_javer_myapplication_MainActivity_stringFromJNI(
        JNIEnv *env,
        jobject ) {
    std::string hello = "Hello from C++";
    test1();
    return env->NewStringUTF(hello.c_str());
}
具体的指令就不一一说明了,大家参考neon汇编指令集,对照着看就好。
纯cpu耗时53ms,neon优化后耗时43ms,提升非常有限,跟提升近8倍的预期相差甚远。这主要是因为c转换为汇编后,生成的汇编指令不够简洁,使得效率大大降低。因此,接下来,使用汇编对代码进行优化。
为了在Cmake中编译汇编文件,我们需要在CMakeLists.txt文件中申明对汇编语言的支持,添加ENABLE_LANGUAGE(ASM)即可实现对汇编的支持,接着将汇编文件添加进来,此处贴出完整的CMakeLists.txt文件供大家参考:
# For more information about using CMake with Android Studio, read the
# documentation: https://d.android.com/studio/projects/add-native-code.html
# Sets the minimum version of CMake required to build the native library.
cmake_minimum_required(VERSION 3.4.1)
# Creates and names a library, sets it as either STATIC
# or SHARED, and provides the relative paths to its source code.
# You can define multiple libraries, and CMake builds them for you.
# Gradle automatically packages shared libraries with your APK.
ENABLE_LANGUAGE(ASM)
add_library( # Sets the name of the library.
             native-lib
             # Sets the library as a shared library.
             SHARED
             # Provides a relative path to your source file(s).
             src/main/cpp/Neon.S
             src/main/cpp/native-lib.cpp
             )
# Searches for a specified prebuilt library and stores the path as a
# variable. Because CMake includes system libraries in the search path by
# default, you only need to specify the name of the public NDK library
# you want to add. CMake verifies that the library exists before
# completing its build.
find_library( # Sets the name of the path variable.
              log-lib
              # Specifies the name of the NDK library that
              # you want CMake to locate.
              log )
# Specifies libraries CMake should link to your target library. You
# can link multiple libraries, such as libraries you define in this
# build script, prebuilt third-party libraries, or system libraries.
target_link_libraries( # Specifies the target library.
                       native-lib
                       # Links the target library to the log library
                       # included in the NDK.
${log-lib} )然后在cpp文件中申明:
void neon_asm_convert(uint8_t * dest, uint8_t * src,int n);
注意,这个申明是包含在extern “C”中的。 然后在Neon.S中实现neon_asm_convert函数:
.globl neon_asm_convert
neon_asm_convert:
      # r0: Ptr to destination data
      # r1: Ptr to source data
      # r2: Iteration count:
      push        {r4-r5,lr}
      lsr         r2, r2, #3
      # build the three constants:
      mov         r3, #77
      mov         r4, #151
      mov         r5, #28
      vdup.8      d3, r3
      vdup.8      d4, r4
      vdup.8      d5, r5
  .loop:
      # load 8 pixels:
      vld3.8      {d0-d2}, [r1]!
      # do the weight average:
      vmull.u8    q3, d0, d3
      vmlal.u8    q3, d1, d4
      vmlal.u8    q3, d2, d5
      # shift and store:
      vshrn.u16   d6, q3, #8
      vst1.8      {d6}, [r0]!
      subs        r2, r2, #1
      bne         .loop
      pop         { r4-r5, pc }
为了对比结果的正确性,专门写了个比对函数:
int compare(uint8_t *a,uint8_t* b,int n)
{
    for(int i=0;i<n;i++){
        if(a[i]!=b[i]){
            return -1;
        }
    }
    return 0;
}
并将结果打印在时间后面:
LOGD("neon c cost time:%ld,result is %d",(tv2.tv_sec-tv1.tv_sec)*1000000+(tv2.tv_usec-tv1.tv_usec),result);三者对比:
09-07 17:12:19.946 25861-25861/com.example.javer.myapplication D/TEST_NEON: pure cpu cost time:57073
09-07 17:12:20.012 25861-25861/com.example.javer.myapplication D/TEST_NEON: neon c cost time:45460,result is 0
09-07 17:12:20.034 25861-25861/com.example.javer.myapplication D/TEST_NEON: neon asm cost time:3397,result is 0
09-07 17:12:25.271 25861-25861/com.example.javer.myapplication D/TEST_NEON: pure cpu cost time:57404
09-07 17:12:25.336 25861-25861/com.example.javer.myapplication D/TEST_NEON: neon c cost time:45166,result is 0
09-07 17:12:25.359 25861-25861/com.example.javer.myapplication D/TEST_NEON: neon asm cost time:3493,result is 0
最终发现,汇编执行的结果完全正确,时间提升超过了16倍!!!!!!!!!!! 我甚至不敢相信能提升这么多。。。可对比的结果是完全一样啊!!这…….
如果程序有问题,感谢大神指出。
最后附完整代码: native_lib.cpp:
#include <jni.h>
#include <string>
#include <arm_neon.h>
#include <android/log.h>
#define LOG_TAG "TEST_NEON"
#define LOGD(...) __android_log_print(ANDROID_LOG_DEBUG, LOG_TAG, __VA_ARGS__)
#define LOGI(...) __android_log_print(ANDROID_LOG_INFO, LOG_TAG, __VA_ARGS__)
extern "C"{
void neon_asm_convert(uint8_t * dest, uint8_t * src,int n);
void test()
{
    int16_t result[8];
    int8x8_t a = vdup_n_s8(121);
    int8x8_t b = vdup_n_s8(2);
    int16x8_t c;
    c = vmull_s8(a,b);
    vst1q_s16(result,c);
    for(int i=0;i<8;i++){
        LOGD("data[%d] is %d ",i,result[i]);
    }
}
void normal_convert (uint8_t * __restrict dest, uint8_t * __restrict src, int n)
{
    int i;
    for (i=0; i<n; i++)
    {
        int r = *src++; // load red
        int g = *src++; // load green
        int b = *src++; // load blue
        // build weighted average:
        int y = (r*77)+(g*151)+(b*28);
        // undo the scale by 256 and write to memory:
        *dest++ = (y>>8);
    }
}
void neon_convert (uint8_t * __restrict dest, uint8_t * __restrict src, int n)
{
    int i;
    uint8x8_t rfac = vdup_n_u8 (77);
    uint8x8_t gfac = vdup_n_u8 (151);
    uint8x8_t bfac = vdup_n_u8 (28);
    n/=8;
    for (i=0; i<n; i++)
    {
        uint16x8_t  temp;
        uint8x8x3_t rgb  = vld3_u8 (src);
        uint8x8_t result;
        temp = vmull_u8 (rgb.val[0],      rfac);
        temp = vmlal_u8 (temp,rgb.val[1], gfac);
        temp = vmlal_u8 (temp,rgb.val[2], bfac);
        result = vshrn_n_u16 (temp, 8);
        vst1_u8 (dest, result);
        src  += 8*3;
        dest += 8;
    }
}
int compare(uint8_t *a,uint8_t* b,int n)
{
    for(int i=0;i<n;i++){
        if(a[i]!=b[i]){
            return -1;
        }
    }
    return 0;
}
void test1()
{
    //准备一张图片,使用软件模拟生成,格式为rgb rgb ..
    uint32_t const array_size = 2048*2048;
    uint8_t * rgb = new uint8_t[array_size*3];
    for(int i=0;i<array_size;i++){
        rgb[i*3]=234;
        rgb[i*3+1]=94;
        rgb[i*3+2]=23;
    }
    //灰度图大小为rgb的1/3
    uint8_t * gray_cpu = new uint8_t[array_size];
    uint8_t * gray_neon = new uint8_t[array_size];
    uint8_t * gray_neon_asm = new uint8_t[array_size];
    struct timeval tv1,tv2;
    gettimeofday(&tv1,NULL);
    normal_convert(gray_cpu,rgb,array_size);
    gettimeofday(&tv2,NULL);
    LOGD("pure cpu cost time:%ld",(tv2.tv_sec-tv1.tv_sec)*1000000+(tv2.tv_usec-tv1.tv_usec));
    gettimeofday(&tv1,NULL);
    neon_convert(gray_neon,rgb,array_size);
    gettimeofday(&tv2,NULL);
    bool result = compare(gray_cpu,gray_neon,array_size);
    LOGD("neon c cost time:%ld,result is %d",(tv2.tv_sec-tv1.tv_sec)*1000000+(tv2.tv_usec-tv1.tv_usec),result);
    gettimeofday(&tv1,NULL);
    neon_asm_convert(gray_neon_asm,rgb,array_size);
    gettimeofday(&tv2,NULL);
    result = compare(gray_cpu,gray_neon_asm,array_size);
    LOGD("neon asm cost time:%ld,result is %d",(tv2.tv_sec-tv1.tv_sec)*1000000+(tv2.tv_usec-tv1.tv_usec),result);
    delete[] rgb;
    delete[] gray_cpu;
    delete[] gray_neon;
    delete[] gray_neon_asm;
}
JNIEXPORT jstring
JNICALL
Java_com_example_javer_myapplication_MainActivity_stringFromJNI(
        JNIEnv *env,
        jobject ) {
    std::string hello = "Hello from C++";
    test1();
    return env->NewStringUTF(hello.c_str());
}
}
Neon.S
.globl neon_asm_convert
neon_asm_convert:
      # r0: Ptr to destination data
      # r1: Ptr to source data
      # r2: Iteration count:
      push        {r4-r5,lr}
      lsr         r2, r2, #3
      # build the three constants:
      mov         r3, #77
      mov         r4, #151
      mov         r5, #28
      vdup.8      d3, r3
      vdup.8      d4, r4
      vdup.8      d5, r5
  .loop:
      # load 8 pixels:
      vld3.8      {d0-d2}, [r1]!
      # do the weight average:
      vmull.u8    q3, d0, d3
      vmlal.u8    q3, d1, d4
      vmlal.u8    q3, d2, d5
      # shift and store:
      vshrn.u16   d6, q3, #8
      vst1.8      {d6}, [r0]!
      subs        r2, r2, #1
      bne         .loop
      pop         { r4-r5, pc }
以上就是Android neon 优化实践示例的详细内容,更多关于Android neon 优化的资料请关注编程网其它相关文章!
--结束END--
本文标题: Androidneon优化实践示例
本文链接: https://www.lsjlt.com/news/166818.html(转载时请注明来源链接)
有问题或投稿请发送至: 邮箱/279061341@qq.com QQ/279061341
下载Word文档到电脑,方便收藏和打印~
2024-01-21
2023-10-28
2023-10-28
2023-10-27
2023-10-27
2023-10-27
2023-10-27
回答
回答
回答
回答
回答
回答
回答
回答
回答
回答


官方手机版

微信公众号

商务合作


0