目录简介一、axiOS配置二、请求接口路径api配置三、axios和接口api的全局注入四、请求接口的使用方式注意简介 关于Vue中使用axios请求的配置,注意其中区分Vue2.0
关于Vue中使用axios请求的配置,注意其中区分Vue2.0和Vue3.0的写法。
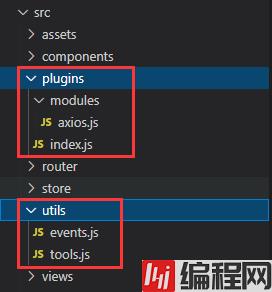
由于可能会有多个插件应用,所以有了plugins(utils里面放的是封装的事件处理方法),自行新建相关文件
1.安装axios
npm install axios --save2.‘plugins/index.js’ 配置
// 导出所有插件
let moduleFiles = require.context('./modules', true, /\.js$/);
export default moduleFiles;
3.'axios.js’配置
'use strict';
import axios from 'axios';
// import store from "@/store";
// import { message } from "ant-design-vue"
import { getAllPromise } from '@/utils/tools';
import { triggerEvent } from '@/utils/events';
// 完整配置参考:  https://GitHub.com/axios/axios#request-config
axios.defaults.headers.post['Content-Type'] = 'application/JSON;charset=utf-8';
axios.defaults.headers.put['Content-Type'] = 'application/json;charset=utf-8';
axios.defaults.headers.delete['Content-Type'] =
  'application/json;charset=utf-8';
let config = {
  baseURL: process.env.VUE_APP_BASE_API || process.env.apiUrl || '',
  timeout: 60 * 1000,
  withCredentials: false,
  crossDomain: true,
  transfORMRequest: [
    (data) => {
      if (!data || typeof data === 'string') {
        return data;
      }
      if (data instanceof FormData) {
        return data;
      }
      // 对Blob对象进行处理
      let hasBlob = Object.values(data).some((it) => {
        return it instanceof Blob;
      });
      if (!hasBlob) {
        return JSON.stringify(data);
      }
      const formData = new FormData();
      Object.entries(data).forEach(([key, value]) => {
        formData.append(key, value);
      });
      return formData;
    },
  ],
};
const _axios = axios.create(config);
// 注册all方法,执行多个并发请求
// 可传入Promise、包含Promise的数组、返回值为Promise的方法
_axios.all = (...requsets) => {
  // 获取所有Promise对象
  let promiseList = getAllPromise(requsets);
  return new Promise((resolve, reject) => {
    axios
      .all(promiseList)
      .then(
        axios.spread((...response) => {
          // 两个请求现在都执行完成
          resolve(response);
        })
      )
      .catch((error) => {
        reject(error);
      });
  });
};
_axios.interceptors.request.use(
  (config) => {
    // const token = getCookie(AUTH_TOKEN_FRONT);
    // config.headers.common[AUTH_TOKEN_END] = token;
    const token = 'AUTH_TOKEN_FRONT';
    config.headers.common.Token = token;
    return config;
  },
  (error) => {
    return Promise.reject(error);
  }
);
// 拦截响应
_axios.interceptors.response.use(
  (response) => {
    // console.log(response)
    // 用来判断是否请求成功
    const success = response.status === 200;
    let messages = '';
    if (!success) {
      if (typeof response.data === 'string') {
        messages = '服务器错误,未获取到响应数据';
      } else {
        if (response.status === 200) {
          return Promise.reject(response);
        }
        // 请求成功,但在业务上为失败
        messages = response.message || response.statusText || '操作执行失败';
      }
      console.error(messages);
      return Promise.reject(response);
    }
    return {
      data: response.data,
      success,
      messages,
    };
  },
  (error) => {
    if (!navigator.onLine) {
      triggerEvent(window, 'offline');
      return Promise.reject(error);
    }
    if (!error.response) {
      console.error('连接服务器失败');
      return Promise.reject(error);
    }
    let status = error.response.status;
    if (status === 401) {
      // message.error("您的登录已过期,请重新登录");
      // window.location.reload();
      // store.dispatch("user/loGout");
      return Promise.reject(error);
    }
    if (status < 200) {
      console.warning(`未处理的消息响应,状态码:${status}`);
    } else if (status >= 300 && status < 400) {
      console.warning(`未处理的重定向响应,状态码:${status}`);
    } else if (status >= 400 && status < 500) {
      console.error(`客户端错误,状态码:${status}`);
    } else if (status >= 500) {
      console.error(`服务器错误,状态码:${status}`);
    }
    // 系统请求失败
    return Promise.reject(error);
  }
);
// -------------------------vue2.x导出-------------------------
// export default {
//   install: (Vue) => {
//     Vue.$_Http = _axios;
//     window.$_http = _axios;
//     Object.defineProperties(Vue.prototype, {
//       $_http: {
//         get() {
//           return _axios;
//         },
//       },
//     });
//   },
// };
// -------------------------vue3.x导出-------------------------
export default {
  install: (app) => {
    app.$_http = _axios;
    window.$_http = _axios;
    Object.defineProperties(app.config.globalProperties, {
      $_http: {
        get() {
          return _axios;
        },
      },
    });
  },
};
4.'utils/tools.js’配置
export function getAllPromise(...datas) {
  let promiseList = [];
  datas.forEach((it) => {
    if (isDataType(it, 'Promise')) {
      promiseList.push(it);
      return;
    }
    // 是方法则获取执行的结果
    if (isDataType(it, 'Function')) {
      promiseList.push(...getAllPromise(it()));
      return;
    }
    if (isDataType(it, 'Array')) {
      promiseList.push(...getAllPromise(...it));
    }
  });
  return promiseList;
}

export function isDataType(data, ...typeList) {
  let dataType = Object.prototype.toString
    .call(data)
    .replace(/^\[object/, '')
    .replace(/\]$/, '')
    .replace(/\s/, '');
  typeList = flat(typeList);
  let hasType = typeList.some((it) => {
    return it && isDataType(it) === 'String';
  });
  if (!hasType) {
    return dataType;
  }
  if (
    typeList.includes(dataType) ||
    typeList.includes(dataType.toLowerCase())
  ) {
    return true;
  }
  return false;
}

export function flat(list) {
  if (Array.prototype.flat) {
    return list.flat(Infinity);
  }
  let retArr = [];
  if (!Array.isArray(list)) {
    throw new Error(
      `Invalid parameter: type check failed for parameter 'list'. Expected Array, But got ${typeof list} with value ${list}`
    );
  }
  list.forEach((it) => {
    if (!Array.isArray(it)) {
      retArr.push(it);
      return;
    }
    retArr.push(...flat(it));
  });
  return retArr;
}
5.'utils/events.js’配置
// 浏览器中的事件管理

export function triggerEvent(node, name, ...options) {
  if (node.fireEvent) {
    return node.fireEvent('on' + name);
  }
  let eventName;
  let evt;
  if (/^mouse|click/.test(name)) {
    eventName = 'MouseEvents';
    evt = document.createEvent(eventName);
    evt.initMouseEvent(name, ...options);
  } else if (['DOMactivate', 'DOMFocusIn', 'DOMFocusOut'].includes(name)) {
    eventName = 'UIEvents';
    evt = document.createEvent(eventName);
    evt.initUIEvent(name, ...options);
  } else if (/^key/.test(name)) {
    eventName = 'KeyboardEvent';
    evt = document.createEvent(eventName);
    evt.iniTKEyboardEvent(name, ...options);
  } else if (name.startsWith('DOM')) {
    eventName = 'MutationEvents';
    evt = document.createEvent(eventName);
    evt.initMutationEvent(name, ...options);
  } else {
    eventName = 'htmlEvents';
    evt = document.createEvent(eventName);
    evt.initEvent(name, ...options);
  }
  return node.dispatchEvent(evt);
}
自行根据目录结构新建文件。
方便区分接口所属模块,于是根据接口分类进行新建js文件。
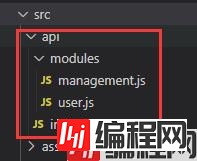
1. api集合中心(‘api/index.js’)
'use strict';


const subList = [
  {
    name: 'API_LIST_USER',
    url: 'VUE_APP_BASE_API',
  },
  {
    name: 'API_LIST_MANAGEMENT',
    url: 'VUE_APP_BASE_API',
  },
];
// 所有api子系统
let API_LIST = {};
const moduleFiles = require.context('./modules', true, /\.js$/);
moduleFiles.keys().forEach((modulePath) => {
  API_LIST = { ...API_LIST, ...moduleFiles(modulePath).default };
});
// 合成API地址集合
let apiList = {};
subList.forEach((it) => {
  let subApi = Object.entries(API_LIST[it.name]).reduce(
    (target, [key, value]) => {
      target[key] = process.env[it.url].replace(/\W*$/, '') + '/' + value.replace(/^\W*/, '');
      return target;
    },
    {}
  );
  apiList = { ...apiList, ...subApi };
});
export default apiList;
2. 模块分类一:user(‘api/user.js’)
export default {
  API_LIST_USER: {
    // 登录
    INTERFACE_GET_USER_LOGIN: 'user/login',
    // 查询管理员列表
    INTERFACE_GET_USER_LIST: 'admin/users',
    // 新增管理员
    INTERFACE_POST_USER_ADMIN: 'admin/reGISter',
    // 删除管理员
    INTERFACE_DELETE_USER_ADMIN: 'admin/users',
  },
};
3. 模块分类二:管理(‘api/management.js’)
export default {
  API_LIST_MANAGEMENT: {
    // 工种列表
    INTERFACE_GET_ENGINEERINGWORK_LIST: '/engineertypes',
    // 新建工种
    INTERFACE_POST_ENGINEERINGWORK_CREATE: '/admin/engineertype',
    // 删除工种
    INTERFACE_DELETE_ENGINEERINGWORK_DELETE:  '/admin/engineertype/{engineertypeid}',
  },
};
(1)vue2.x
import Vue from 'vue';
import App from './App.vue';
// 注册自定义插件
import moduleFiles from './plugins';
// 引入api地址
import apiList from '@/api';
// 批量使用自定义插件
moduleFiles.keys().forEach(modulePath => {
  Vue.use(moduleFiles(modulePath).default);
});
// 注册所有api地址为全局变量
Vue.prototype.$_API = apiList;
new Vue({
  render: (h) => h(App),
}).$mount('#app');
(2)vue3.x
import { createApp } from 'vue';
import App from './App.vue';
// 引入自定义插件
import moduleFiles from './plugins';
// 引入api地址
import apiList from '@/api';
const app = createApp(App);
app.mount('#app');
// 注册所有api地址为全局变量
app.config.globalProperties.$_API = apiList;
// 批量使用自定义插件
moduleFiles.keys().forEach((modulePath) => {
  app.use(moduleFiles(modulePath).default);
});
以下是vue2.x的使用方式
// 其中 url为接口地址,在api目录下定义
// config内容为参数和其他配置,例如:
--------------------------执行 GET 请求---------------------------------
// 执行 GET 请求
this.$_http.get('url' + "?ID=12345")
  .then(response => {
    // 自己的操作
    console.log(response);
  })
// 不需要写catch,axios配置会自动提示出来
// 可选地,上面的请求可以这样写
this.$_http.get('url', {
    params: {
      ID: 12345
    }
  }).then(response => {
    // 自己的操作
    console.log(response);
  })
--------------------------执行 POST 请求---------------------------------
// 执行 POST 请求
this.$_http.post('url', {
  firstName: "Fred",
  lastName: "Flintstone"
}).then(response => {
  // 自己的操作
  console.log(response);
})
--------------------------执行 DELETE 请求---------------------------------
// 执行 POST 请求
this.$_http.delete('url', {
  data: { id: 1 }
}).then(response => {
  // 自己的操作
  console.log(response);
})
--------------------------案例---------------------------------------------
let params = {
  page: 0,
  size: 10,
};
this.$_http.get(this.$_API.INTERFACE_GET_USER_LIST, { params }).then((res) => {
  console.log(res);
});
以下是vue3.x的使用方式
import { getCurrentInstance } from "vue"
setUp() {
  // 方式一
  // const internalInstance = getCurrentInstance()
  // const globalProperties = internalInstance.appContext.config.globalProperties
  // const _http = globalProperties.$_http
  // const _API = globalProperties.$_API
  // 方式二
  const { proxy } = getCurrentInstance()
  const _http = proxy.$_http
  const _API = proxy.$_API
  console.log(_http, _API)
  let params = {
    page: 0,
    size: 10,
  }
  _http.get(_API.INTERFACE_GET_USER_LIST, { params }).then((res) => {
    console.log("axios请求结果", res);
  })
}
在 axios.js 中,关于 console.error 相关的部分,替换为自己项目所引入的ui框架的消息提示即可,如 ant Design 的 message,就有请求后报错的相关提示。
以上为个人经验,希望能给大家一个参考,也希望大家多多支持编程网。
--结束END--
本文标题: vue中的axios配置及接口请求路径api配置
本文链接: https://www.lsjlt.com/news/168096.html(转载时请注明来源链接)
有问题或投稿请发送至: 邮箱/279061341@qq.com QQ/279061341
下载Word文档到电脑,方便收藏和打印~
2024-01-12
2023-05-20
2023-05-20
2023-05-20
2023-05-20
2023-05-20
2023-05-20
2023-05-20
2023-05-20
2023-05-20
回答
回答
回答
回答
回答
回答
回答
回答
回答
回答


官方手机版

微信公众号

商务合作


0