目录思路Flutter BlendModeColorFiltered实现获取镂空位置ColorFiltered child完整代码最终效果小结思路 开发过程中常见这样的需求,页面中有
开发过程中常见这样的需求,页面中有几个按钮,用户首次进入时需要对这几个按钮高亮展示并加上文字提示。常见的一种方案是找UI切图,那如何完全使用代码来实现呢?
就以Flutter原始Demo页面为例,如果我们需要对中间展示区域以及右下角按钮进行一个引导提示。
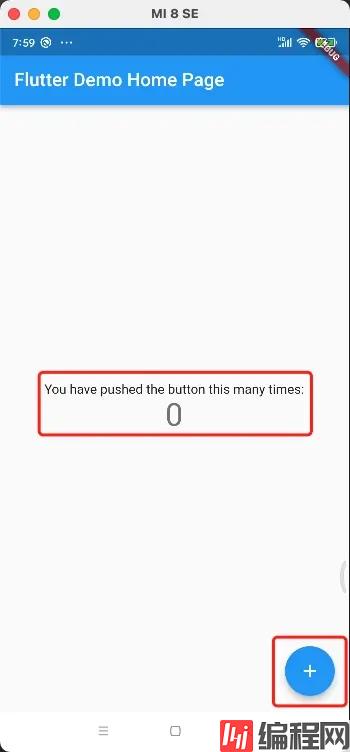
我们需要做到的效果是除了红色框内的Widget,其余部分要盖上一层半透明黑色浮层,相当于是全屏浮层,红色区域镂空。
首先是黑色浮层,这个比较容易,Flutter中的Overlay可以轻易实现,它可以浮在任意的Widget之上,包括Dialog。
那么如何镂空呢?
一种思路是首先拿到对应的Widget与其宽高和xy偏移量,然后在Overlay中先铺一层浮层后,把该Widget在Overlay的对应位置中再绘制一遍。也就是说该Widget存在两份,一份是原本的Widget,另一份是在Overlay之上又绘制一层,并且不会被浮层所覆盖,即为高亮。这是一种思路,但如果你需要进行引导提示的Widget自身有透明度,那么这个方案就略有问题,因为你的浮层即为半透明,那么用户就可以穿过顶层的Widget看到下面的内容,略有瑕疵。
那么另一种思路就是我们不去在Overlay之上盖上另一个克隆Widget,而是将Overlay半透明黑色涂层对应位置进行镂空即可,就不存在任何问题了。
既然需要镂空,我们需要了解一下Flutter中的图层混合模式概念
在画布上绘制形状或图像时,可以使用不同的算法来混合像素,每个算法都存在两个输入,即源(正在绘制的图像 src)和目标(要合成源图像的图像 dst)
我们把半透明黑色涂层 和 需要进行高亮的Widget 理解为src和dst。
接下来我们通过下面的图例可知,如果我们需要实现镂空效果,需要的混合模式为SrcOut或DstOut,因为他们的混合模式为一个源展示,且该源与另一个源有非透明像素交汇部分完全剔除。

Flutter中为我们提供了ColorFiltered,这是一个官方为我们封装的一个以Color作为源的混合模式Widget。其接收两个参数,colorFilter和child,前者我们可以理解为上述的src,后者则为dst。
下面以一段简单的代码说明
class TestColorFilteredPage extends StatelessWidget {
  const TestColorFilteredPage({Key? key}) : super(key: key);
  @override
  Widget build(BuildContext context) {
    return ColorFiltered(
      colorFilter: const ColorFilter.mode(Colors.yellow, BlendMode.srcOut),
      child: Stack(
        children: [
          Positioned.fill(
              child: Container(
            color: Colors.transparent,
          )),
          Positioned(
              top: 100,
              left: 100,
              child: Container(
                color: Colors.black,
                height: 100,
                width: 100,
              ))
        ],
      ),
    );
  }
}
效果:
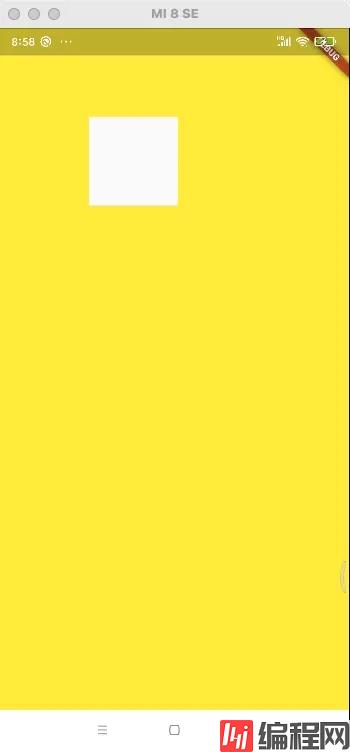
可以看到作为src的colorFiler除了与作为dst的Stack有非透明像素交汇的地方被镂空了,其他地方均正常显示。
此处需要说明一下,作为dst的child,要实现蒙版的效果,必须要与src有所交汇,所以Stack中使用了透明的Positioned.fill填充,之所以要用透明色,是因为我们使用的混合模式srcOut的算法会剔除非透明像素交互部分
上述部分思路已经足够支持我们写出想要的效果了,接下来我们来进行实现
首先我需要拿到对应Widget的key,就可以拿到对应的宽高与xy偏移量
RenderObject? promptRenderObject =
    promptWidgeTKEy.currentContext?.findRenderObject();
double widgetHeight = promptRenderObject?.paintBounds.height ?? 0;
double widgetWidth = promptRenderObject?.paintBounds.width ?? 0;
double widgetTop = 0;
double widgetLeft = 0;
if (promptRenderObject is RenderBox) {
  Offset offset = promptRenderObject.localToGlobal(Offset.zero);
  widgetTop = offset.dy;
  widgetLeft = offset.dx;
}
lastOverlay = OverlayEntry(builder: (ctx) {
  return GestureDetector(
    onTap: () {
      // 点击后移除当前展示的overlay
      _removeCurrentOverlay();
      // 准备展示下一个overlay
      _prepareToPromptSingleWidget();
    },
    child: Stack(
      children: [
        Positioned.fill(
            child: ColorFiltered(
          colorFilter: ColorFilter.mode(
              Colors.black.withOpacity(0.7), BlendMode.srcOut),
          child: Stack(
            children: [
              // 透明色填充背景,作为蒙版
              Positioned.fill(
                  child: Container(
                color: Colors.transparent,
              )),
              // 镂空区域
              Positioned(
                  left: l,
                  top: t,
                  child: Container(
                    width: w,
                    height: h,
                    decoration: decoration ??
                        const BoxDecoration(color: Colors.black),
                  )),
            ],
          ),
        )),
        // 文字提示,需要放在ColorFiltered的外层
        Positioned(
            left: l - 40,
            top: t - 40,
            child: Material(
              color: Colors.transparent,
              child: Text(
                tips,
                style: const TextStyle(fontSize: 14, color: Colors.white),
              ),
            ))
      ],
    ),
  );
});
Overlay.of(context)?.insert(lastOverlay!);
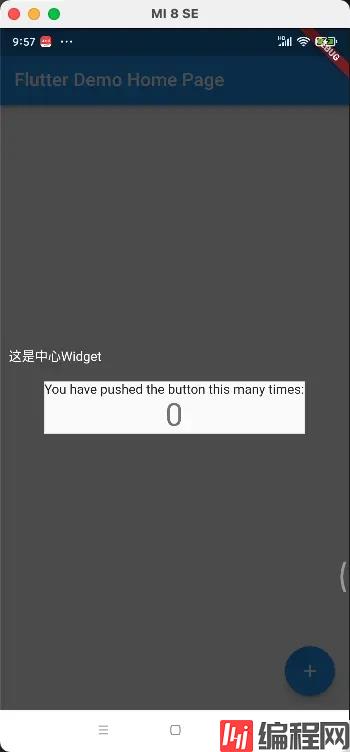
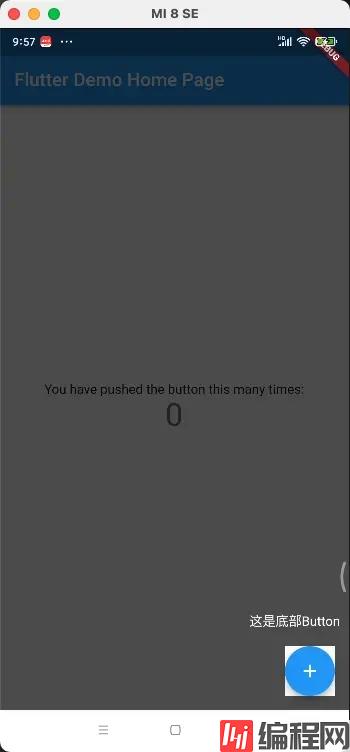
其中的文字偏移量,可以自己通过代码来设置,展示在中心,或者判断位置跟随Widget展示均可,此处不再赘述。
最后我们把Overlay添加到屏幕上展示即可。
这里我将逻辑封装在静态工具类中,鉴于单个页面可能会有不止一个引导Widget,所以对于这个静态工具类,我们需要传入需要进行高亮引导的Widget和提示语的集合。
class PromptItem {
  GlobalKey promptWidgetKey;
  String promptTips;
  PromptItem(this.promptWidgetKey, this.promptTips);
}
class PromptBuilder {
  static List<PromptItem> toPromptWidgetKeys = [];
  static OverlayEntry? lastOverlay;
  static promptToWidgets(List<PromptItem> widgetKeys) {
    toPromptWidgetKeys = widgetKeys;
    _prepareToPromptSingleWidget();
  }
  static _prepareToPromptSingleWidget() async {
    if (toPromptWidgetKeys.isEmpty) {
      return;
    }
    PromptItem promptItem = toPromptWidgetKeys.removeAt(0);
    RenderObject? promptRenderObject =
        promptItem.promptWidgetKey.currentContext?.findRenderObject();
    double widgetHeight = promptRenderObject?.paintBounds.height ?? 0;
    double widgetWidth = promptRenderObject?.paintBounds.width ?? 0;
    double widgetTop = 0;
    double widgetLeft = 0;
    if (promptRenderObject is RenderBox) {
      Offset offset = promptRenderObject.localToGlobal(Offset.zero);
      widgetTop = offset.dy;
      widgetLeft = offset.dx;
    }
    if (widgetHeight != 0 &&
        widgetWidth != 0 &&
        widgetTop != 0 &&
        widgetLeft != 0) {
      _buildNextPromptOverlay(
          promptItem.promptWidgetKey.currentContext!,
          widgetWidth,
          widgetHeight,
          widgetLeft,
          widgetTop,
          null,
          promptItem.promptTips);
    }
  }
  static _buildNextPromptOverlay(BuildContext context, double w, double h,
      double l, double t, Decoration? decoration, String tips) {
    _removeCurrentOverlay();
    lastOverlay = OverlayEntry(builder: (ctx) {
      return GestureDetector(
        onTap: () {
          // 点击后移除当前展示的overlay
          _removeCurrentOverlay();
          // 准备展示下一个overlay
          _prepareToPromptSingleWidget();
        },
        child: Stack(
          children: [
            Positioned.fill(
                child: ColorFiltered(
              colorFilter: ColorFilter.mode(
                  Colors.black.withOpacity(0.7), BlendMode.srcOut),
              child: Stack(
                children: [
                  // 透明色填充背景,作为蒙版
                  Positioned.fill(
                      child: Container(
                    color: Colors.transparent,
                  )),
                  // 镂空区域
                  Positioned(
                      left: l,
                      top: t,
                      child: Container(
                        width: w,
                        height: h,
                        decoration: decoration ??
                            const BoxDecoration(color: Colors.black),
                      )),
                ],
              ),
            )),
            // 文字提示,需要放在ColorFiltered的外层
            Positioned(
                left: l - 40,
                top: t - 40,
                child: Material(
                  color: Colors.transparent,
                  child: Text(
                    tips,
                    style: const TextStyle(fontSize: 14, color: Colors.white),
                  ),
                ))
          ],
        ),
      );
    });
    Overlay.of(context)?.insert(lastOverlay!);
  }
  static _removeCurrentOverlay() {
    if (lastOverlay != null) {
      lastOverlay!.remove();
      lastOverlay = null;
    }
  }
}
class MyHomePage extends StatefulWidget {
  const MyHomePage({Key? key, required this.title}) : super(key: key);
  final String title;
  @override
  State<MyHomePage> createState() => _MyHomePageState();
}
class _MyHomePageState extends State<MyHomePage> with WidgetsBindinGobserver {
  int _counter = 0;
  GlobalKey centerWidgetKey = GlobalKey();
  GlobalKey bottomWidgetKey = GlobalKey();
  void _incrementCounter() {
    setState(() {
      _counter++;
    });
  }
  @override
  void initState() {
    super.initState();
    // 页面展示时进行prompt绘制,在此添加observer监听等待渲染完成后挂载prompt
    WidgetsBinding.instance.addObserver(this);
    WidgetsBinding.instance.addPostFrameCallback((timeStamp) {
      List<PromptItem> prompts = [];
      prompts.add(PromptItem(centerWidgetKey, "这是中心Widget"));
      prompts.add(PromptItem(bottomWidgetKey, "这是底部Button"));
      PromptBuilder.promptToWidgets(prompts);
    });
  }
  @override
  Widget build(BuildContext context) {
    return Scaffold(
      appBar: AppBar(
        title: Text(widget.title),
      ),
      body: Center(
        child: Column(
          mainAxisSize: MainAxisSize.min,
          mainAxisAlignment: MainAxisAlignment.center,
          // 需要高亮展示的widget,需要声明其GlobalKey
          key: centerWidgetKey,
          children: <Widget>[
            const Text(
              'You have pushed the button this many times:',
            ),
            Text(
              '$_counter',
              style: Theme.of(context).textTheme.headline4,
            ),
          ],
        ),
      ),
      floatingActionButton: FloatingActionButton(
        // 需要高亮展示的widget,需要声明其GlobalKey
        key: bottomWidgetKey,
        onPressed: _incrementCounter,
        tooltip: 'Increment',
        child: const Icon(Icons.add),
      ), // This trailing comma makes auto-fORMatting nicer for build methods.
    );
  }
}
本文仅总结代码实现思路,对于具体细节并未处理,可以在PromptItem和PromptBuilder进行更多的属性声明以更加灵活的展示prompt,比如圆角等参数。有任何问题欢迎大家随时讨论。
最后附上GitHub地址:github.com/slowguy/flu…
以上就是Flutter使用Overlay与ColorFiltered新手引导实现示例的详细内容,更多关于Flutter使用Overlay ColorFiltered的资料请关注编程网其它相关文章!
--结束END--
本文标题: Flutter使用Overlay与ColorFiltered新手引导实现示例
本文链接: https://www.lsjlt.com/news/168923.html(转载时请注明来源链接)
有问题或投稿请发送至: 邮箱/279061341@qq.com QQ/279061341
下载Word文档到电脑,方便收藏和打印~
2024-01-21
2023-10-28
2023-10-28
2023-10-27
2023-10-27
2023-10-27
2023-10-27
回答
回答
回答
回答
回答
回答
回答
回答
回答
回答


官方手机版

微信公众号

商务合作


0