目录Vant上传多个图片或视频,更改视频预览图需求最终成果过程Vant上传压缩图片;多图片压缩上传Vant上传多个图片或视频,更改视频预览图 需求 vant上传多个视频或图片图片和视

            <van-uploader
              accept="*"
              v-model="imgList"
              :after-read="afterRead"
              :before-read="beforeRead"
              preview-size='25vw'
              @click-preview="handleclicksc"
              :before-delete="afterDelete"
              :preview-full-image="false"
              :disabled="isUploading?true:false"
              />
<!--点击图片或视频出现放大图片或播放视频的弹窗-->
    <van-overlay :show="show" @click="show = false">
      <div class="wrapper" >
        <div class="img-block">
          <img v-if="urlType==='image'"   :src="url">
          <video autoplay class="video" v-if="urlType==='video'" :src="url" controls></video>
        </div>
<!--给视频添加关闭图标-->
          <img v-if="urlType==='video'"
            @click="show=false"
            class="video-delete"
            src="./close.png"
          />
        </div>
    </van-overlay>
data(){
    return {
        isUploading:false,
        allInfoList:[],
        url:'',  //弹窗展示的图片/视频路径
        urlType:'',  //弹窗展示的类型
    }
 },
  watch: {
  //监听allInfoList,根据allInfoList动态地修改文件列表
    'allInfoList' () {
      this.imgList = []
      for (let item of this.allInfoList) {
        let data = {
          type: item.type,
          name: item.originalName,
          url: item.type === 'video' ? 'https://replacement.png' : 'Https://' + item.fileUri
        }
        this.imgList.push(data)
      }
    }
  },
methods:{
//限制上传的内容为视频或图片
    beforeRead (file) {
      if (!file.type.startsWith('image') && !file.type.startsWith('video')) {
        this.$toast('请上传图片或视频')
        return false
      }
      return true
    },
    afterRead (file) {
      file.status = 'uploading'
      file.message = '上传中...'
      //添加上传状态,避免用户在上传未完成时点击提交按钮
      this.isUploading = true
      fileapi
        .uploadFile(file.file)
        .then(res => {
          if (res.data.status === 'success') {
            let fileDTO = response.data.fileDTO
            //为返回的数据添加文件类型,后面依据此来判断
            if (file.file.type.startsWith('video')) {
              fileDTO.type = 'video'
            }
            if (file.file.type.startsWith('image')) {
              fileDTO.type = 'image'
            }
            //将返回的所有数据都保存起来(文件地址,文件名等)
            this.allInfoList.push(fileDTO)
          } else {
          //上传失败要清空数组,不然失败的文件依旧会展示
            this.handleDelete(file.file.name)
          }
          file.status = ''
          file.message = ''
          this.isUploading = false
        })
        .catch((error) => {
          console.log(error)
          this.handleDelete(file.file.name)
          file.status = ''
          file.message = ''
          this.isUploading = false
        })
    },
    //根据文件名来查找到文件列表中要删除的文件
    handleDelete (name) {
      this.imgList.forEach((item, index) => {
        if (item.file.name === name) {
          this.imgList.splice(index, 1)
        }
      })
    },
    //手动点击删除,修改包含所有信息的文件列表,通过watch根据该列表动态修改图片文件列表
    afterDelete (file) {
      let name = file.name
      this.allInfoList.forEach((item, index) => {
        if (item.originalName === name) {
          this.allInfoList.splice(index, 1)
        }
      })
      return true
    },
   }
   //取消掉组件自带的点击预览功能,自己添加(系统自带预览点击视频时会先视频的播放图片)
   handleclicksc (file) {
      let name = file.name
      for (let item of this.allInfoList) {
        if (item.type === 'video' && item.originalName === name) {
          this.url = this.getUrl(item.fileUri)
          this.urlType = 'video'
          this.show = true
        }
        if (item.type === 'image' && item.originalName === name) {
          this.url = this.getUrl(item.fileUri)
          this.urlType = 'image'
          this.show = true
        }
      }
    },
  .wrapper {
    display: flex;
    align-items: center;
    justify-content: center;
    height: 100%;
  }
  .img-block {
    position: relative;
    img{
      z-index: 99;
      max-width: 100%;
      height: auto;
      object-fit: cover;
    }
    video{
      width: 100%;
      max-height: 100vh;
    }
  }
  .video-delete{
    width: 45px;
    position: absolute;
    top: 60px;
    left: calc(100vw - 60px);
  }
vant这种上传方式是一个一个读取的,需要将多文件上传给禁用了,multiple=“false”——使用这个属性
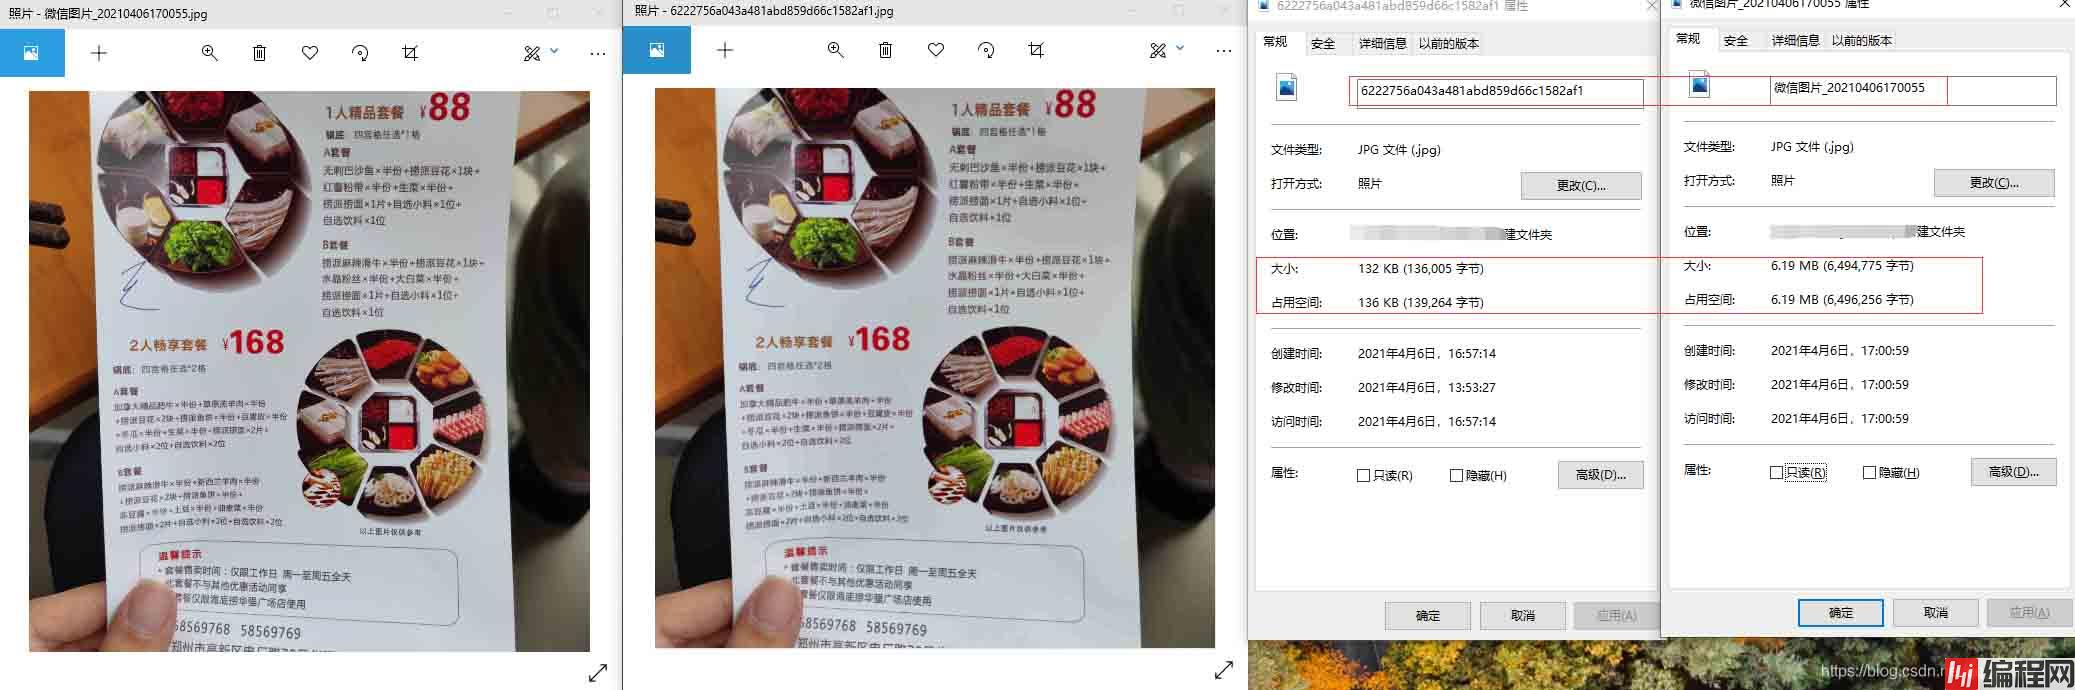
根据实际情况测试,7Mb图片结果为100+kb,个别不代表全部,也有压缩完为400多k的,压缩后体积还是很小的,图片也比较清晰,提前给大家一个参考
  <van-uploader :after-read="afterRead"  :accept="'image/*'" v-model="fileList" multiple="false"
                               :max-count="4"
                />
return {
      // 图片信息
      files: {
        name: "",
        type: ""
      }
    // 单图片上传图片
    afterRead(file) {
      this.files.name = file.file.name // 获取文件名
      this.files.type = file.file.type // 获取类型
      this.imgPreview(file.file)
    },
// 如果是多图片按照这种写法即可,不过需要在上面将multiple设置为true
// afterRead(file,name) { 方法参数设置为多参数
//        if (file instanceof Array && file.length) { // 判断是否是多图上传 多图则循环添加进去
//            file.forEach(item => {
//                    this.imgPreview(item.file)
//            })
//        } else {
//            this.imgPreview(file.file)
//        }
// },

    // 处理图片
    imgPreview(file) {
      let self = this
      let Orientation
      //去获取拍照时的信息,解决拍出来的照片旋转问题   npm install exif-js --save   这里需要安装一下包
      Exif.getData(file, function() {
        Orientation = Exif.getTag(this, 'Orientation')
      })
      // 看支持不支持FileReader
      if (!file || !window.FileReader) return
      if (/^image/.test(file.type)) {
        // 创建一个reader
        let reader = new FileReader()
        // 将图片2将转成 base64 格式
        reader.readAsDataURL(file)
        // 读取成功后的回调
        reader.onloadend = function() {
          let result = this.result
          let img = new Image()
          img.src = result
          //判断图片是否大于500K,是就直接上传,反之压缩图片
          if (this.result.length <= 500 * 1024) {
            // 上传图片
            self.postImg(this.result)
          } else {
            img.onload = function() {
              let data = self.compress(img, Orientation)
              // 上传图片
              self.postImg(data)
            }
          }
        }
      }
    },
    // 压缩图片
    compress(img, Orientation) {
      let canvas = document.createElement('canvas')
      let ctx = canvas.getContext('2d')
      //瓦片canvas
      let tCanvas = document.createElement('canvas')
      let tctx = tCanvas.getContext('2d')
      // let initSize = img.src.length;
      let width = img.width
      let height = img.height
      //如果图片大于四百万像素,计算压缩比并将大小压至400万以下
      let ratio
      if ((ratio = (width * height) / 4000000) > 1) {
        // console.log("大于400万像素");
        ratio = Math.sqrt(ratio)
        width /= ratio
        height /= ratio
      } else {
        ratio = 1
      }
      canvas.width = width
      canvas.height = height
      //    铺底色
      ctx.fillStyle = '#fff'
      ctx.fillRect(0, 0, canvas.width, canvas.height)
      //如果图片像素大于100万则使用瓦片绘制
      let count
      if ((count = (width * height) / 1000000) > 1) {
        // console.log("超过100W像素");
        count = ~~(Math.sqrt(count) + 1) //计算要分成多少块瓦片
        //      计算每块瓦片的宽和高
        let nw = ~~(width / count)
        let nh = ~~(height / count)
        tCanvas.width = nw
        tCanvas.height = nh
        for (let i = 0; i < count; i++) {
          for (let j = 0; j < count; j++) {
            tctx.drawImage(img, i * nw * ratio, j * nh * ratio, nw * ratio, nh * ratio, 0, 0, nw, nh)
            ctx.drawImage(tCanvas, i * nw, j * nh, nw, nh)
          }
        }
      } else {
        ctx.drawImage(img, 0, 0, width, height)
      }
      //修复iOS上传图片的时候 被旋转的问题
      if (Orientation != '' && Orientation != 1) {
        switch (Orientation) {
          case 6: //需要顺时针(向左)90度旋转
            this.rotateImg(img, 'left', canvas)
            break
          case 8: //需要逆时针(向右)90度旋转
            this.rotateImg(img, 'right', canvas)
            break
          case 3: //需要180度旋转
            this.rotateImg(img, 'right', canvas) //转两次
            this.rotateImg(img, 'right', canvas)
            break
        }
      }
      //进行最小压缩
      let ndata = canvas.toDataURL('image/jpeg', 0.2)
      tCanvas.width = tCanvas.height = canvas.width = canvas.height = 0
      console.log(ndata)
      return ndata
    },
    // 旋转图片
    rotateImg(img, direction, canvas) {
      //最小与最大旋转方向,图片旋转4次后回到原方向
      const min_step = 0
      const max_step = 3
      if (img == null) return
      //img的高度和宽度不能在img元素隐藏后获取,否则会出错
      let height = img.height
      let width = img.width
      let step = 2
      if (step == null) {
        step = min_step
      }
      if (direction == 'right') {
        step++
        //旋转到原位置,即超过最大值
        step > max_step && (step = min_step)
      } else {
        step--
        step < min_step && (step = max_step)
      }
      //旋转角度以弧度值为参数
      let degree = (step * 90 * Math.PI) / 180
      let ctx = canvas.getContext('2d')
      switch (step) {
        case 0:
          canvas.width = width
          canvas.height = height
          ctx.drawImage(img, 0, 0)
          break
        case 1:
          canvas.width = height
          canvas.height = width
          ctx.rotate(degree)
          ctx.drawImage(img, 0, -height)
          break
        case 2:
          canvas.width = width
          canvas.height = height
          ctx.rotate(degree)
          ctx.drawImage(img, -width, -height)
          break
        case 3:
          canvas.width = height
          canvas.height = width
          ctx.rotate(degree)
          ctx.drawImage(img, -width, 0)
          break
      }
    },
    //将base64转换为文件
    dataURLtoFile(dataurl) {
      var arr = dataurl.split(','),
        bstr = atob(arr[1]),
        n = bstr.length,
        u8arr = new Uint8Array(n)
      while (n--) {
        u8arr[n] = bstr.charCodeAt(n)
      }
      return new File([u8arr], this.files.name, {
        type: this.files.type
      })
    },
    // 提交图片到后端
    postImg(base64) {
      let file = this.dataURLtoFile(base64)
      // 然后压缩后的图片放入集合,根据自己业务调用然后一起上传
      this.fileCompressList.push(file)
    },
以上为个人经验,希望能给大家一个参考,也希望大家多多支持编程网。
--结束END--
本文标题: Vant实现上传多个图片或视频,更改视频预览图
本文链接: https://www.lsjlt.com/news/169786.html(转载时请注明来源链接)
有问题或投稿请发送至: 邮箱/279061341@qq.com QQ/279061341
下载Word文档到电脑,方便收藏和打印~
2024-01-12
2023-05-20
2023-05-20
2023-05-20
2023-05-20
2023-05-20
2023-05-20
2023-05-20
2023-05-20
2023-05-20
回答
回答
回答
回答
回答
回答
回答
回答
回答
回答


官方手机版

微信公众号

商务合作


0